Sandbox Testing V2
Last Updated: 2025-09-16
Language Supported:
English /
简体中文 /
ไทย
Overall Introduction
(Notice: After logging into the Open Console, check the Test Account function to determine whether it is a new sandbox. The new sandbox is Test Account-Sandbox v2.)
The sandbox environment is a testing environment provided by Open Platform to developers. It provides various types of test accounts and data. Developers can complete testing of most API scenarios in the sandbox environment. The sandbox provides basically the same functions as online, but only covers core scenarios, such as product management, order management, logistics and delivery, etc.
Sandbox V2 support range:
| Portal | Features | Remark | |
|---|---|---|---|
| Console | Shop | Create test shop account | |
| Order | Create test order | ||
| Push | Push test data | ||
| Seller Center | Product | Create and manage the global SKU | |
| Publish and manage the shop SKU | |||
| Order | Order | ||
| Ship Order | Printing of receipts is not supported at the moment, please use Open API to print. | ||
| Open API | Product | All APIs | Call through the API Test Tools in the Console, or call it yourself using the domain name https://openplatform.sandbox.test-stable.shopee.sg/ (for CN, please use https://openplatform.sandbox.test-stable.shopee.cn/) |
| Global Product | All APIs | ||
| Media Space | All APIs | ||
| Order | All APIs | ||
| Logistics | All APIs | ||
| First Mile | All APIs | ||
| Shop | All APIs | ||
| Merchant | All APIs | ||
| Push | Supports receiving some push test data, see details 3.3 |
(If you require additional sandbox support features, please submit aticket with your specific use case and requirements.)
This document mainly introduces the process of creating test accounts, test orders and shipping in the Sandbox test environment.
1. Create a test account
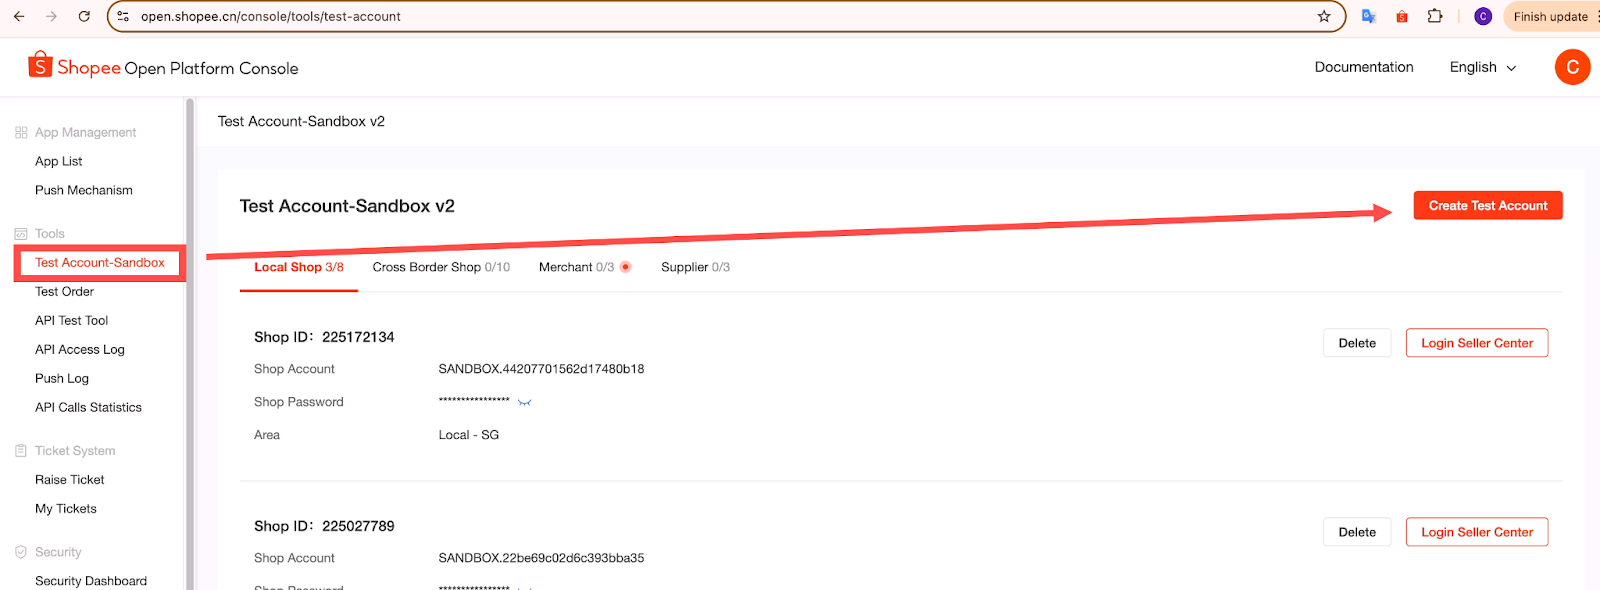
Click Console>Select Test Account-Sandbox v2, the url is Create a test account
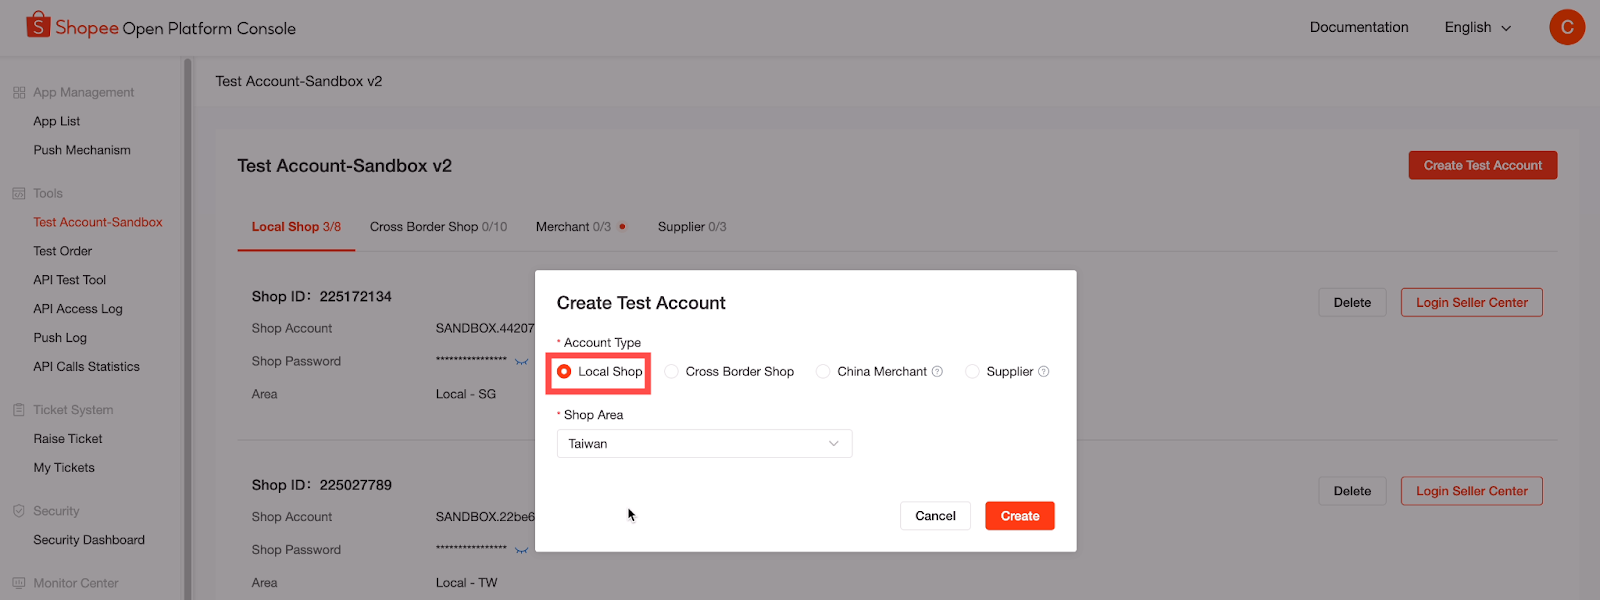
1.1 Local and cross-border test stores
Local and cross-border test stores differ in many aspects, such as store categories, available transportation channels, and other special logic.. It is recommended that developers create a test store corresponding to the service market.
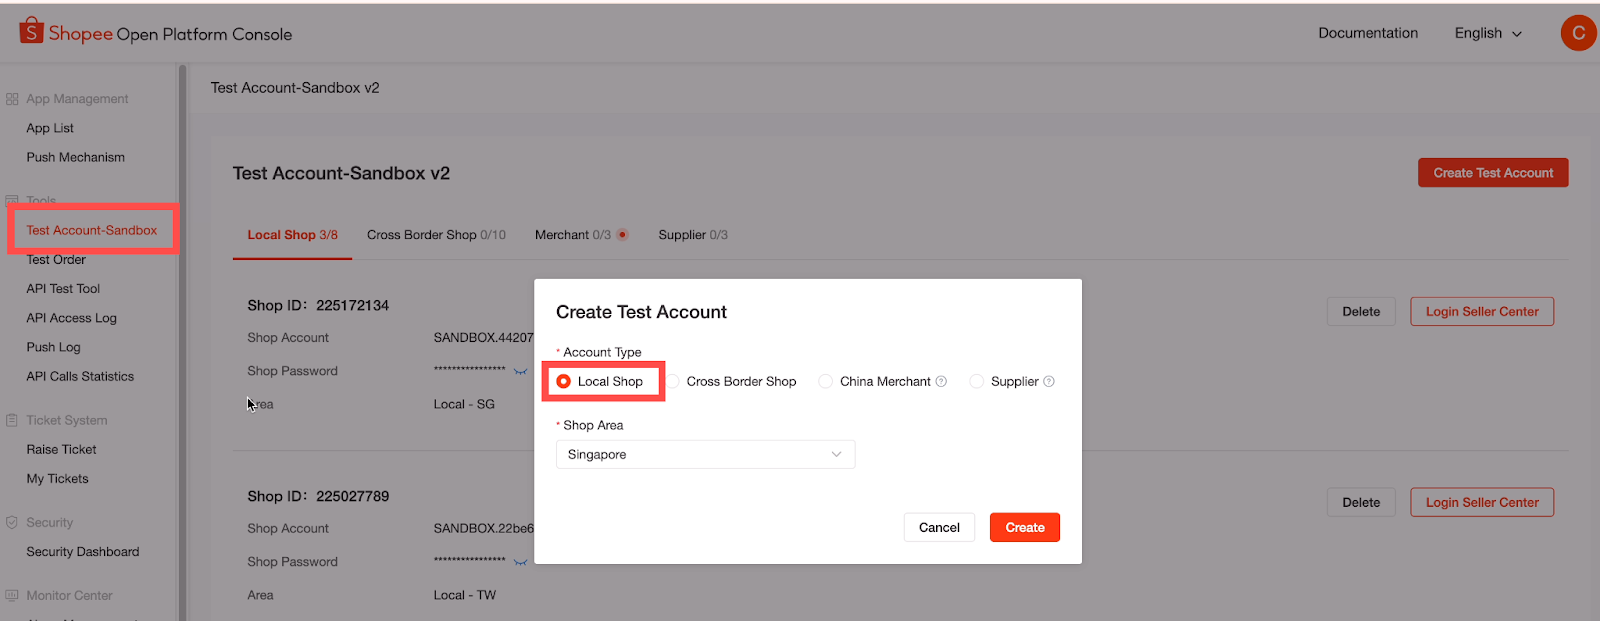
1.2 Merchant
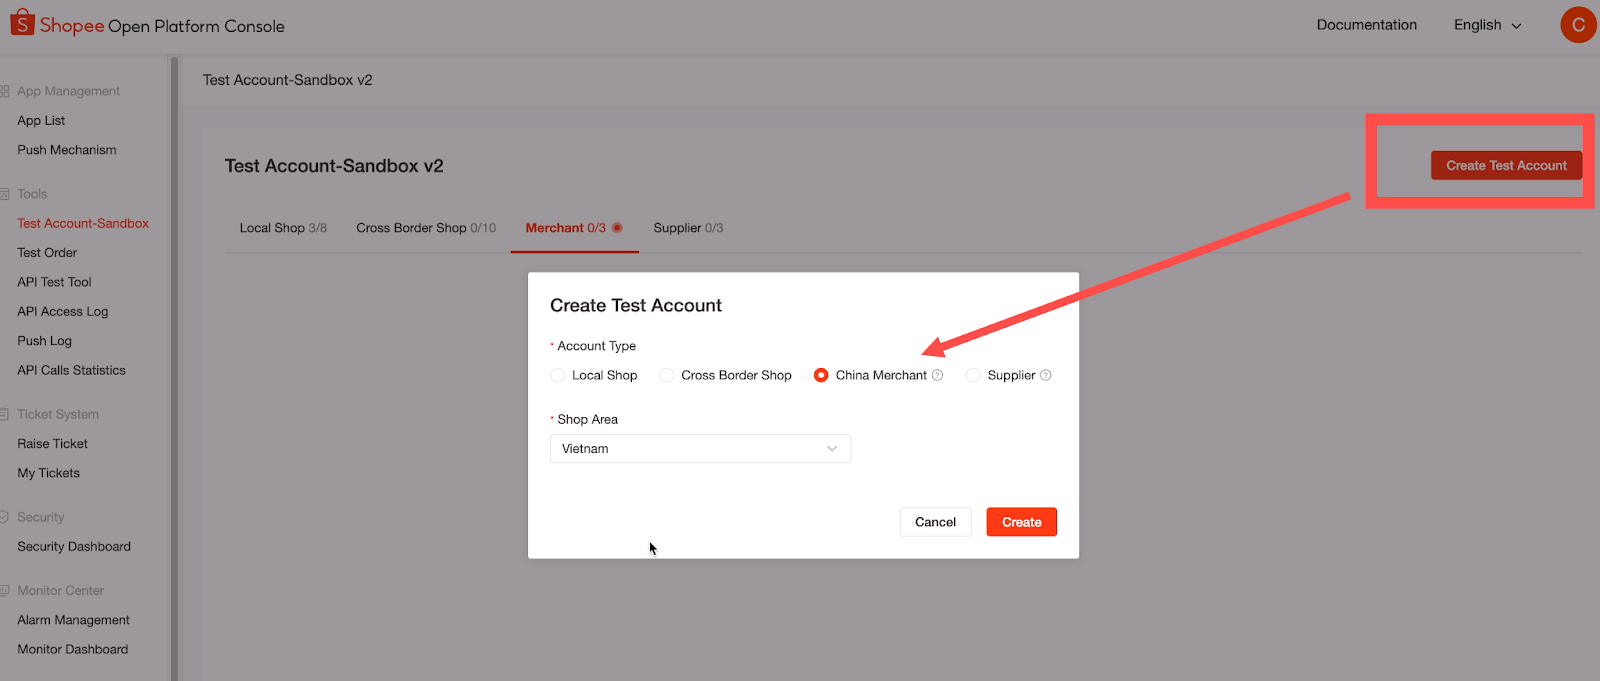
For testing in China Seller Center (CNSC), developers can choose “Merchant"To create a test master account and bind merchants and stores.
2.Authorize the test account to the test Partner_id
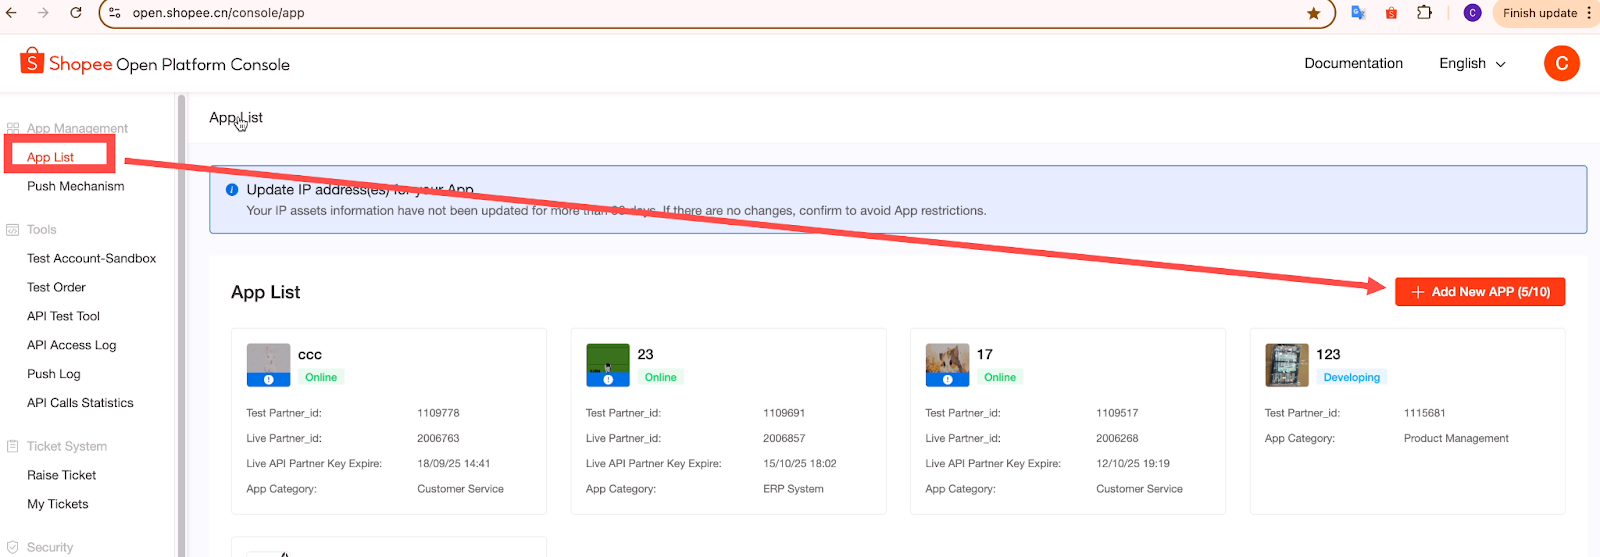
2.1Preliminary steps:
- Create APP:
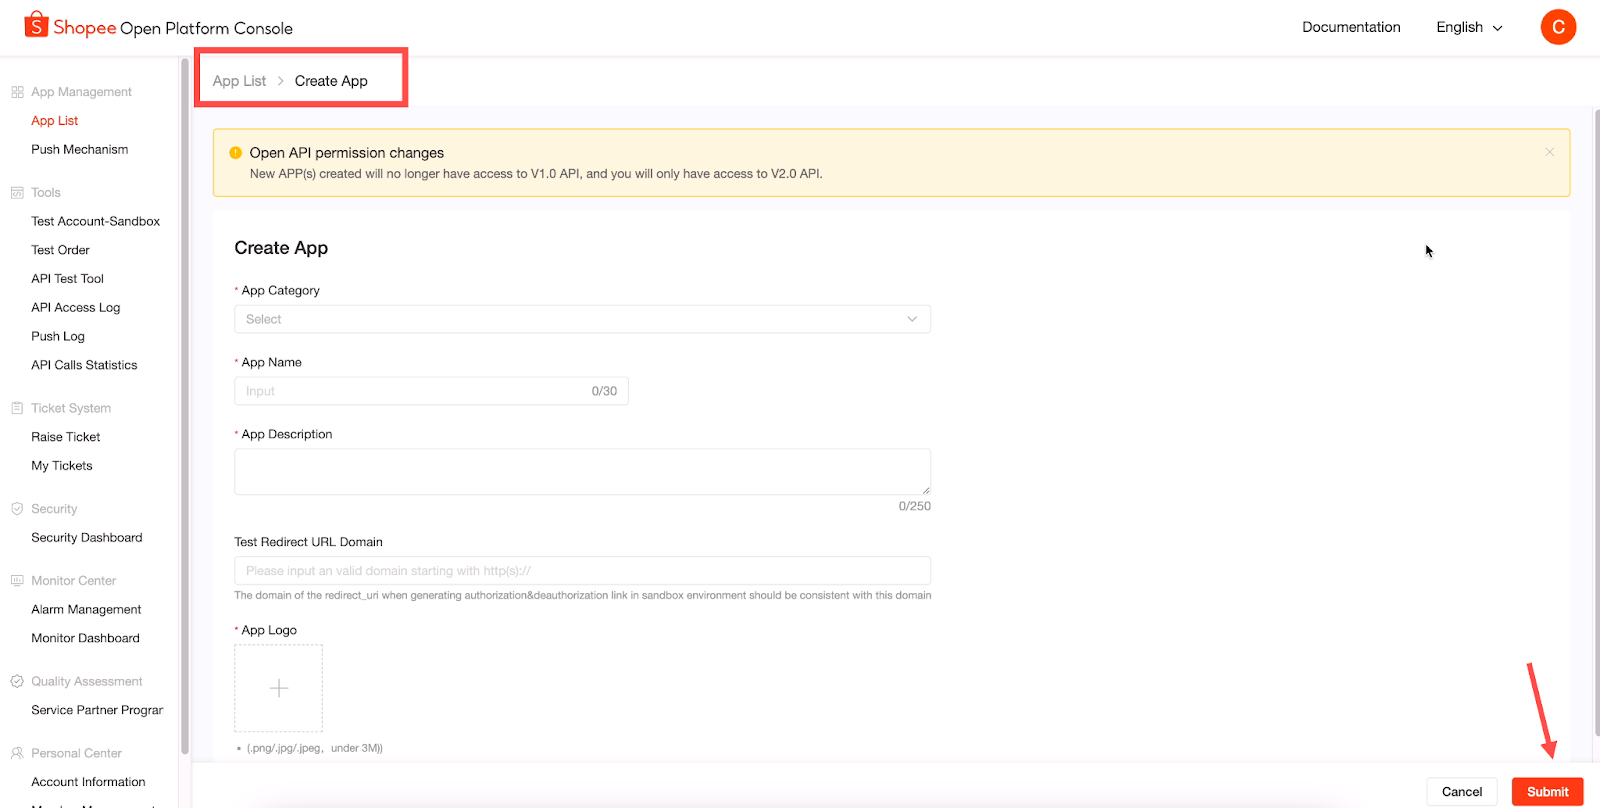
- Create Sandbox Account:
You can choose the account type and create a shop or merchant type test account:
2.2 Shop authorization document
Authorization steps:
For the test Partner_id, see the figure below for the specific authorization process.Can be referencedAuthorization related documents, or follow the steps below.
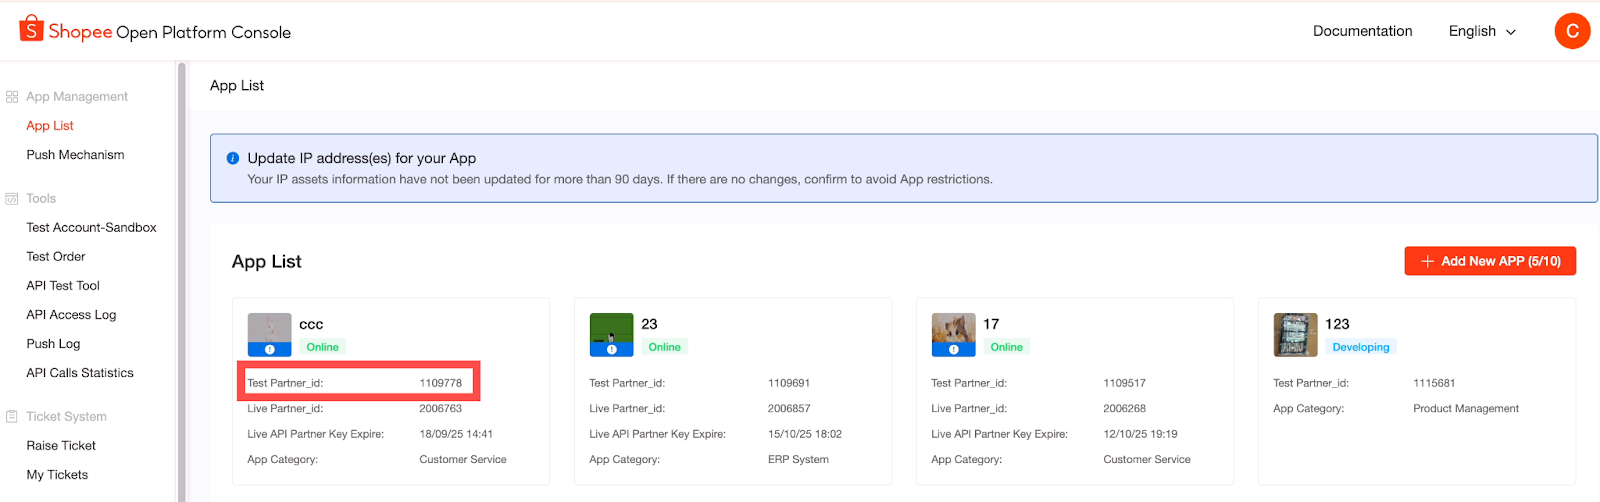
- Use the authorization link and fill in the corresponding partner_id:
https://open.sandbox.test-stable.shopee.com/auth?auth_type=seller&partner_id=***&redirect_uri=https%3A%2F%2Fwww.baidu.com%2F&response_type=code
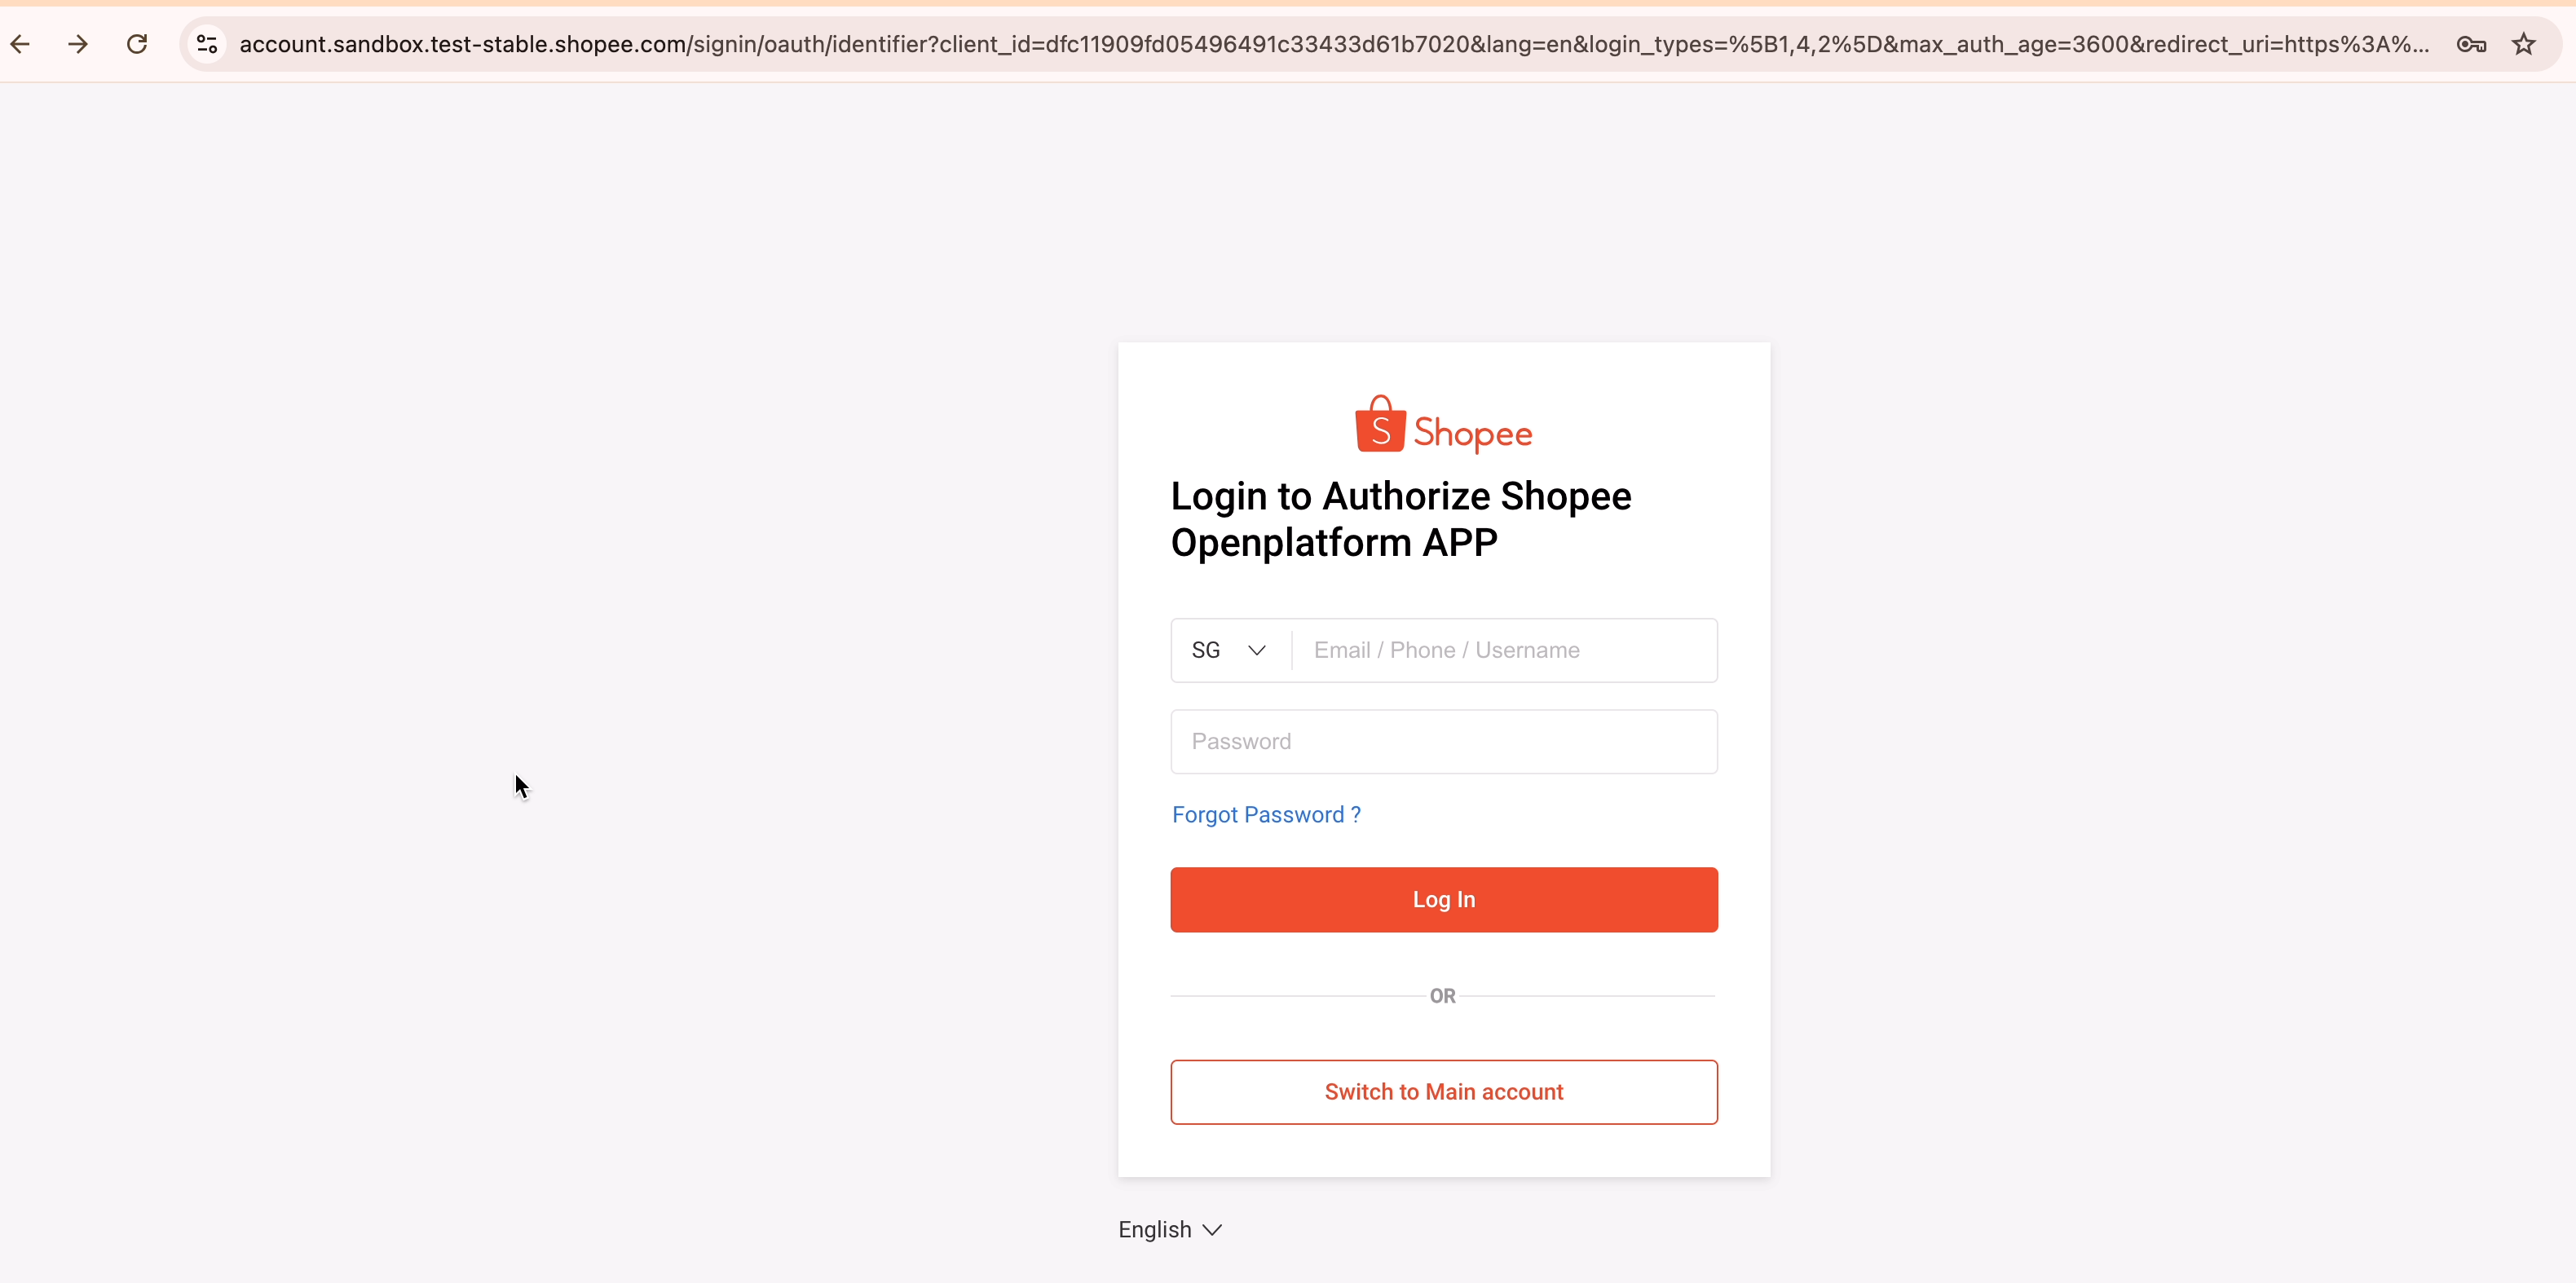
Noti: Fixed authorization URL for sandbox environment (including https://account.sandbox.test-stable.shopee.com), please use Sandbox Shop Account to make a login, not a live account. Otherwise, the error "Account/Password Verification Failed" will be reported.
- Fill in the corresponding Sandbox Account and log in:
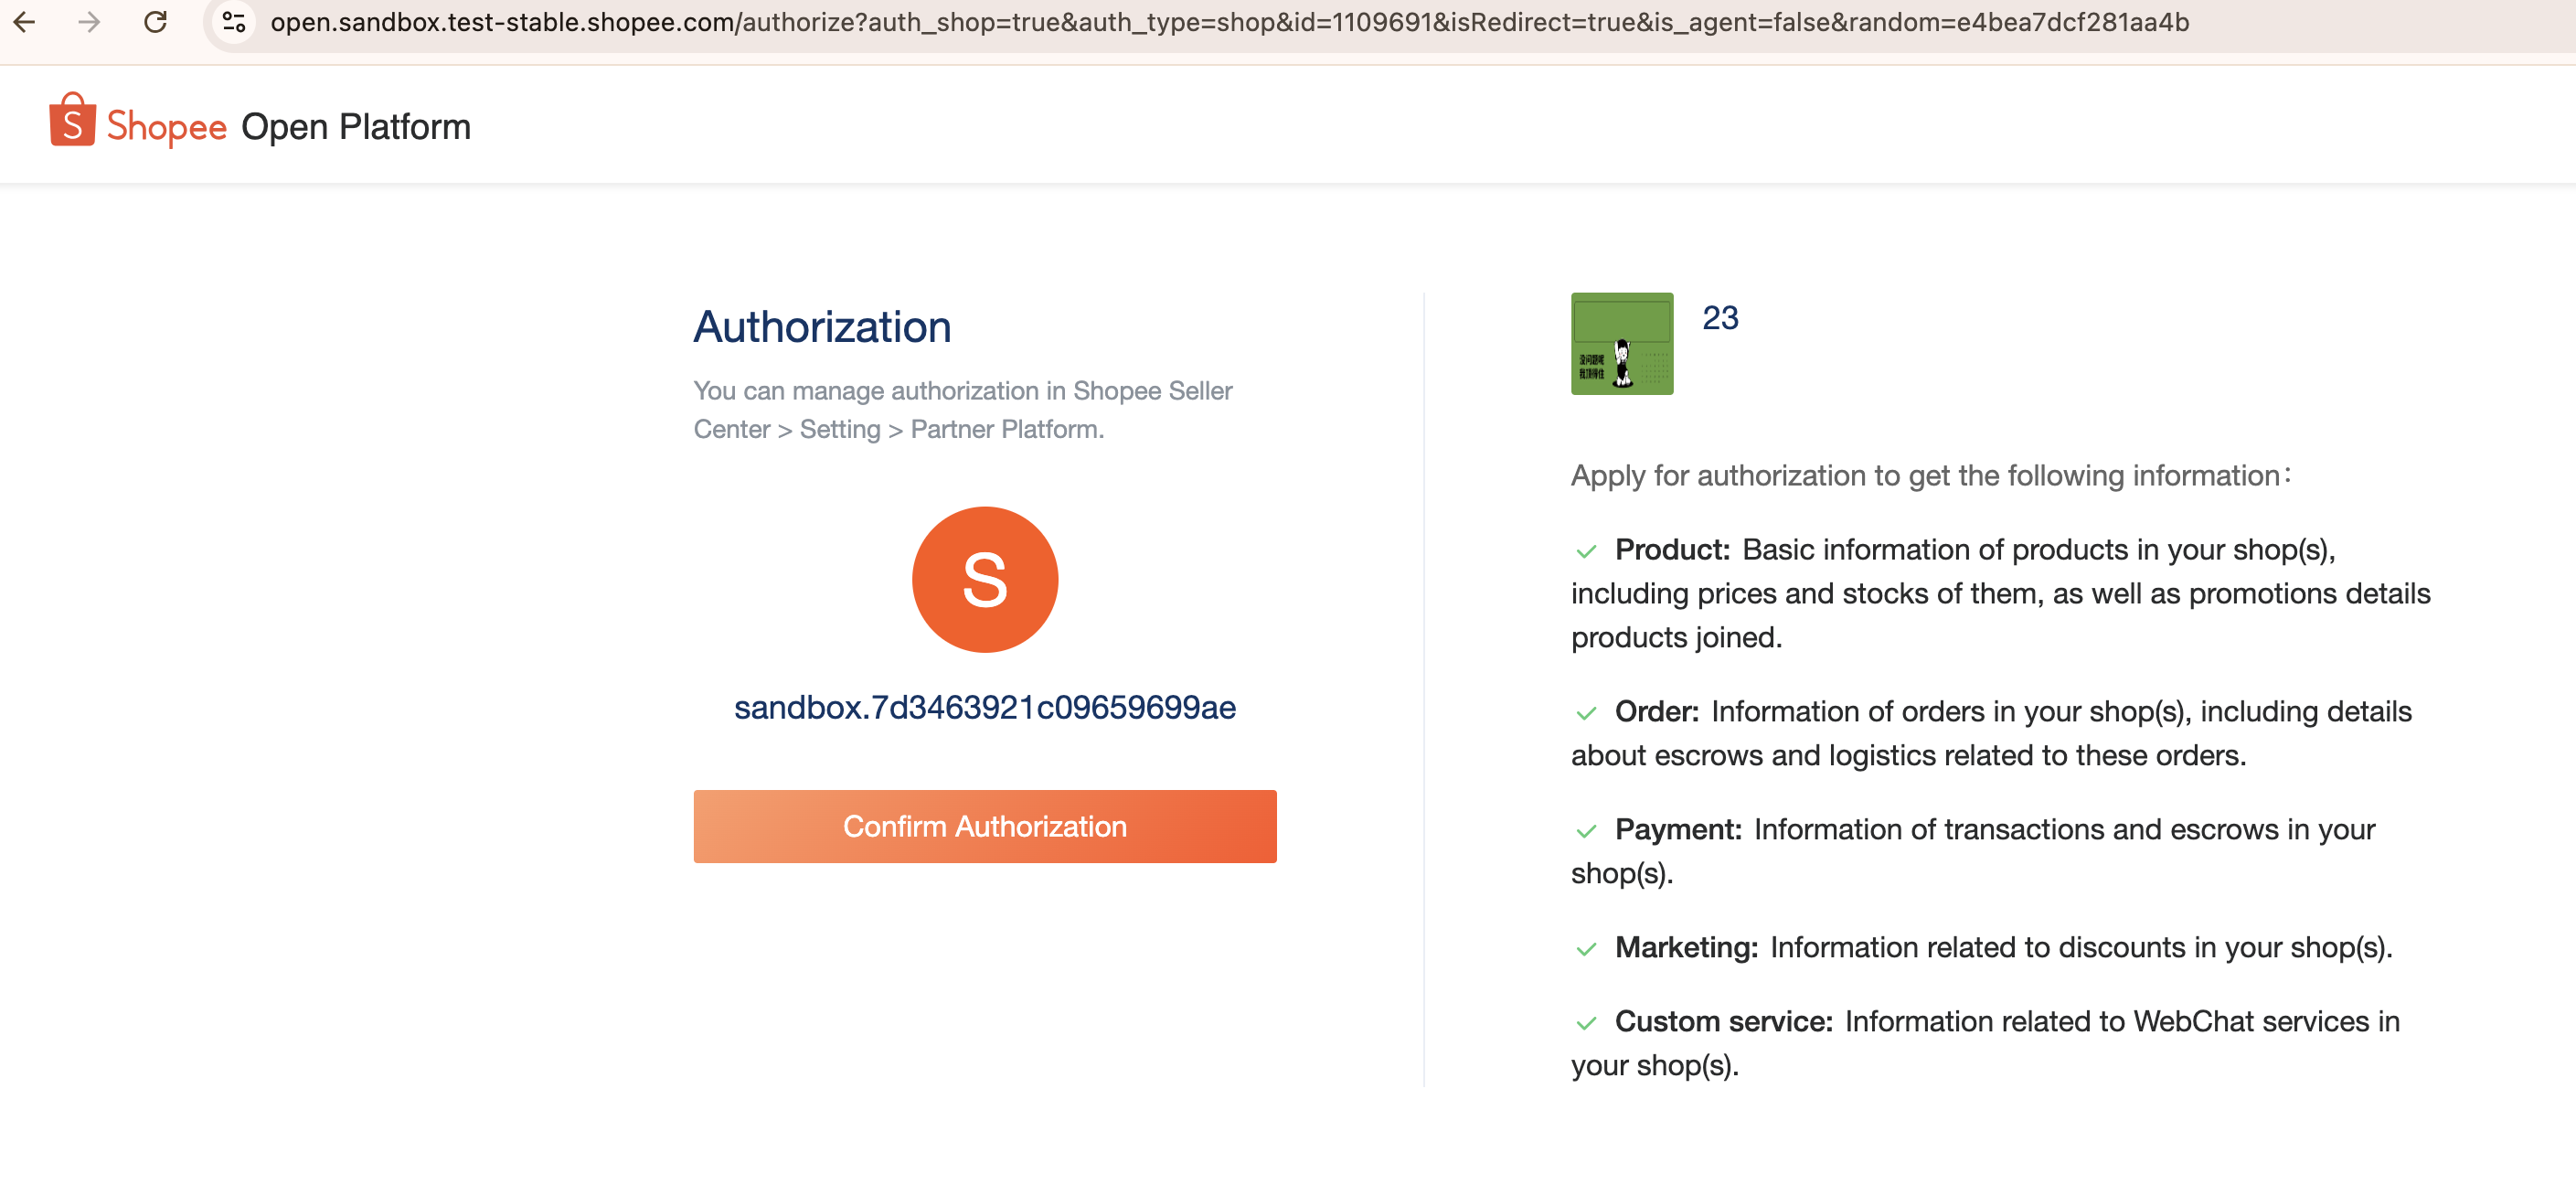
- Click Authorization to jump to the success page:
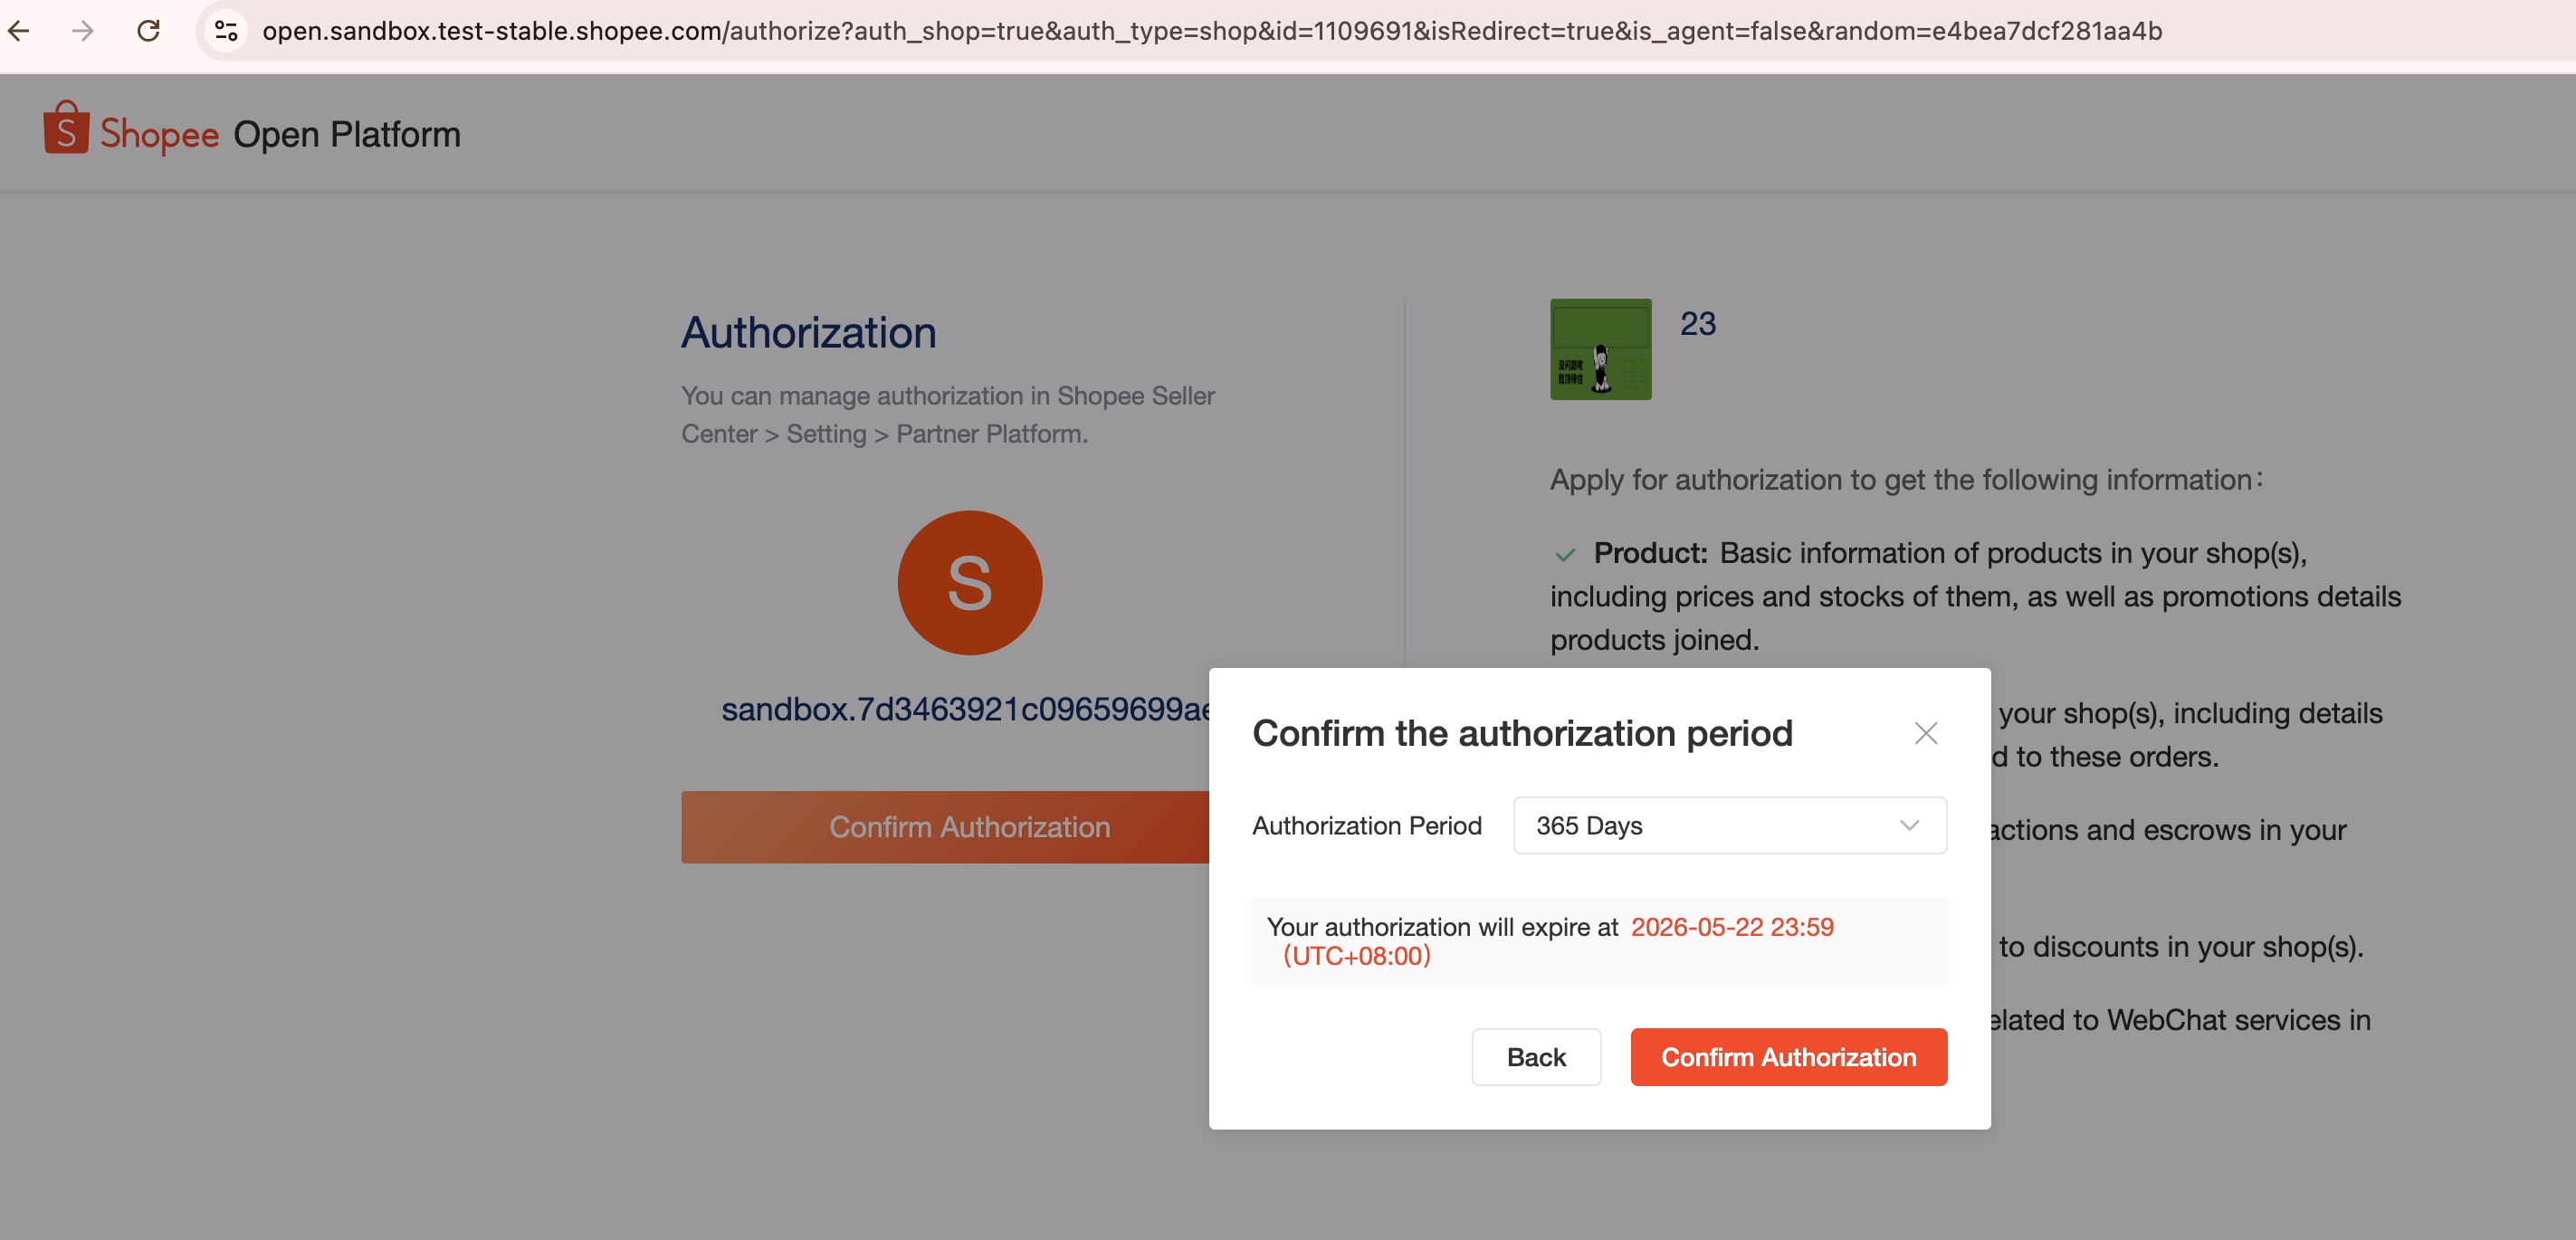
2.3 Merchant authorization document
For the test Partner_id, see the figure below for the specific authorization process.Can be referencedAuthorization related documents, or follow the steps below.
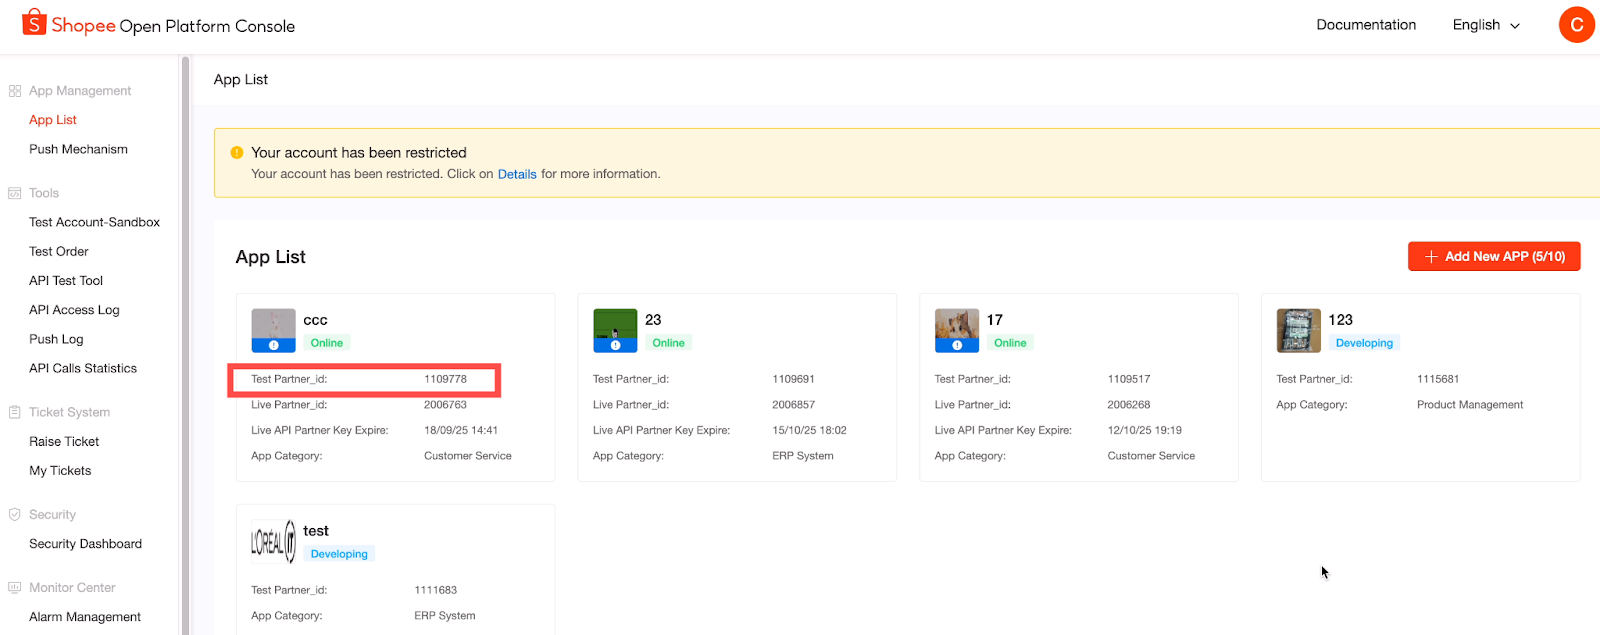
- Use the authorization link and fill in the corresponding partner_id:
2.Click "main account" for merchant authorization:
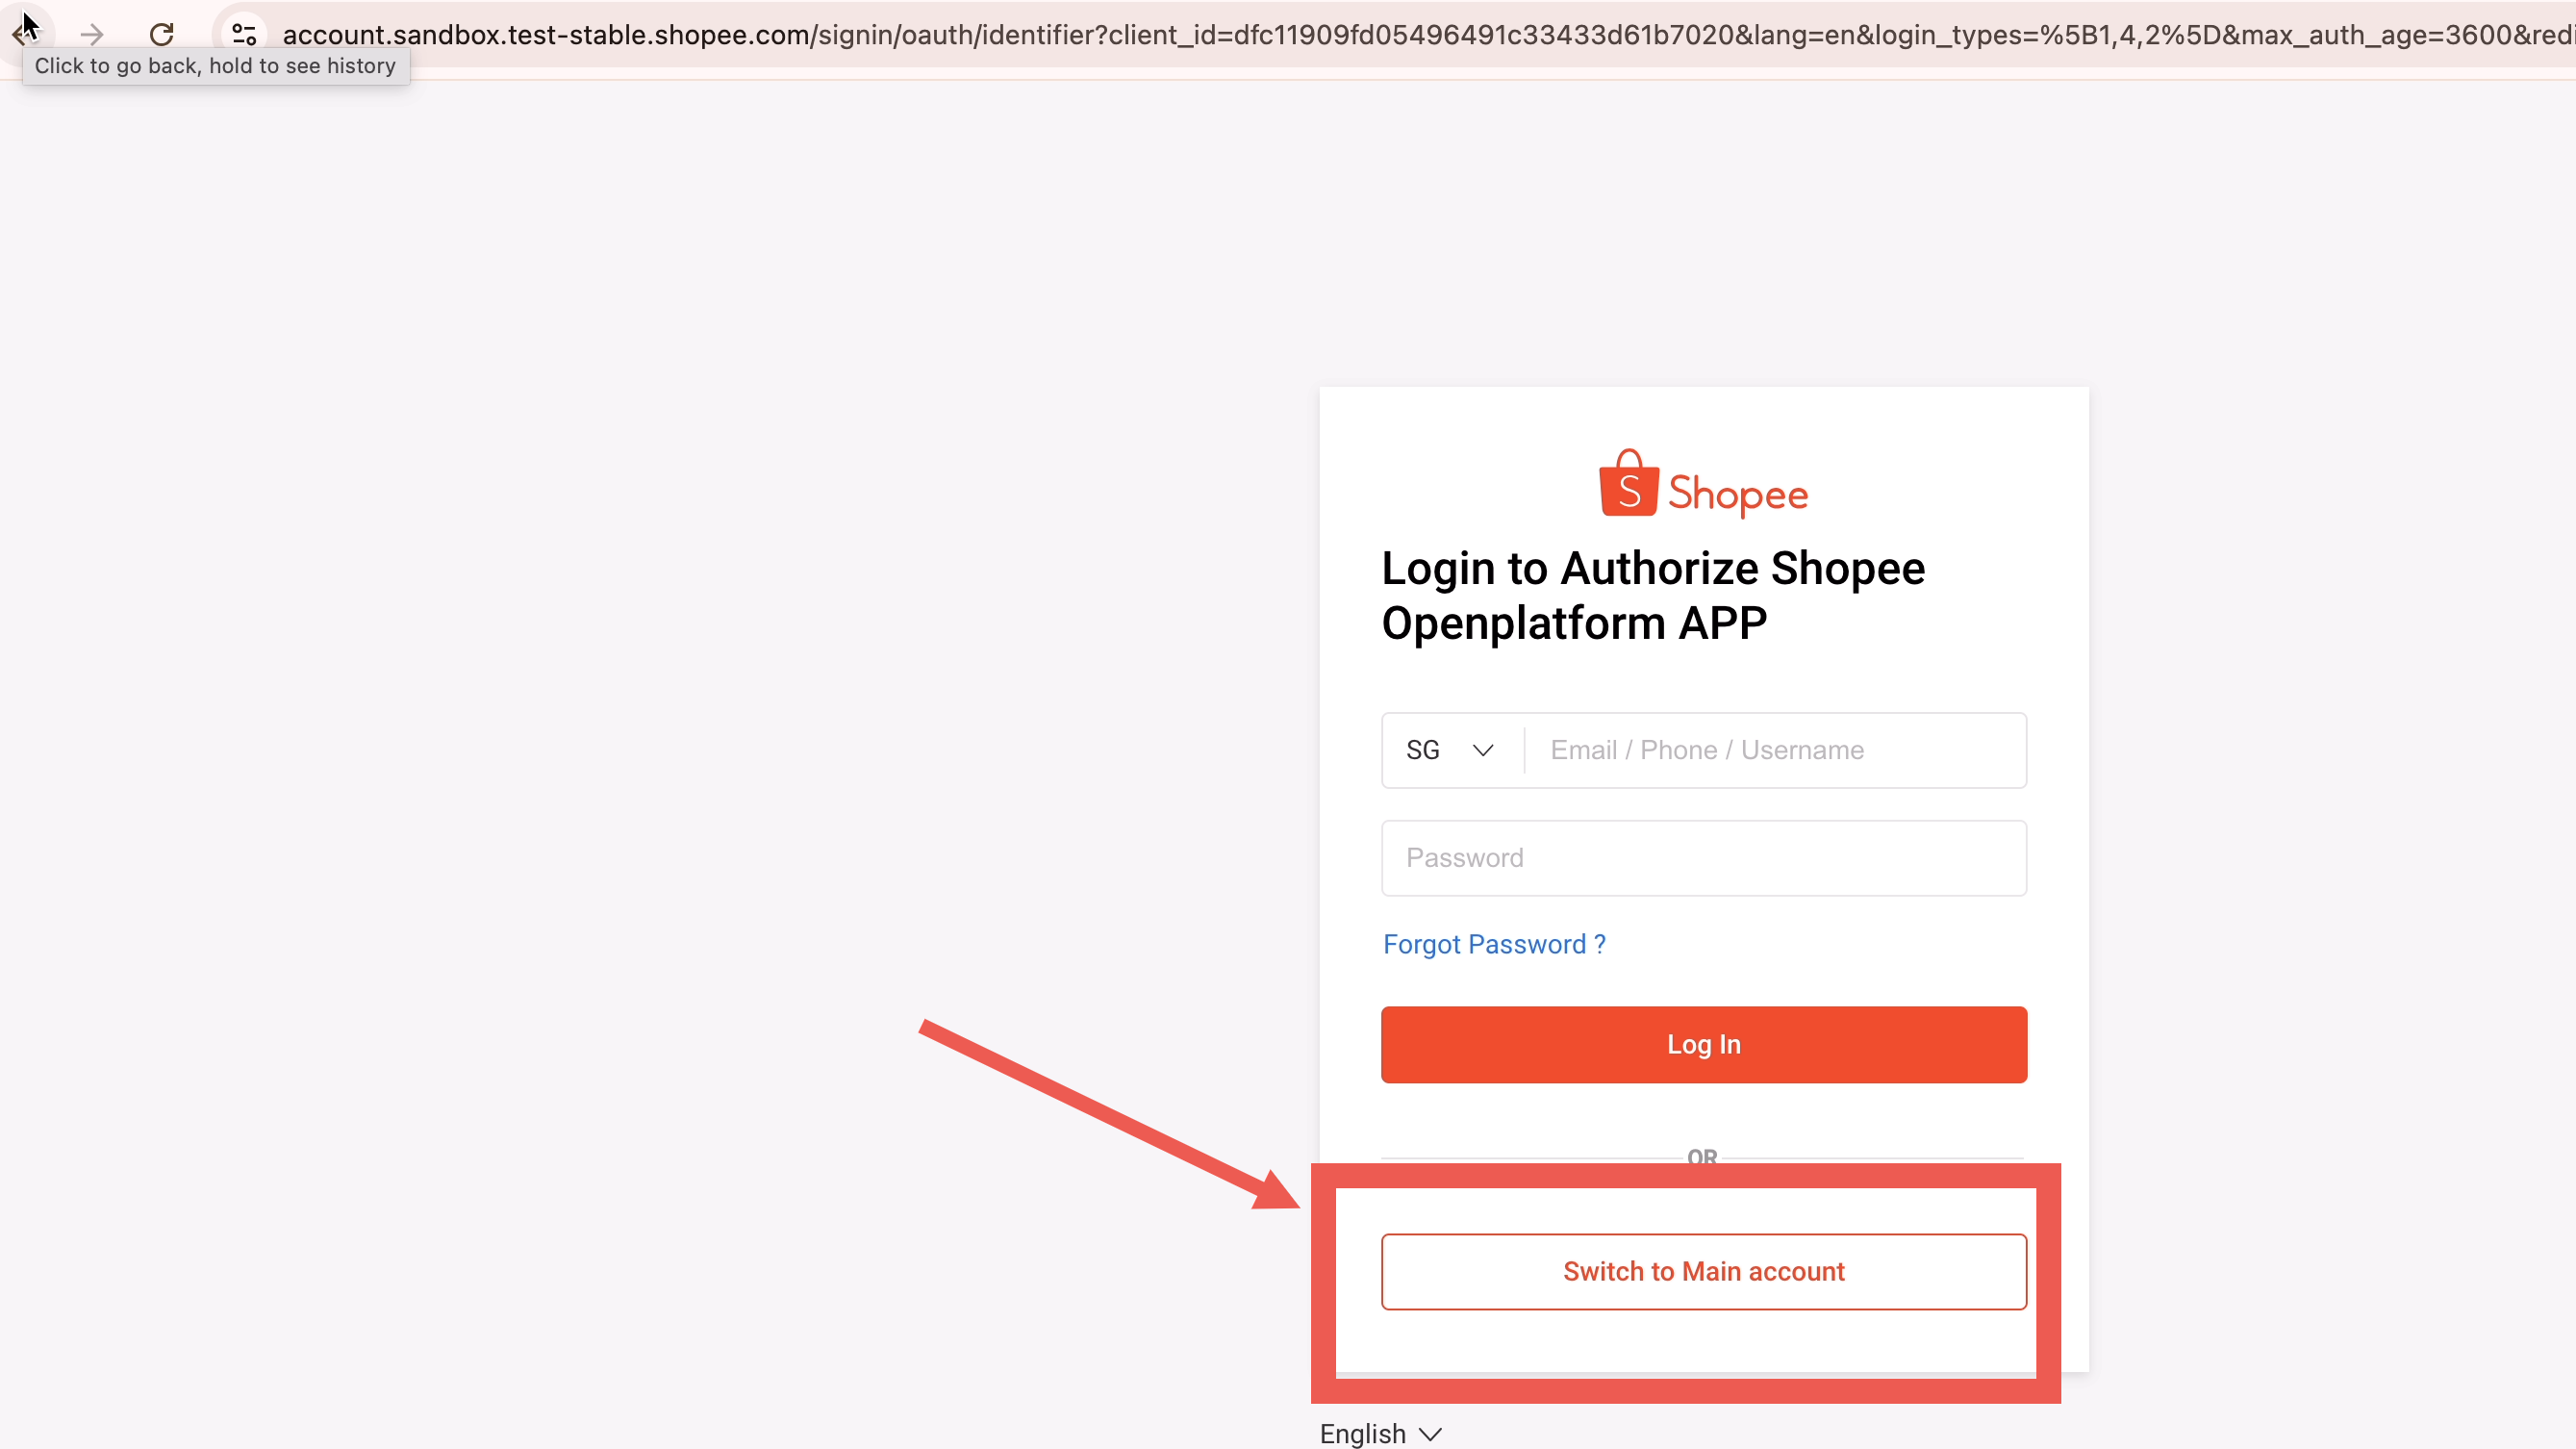
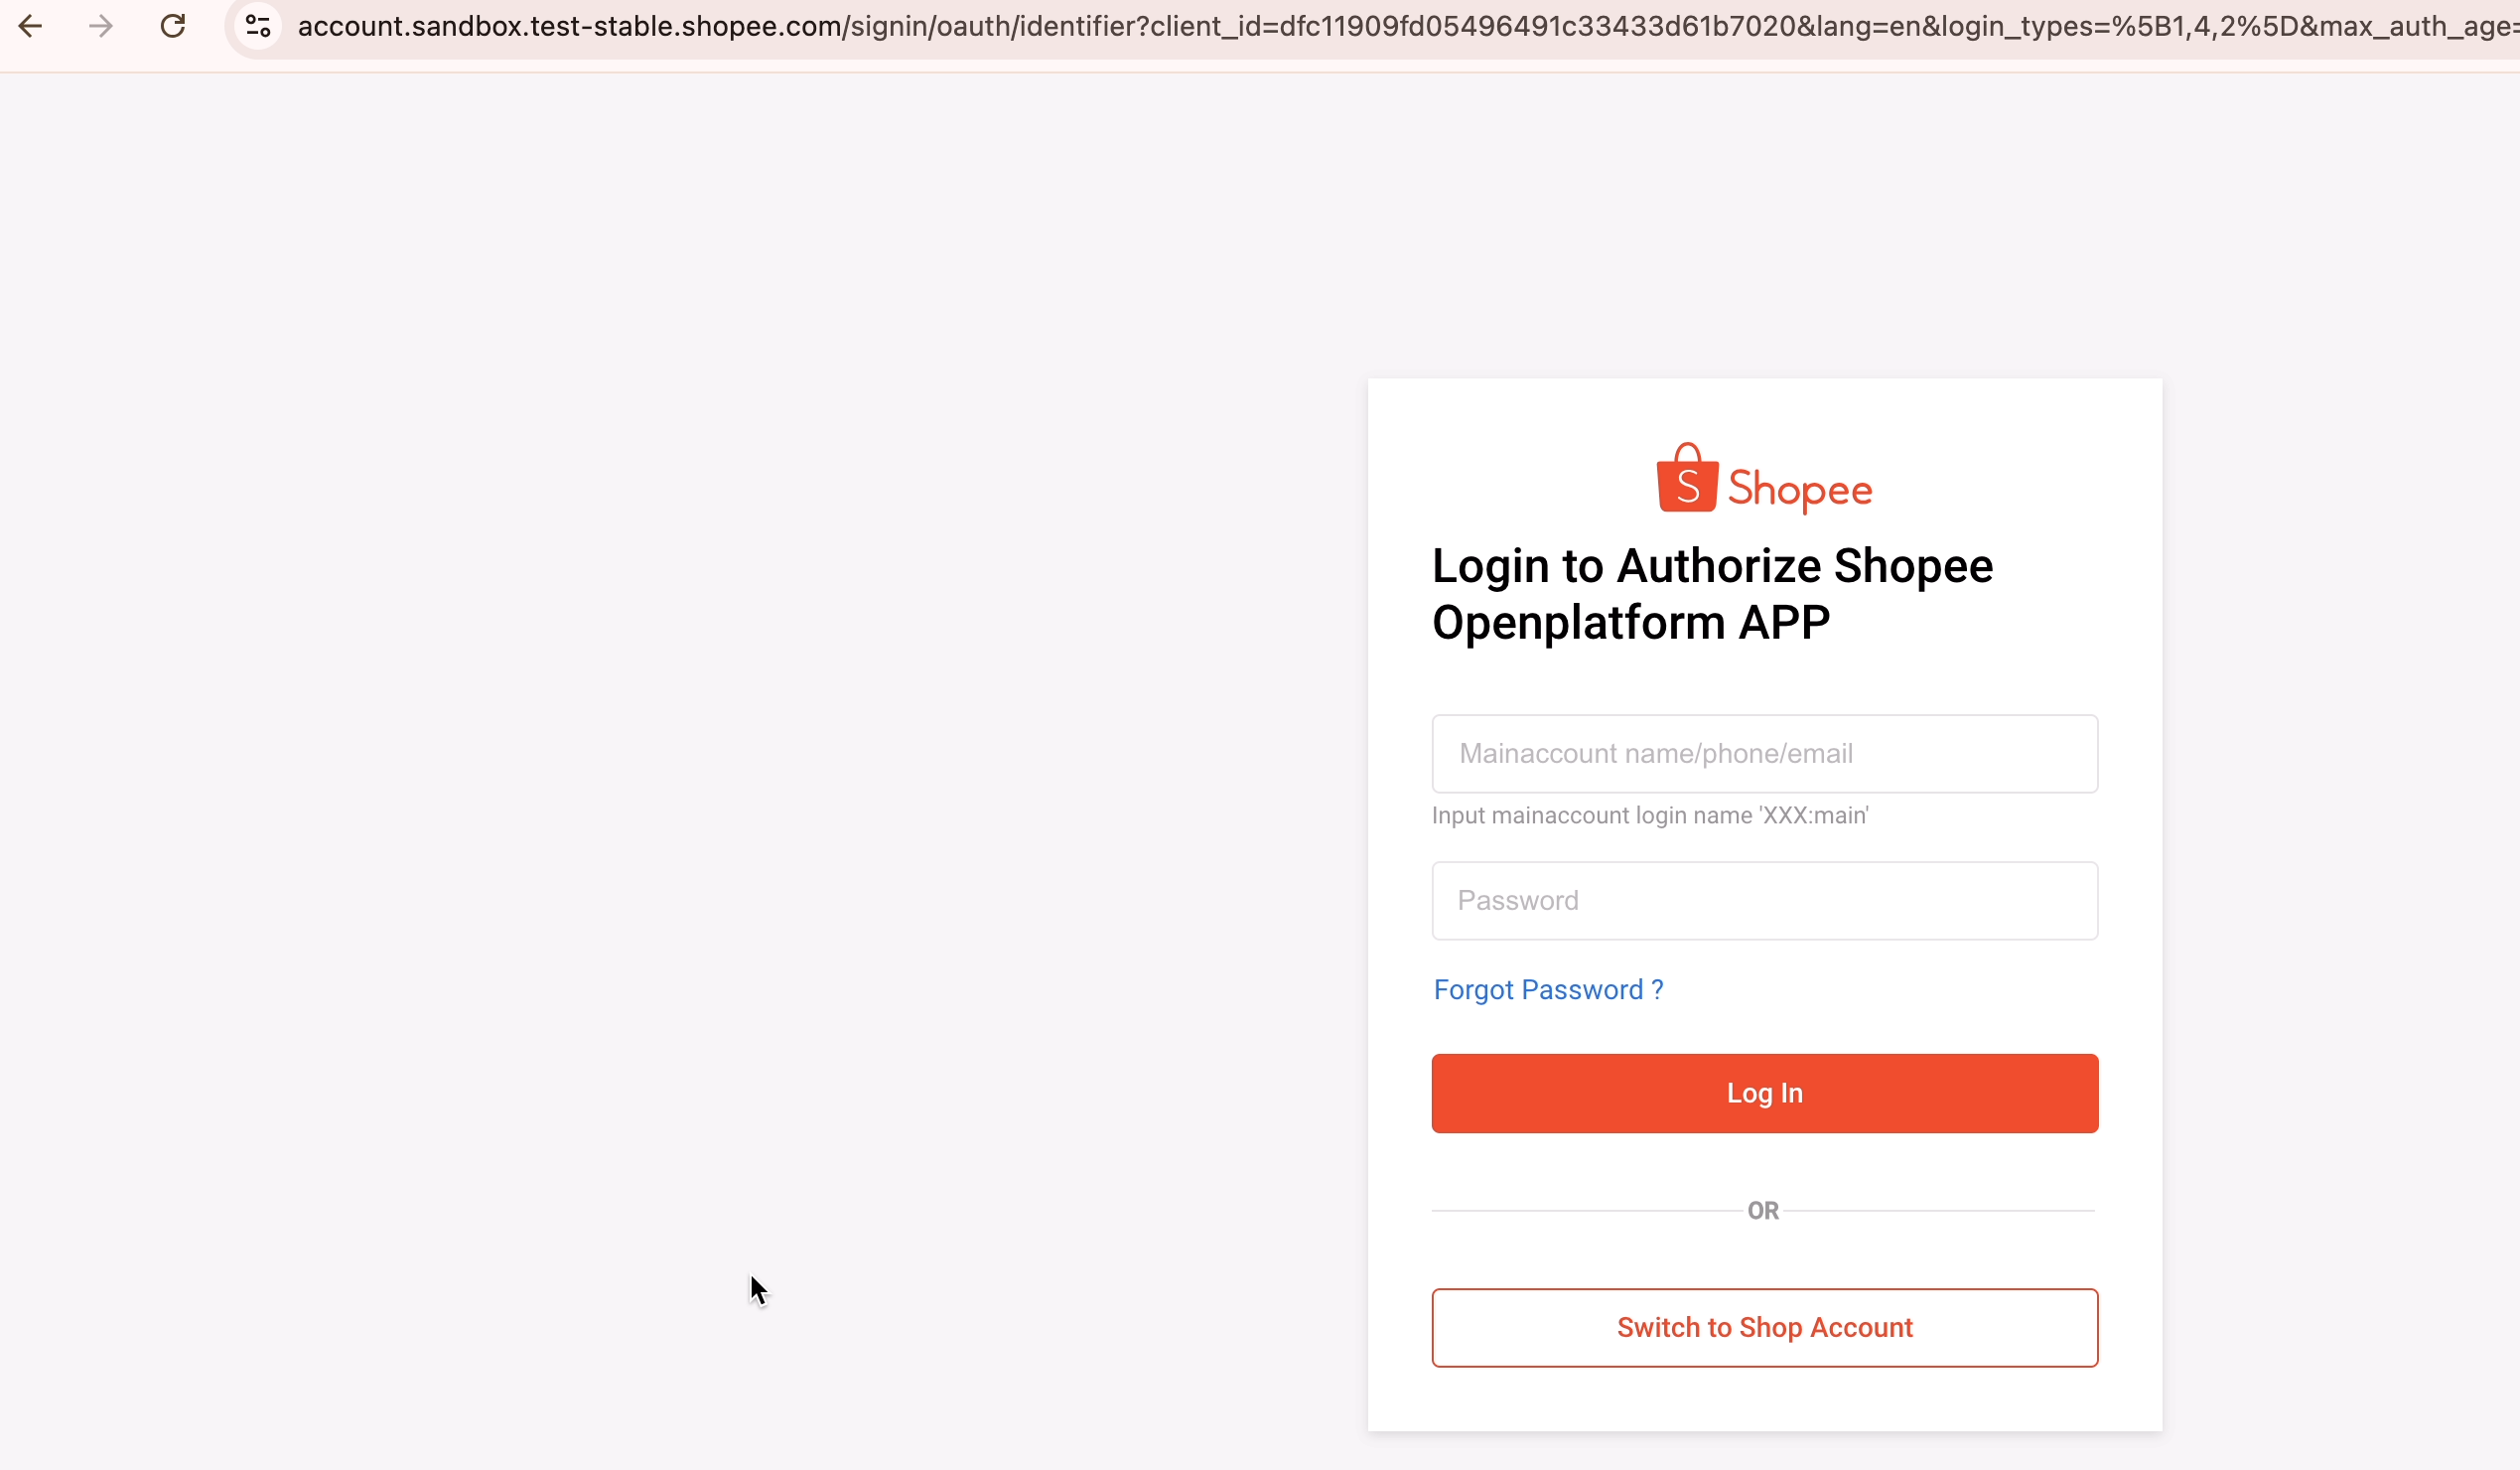
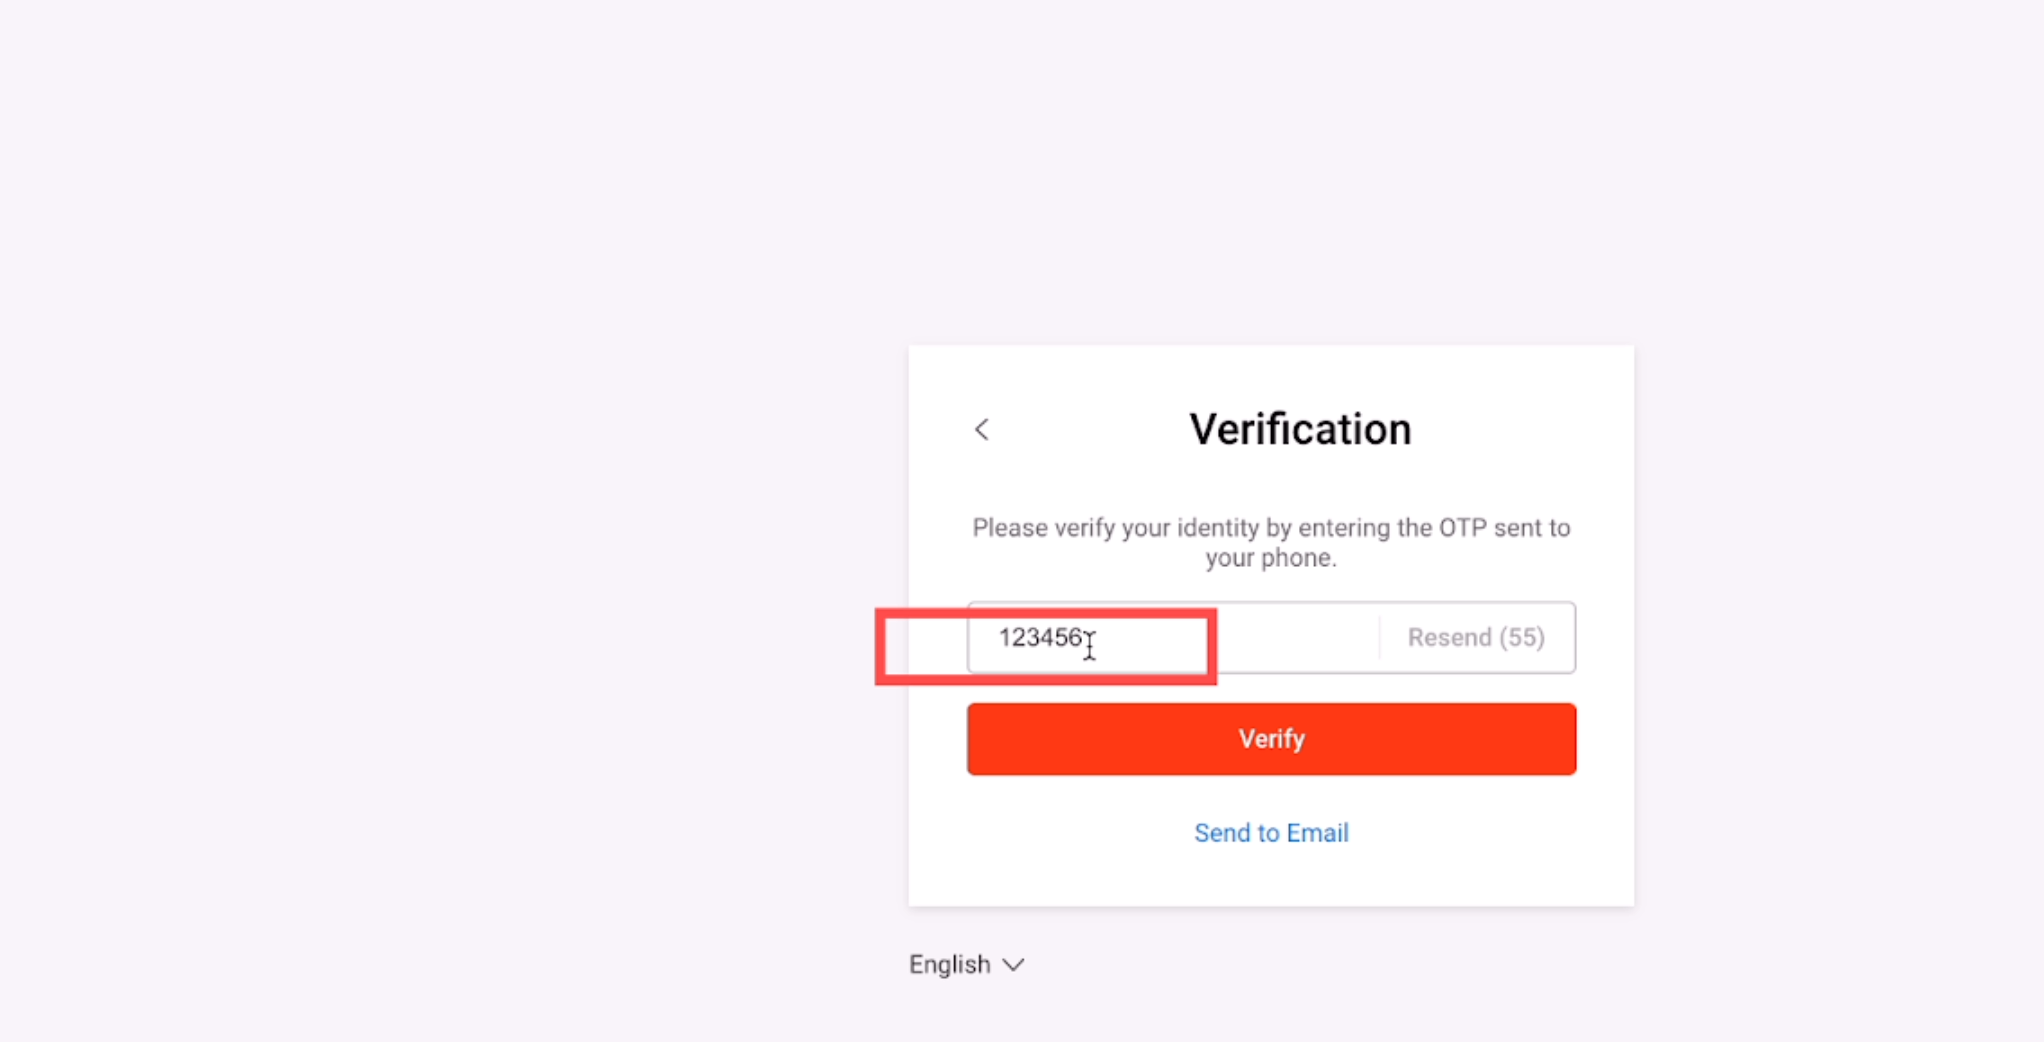
Noti: Fixed authorization URL for sandbox environment (including https://account.sandbox.test-stable.shopee.com), please useSandbox Merchat AccountMake a login, not a live account. Otherwise, the error "Account/Password Verification Failed" will be reported.
- The verification code is “123456”
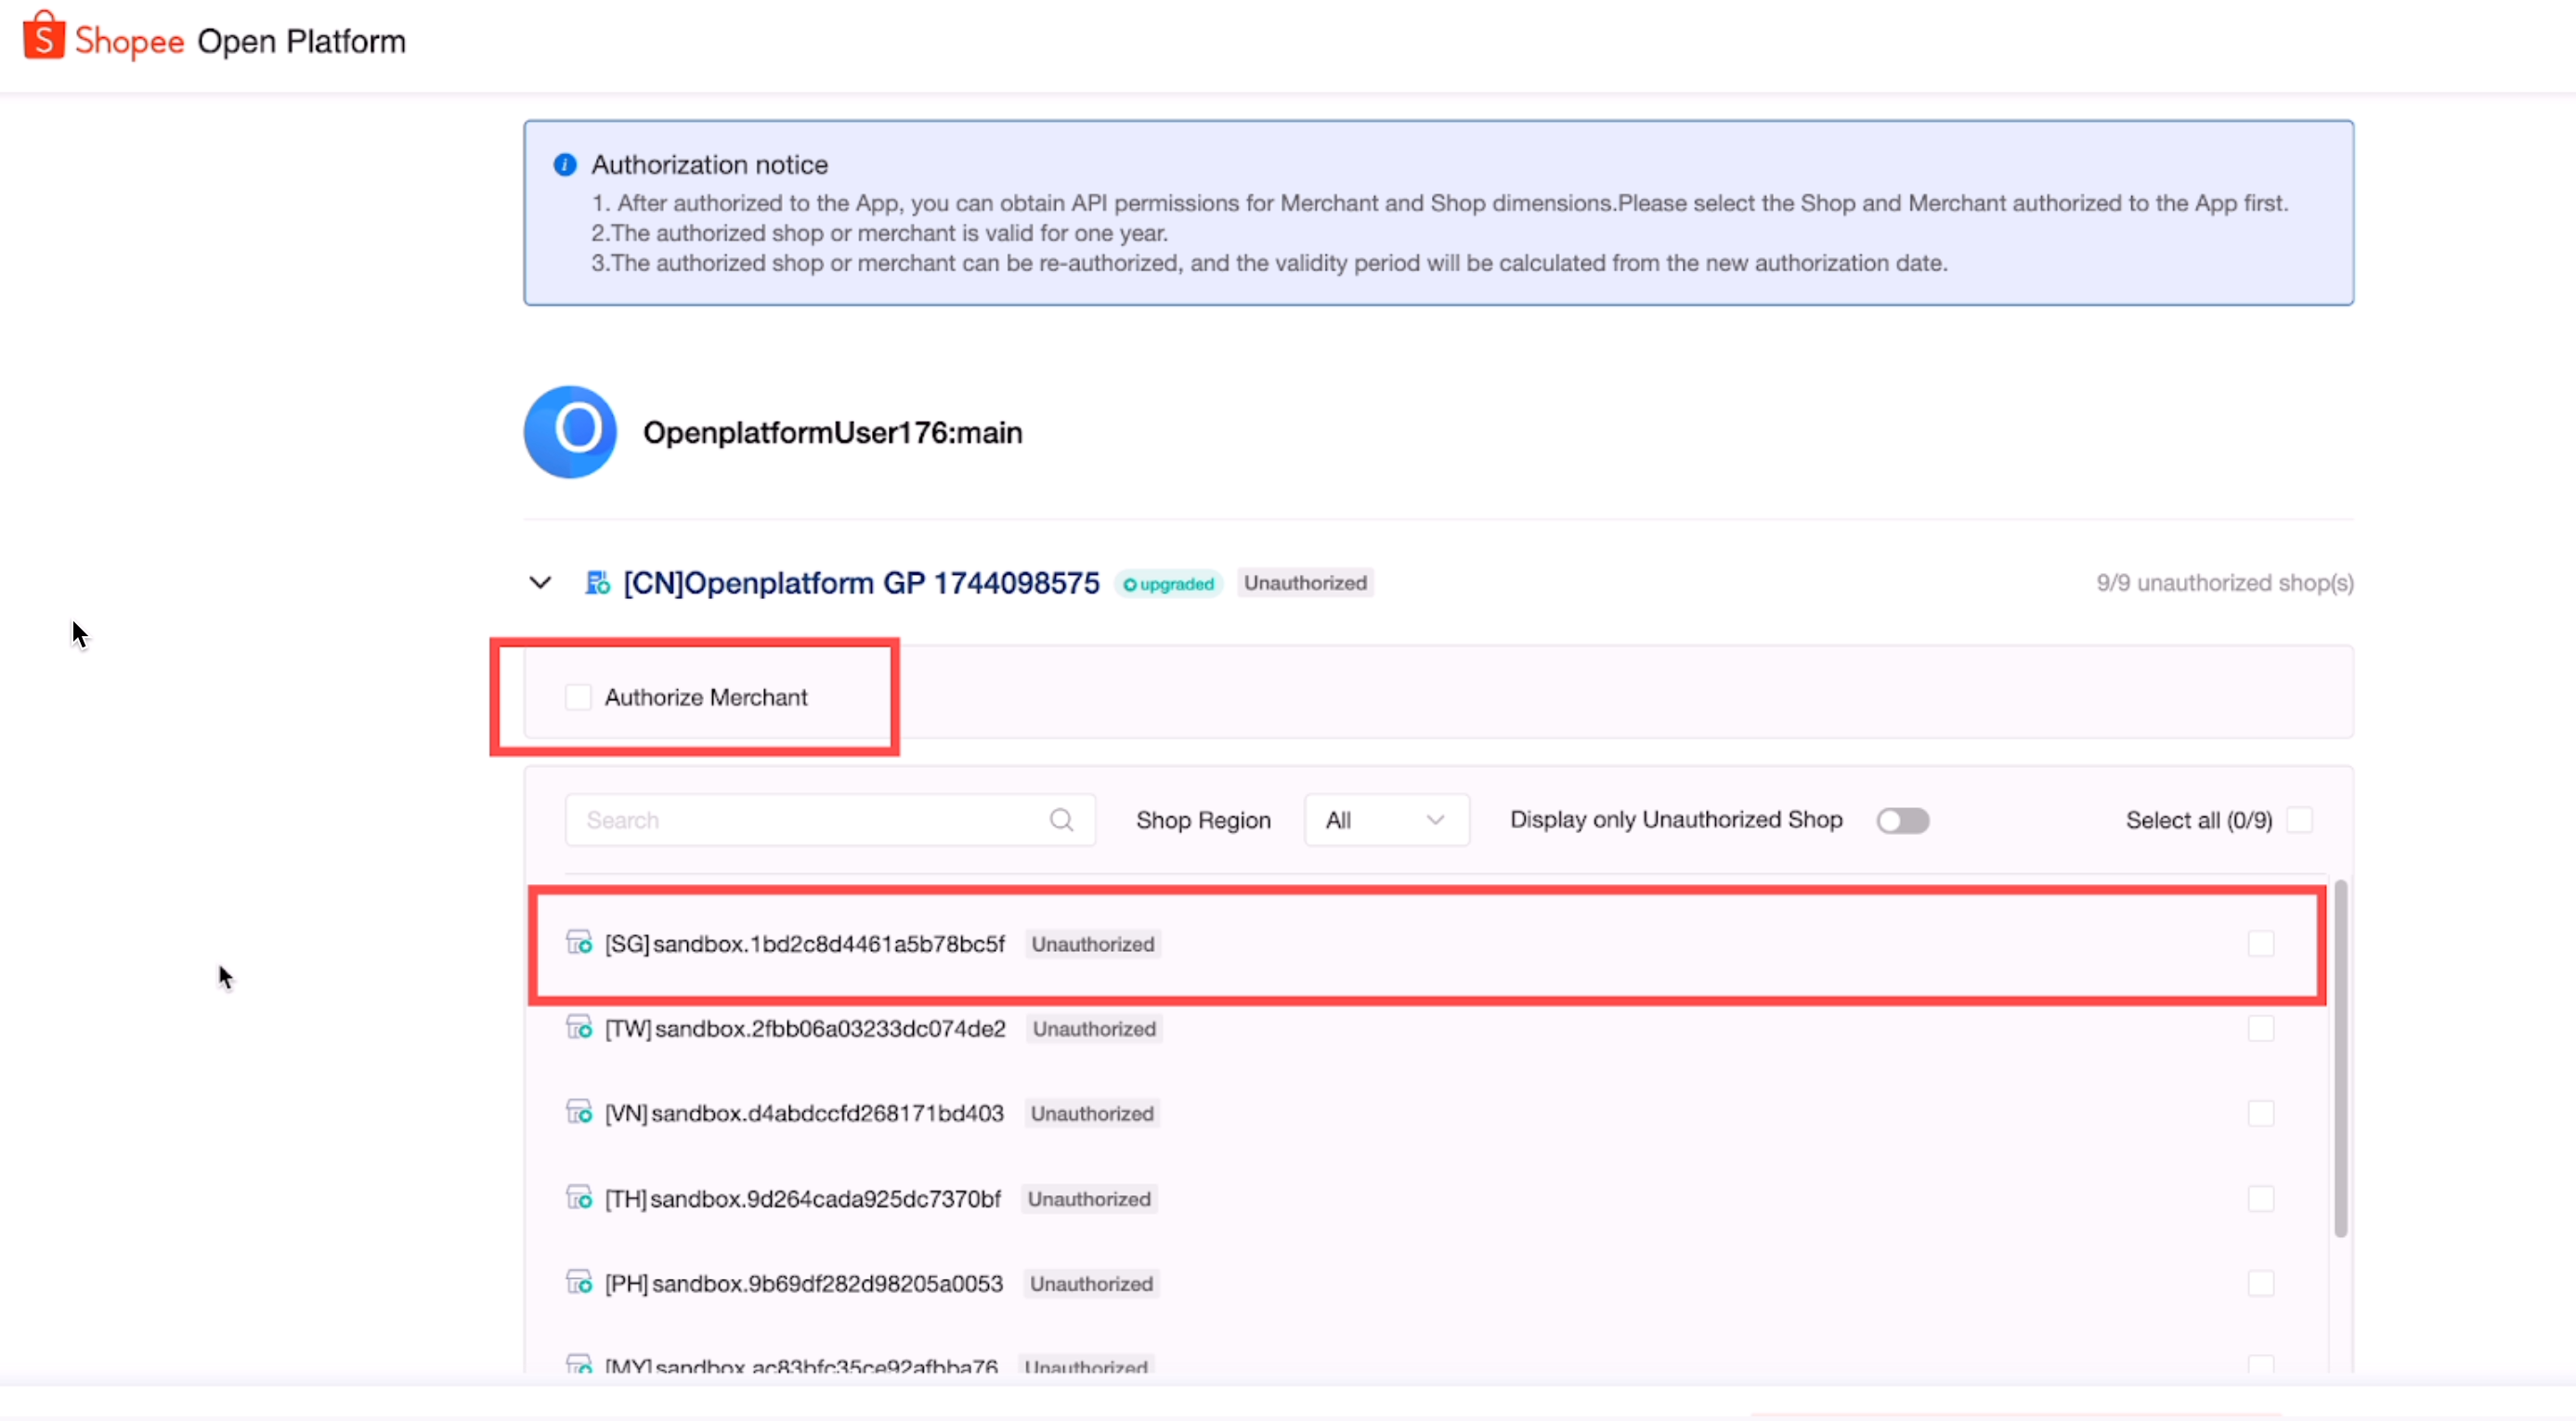
- After logging in, check the stores that require authorization:
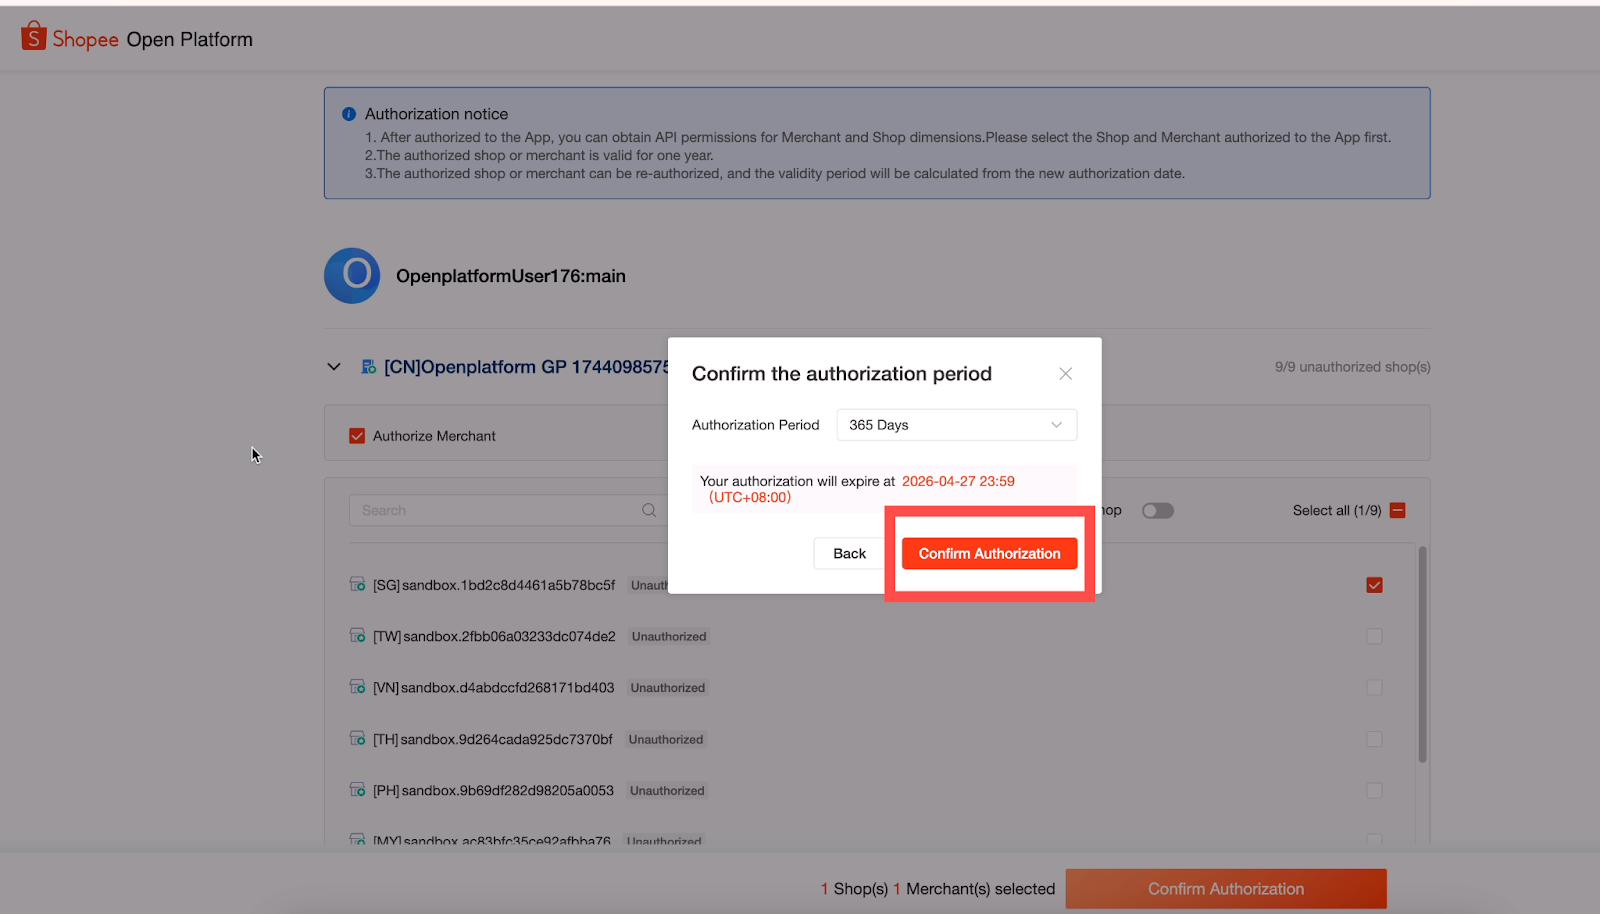
- Click Authorization to jump to the success page:
3. Sandbox testing process
3.1 Shop account
3.1.1 Log in to the Seller Center
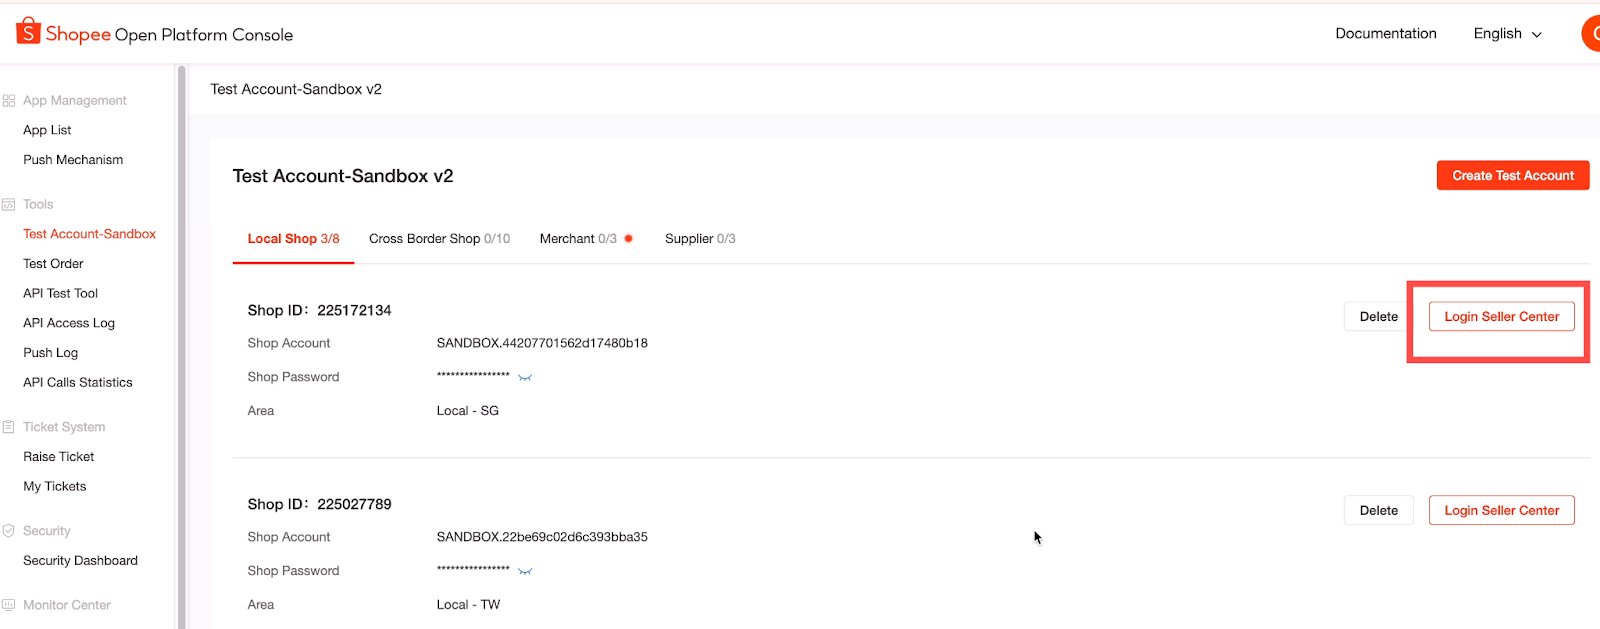
Click Console>SelectTest Account-Sandbox page, click Login Seller Center on the right side of the created test store to enter the Seller Center page.
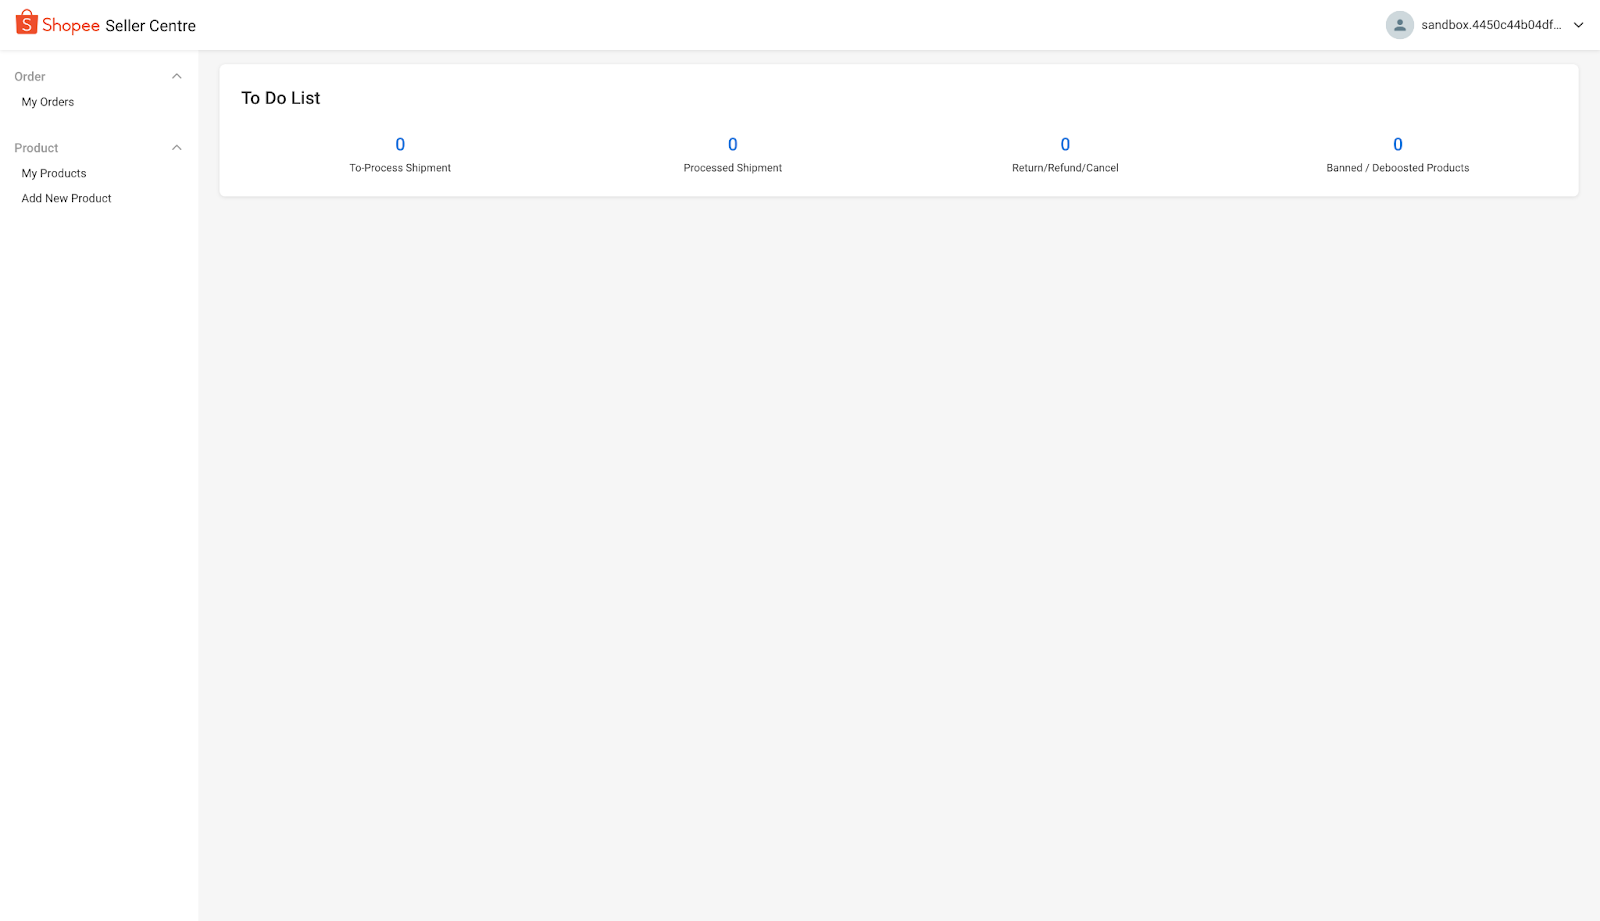
The Seller Center page is displayed as shown below:
3.1.2 Create test products
3.1.2.1 You can choose to create products from SellerCenter or through Open API.
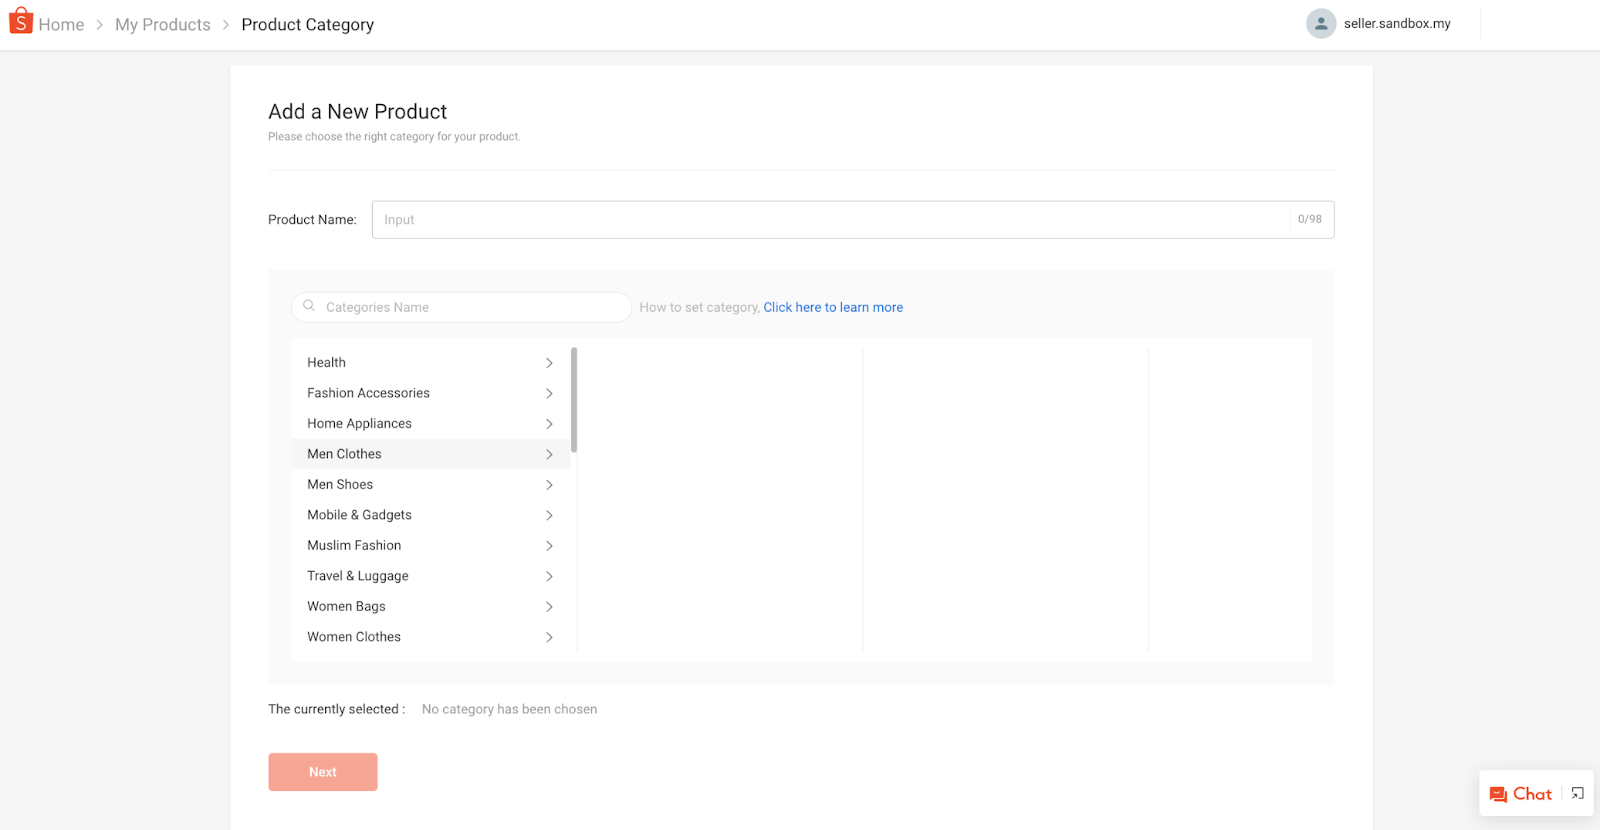
The following are test products created through Seller Center:
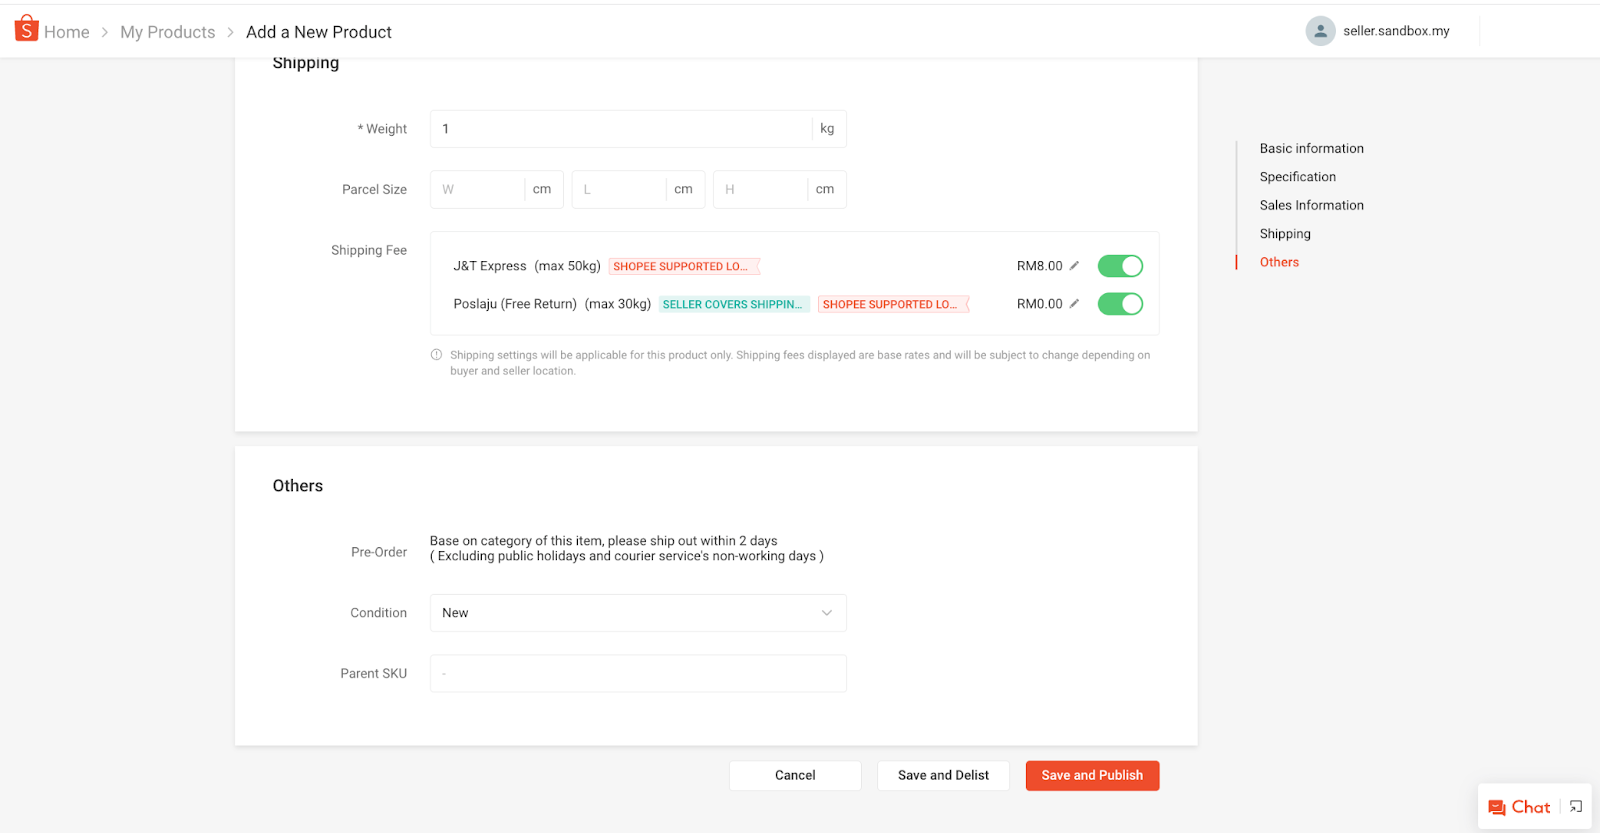
Fill in all required information, select Save and Publish
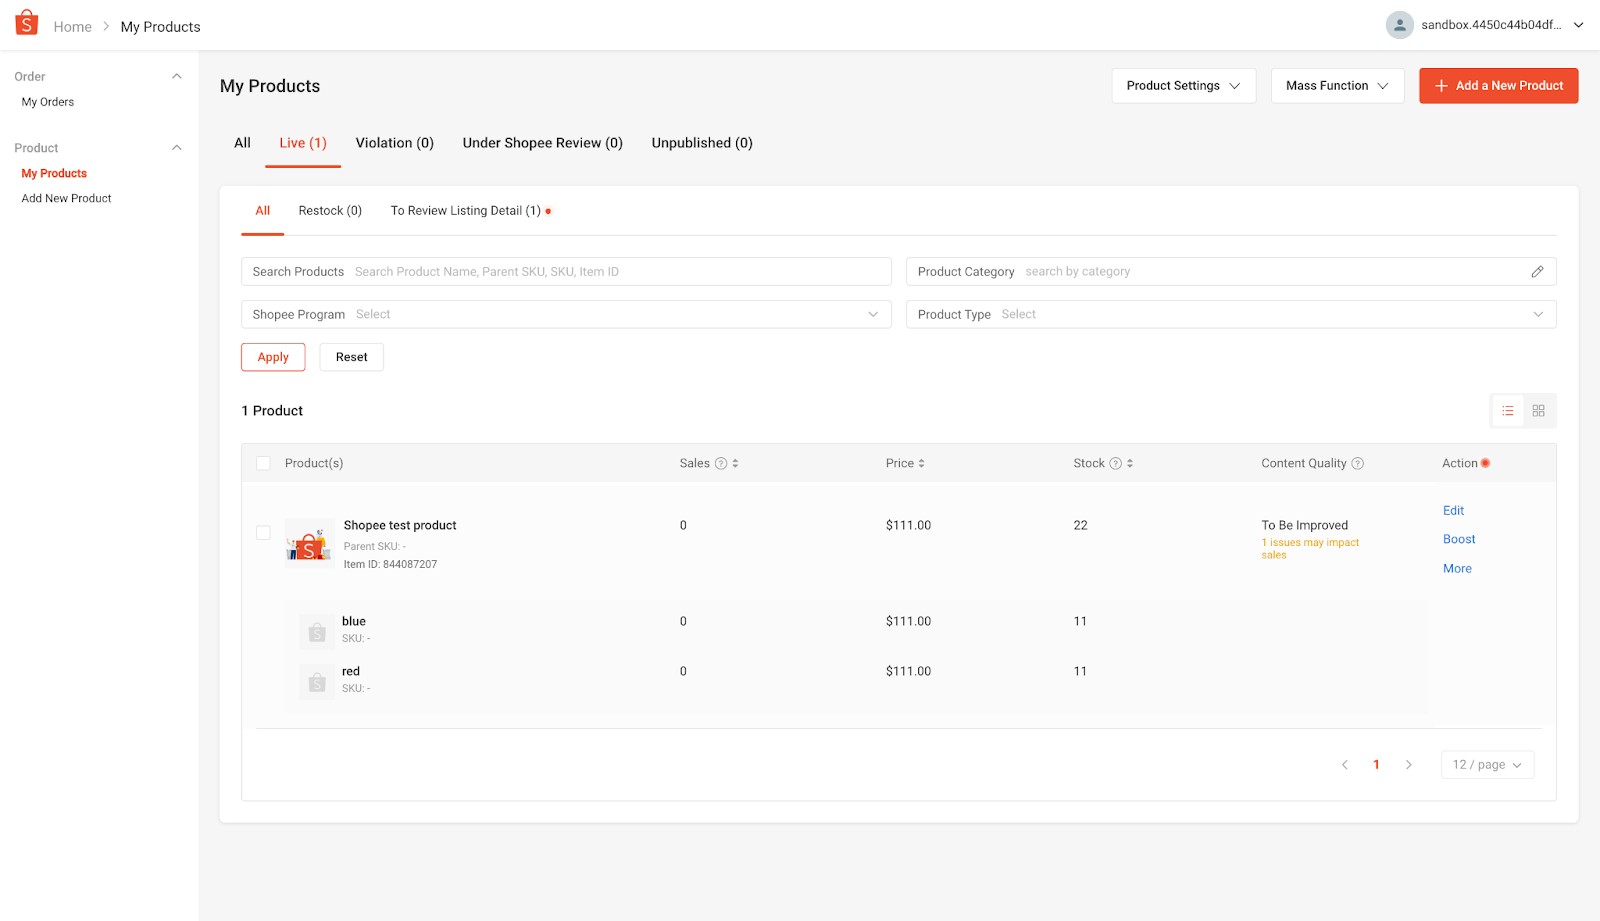
3.1.2.2 After successfully creating the product, the seller center can view My Products (My Products)
3.1.3 Create test order
3.1.3.1 Click Console>select the Test Order page, click "Create Test Order" to pop up the order creation pop-up window.
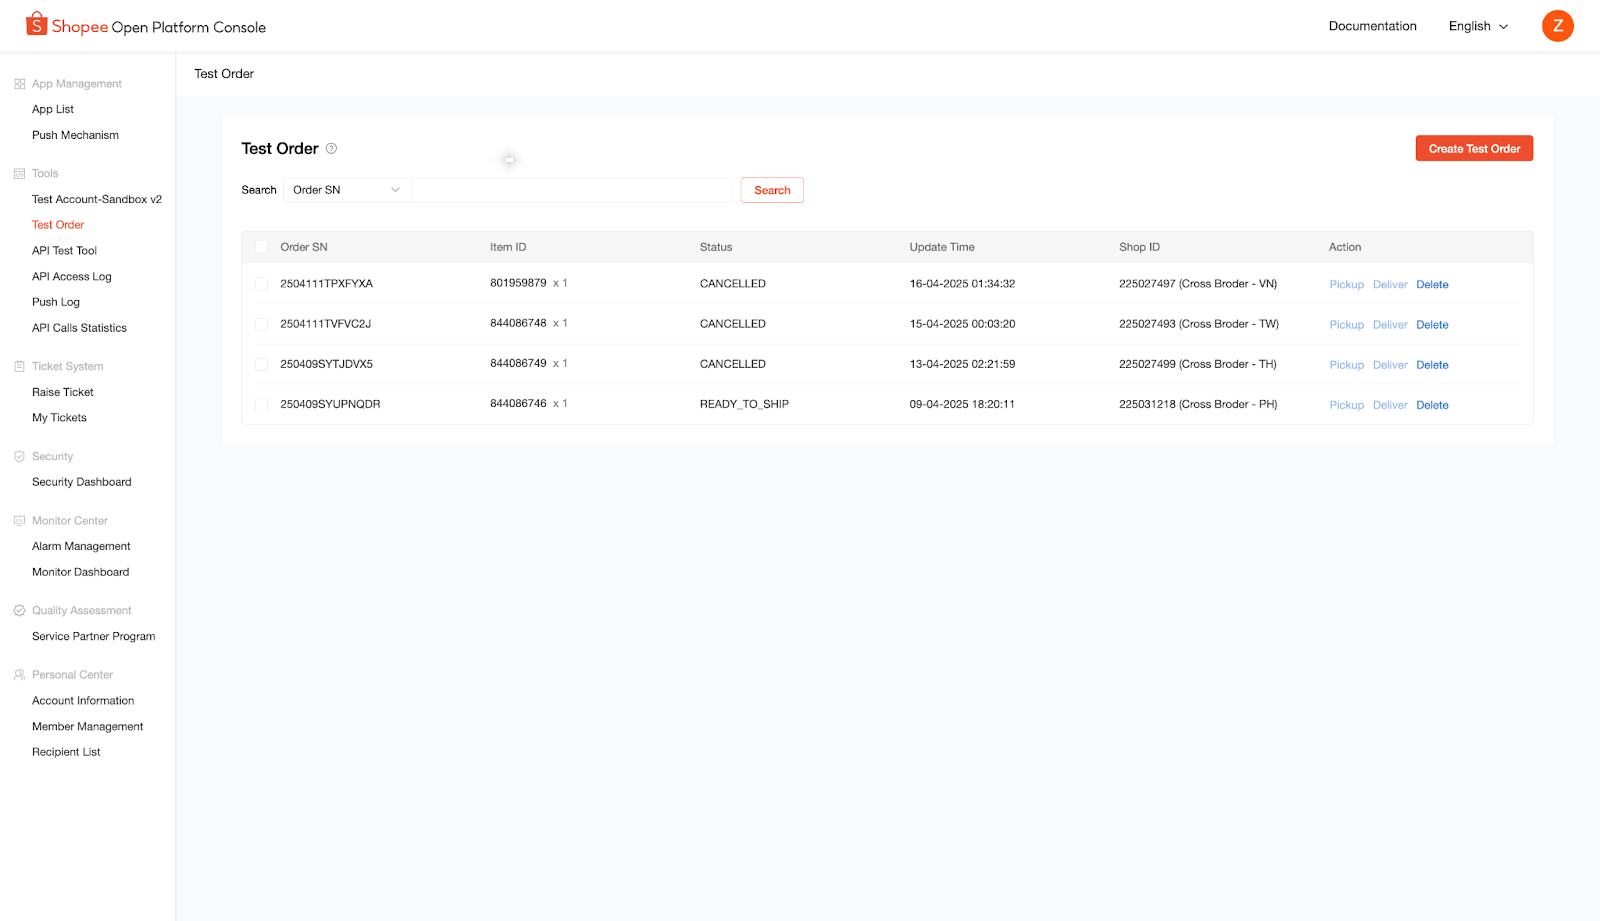
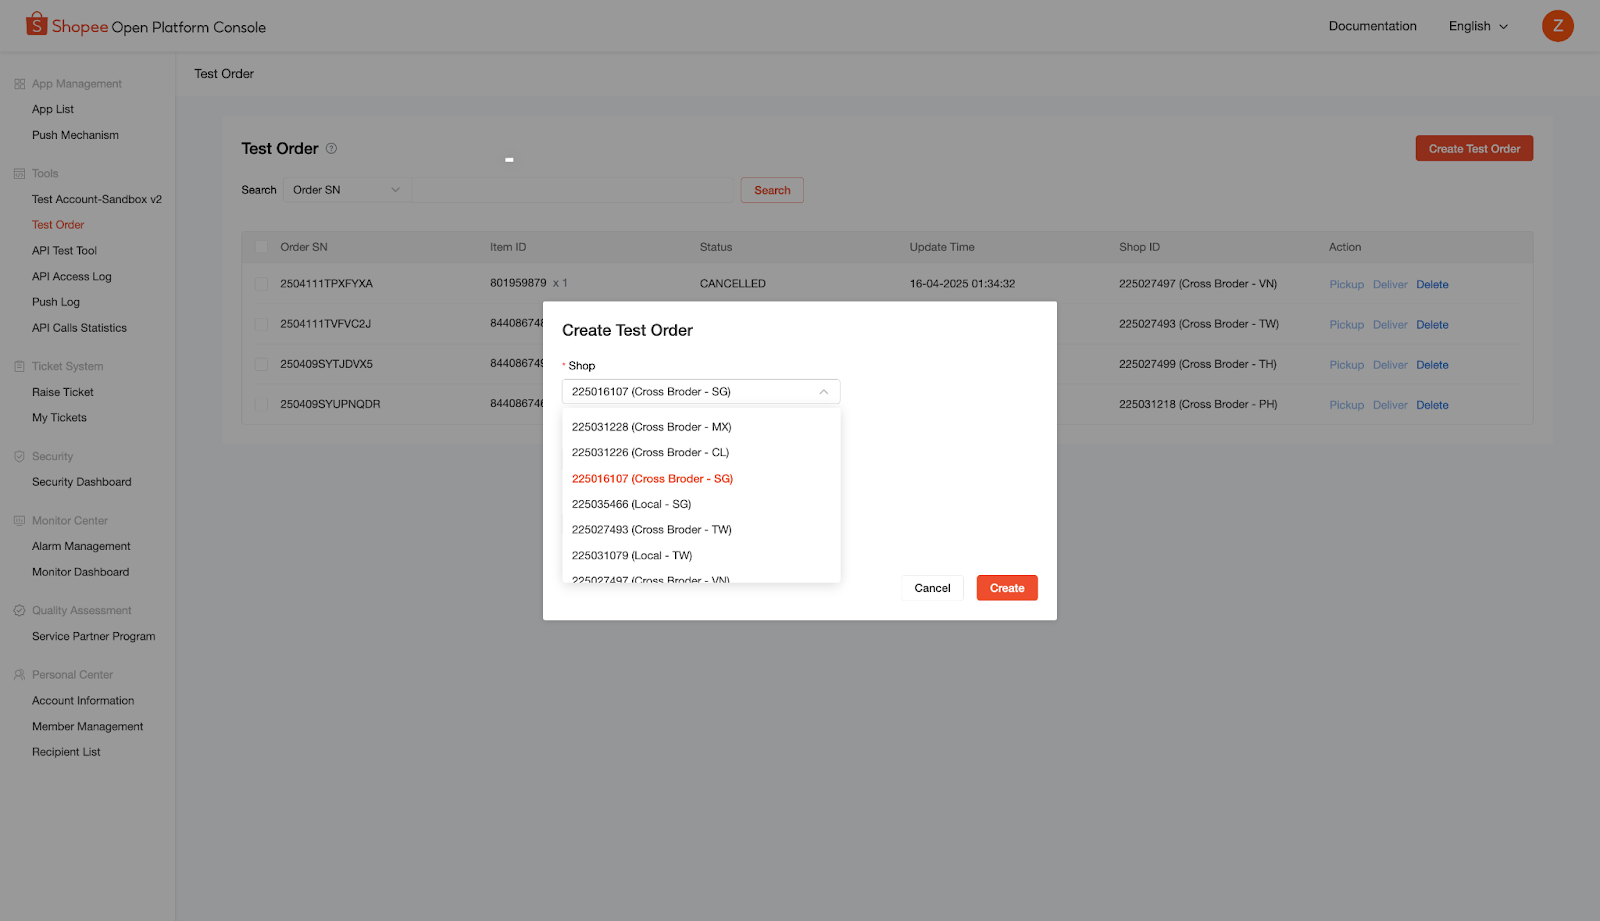
Click the "Shop" drop-down box and select the shop you want to create
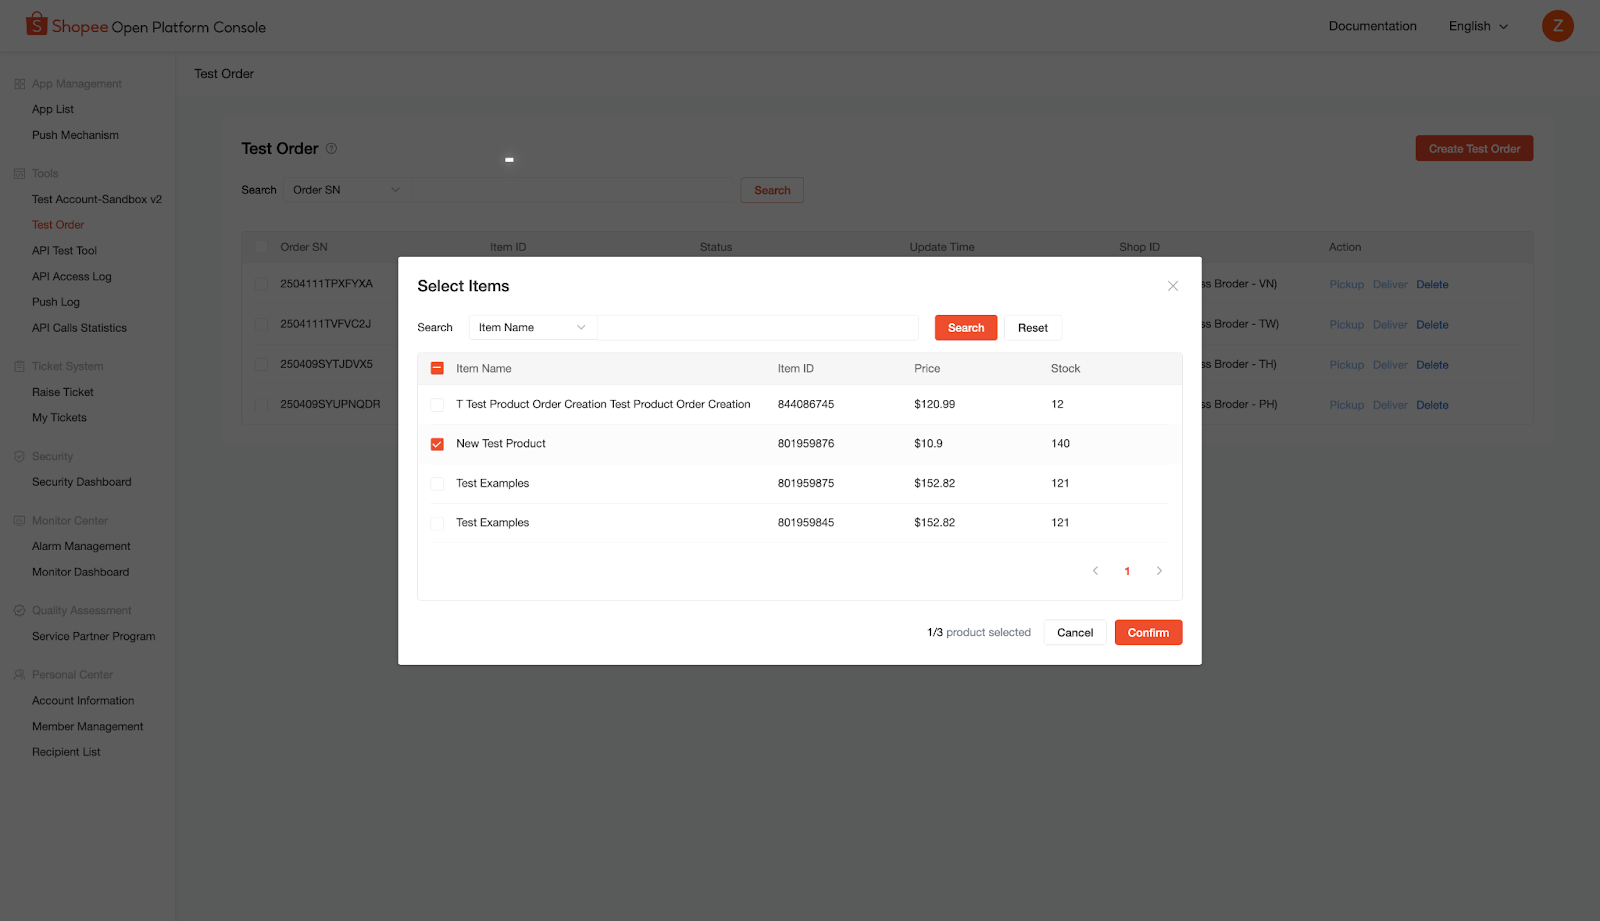
Click"Select Item" under Item(s), select the item that needs to be created, and click "Confirm"
Click the "Shipping Option" drop-down box to select the fulfillment channel, and click "Create" to complete the order creation
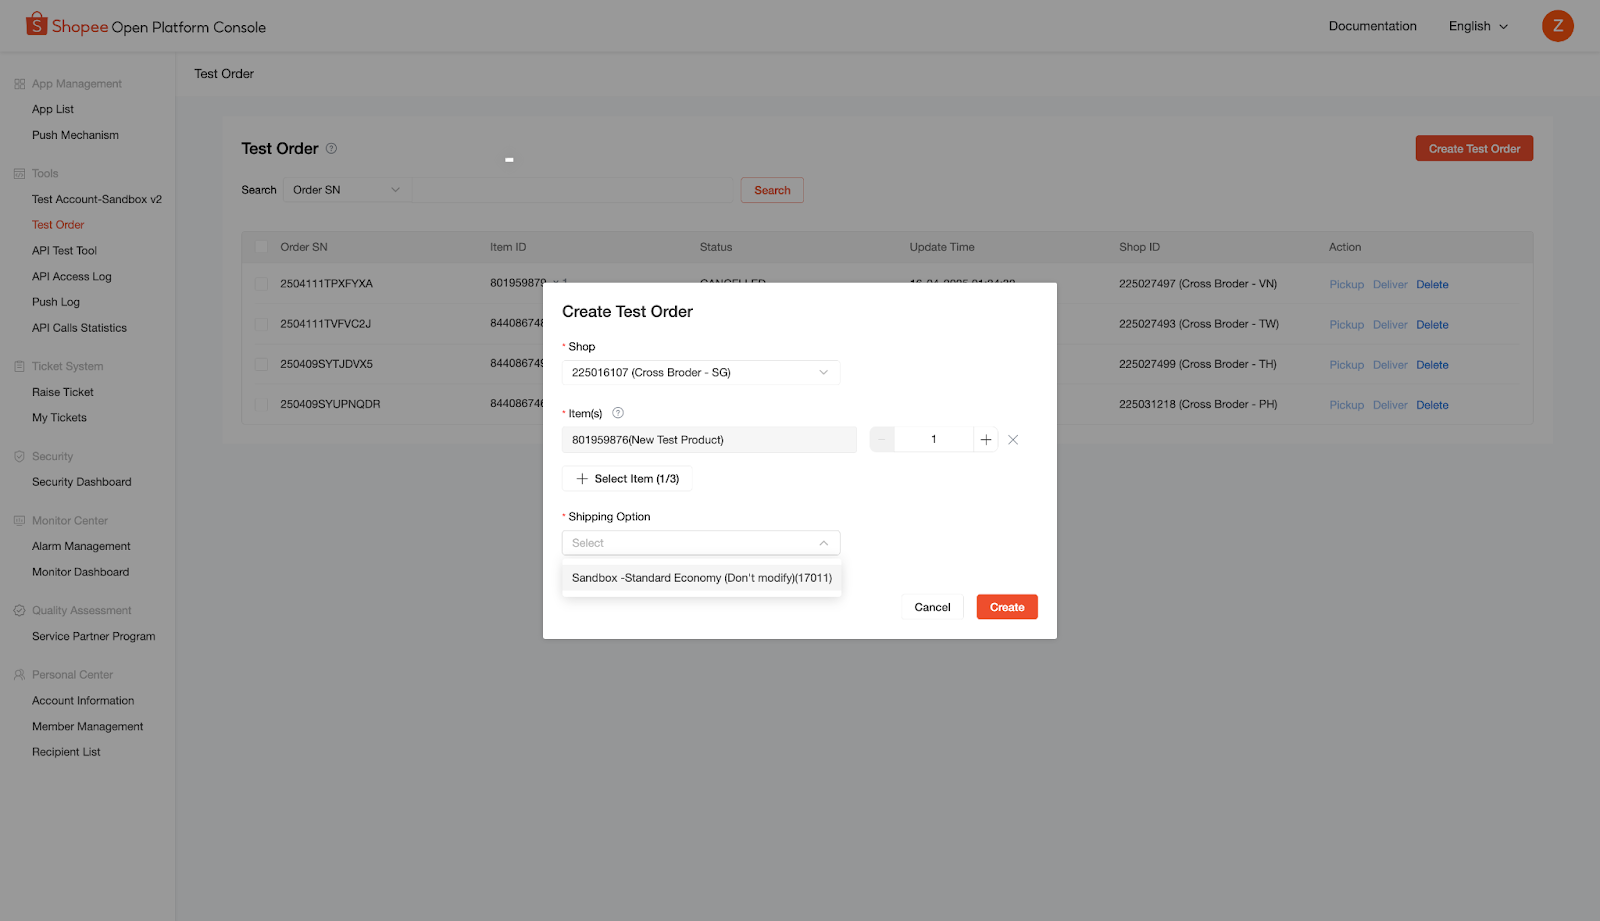
3.1.3.2 Test order creation completed
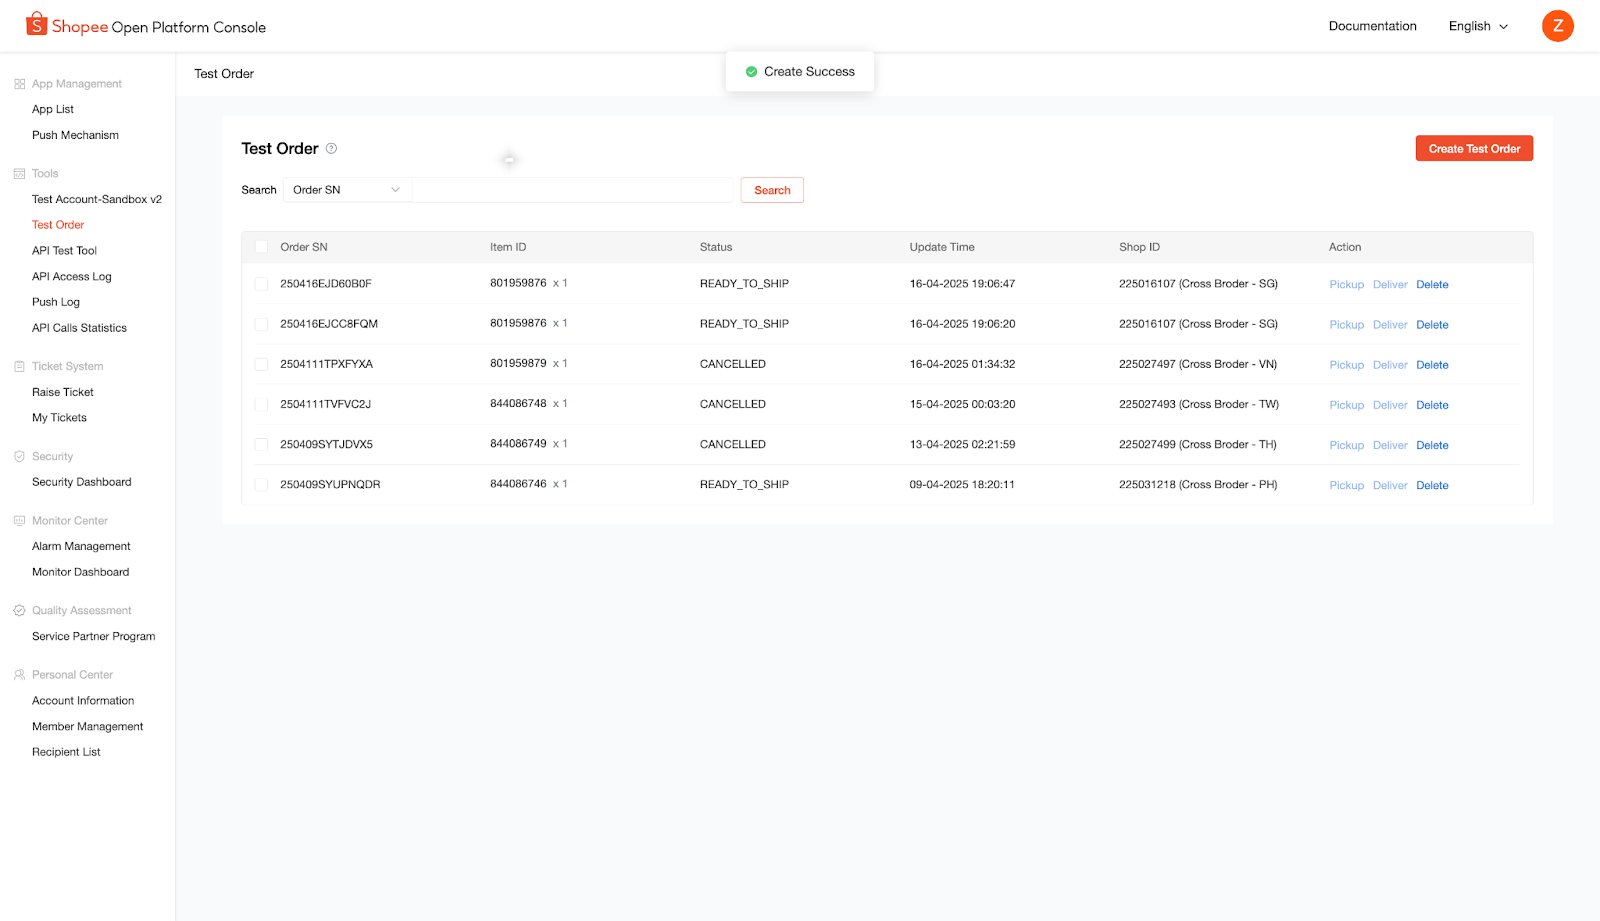
3.1.4 View created orders
Enter the seller center and click "My Orders" to view the created orders
Note: After creating an order on the Console page, you need to wait for about 5 minutes before proceeding to the next step.
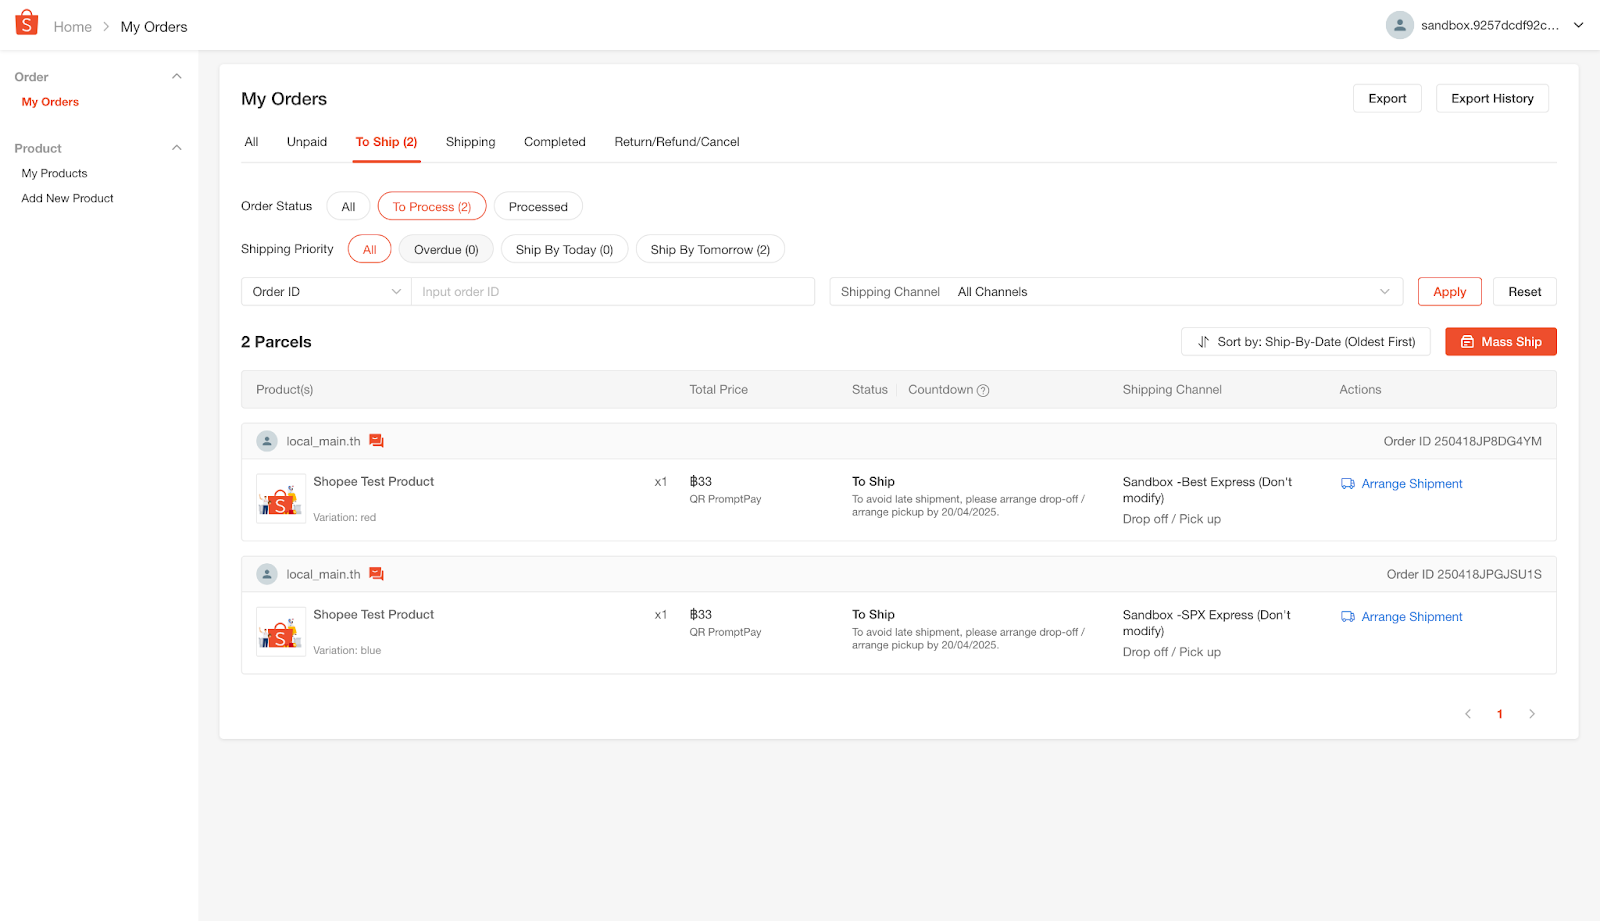
3.1.5 Shipping
Click Arrange shipment and select the shipping method (pickup/dropoff). A tracking number will be automatically generated. At this time, the order status is PROCESSED.
Note: Please operate the shipment in the "To Ship" tab. The "All" tab may not be able to operate.
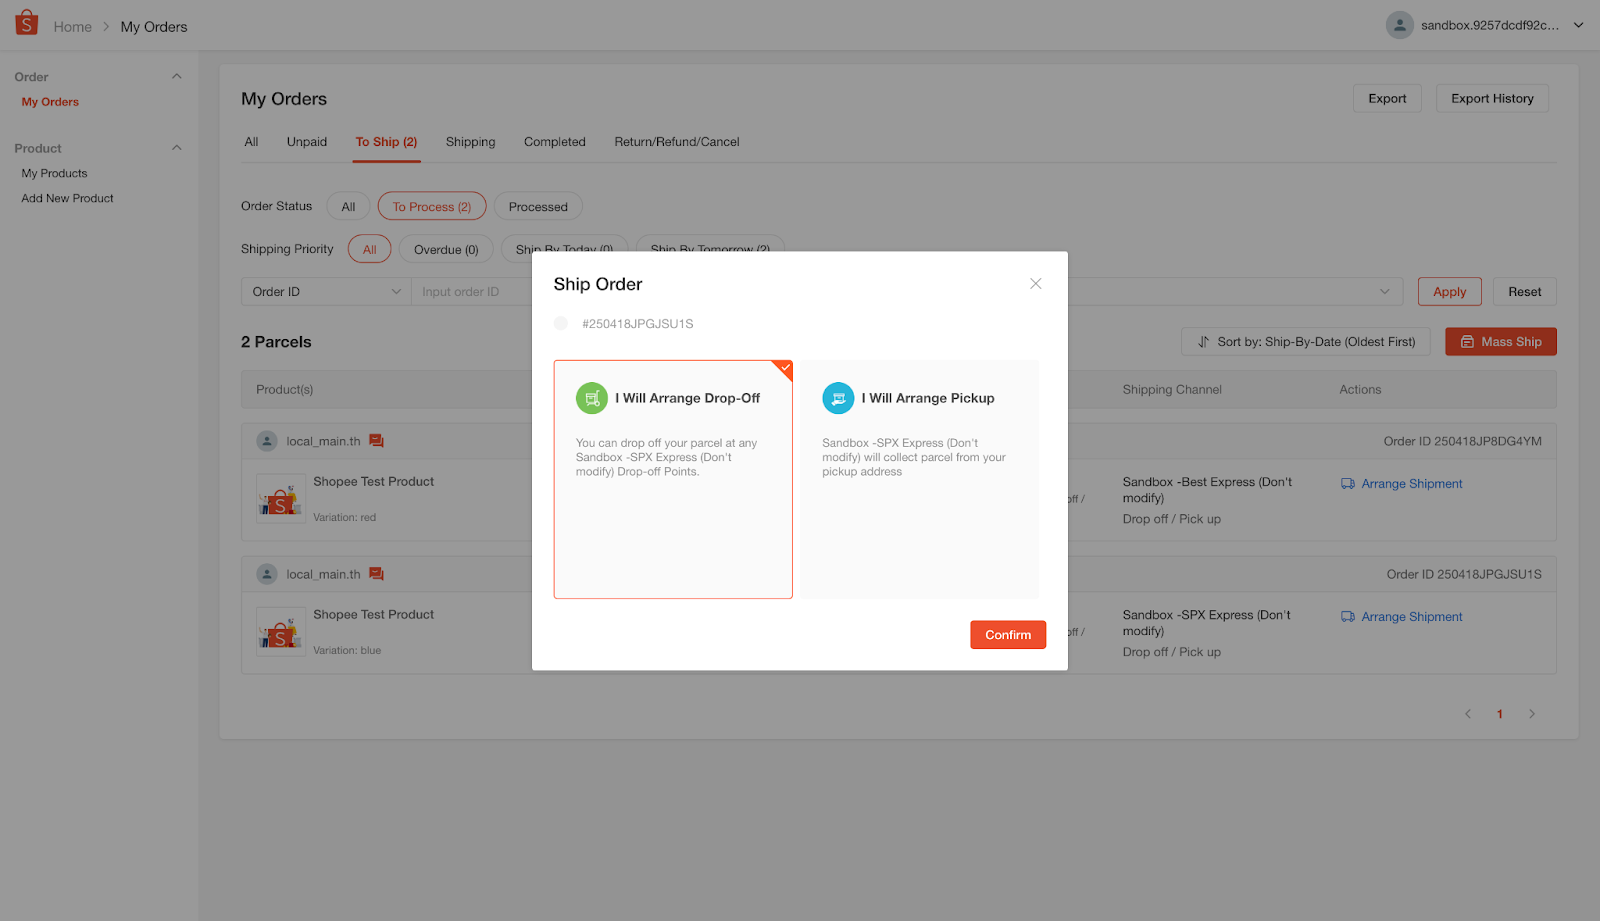
Note: The logistics channels selected for testing in different regions are different, and the order delivery methods will be different. Generally, only two delivery methods, drop off/pick up, are provided.
3.1.6 Print the form
Currently, at the Seller CenterPrinting of the form is not currently supported.This operation. If you need to print a form, this can only be achieved through the API.
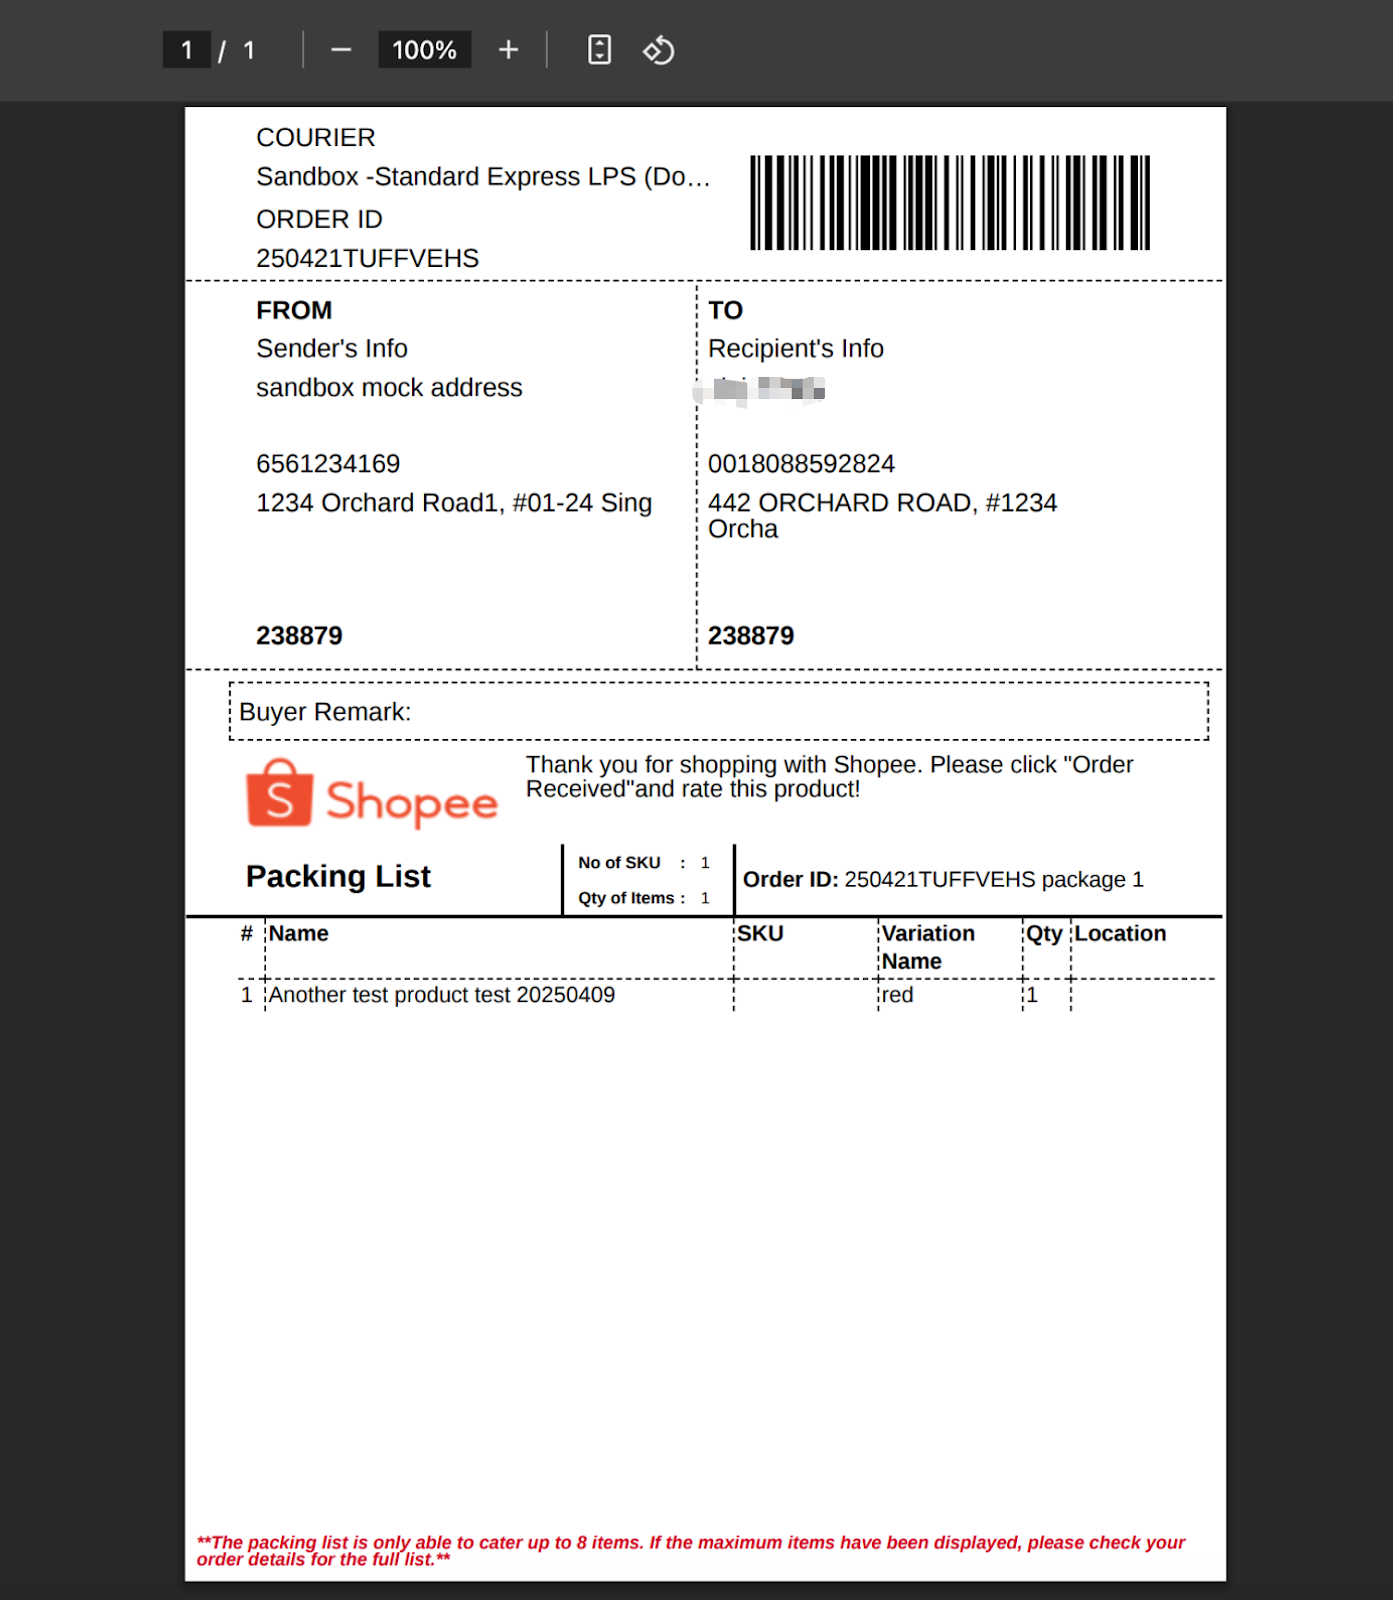
Note: The receipt can only be printed after the order is shipped successfully and before the order status reaches SHIPPED. There is no limit to the number of times it can be printed.
3.1.7 Order status transfer
After completing the shipment in the test environment, you can enter the Console->Test Order page to operate the order flow status.
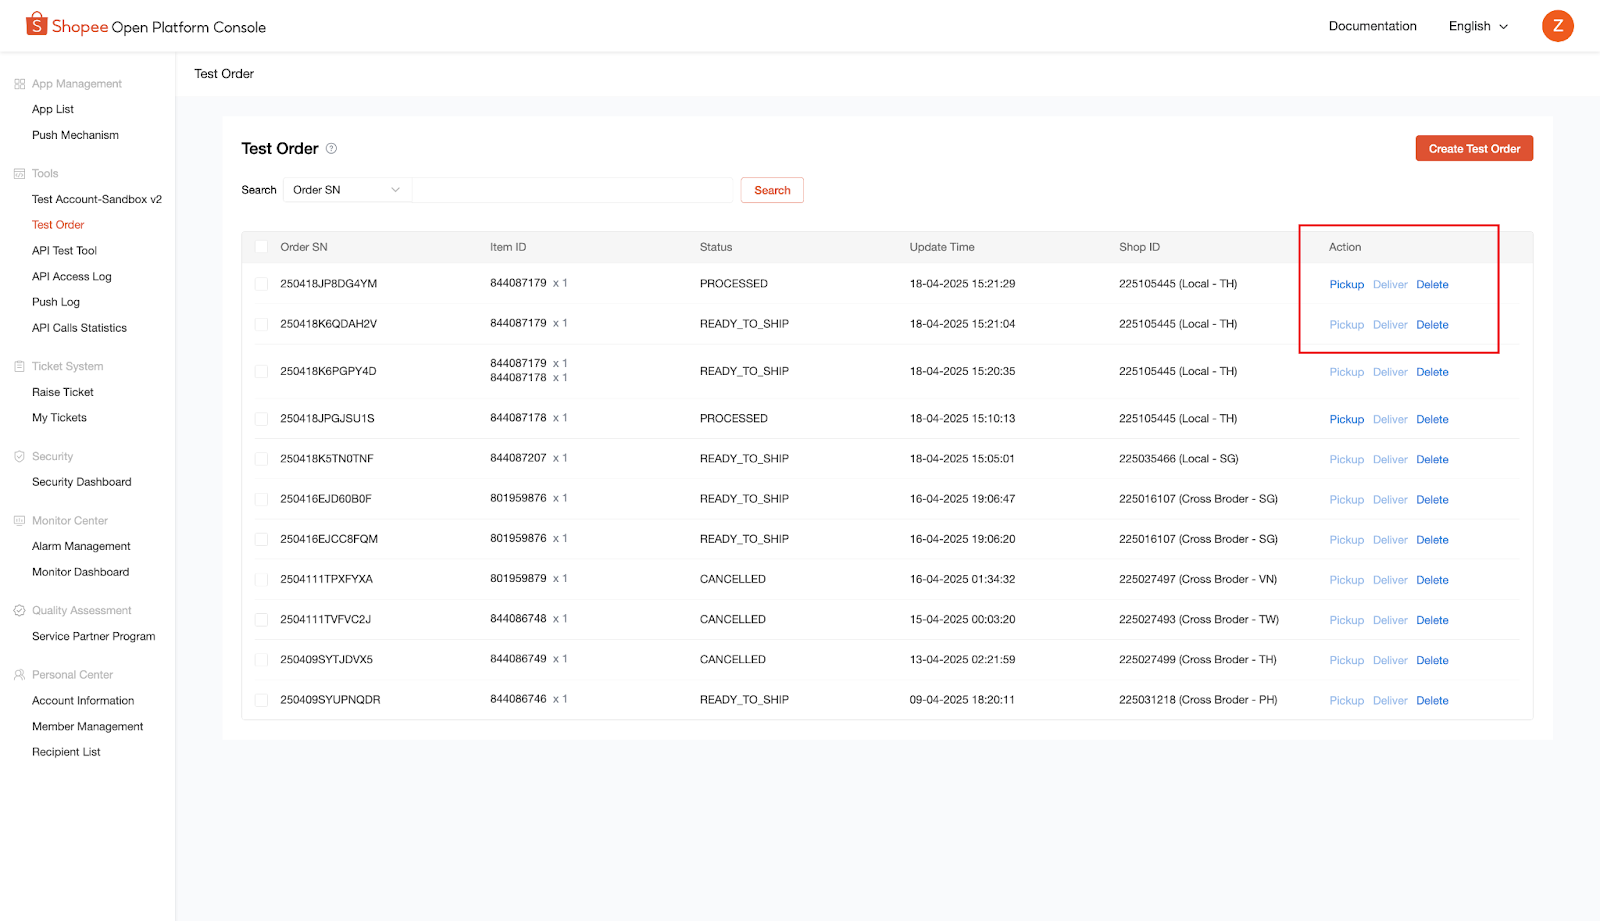
3.1.7.1 Click "Pickup" and the order status will automatically change to "SHIPPED"
Note: You need to complete Arrange Shipment in the seller center or call /api/v2/logistics/ship_order. You can click "Pickup" only when the order status is PROCESSED.
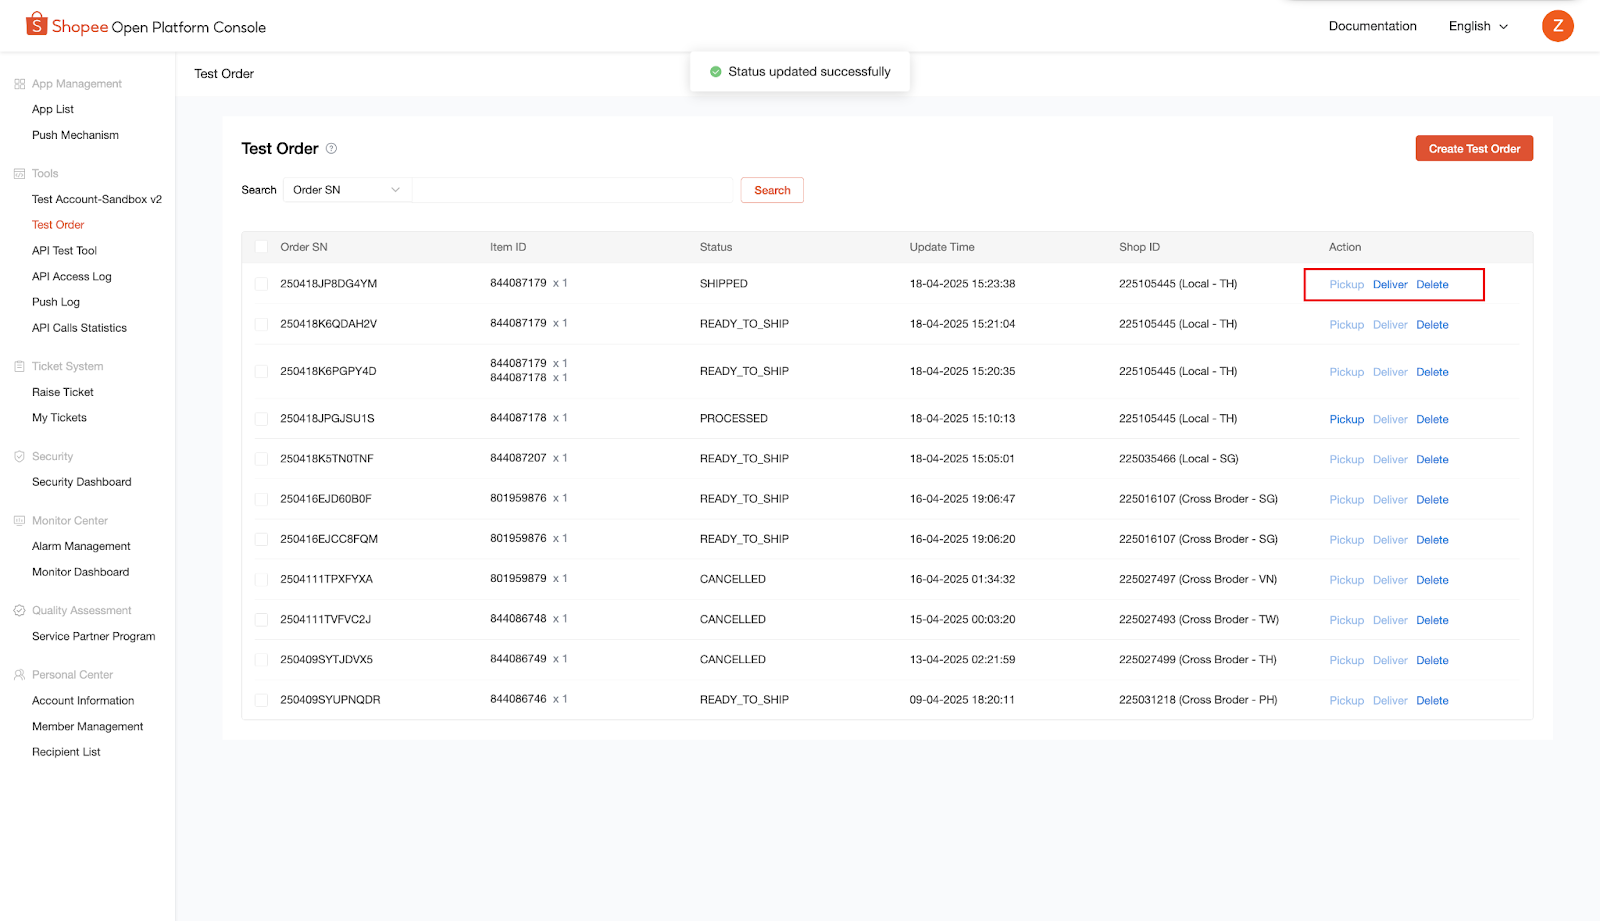
3.1.7.2 Click“Deliver”When the order delivery is completed, it will change to "TO_CONFIRM_RECEIVE”
Note: The order needs to be in the "SHIPPED" status before you can click "Deliver”
3.2 Merchant account
For testing of China Seller Center (CNSC), developers can choose "China Merchant" to create a main test account and bind merchants and stores.
CNSC, the full name of China Seller Center, is a seller backend customized for Chinese cross-border sellers. Sellers can manage products, orders, marketing, etc. in multiple stores through it. For basic operating instructions and introduction to CNSC, please visithere。
3.2.1 Basic settings
After the Merchant test account is created, log in to the main account through "login Seller Center", complete the authorization of the main account and store, and set the exchange rate conversion and price adjustment percentage of each site to facilitate subsequent interface debugging smoothly. For detailed tutorials, please refer to the Seller Learning Center:Required basic settings
Note: If you need to enter the verification code (OTP), please enter"123456".
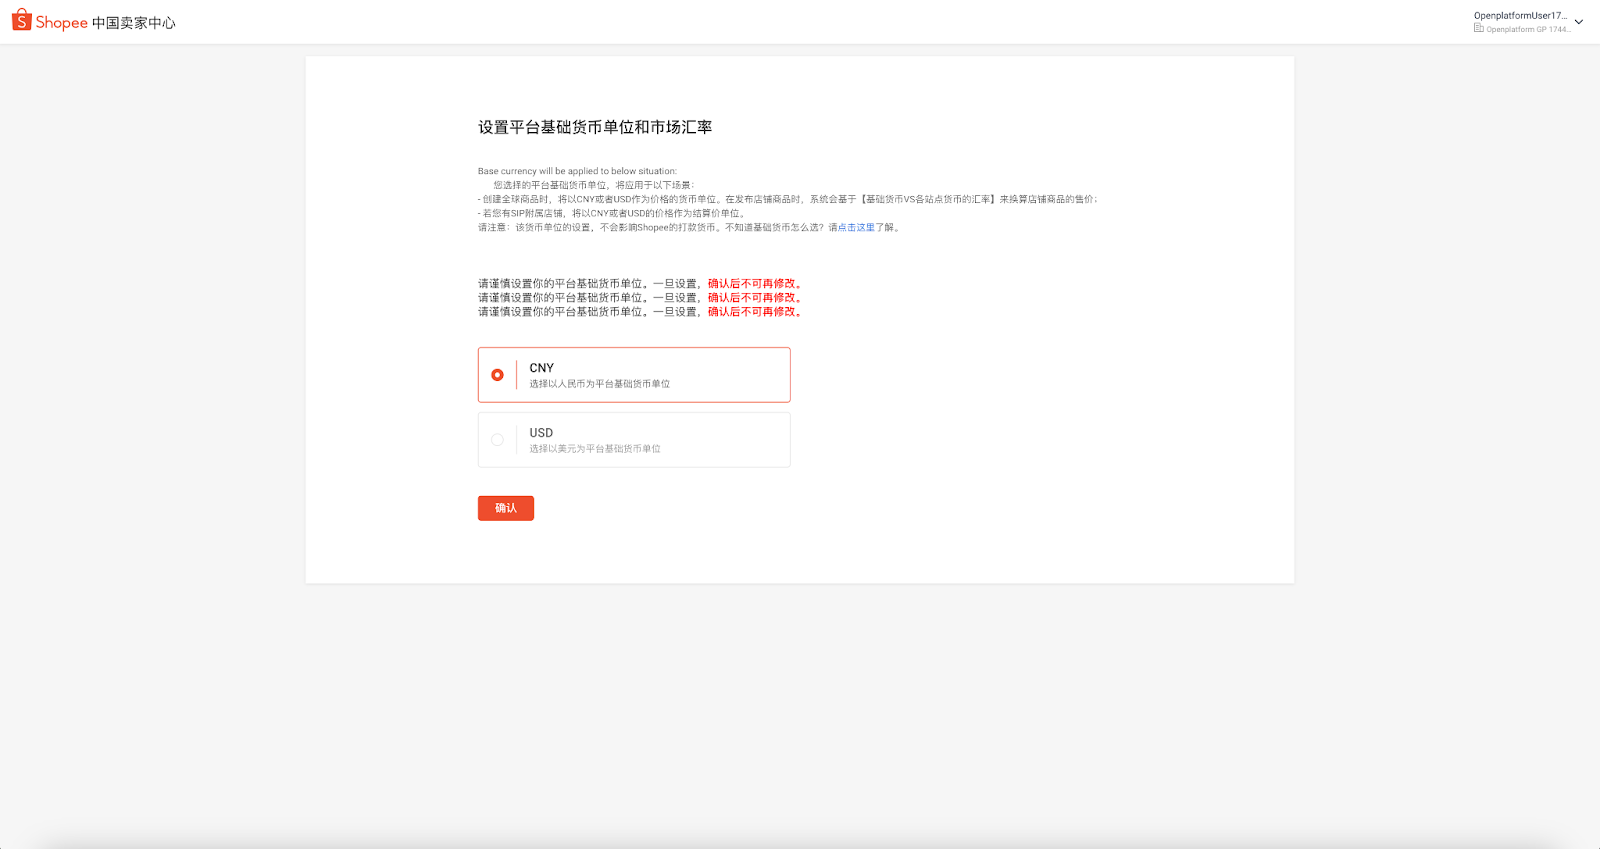
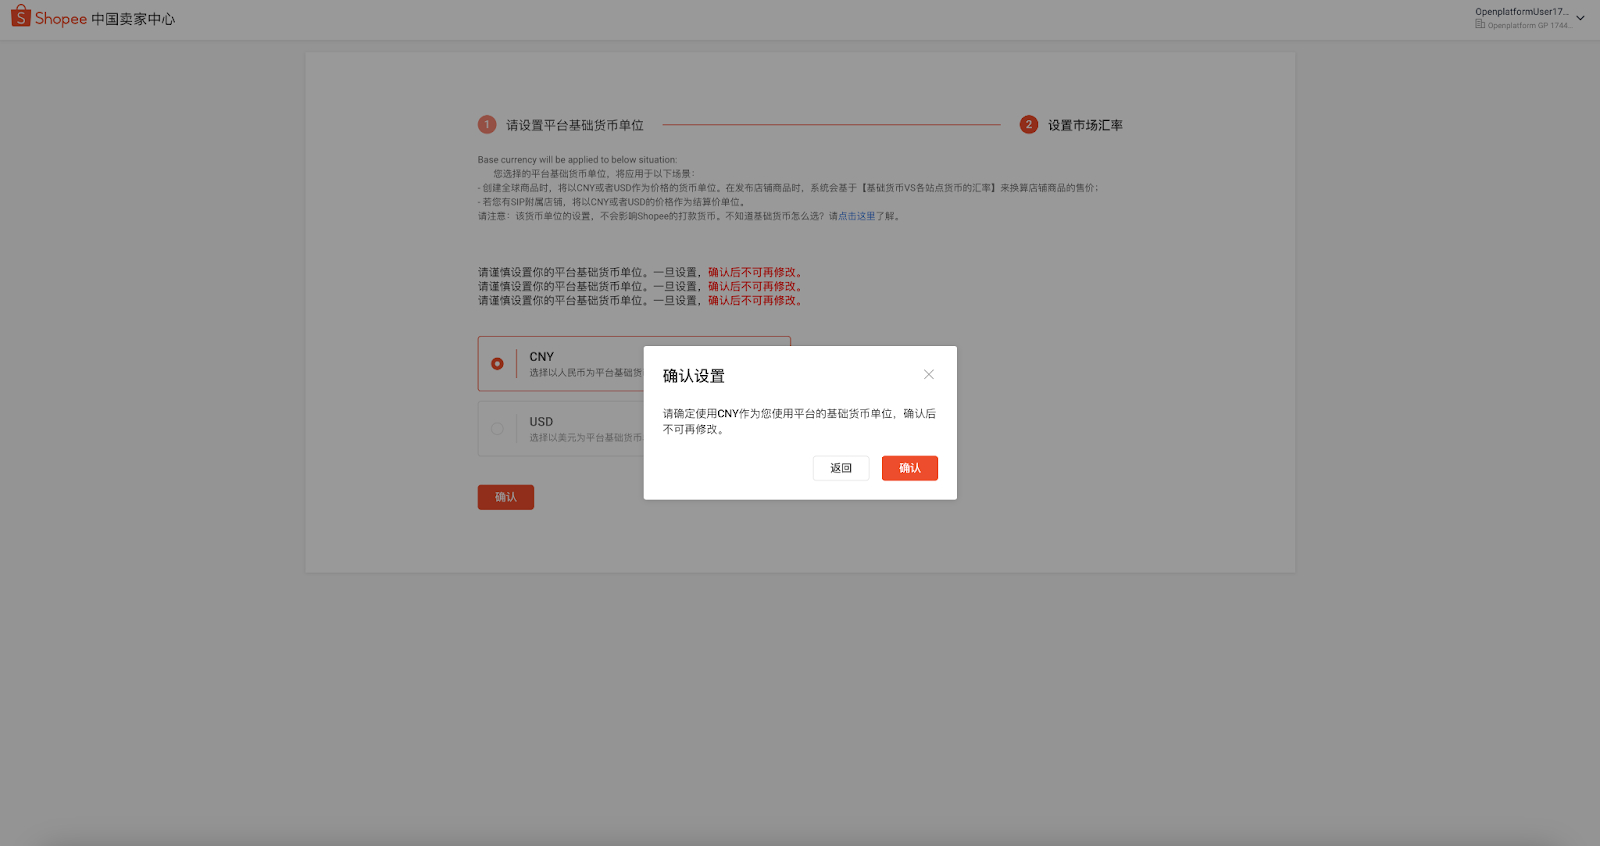
(Log in to CNSC-->Select the desiredPlatform base currency unit-->Complete pop-up window settings-->Click OK)
Set the platform base currency unit and market exchange rate:
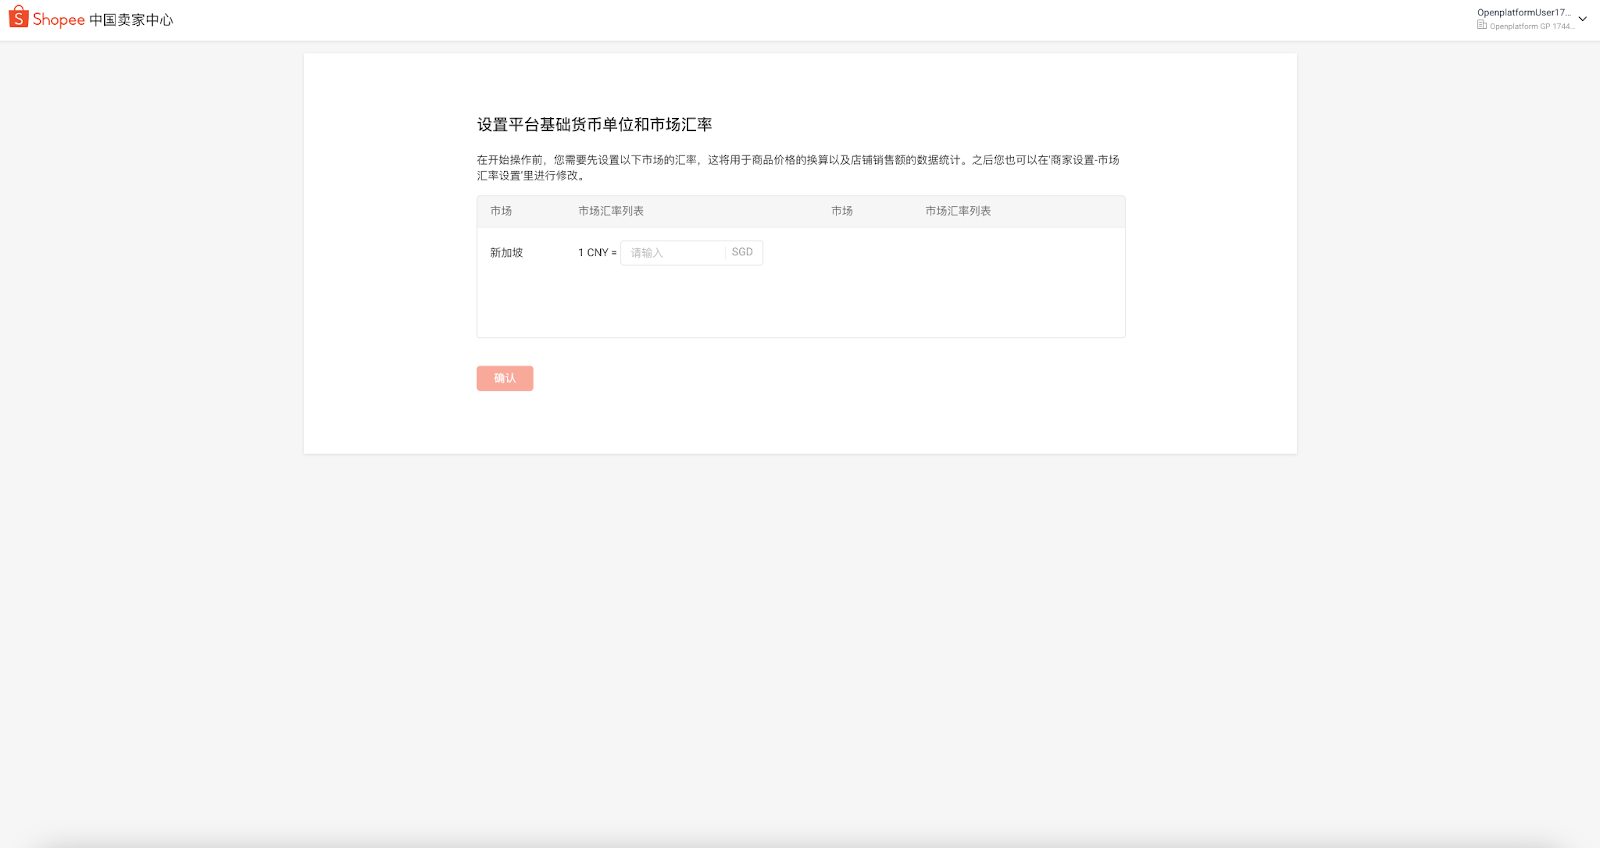
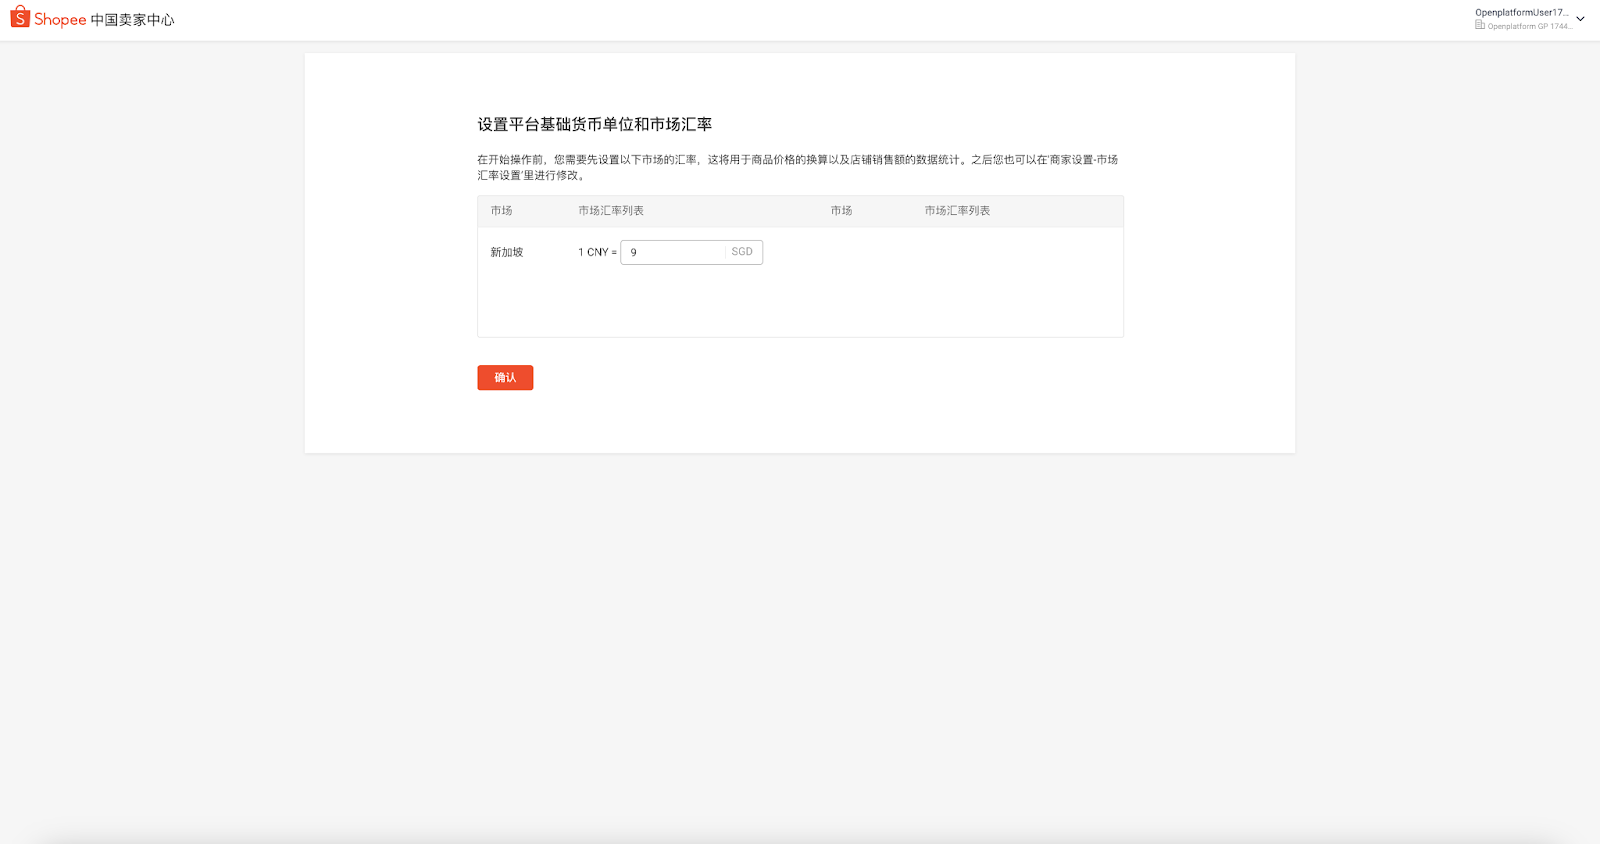
(Set the market exchange rate of the platform currency-->fill in the specific exchange rate ratio-->click OK-->complete the setting and enter CNSC)
Global product and store product price settings:
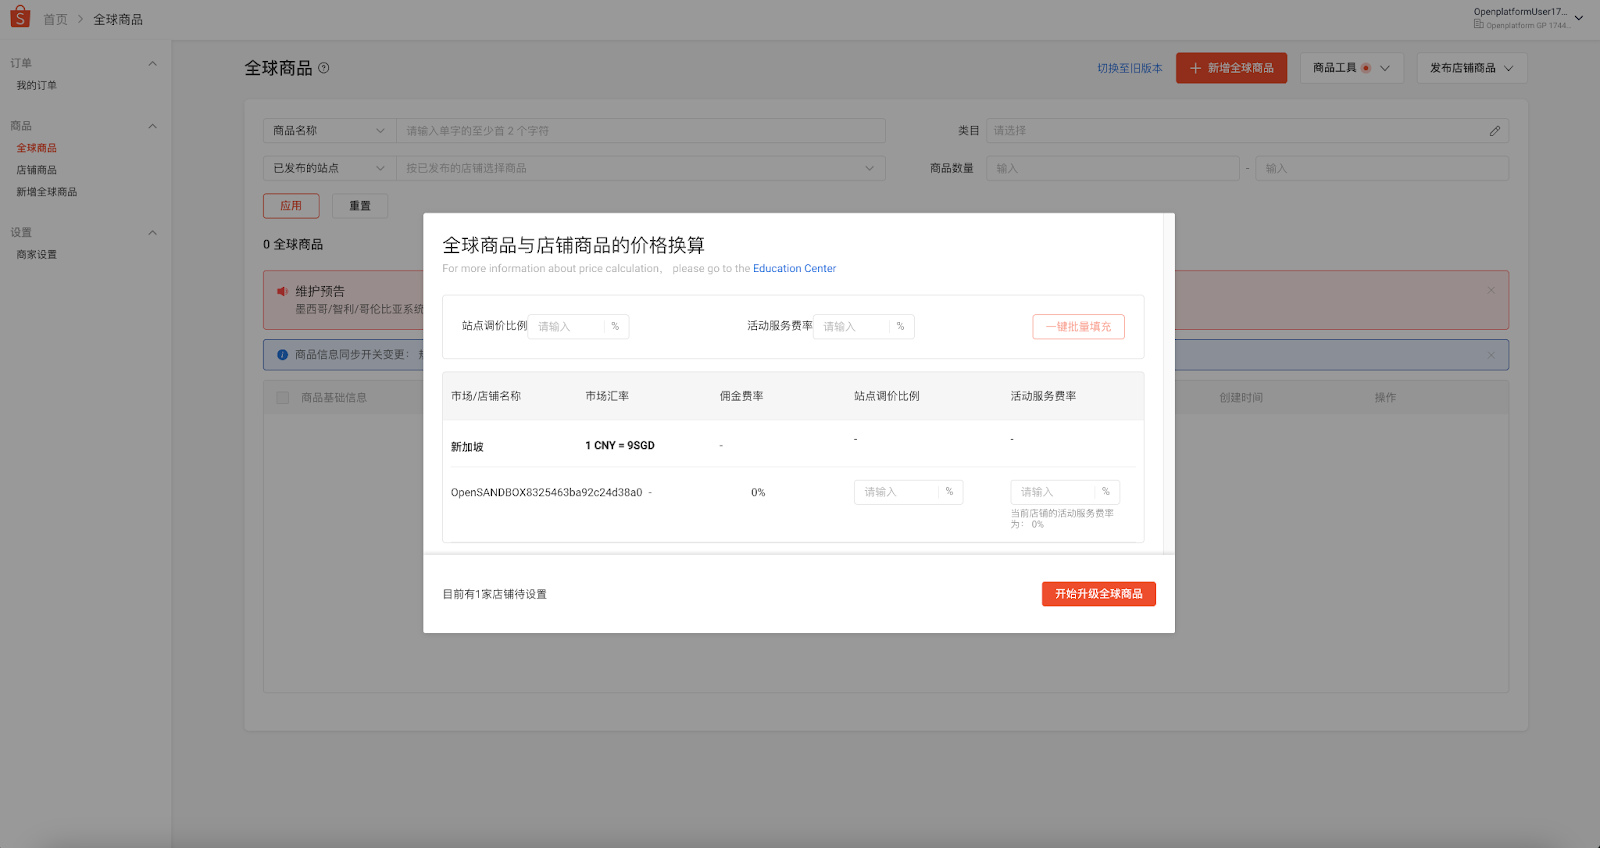
After entering CNSC, click on the "Global Products" page, and a pop-up window will pop up to set the prices of global products and store products.
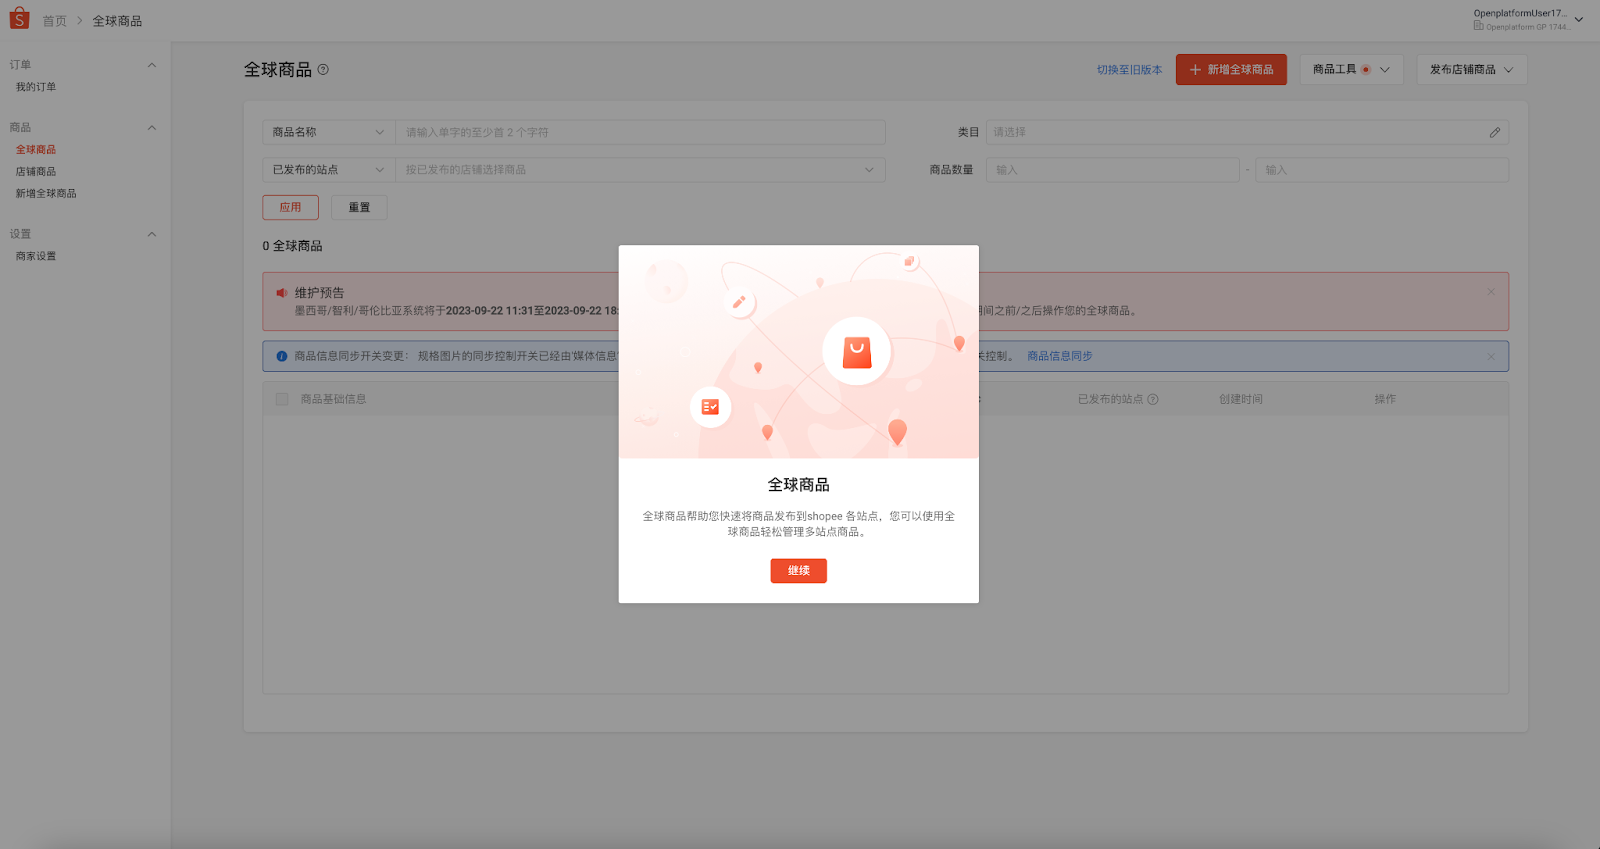
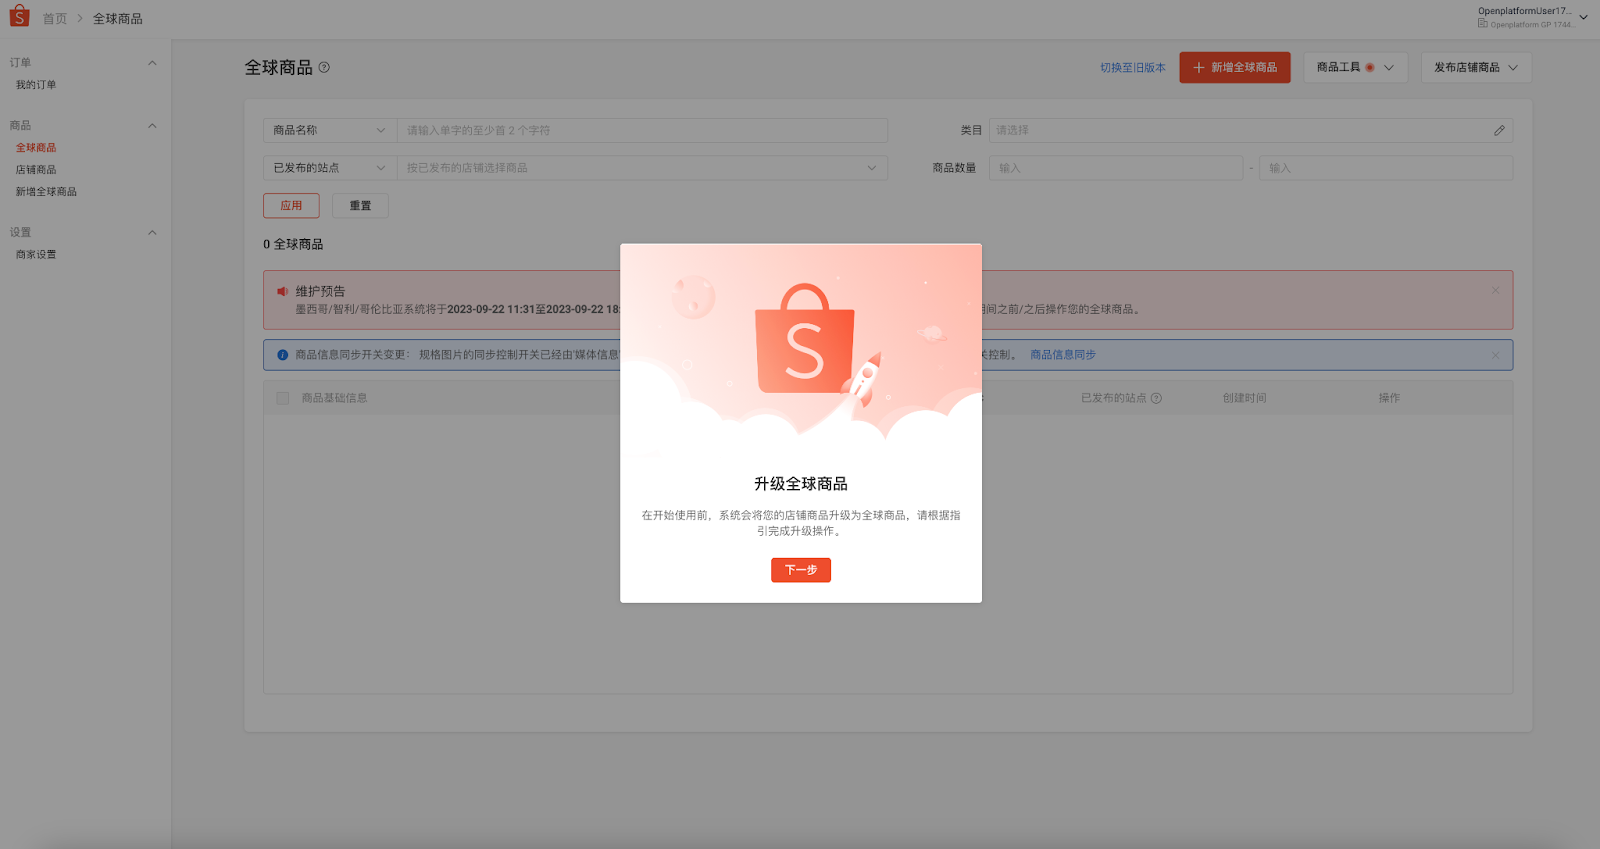
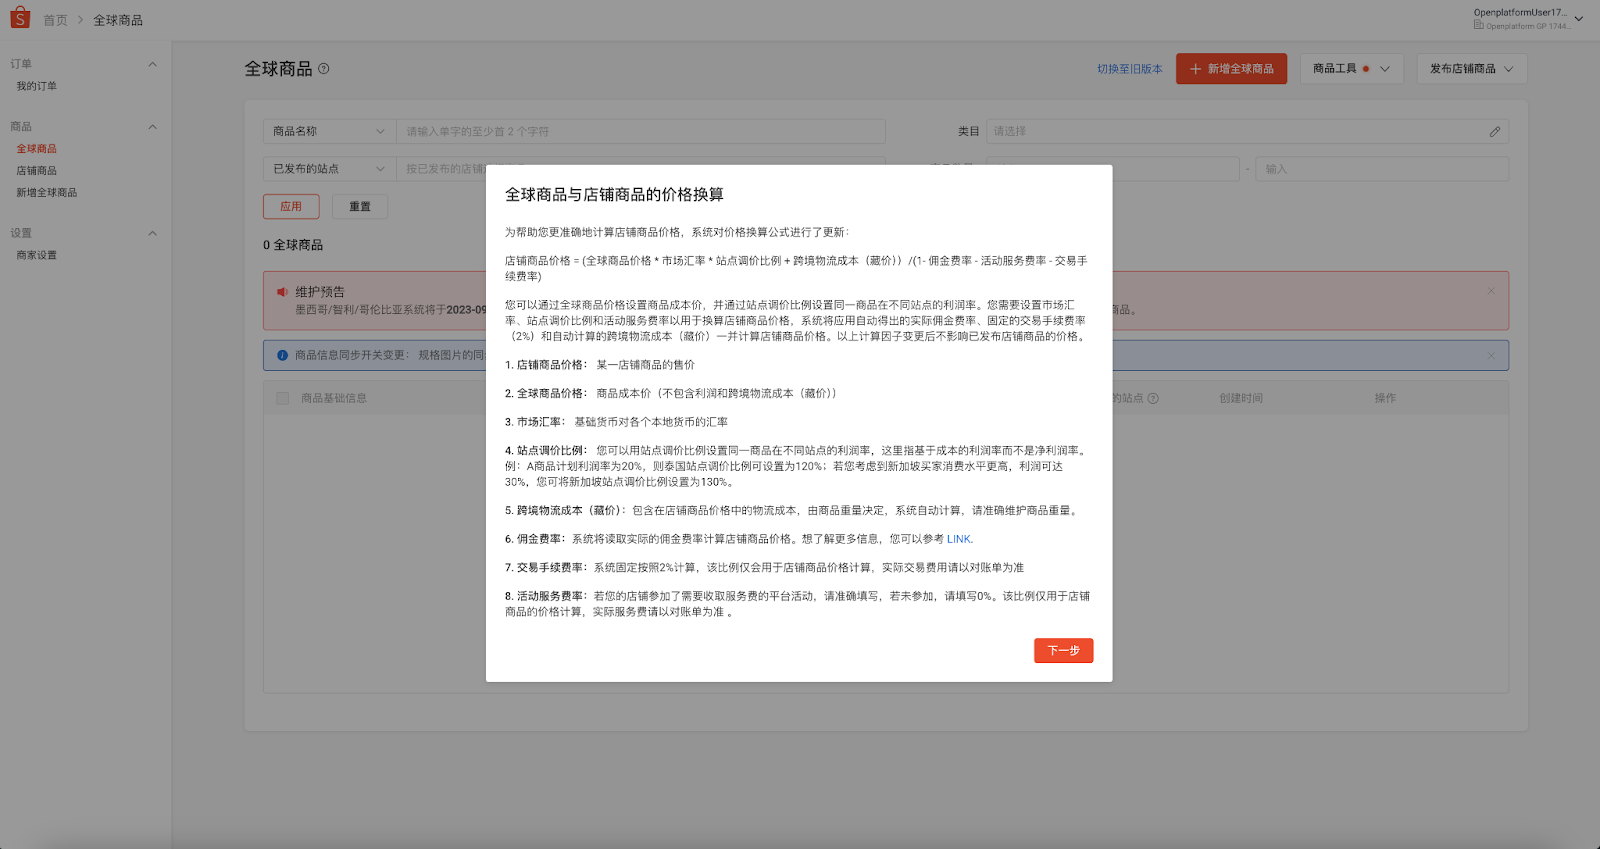
Fill in the site price adjustment ratio, event service rate and other parameters. It can be applied to multiple stores under Main Account through "one batch filling". After filling in, click "Start Upgrading Global Products" to complete the settings:
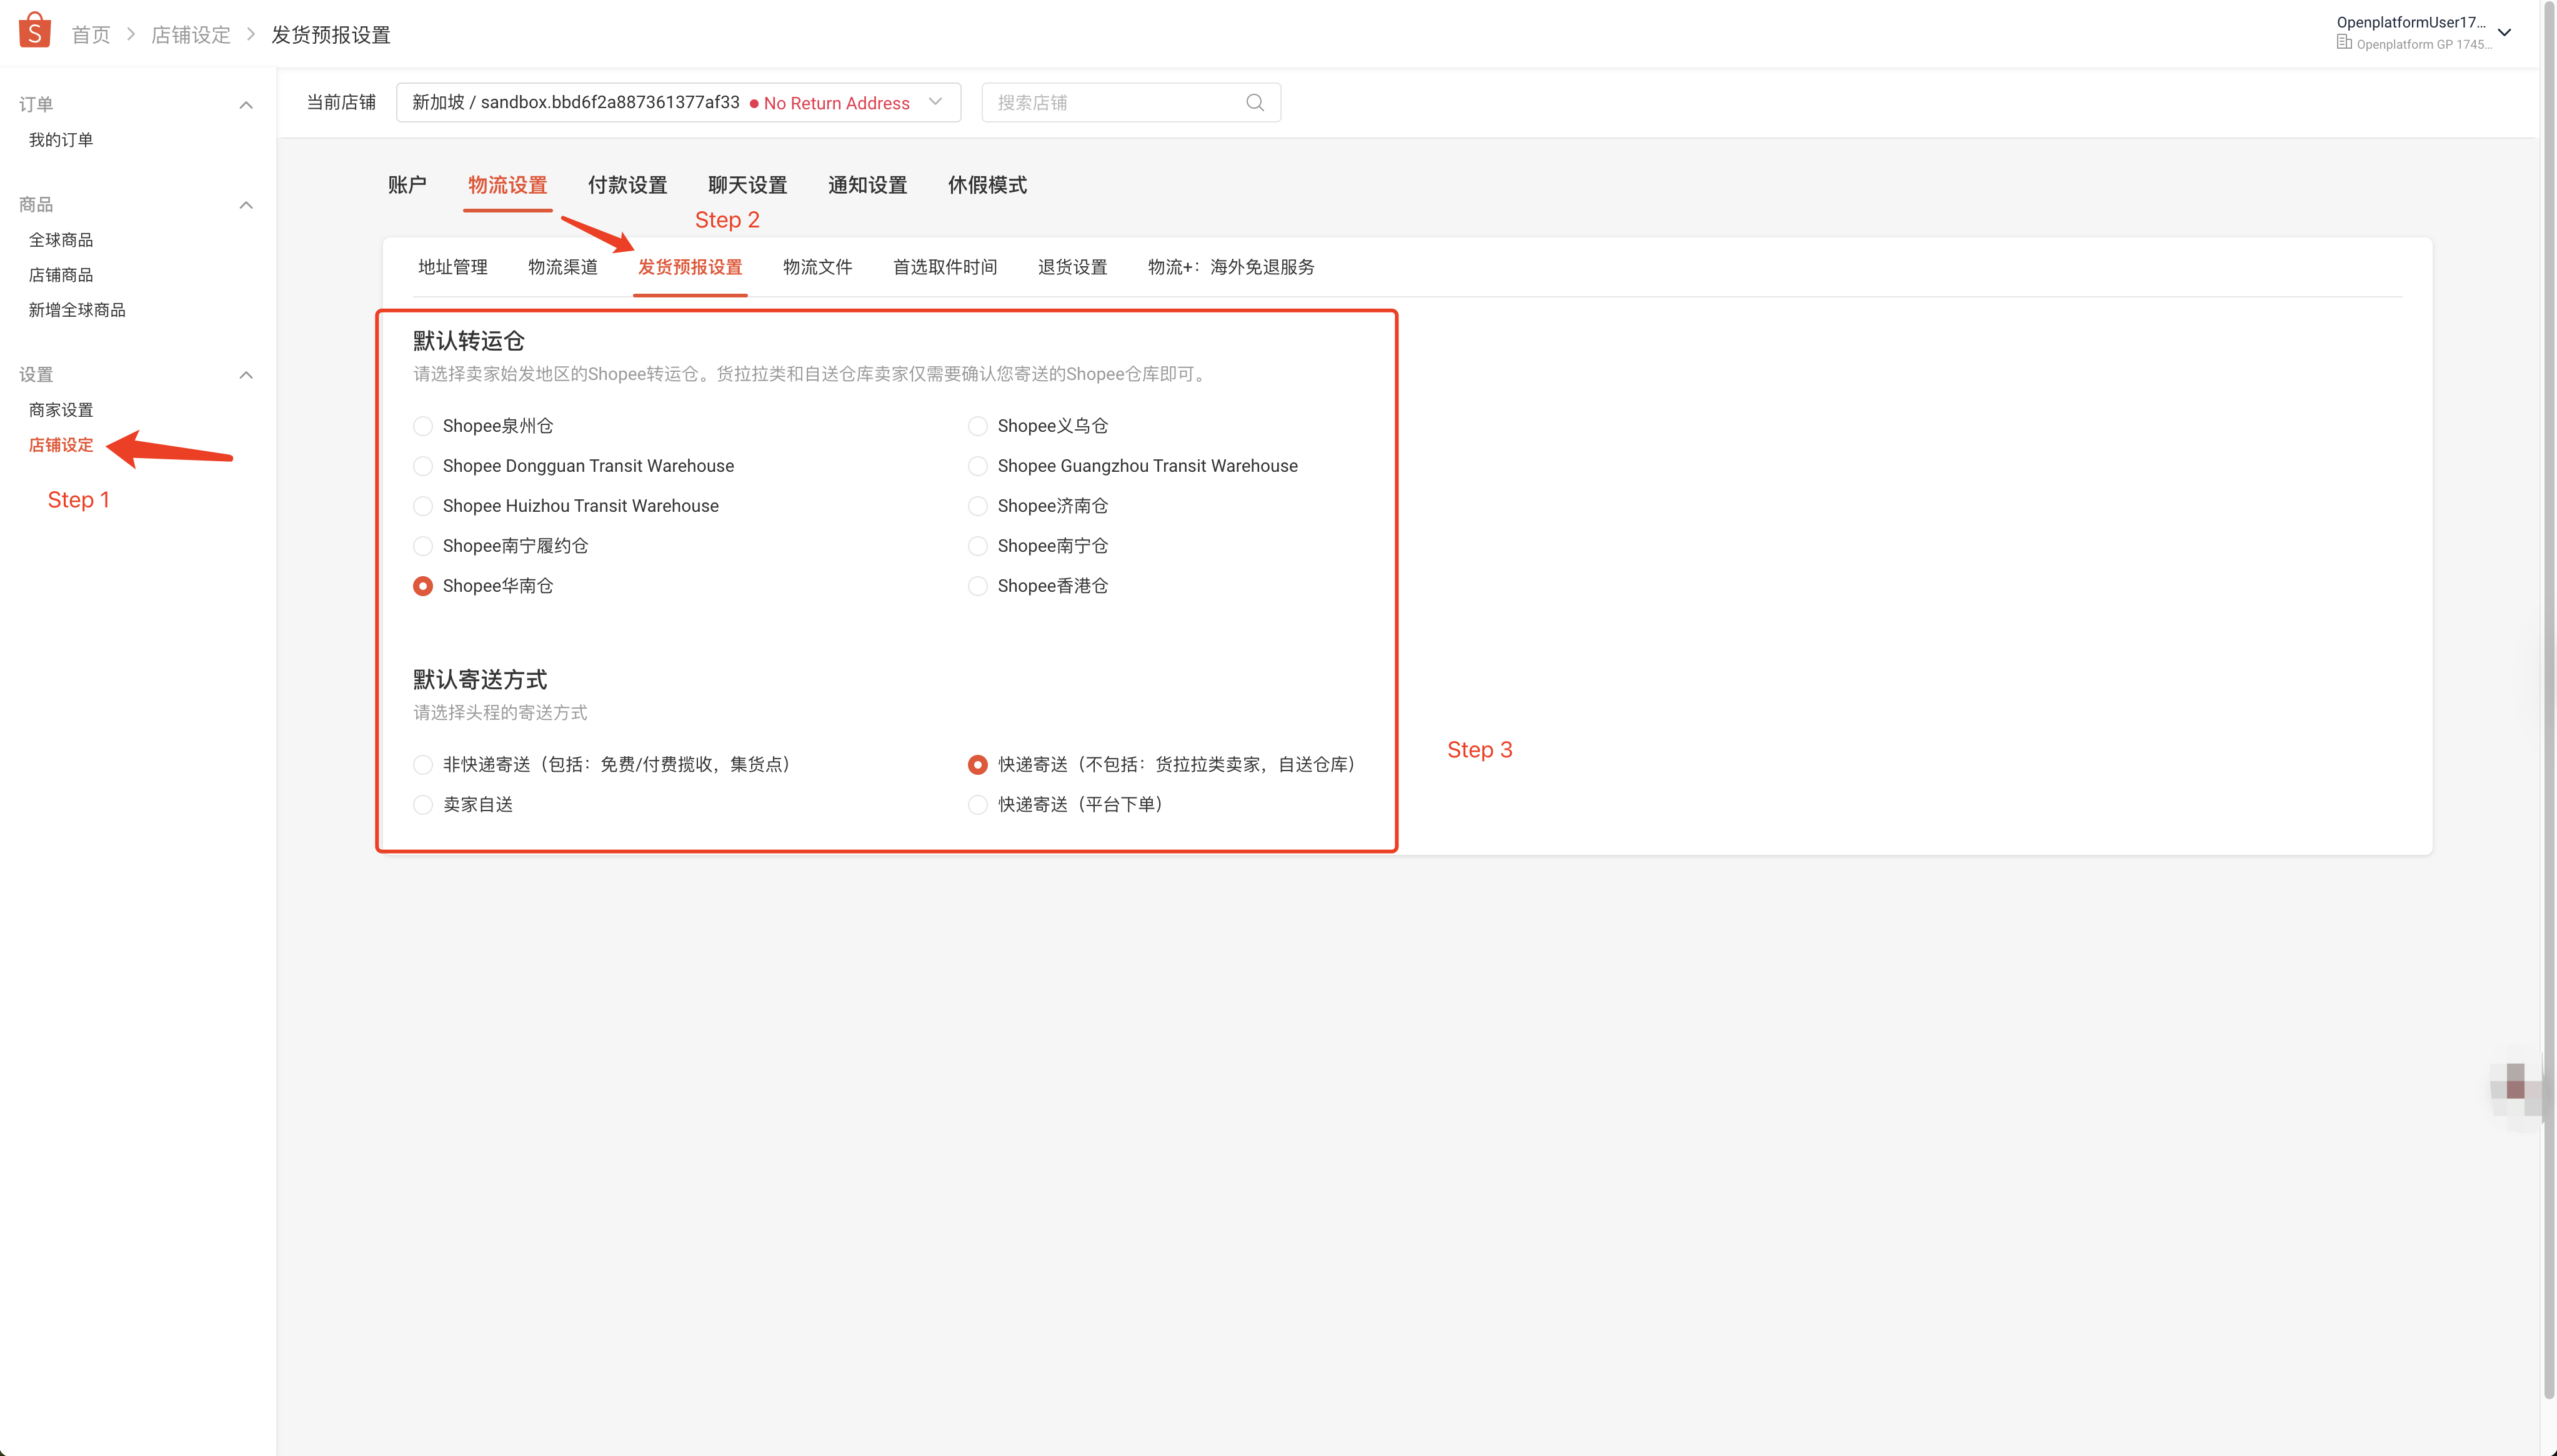
Global Item FM shipment warehouse settings
In Seller center, select Settings>Store Settings>Logistics Settings>Shipping Forecast Settings, and then you can ship your products according to the standard process after the settings are completed.
3.2.2 Add global products
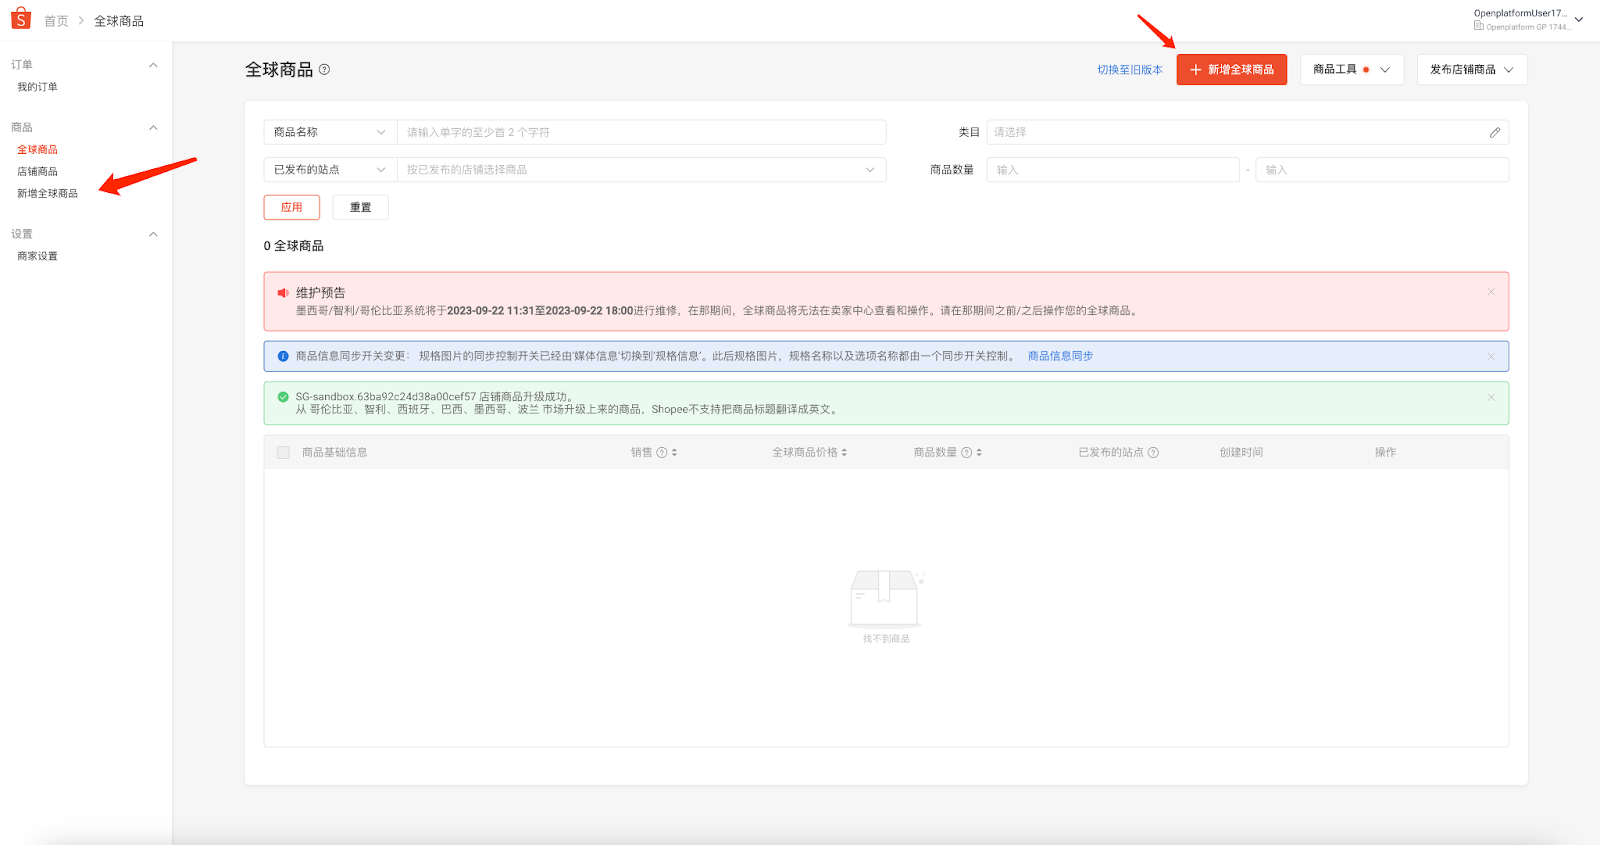
3.2.2.1 Click Add Global Product in the sidebar or click Add Global Product on the Global Product Page
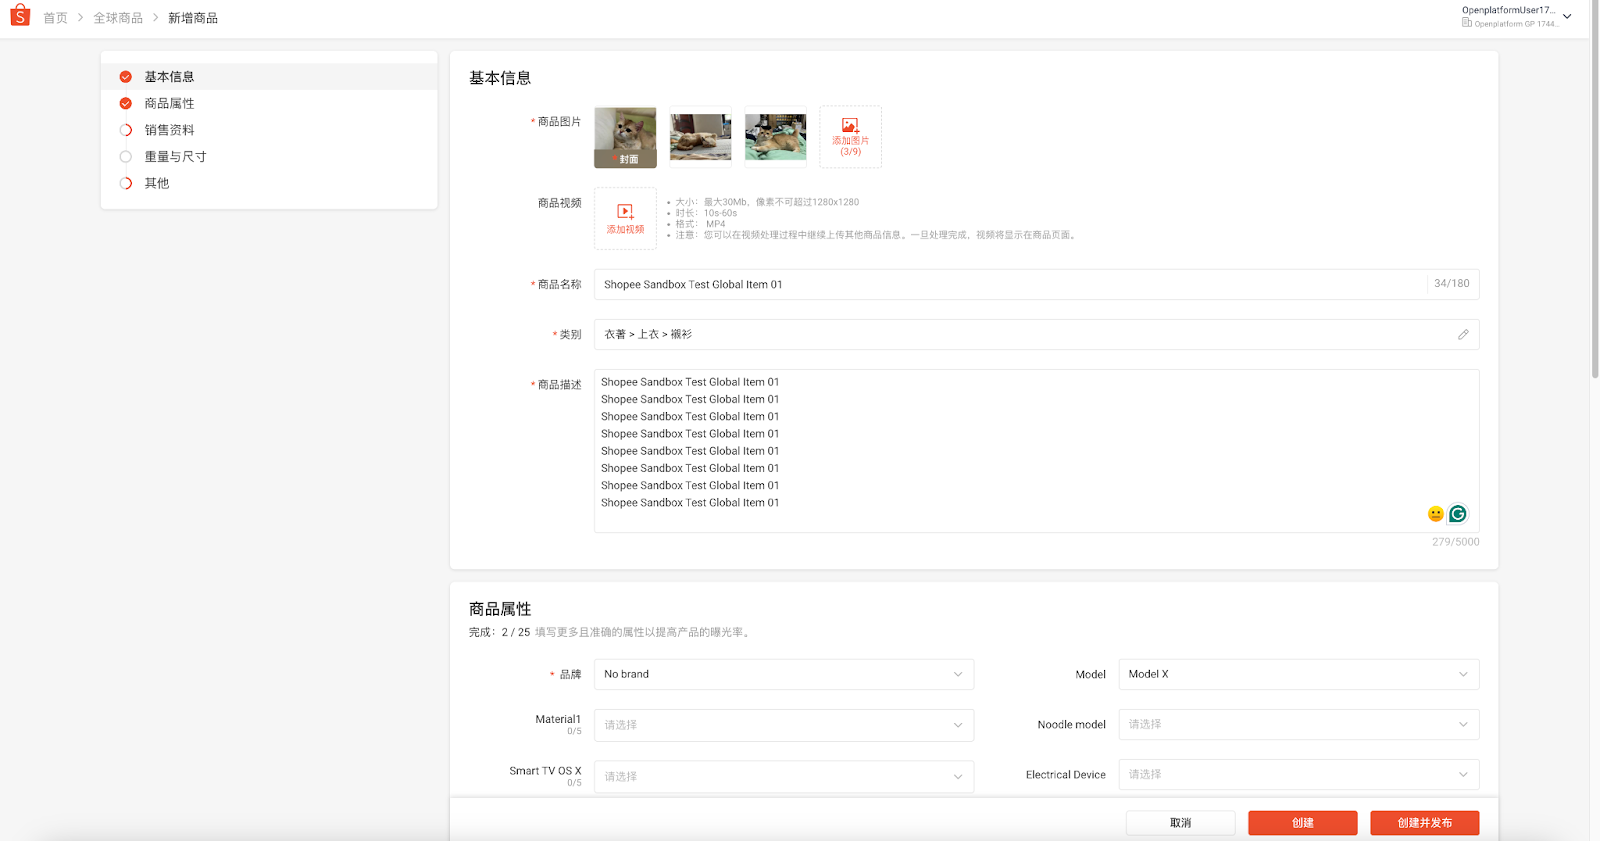
3.2.2.2 Add global product details (please fill in and select each attribute according to your needs:Create global products)
3.2.3 Global products and store products
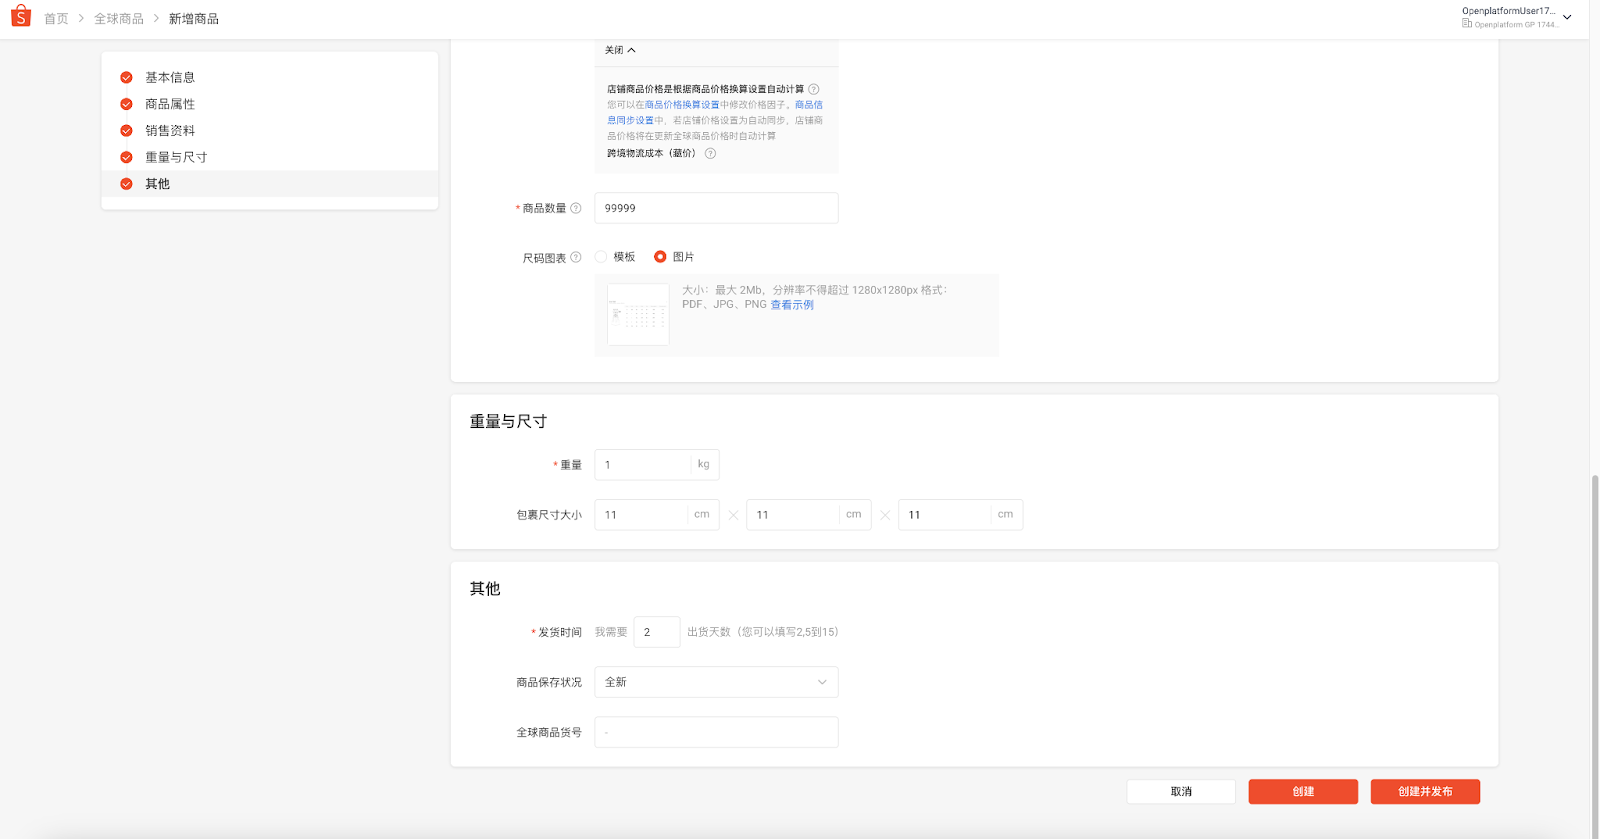
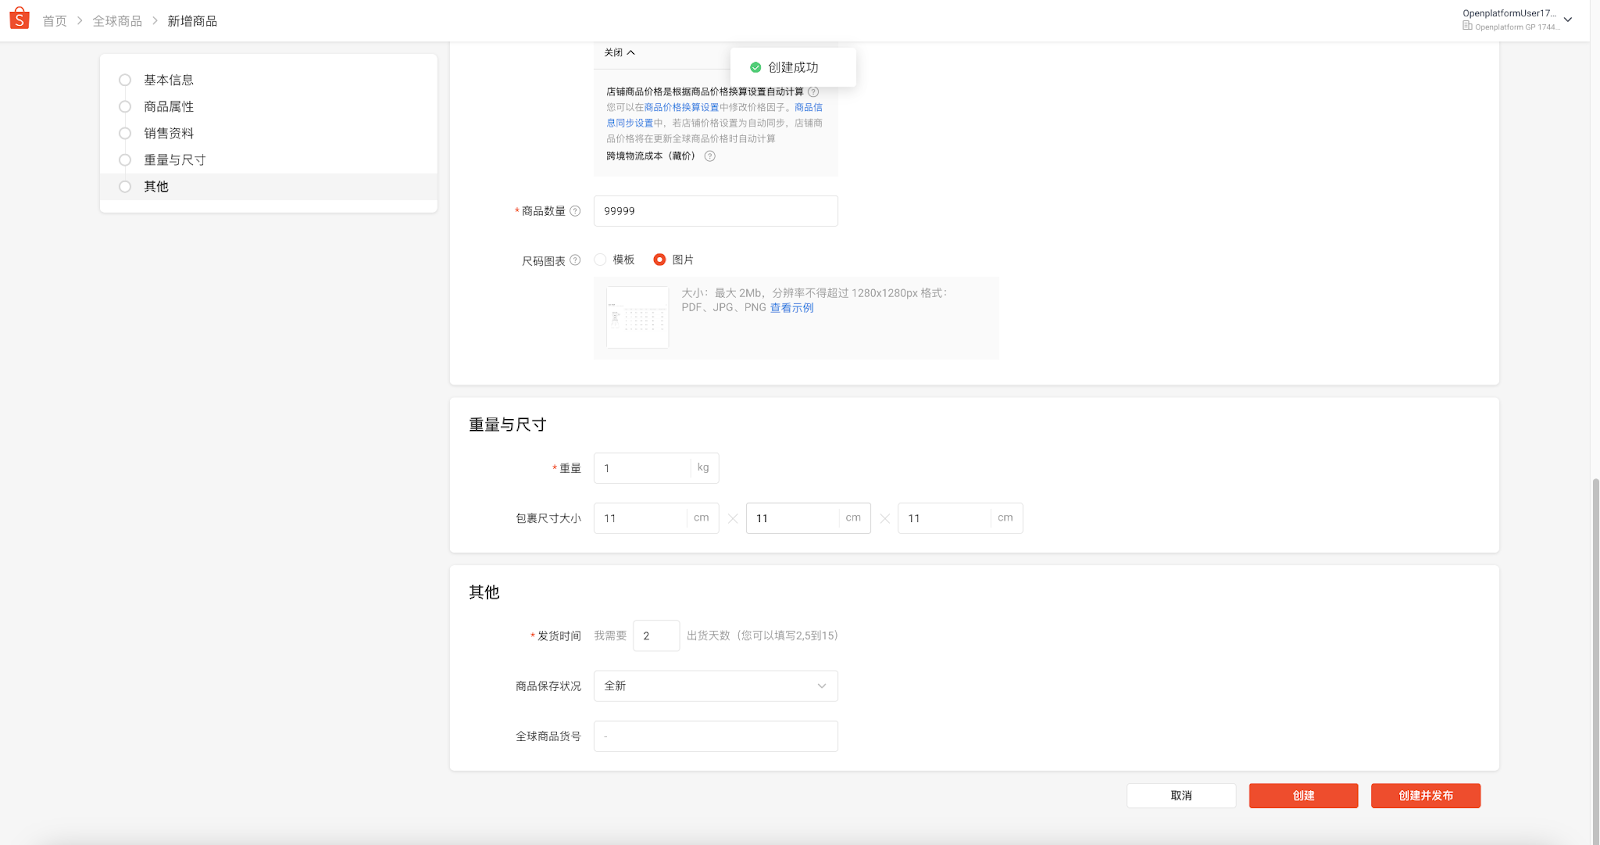
3.2.3.1 Add and publish global products
Click Save and Publish
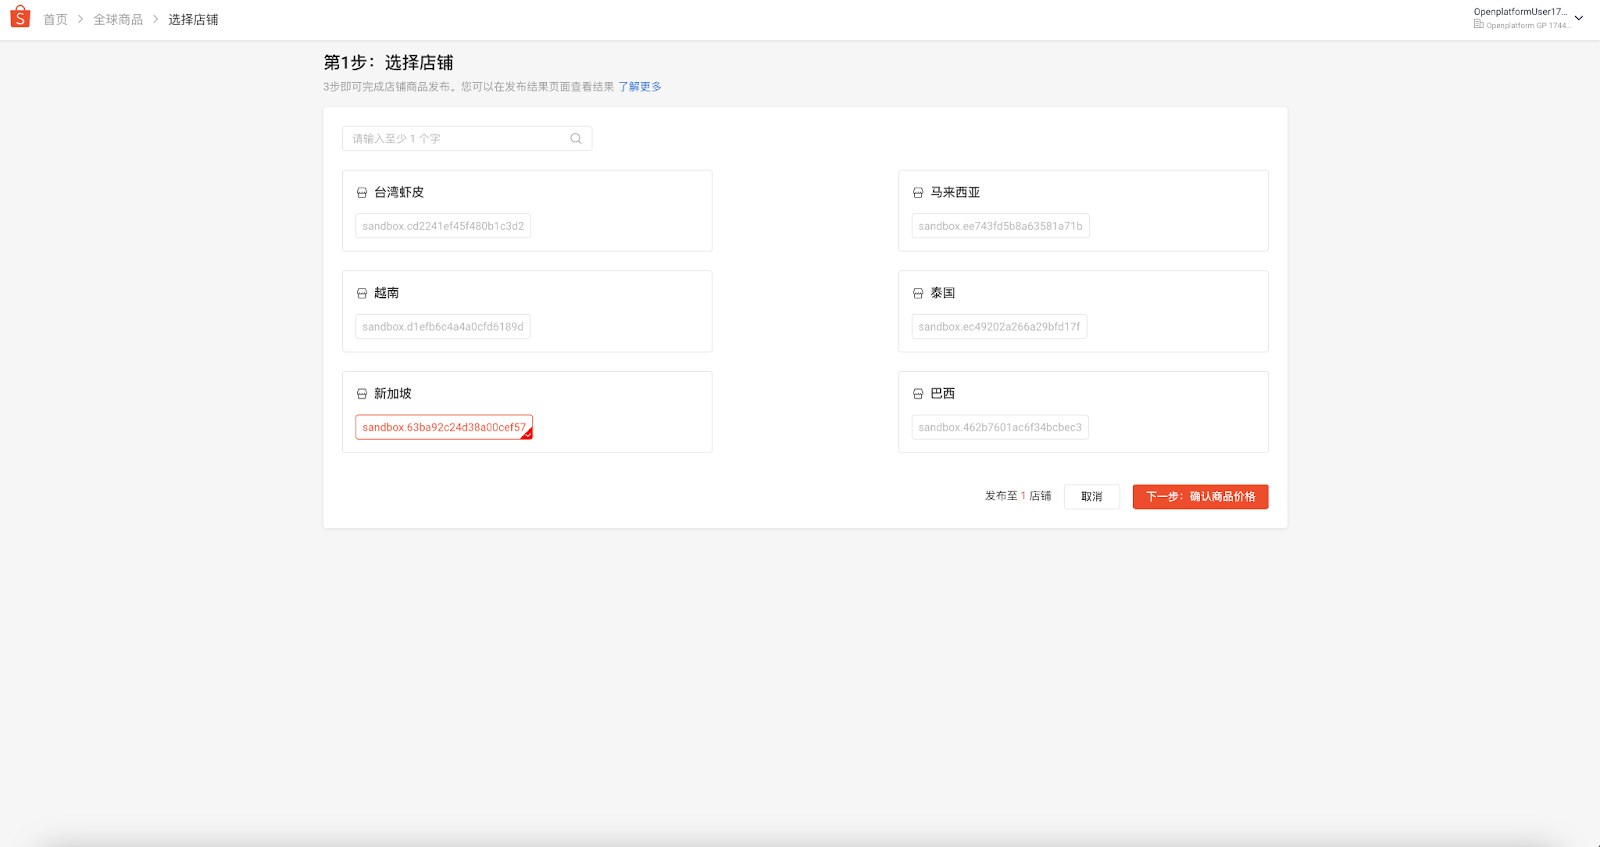
3.2.3.2 Select publishing store
a. The picture below shows a store selected from the Singapore site (due to region restrictions, shop sites that cannot be published will be grayed out. Please select the appropriate global product information as needed)
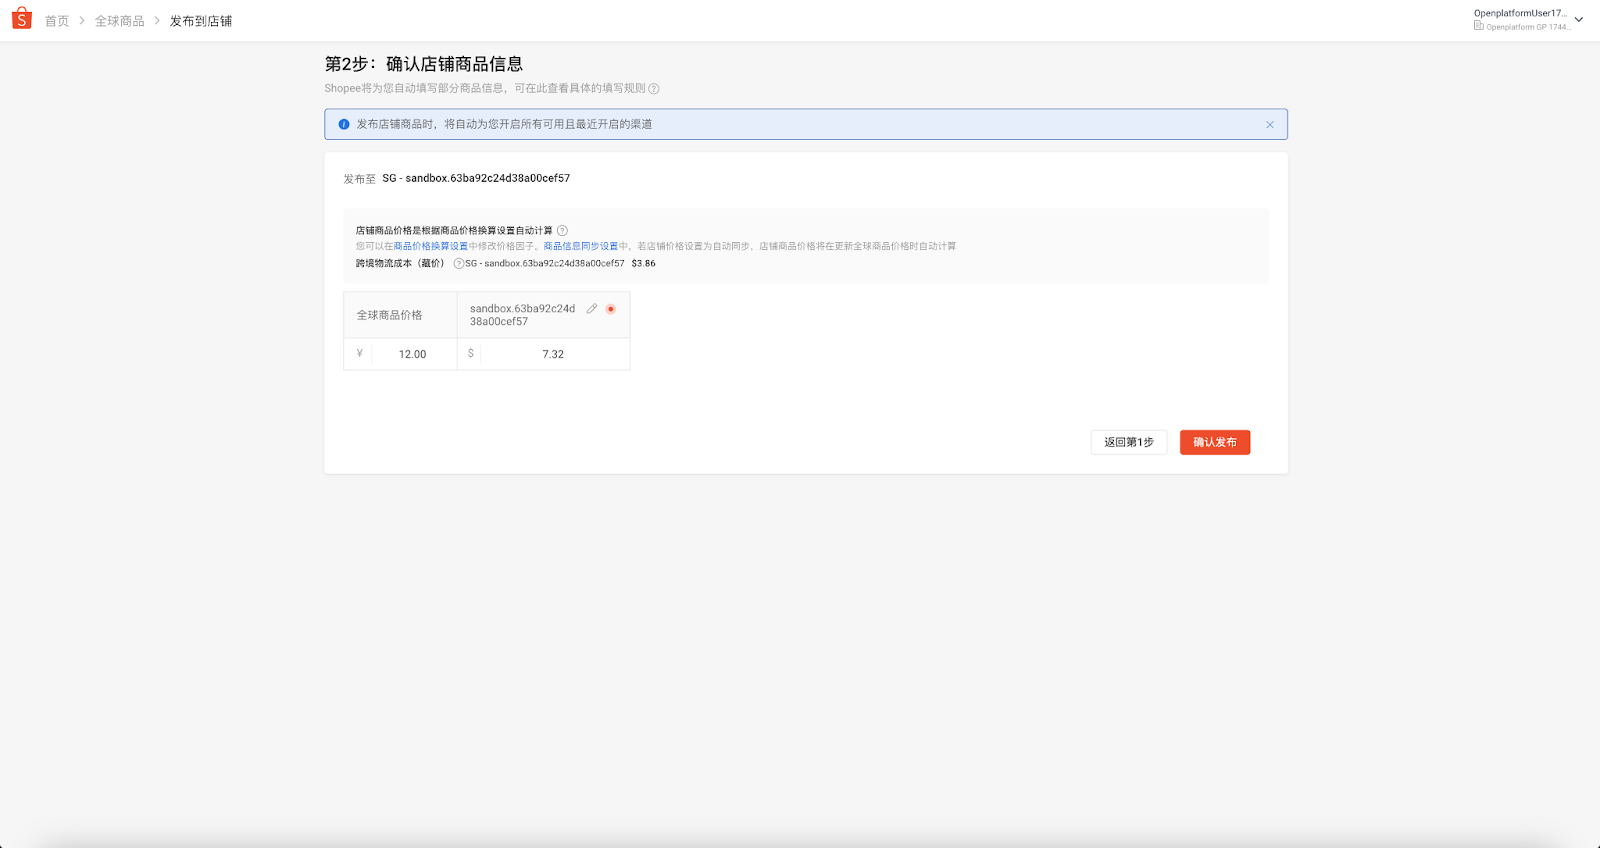
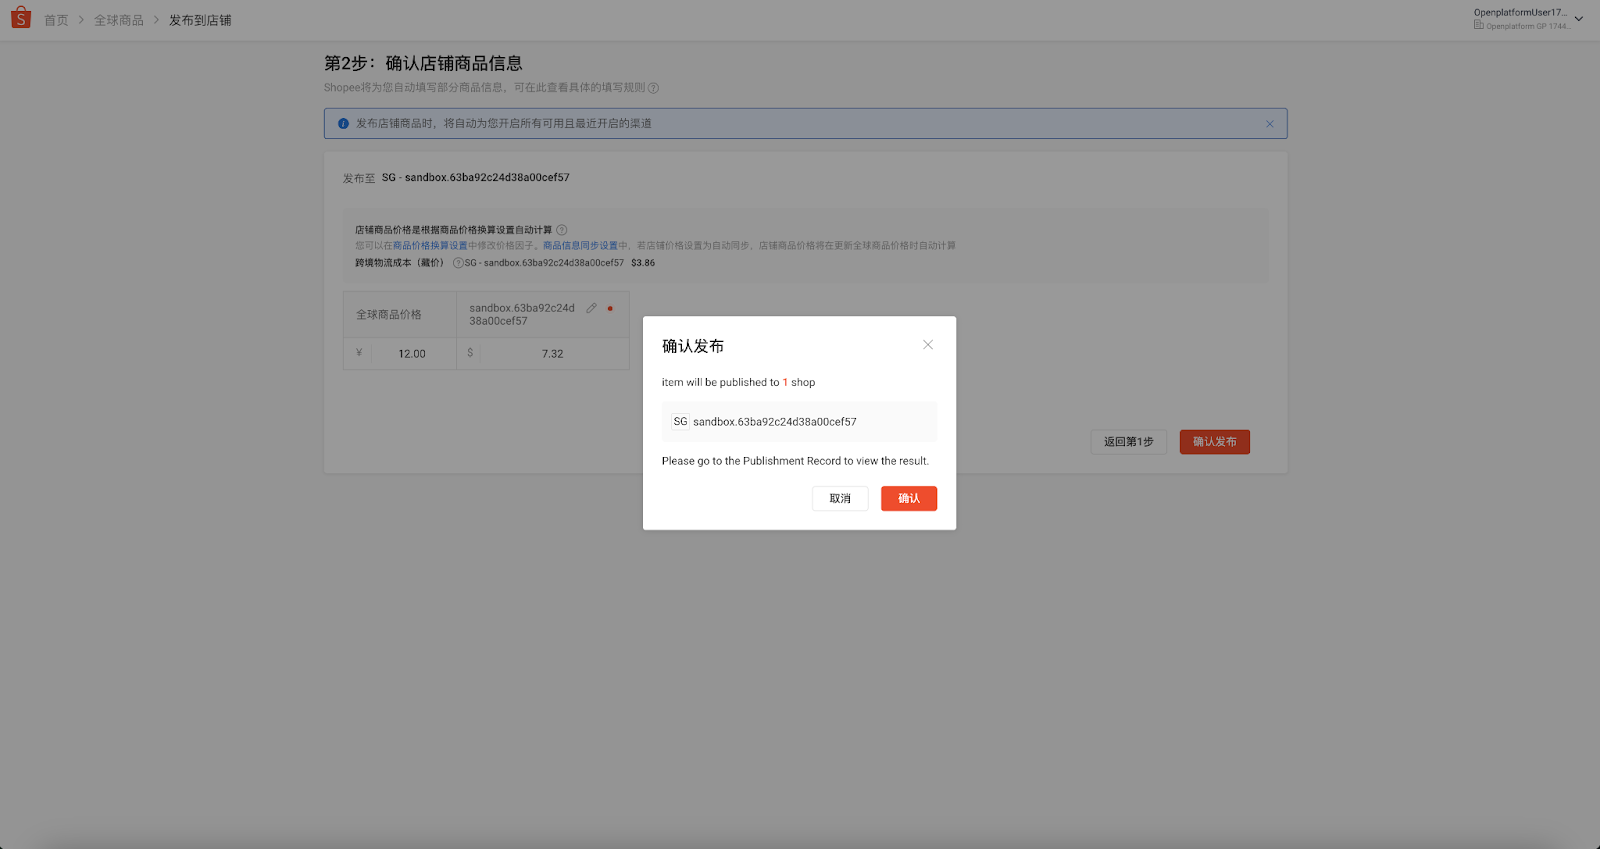
b. Confirm the store product information and click Confirm to publish if it is correct.
c.
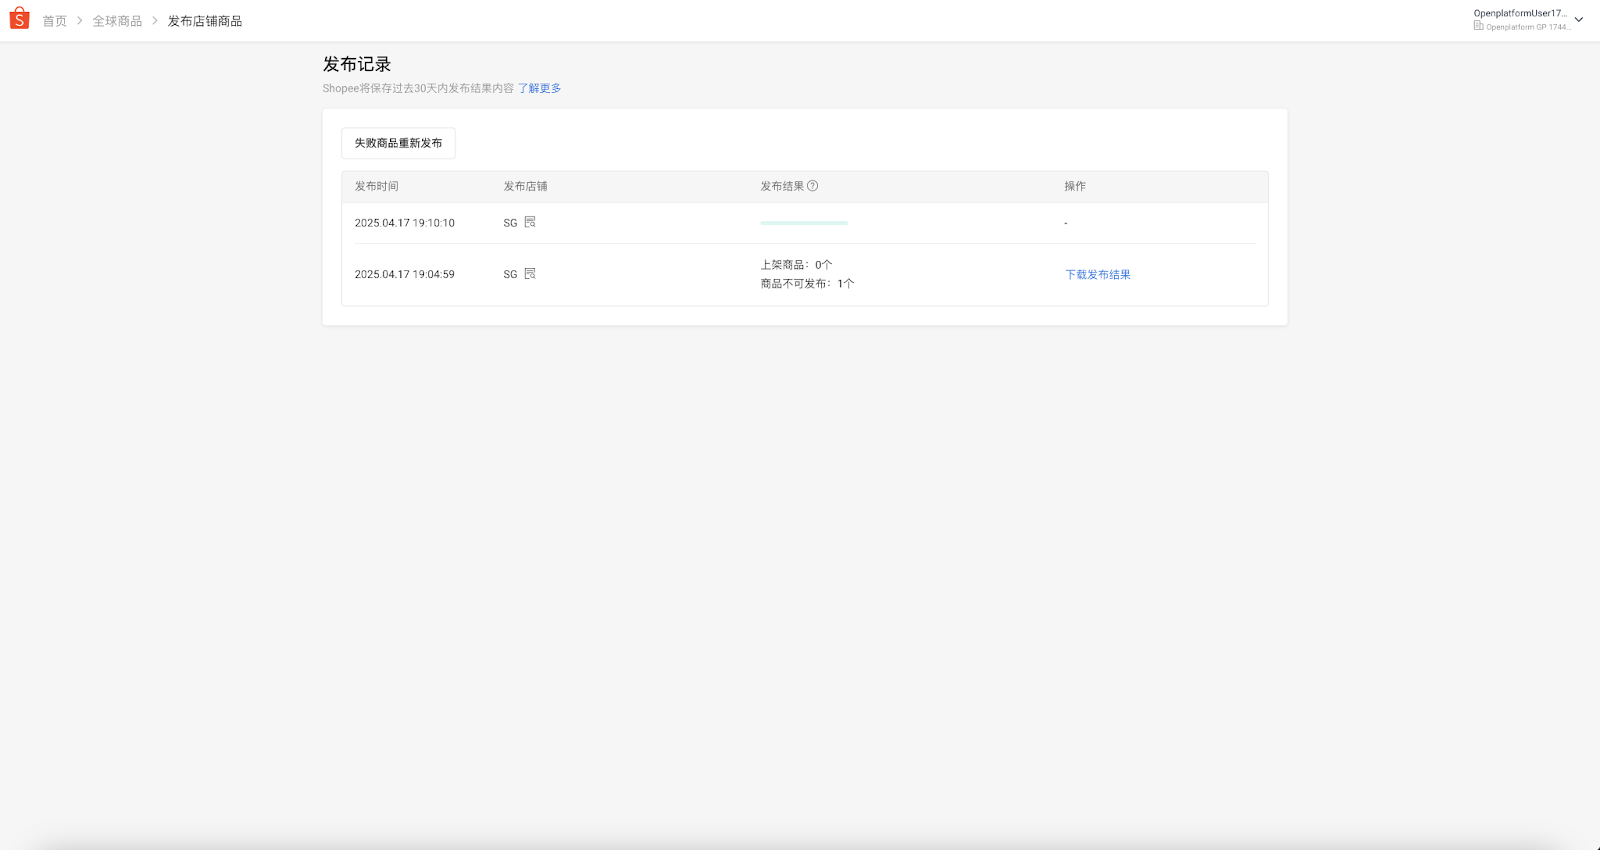
d. Select the store product to view the released product.
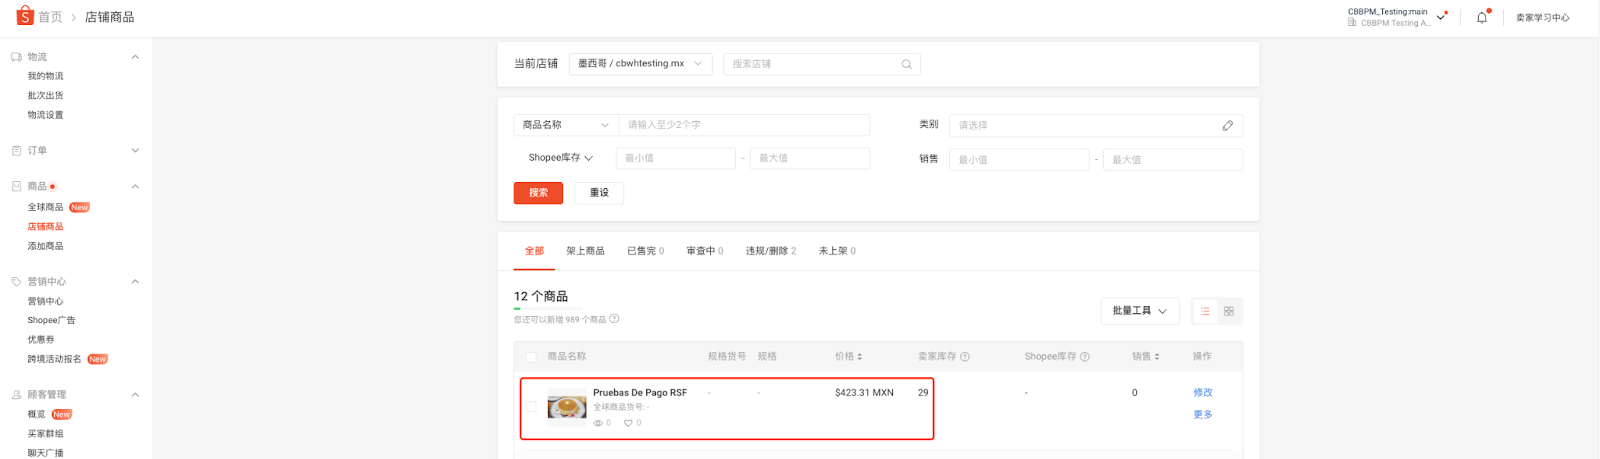
e. Select to modify the inventory, price and other attributes of the item that can be updated (MPSKU)
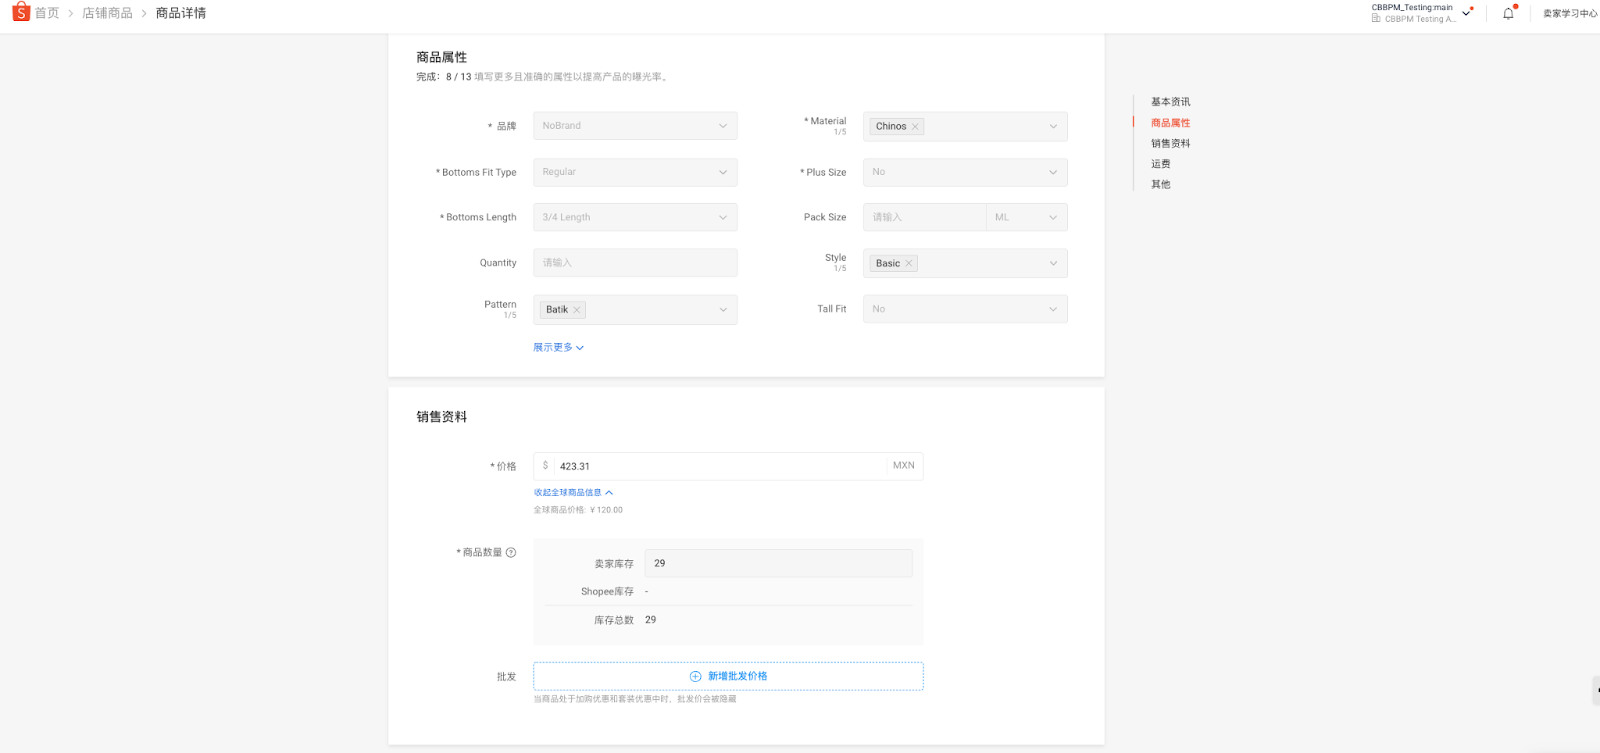
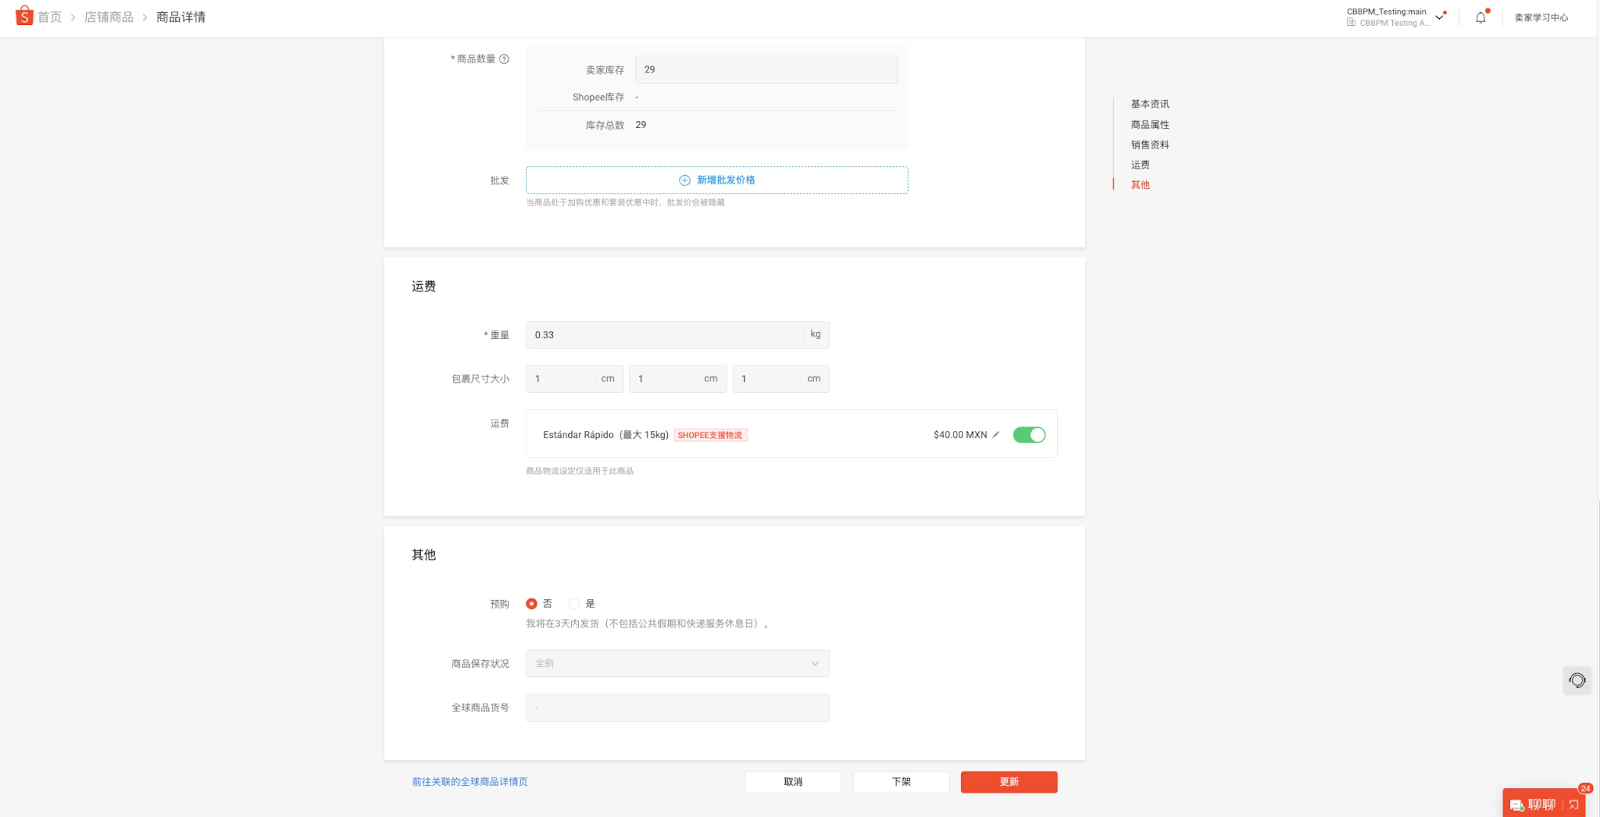
3.2.3.3 MTSKU and MPSKU
Global product (MTSKU): MTSKU is equivalent to a parent product, a virtual product, which can be published to multiple regions and generate multiple product MPSKUs.
Store item (MPSKU): item=store item. Real item visible to buyers.
Note: MPSKUs will directly inherit the basic information of MTSKUs. The inventory information of MPSKUs and MTSKUs in multiple regions is the same. Sellers no longer need to manage some basic information of the same product in multiple regions. Sellers only need to modify the basic information of MTSKU, and the system can automatically modify all published MPSKUs simultaneously.
3.2.5 Shipment of global orders
a. The order creation procedure is the same as Local Shop, you can refer to 3.1.3 Creating Test Orders and 3.1.4 Viewing Created Orders.
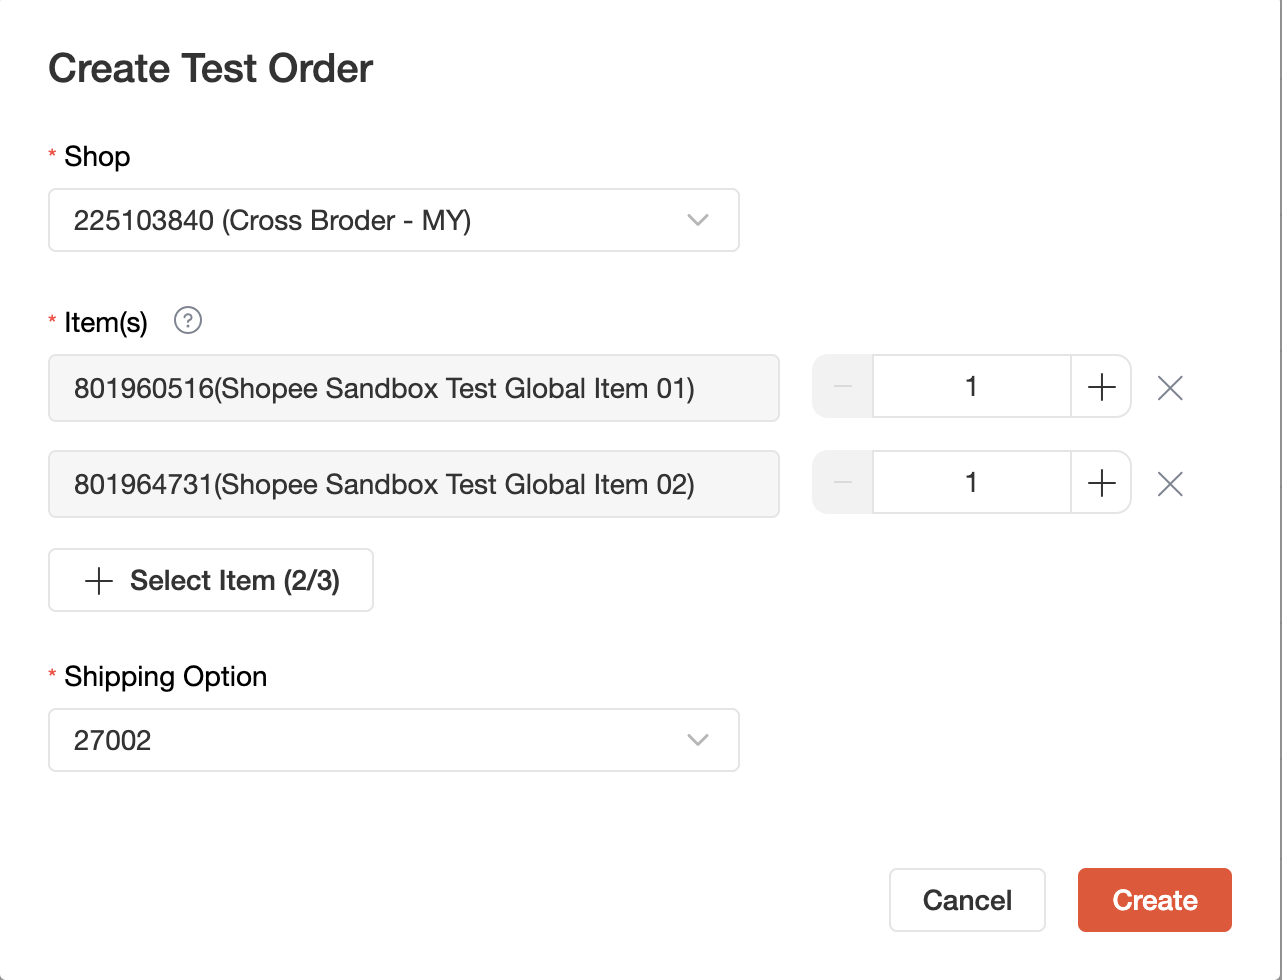
b. After the order creation step is completed, find your test account under Test Account-Sandbox v2> China Merchant and CB Shops and press the button "Login Seller Center".
After successfully logging in, go to the "My Order" page and select the site and shop for the order you created.
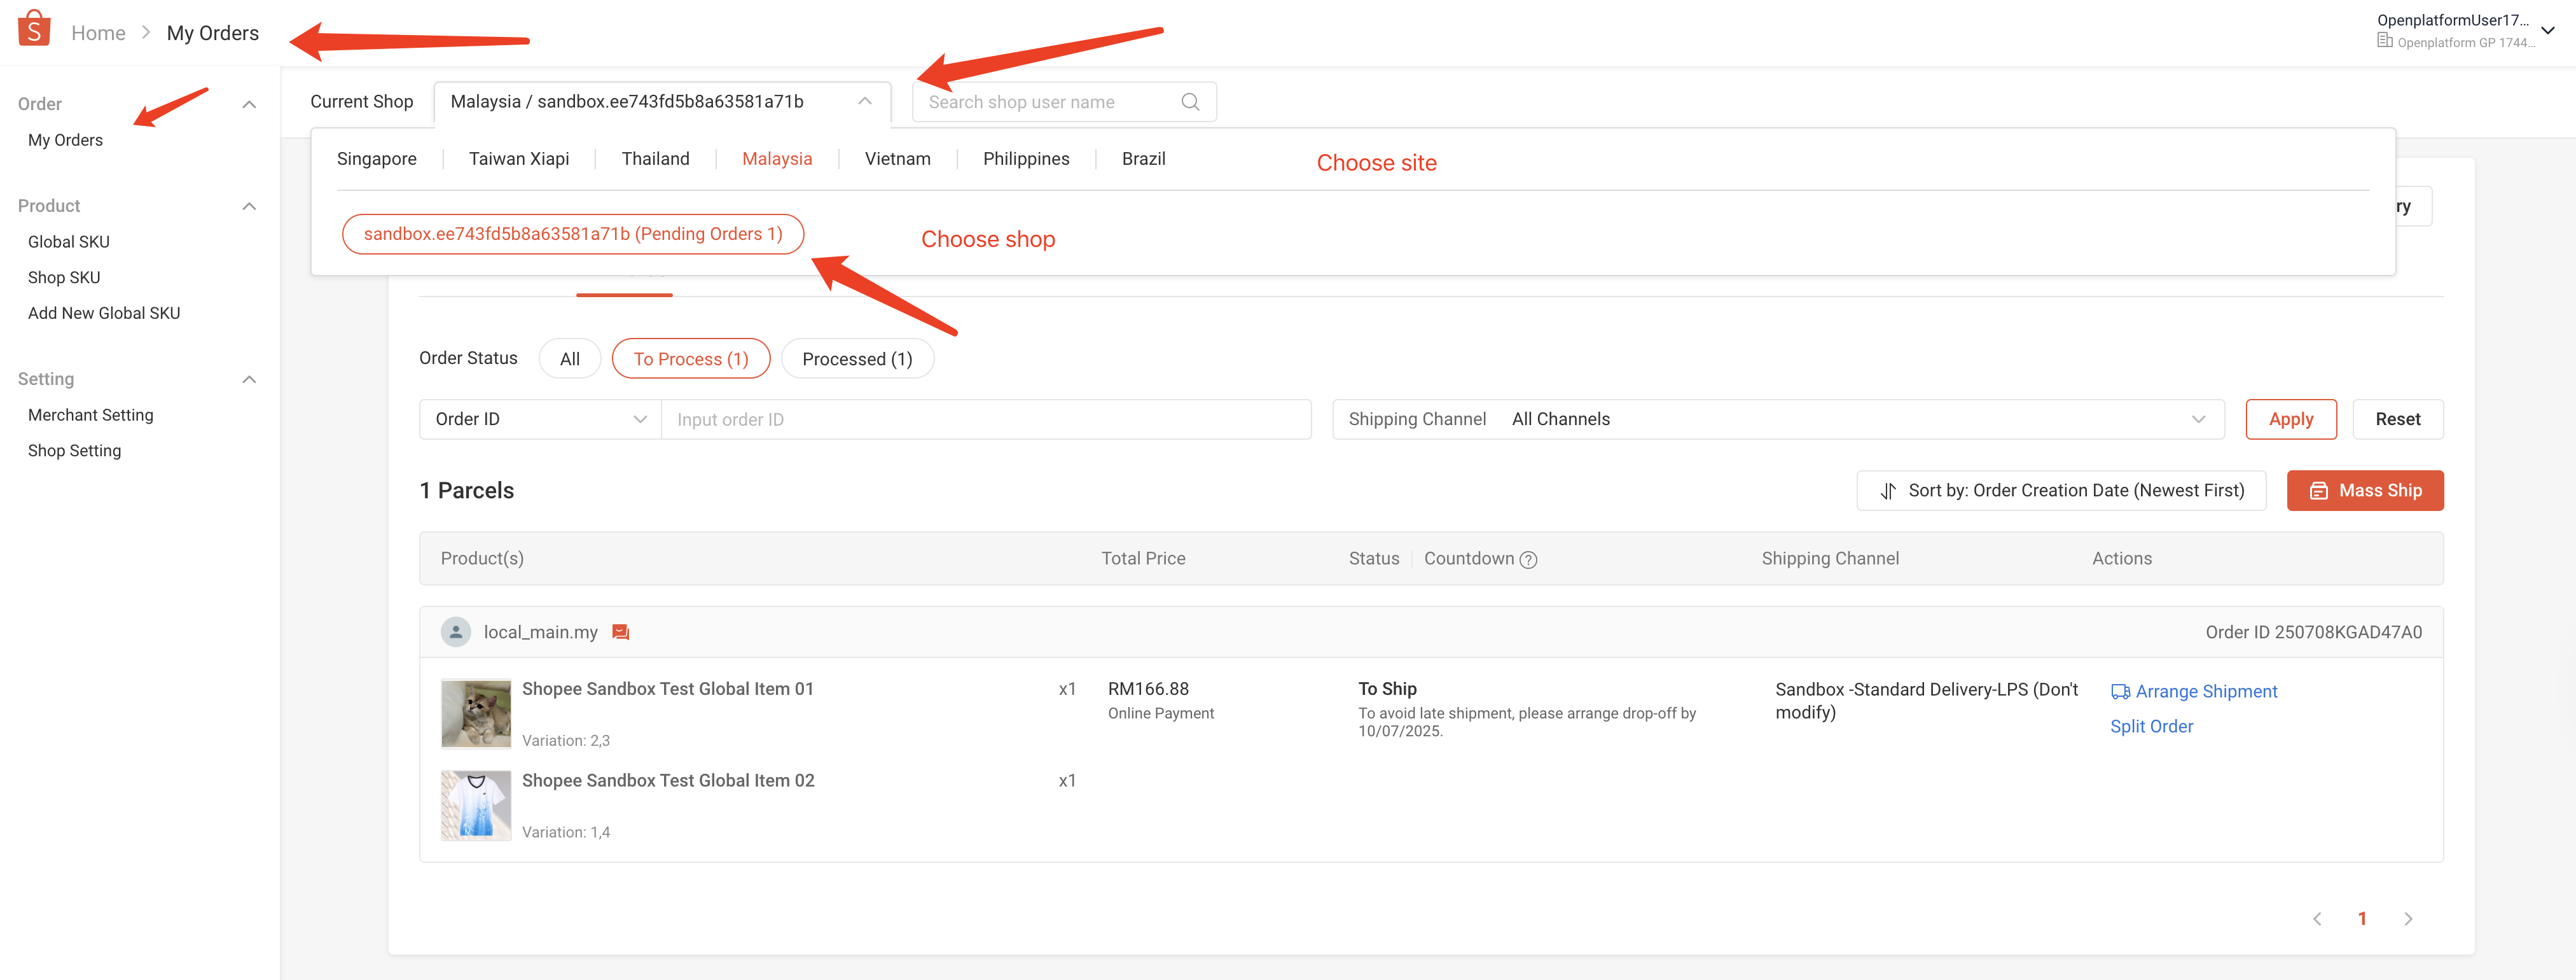
c. After switching to the corresponding shop, you can see the corresponding order, the order status flow to "To Ship" can be operated after the shipment (before shipment, please make sure that the first kilometer of the global goods shipment warehouse setup is complete).
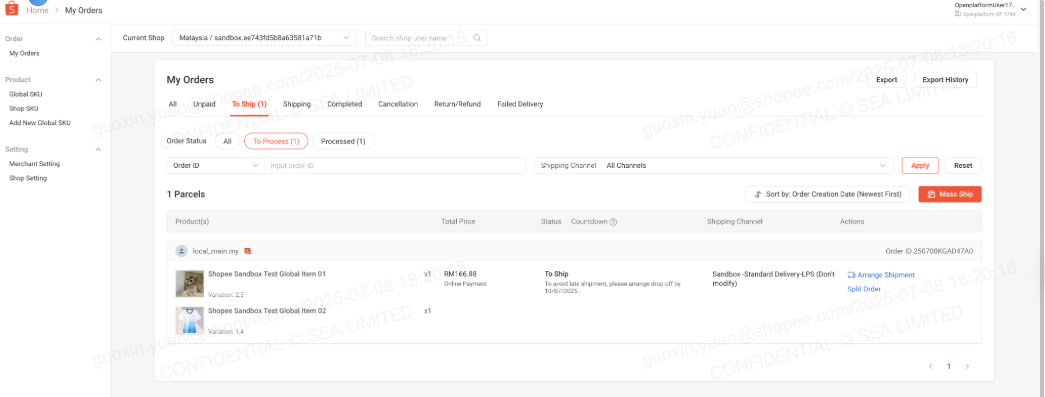
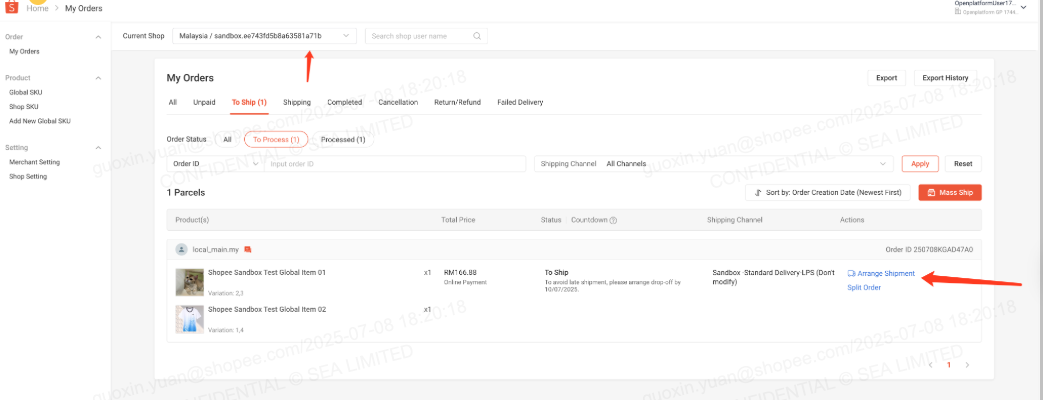
d. Select your order and click "Arrange Shipment".
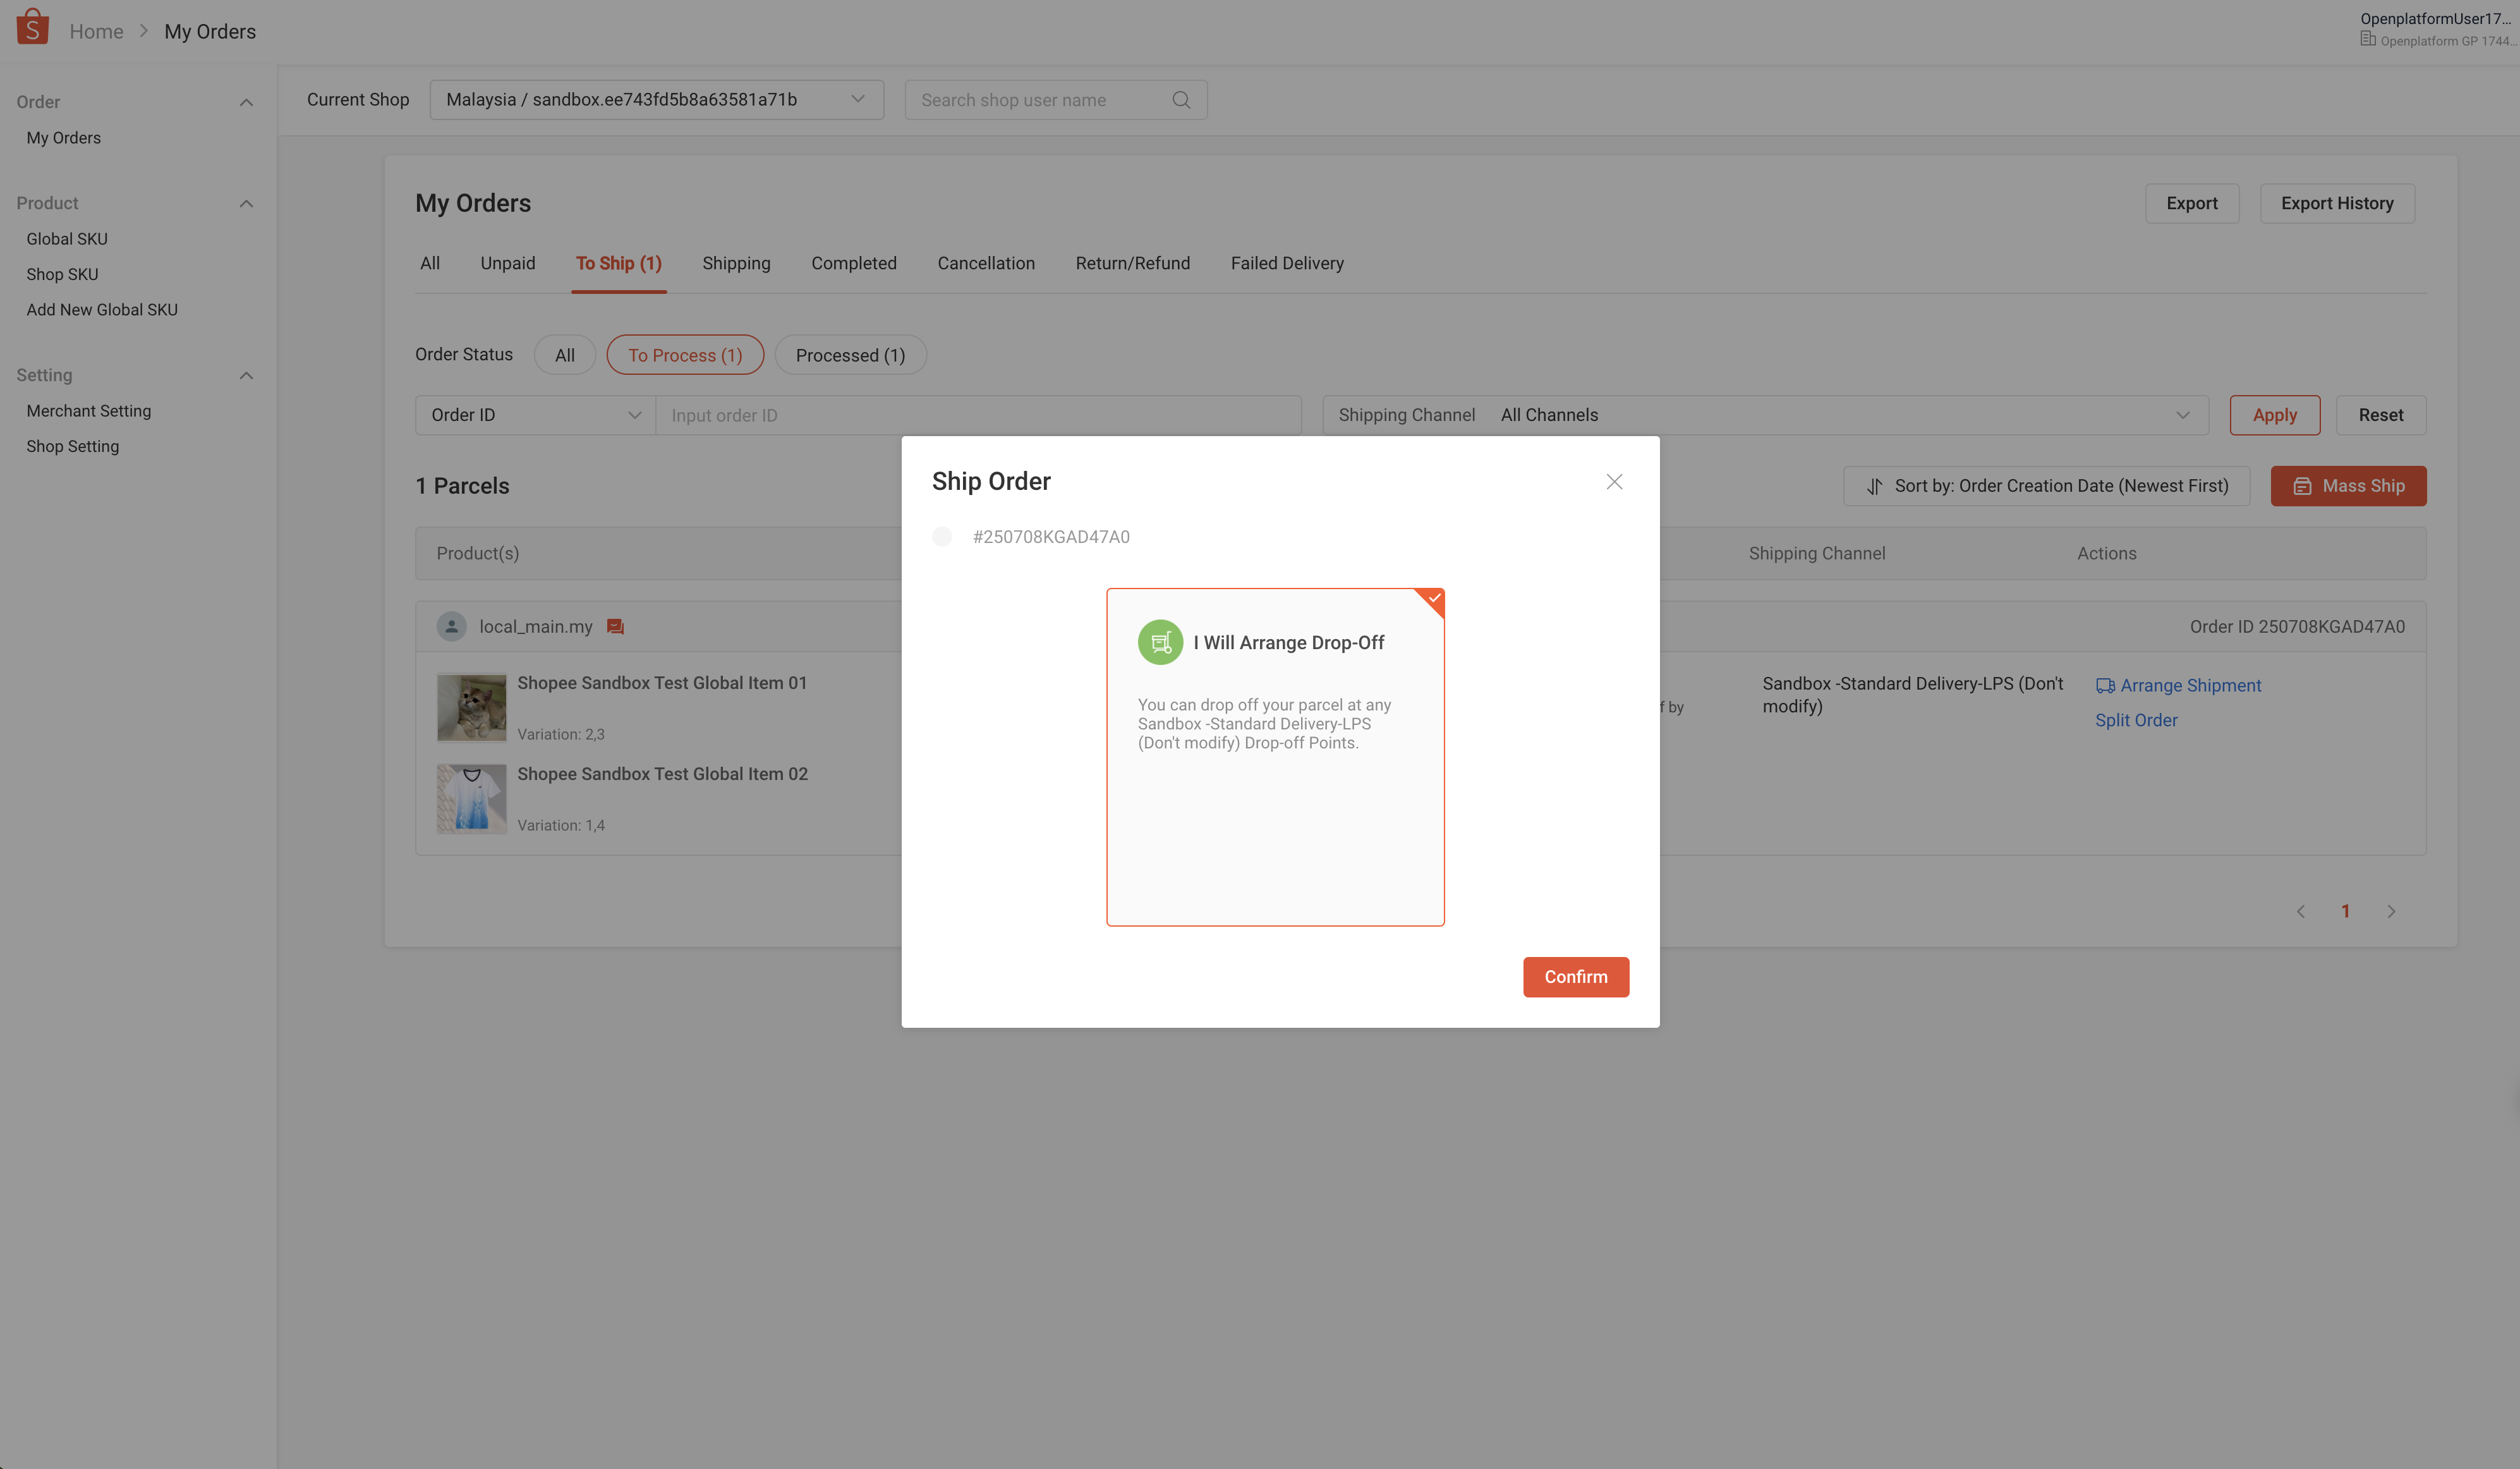
e. Select your order, click "Arrange Shipment", select the Drop-off method, and click "Confirm" to ship your order. (CB channel only supports Drop-off method at this time)
f. After shipment, the order generates a TN as well as an AWB, which the developer can obtain as appropriate (currently only the API is supported for obtaining the AWB).
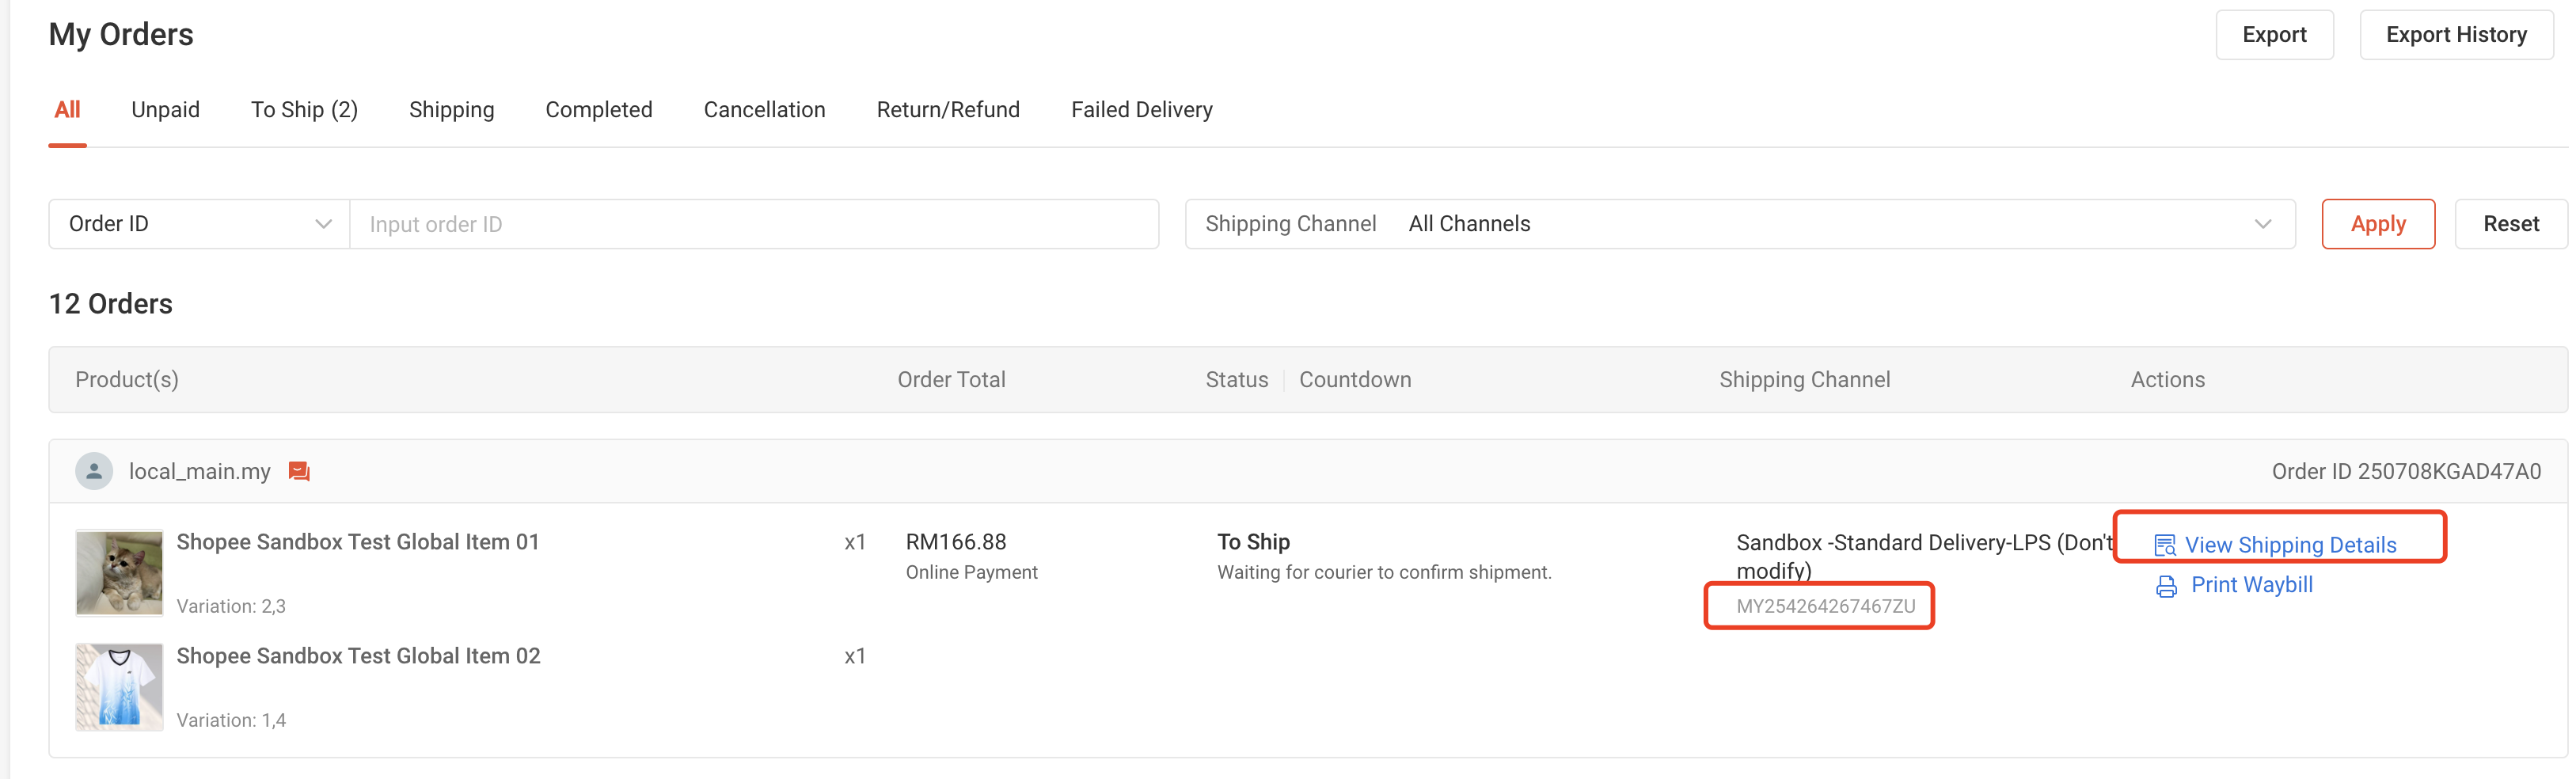
g. Finally, return to the Test Order page and complete the simulation by clicking "Pickup" and "Deliver" to complete the subsequent fulfillment.
After clicking "Pickup", the order will flow to "SHIPPED" status.
After clicking "Deliver", the order will flow to "TO_CONFIRM_RECEIVE" status.
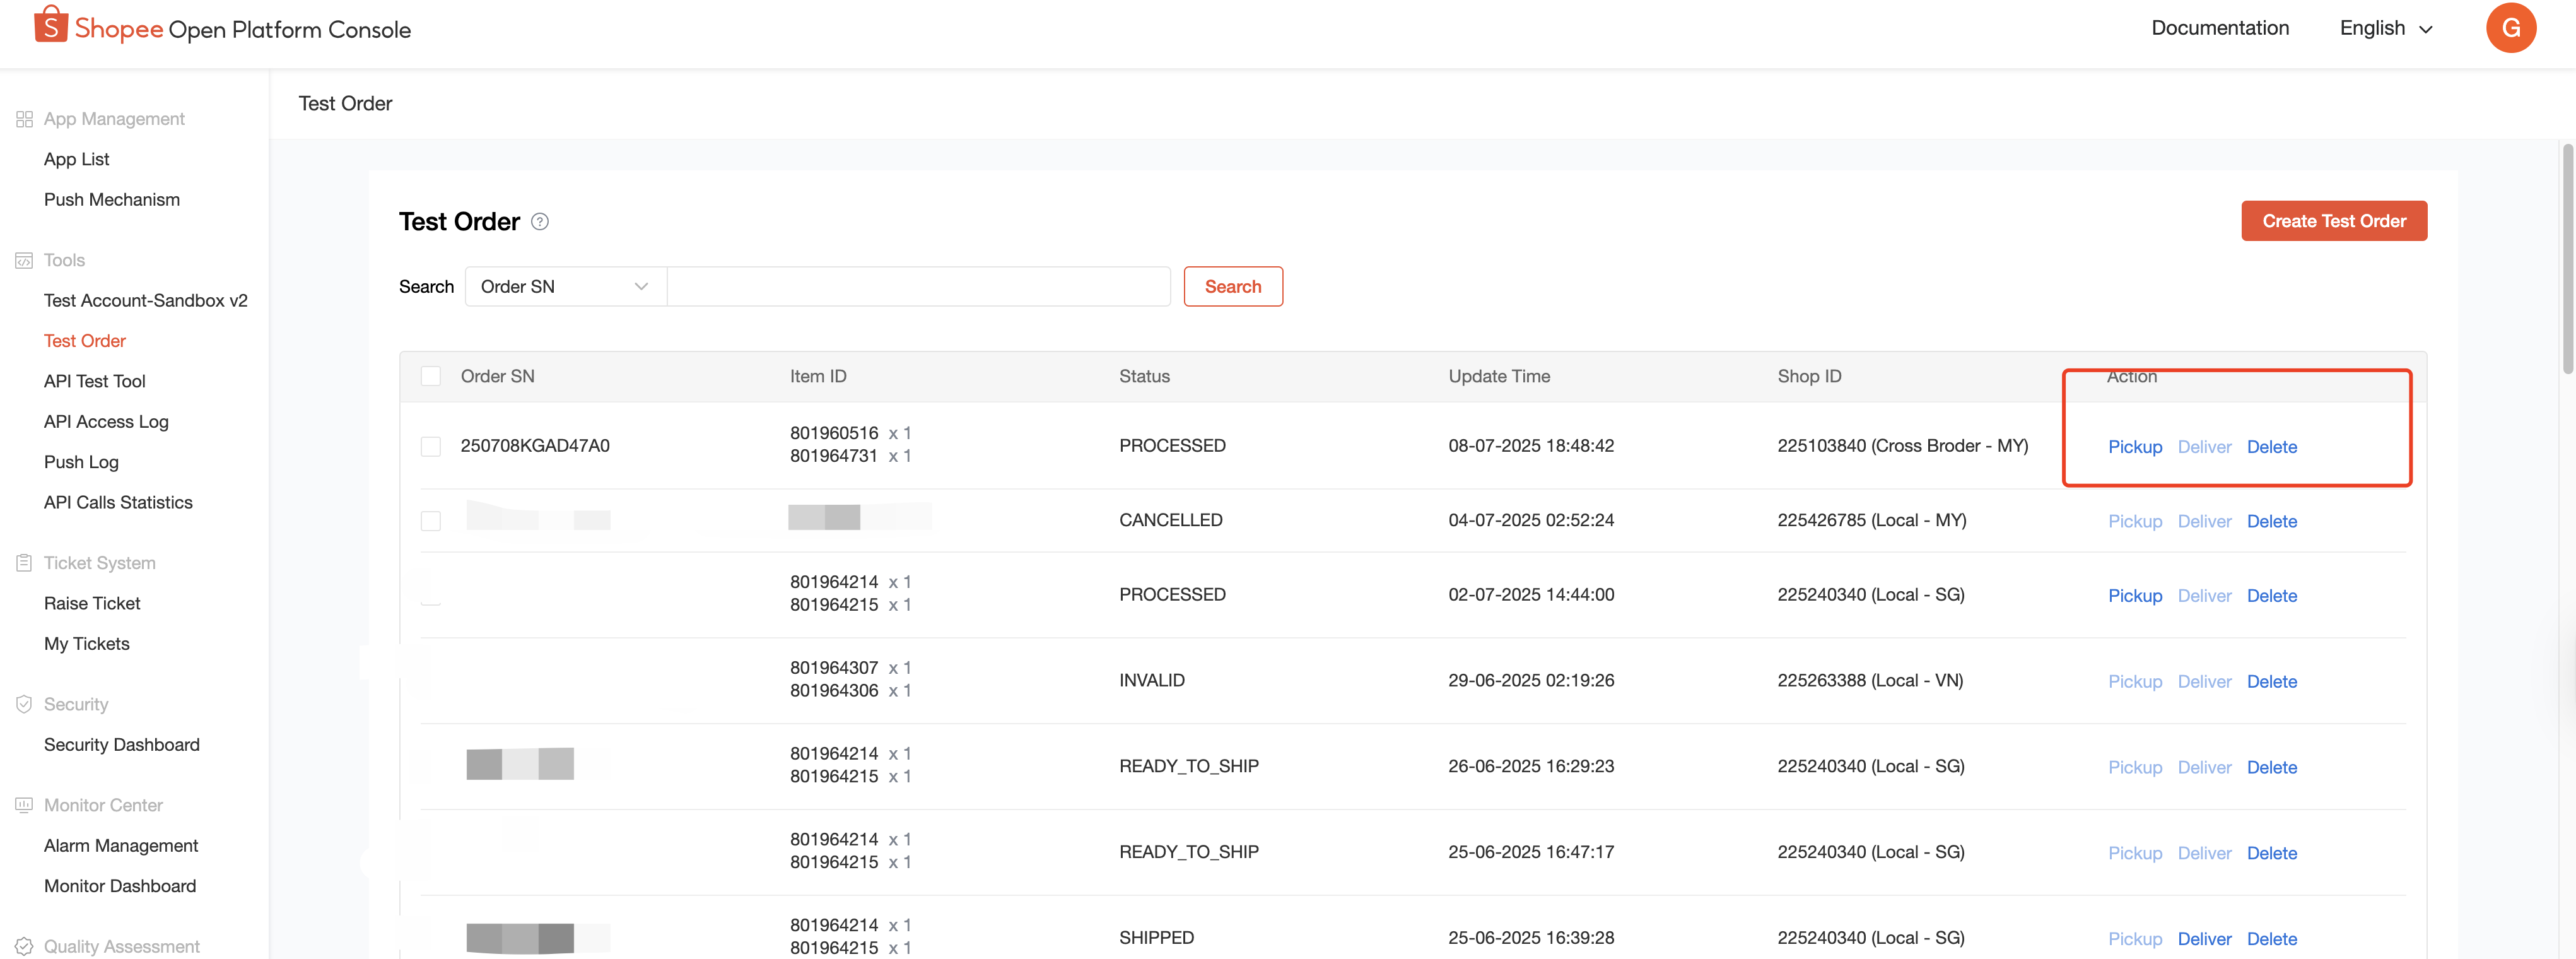
h. After the fulfillment is completed, the order does not need to be operated by you, and will flow to the status of "COMPLETED" after a certain period of time, so that the fulfillment is completed.
3.2.5 CNSC testable interface
The interfaces that CNSC focuses on are related to commodity management, and testable interfaces includeMerchant GlobalProduct andMediaSpaceAll interfaces are downloaded, and other tests are no different from ordinary stores.
3.3
Click Console>select the Push Mechaniam page, select the APP with the status of Developing, and enter Set Push.
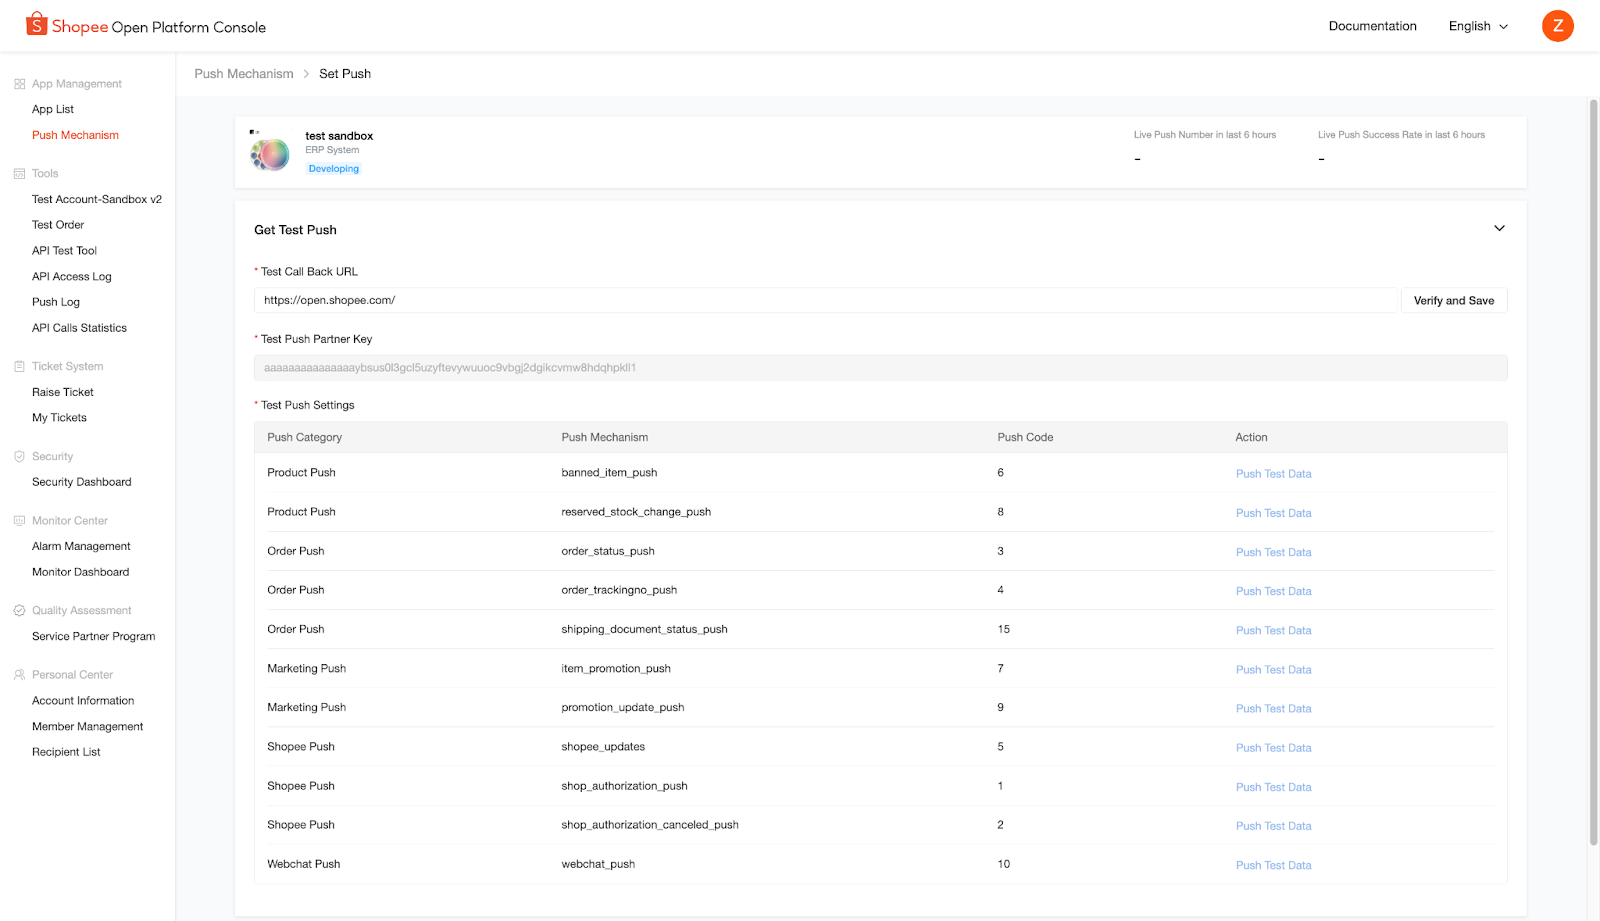
The Push Mechanism in the Sandbox environment is different from the production environment. It is no longer necessary to use related operations to trigger the push. Enter the Test Call Back URL and click "Verify and Save" to complete the verification. Just click "Push Test Data" after the corresponding Push Mechaniam to receive the test data.