Tokopedia & Shop - ISV & Seller developer onboarding
Overview
Welcome to the Tokopedia & Shop Developer Guideline. Here you'll find guidance on how to:
- Onboard as a developer partner in Tokopedia & Shop Partner Center.
- Develop and publish your apps in Tokopedia & Shop Partner Center.
- Implement new Tokopedia & Shop APIs and configure your Webhooks.
- Use our developer tools provided in your Tokopedia & Shop Partner Center
Integration Guide
Onboarding process

High-level timeline

Definition and basic business introductions
- Tokopedia & Shop Partner Center: mainly builds related systems for two types of User Persona, partners and sellers, and finally realizes a complete B2B product process around partners' service/App release and platform sellers' order services. Compared with the B2C e-commerce scenario, the role of the partners is "service seller" and the role of the e-commerce seller is "service buyer".
- Tokopedia & Shop App Store:
For partners: The Public App will be published in the Tokopedia & Shop App Store. Sellers can browse and authorize the App(s) created by ISV or 3rd-party developers in the App Store. For sellers: To help sellers boost business on Tokopedia & Shop and improve your operational efficiency, Tokopedia & Shop now offers an App Store where sellers can contact and authorize App(s) that suit sellers to improve productivity, and synchronize products. Tokopedia & Shop App Store
: - For partners: The Public App will be published in the Tokopedia & Shop App Store. Sellers can browse and authorize the App(s) created by ISV or 3rd-party developers in the App Store.
- For sellers: To help sellers boost business on Tokopedia & Shop and improve your operational efficiency, Tokopedia & Shop now offers an App Store where sellers can contact and authorize App(s) that suit sellers to improve productivity, and synchronize products.
| Seller Market | App Store Portal | Tokopedia & Shop Seller Center - App Store |
|---|---|---|
| Indonesia local seller | https://seller-id.tokopedia.com/appstore/id | https://seller-id.tokopedia.com/services/market?shop_region=ID |
Case 1: If you have integrated with「Tokopedia Open Platform」and「Tokopedia & Shop Partner Center」before
Tokopedia Open Platform: https://developer.tokopedia.com/
Tokopedia & Shop Partner Center: https://partner.tiktokshop.com/
Step 1: Login「Tokopedia & Shop Partner Center」
📌 Access to Tokopedia & Shop website: https://partner.tiktokshop.com/
Step 2: Bind「Tokopedia Open Platform」account and「Tokopedia & Shop Partner Center」account
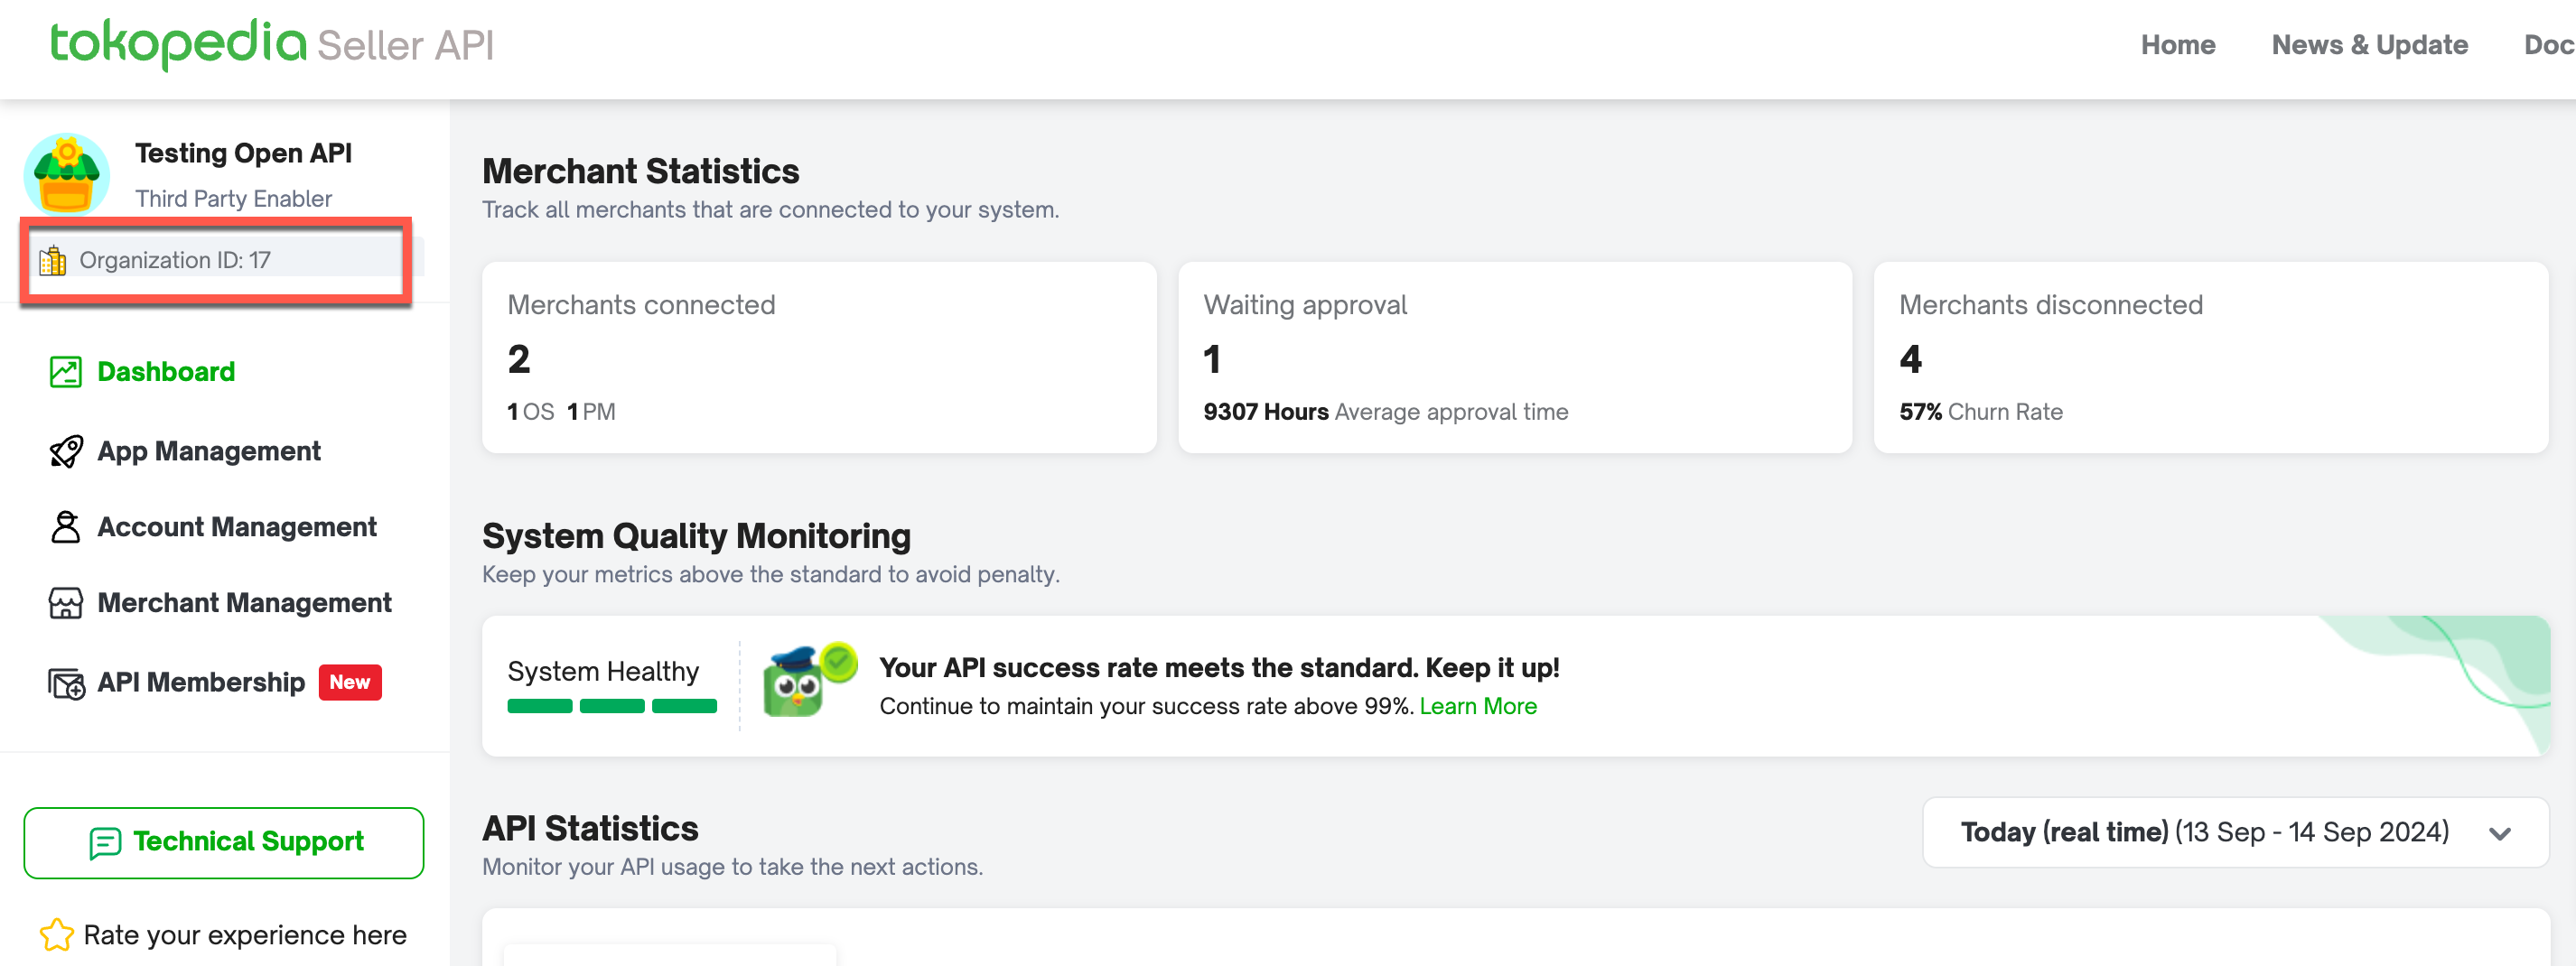
2.1 Find the Organization ID in Tokopedia Open Platform
- Go to Tokopedia dev portal. Once logged in, you will be directed to the main dashboard of the developer console.
- Identify Organization ID: Look at the top left corner of the dashboard, below your company's name, you will see the Organization ID
2.2 Bind account
📌 By binding the accounts, you no longer need to create multiple applications. This not only saves your time and resources but also reduces complexity. In the future, you will be able to maintain merchants from both platforms under a single application, which will significantly streamline your shop operation.
Use the Organization ID from Tokopedia Open Platform and input it into the「Tokopedia & Shop Partner Center」.
| # | Operation | Demo |
|---|---|---|
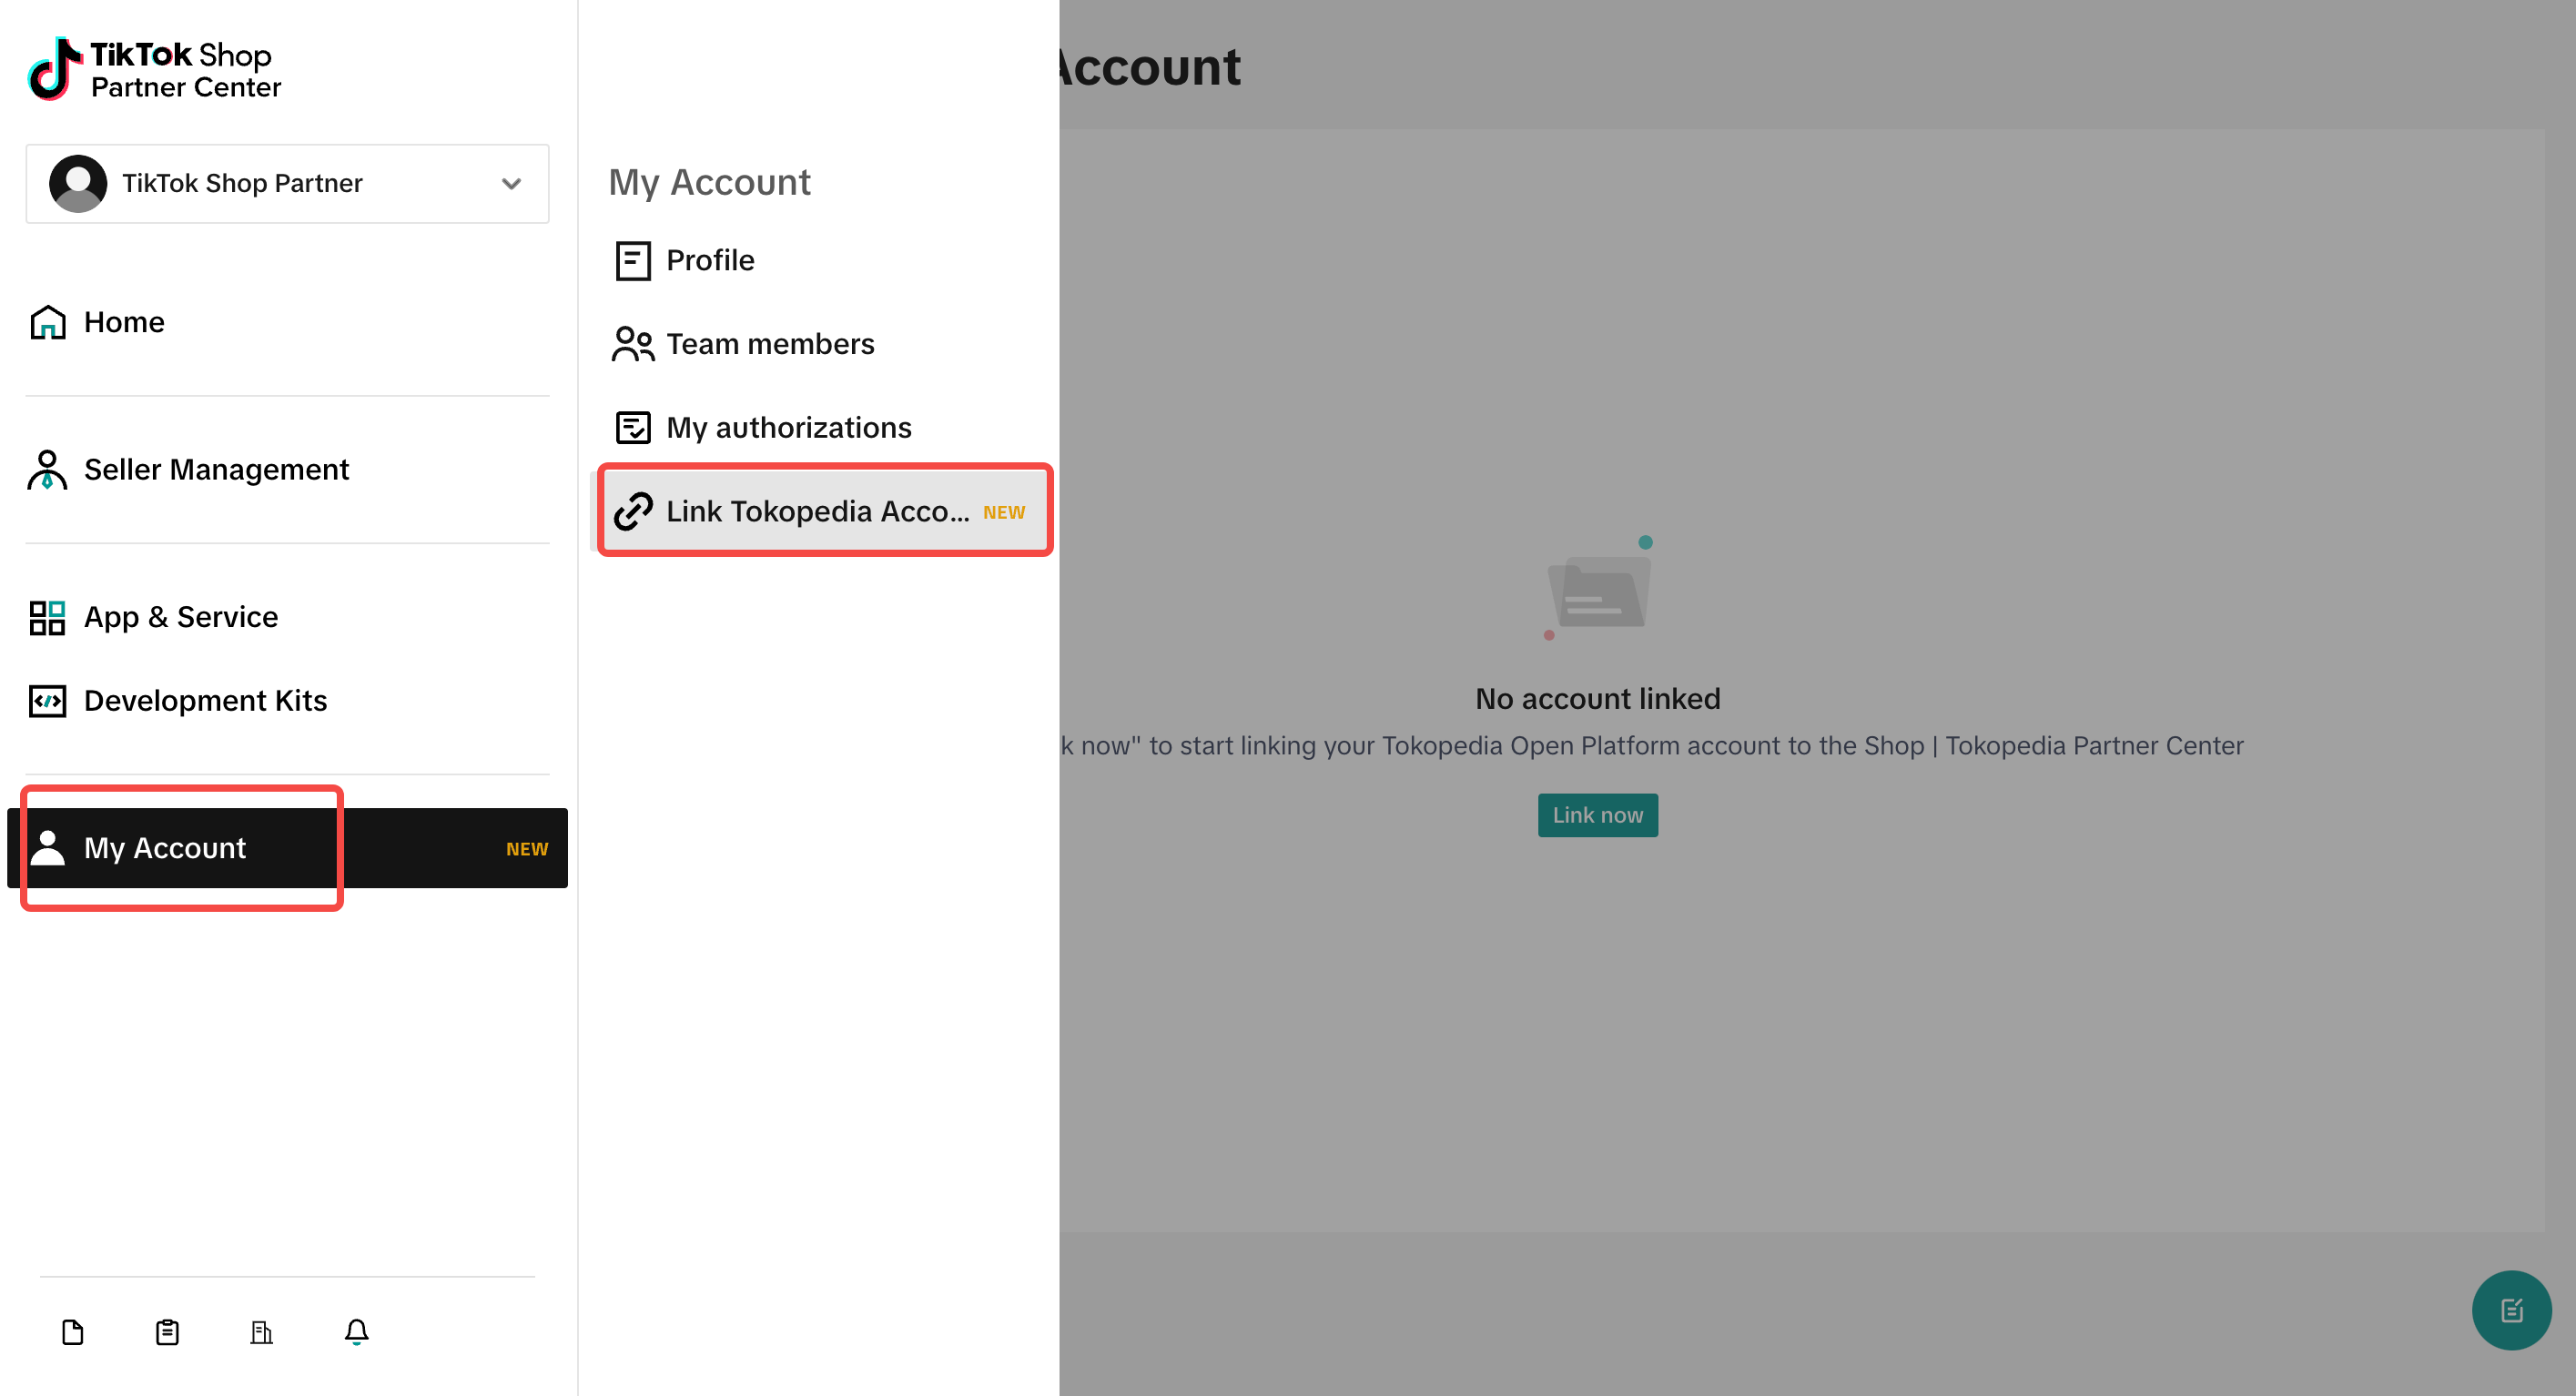
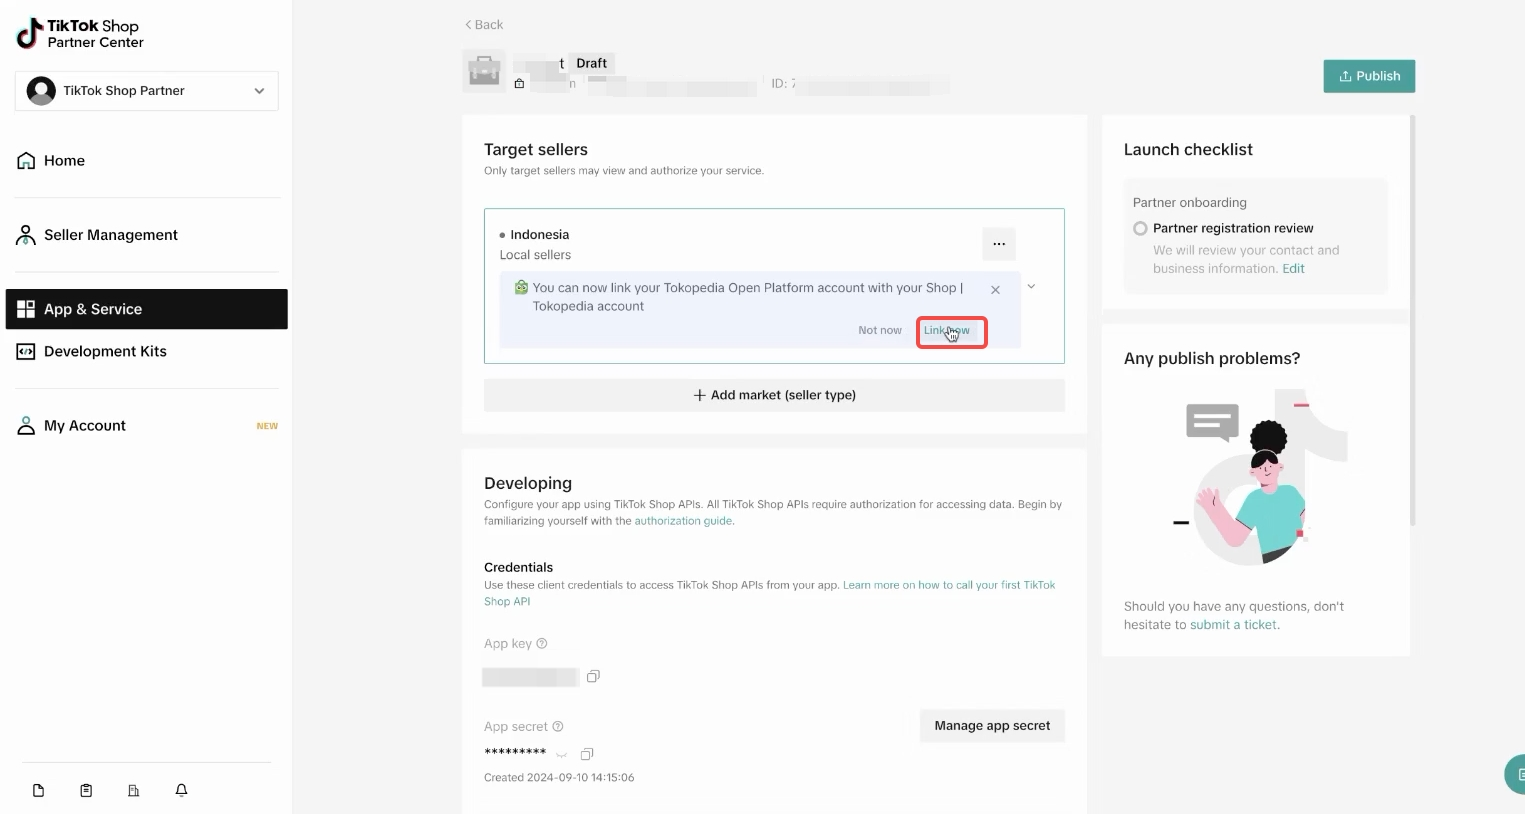
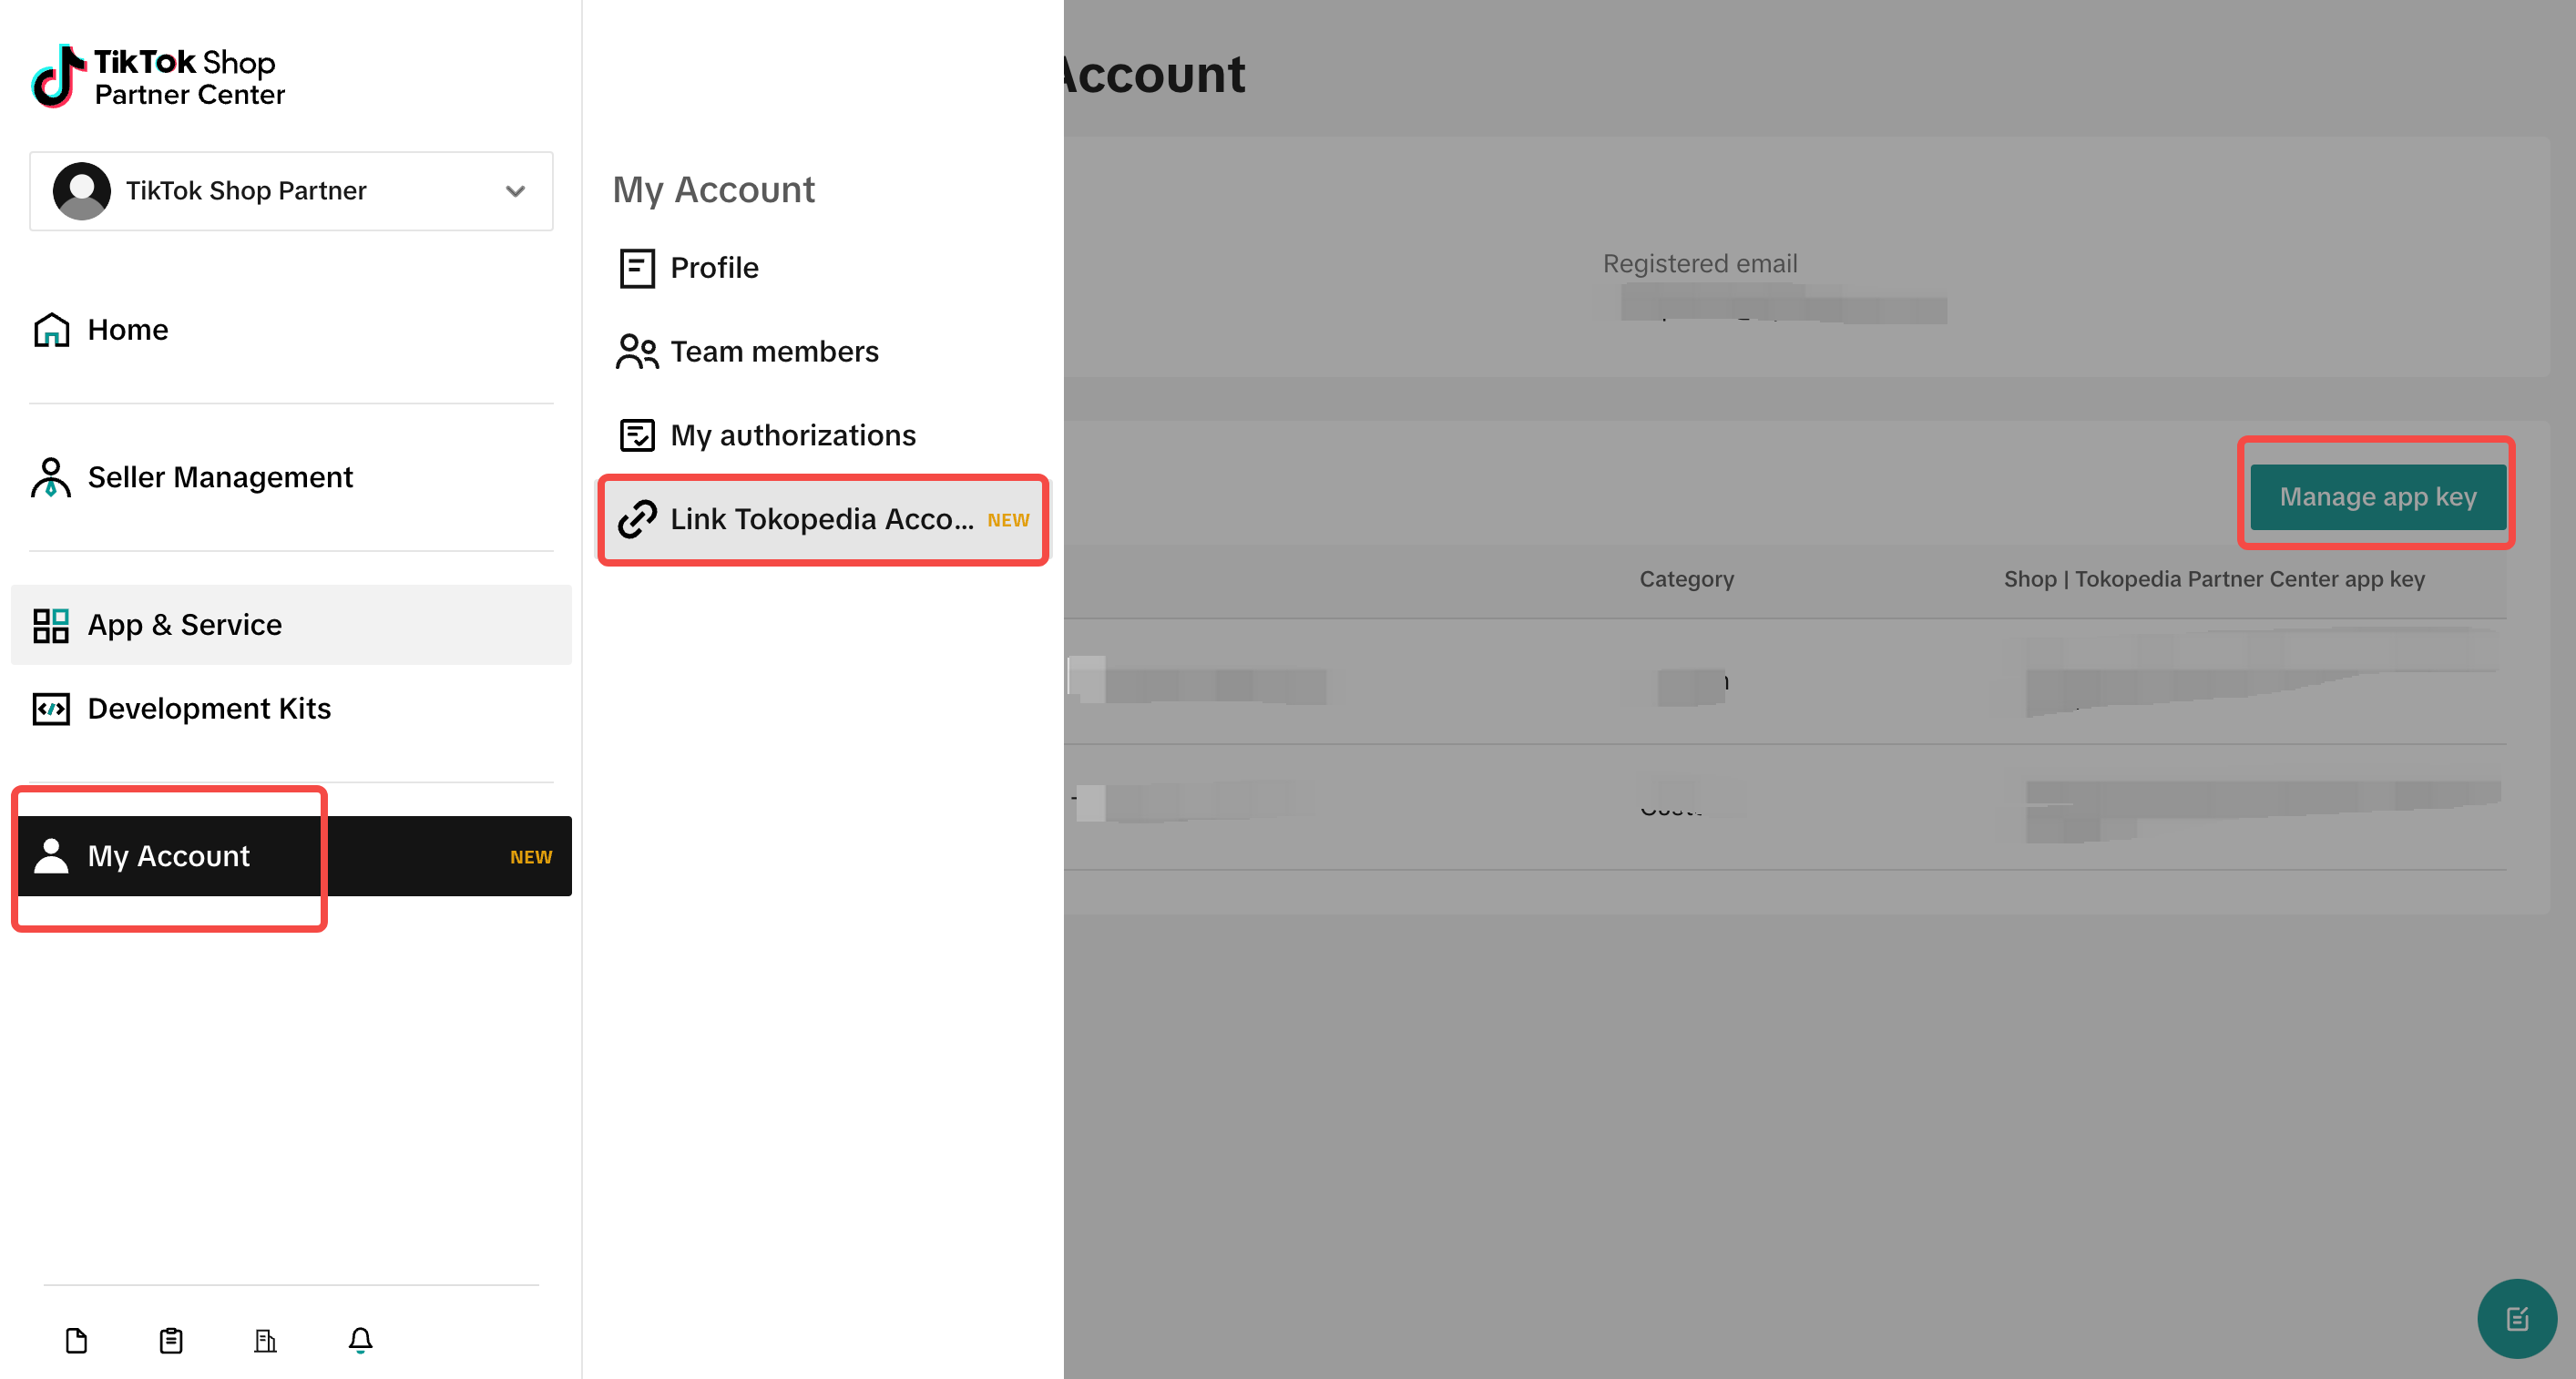
| Step 1 | 1. Click "My Account - Link Tokopedia Account" |
- If you already have Tokopedia & Shop App, you can see the entrance in the App Management page |
 |
| Step 2 | Click "Link now" and enter Tokopedia organization ID and Registered email in Tokopedia Open Platform
📌 One「Tokopedia & Shop Partner Center」account can only be bound to one 「Tokopedia Open Platform」account, establishing a 1:1 mapping relationship. |
|
| Step 2 | Click "Link now" and enter Tokopedia organization ID and Registered email in Tokopedia Open Platform
📌 One「Tokopedia & Shop Partner Center」account can only be bound to one 「Tokopedia Open Platform」account, establishing a 1:1 mapping relationship. | 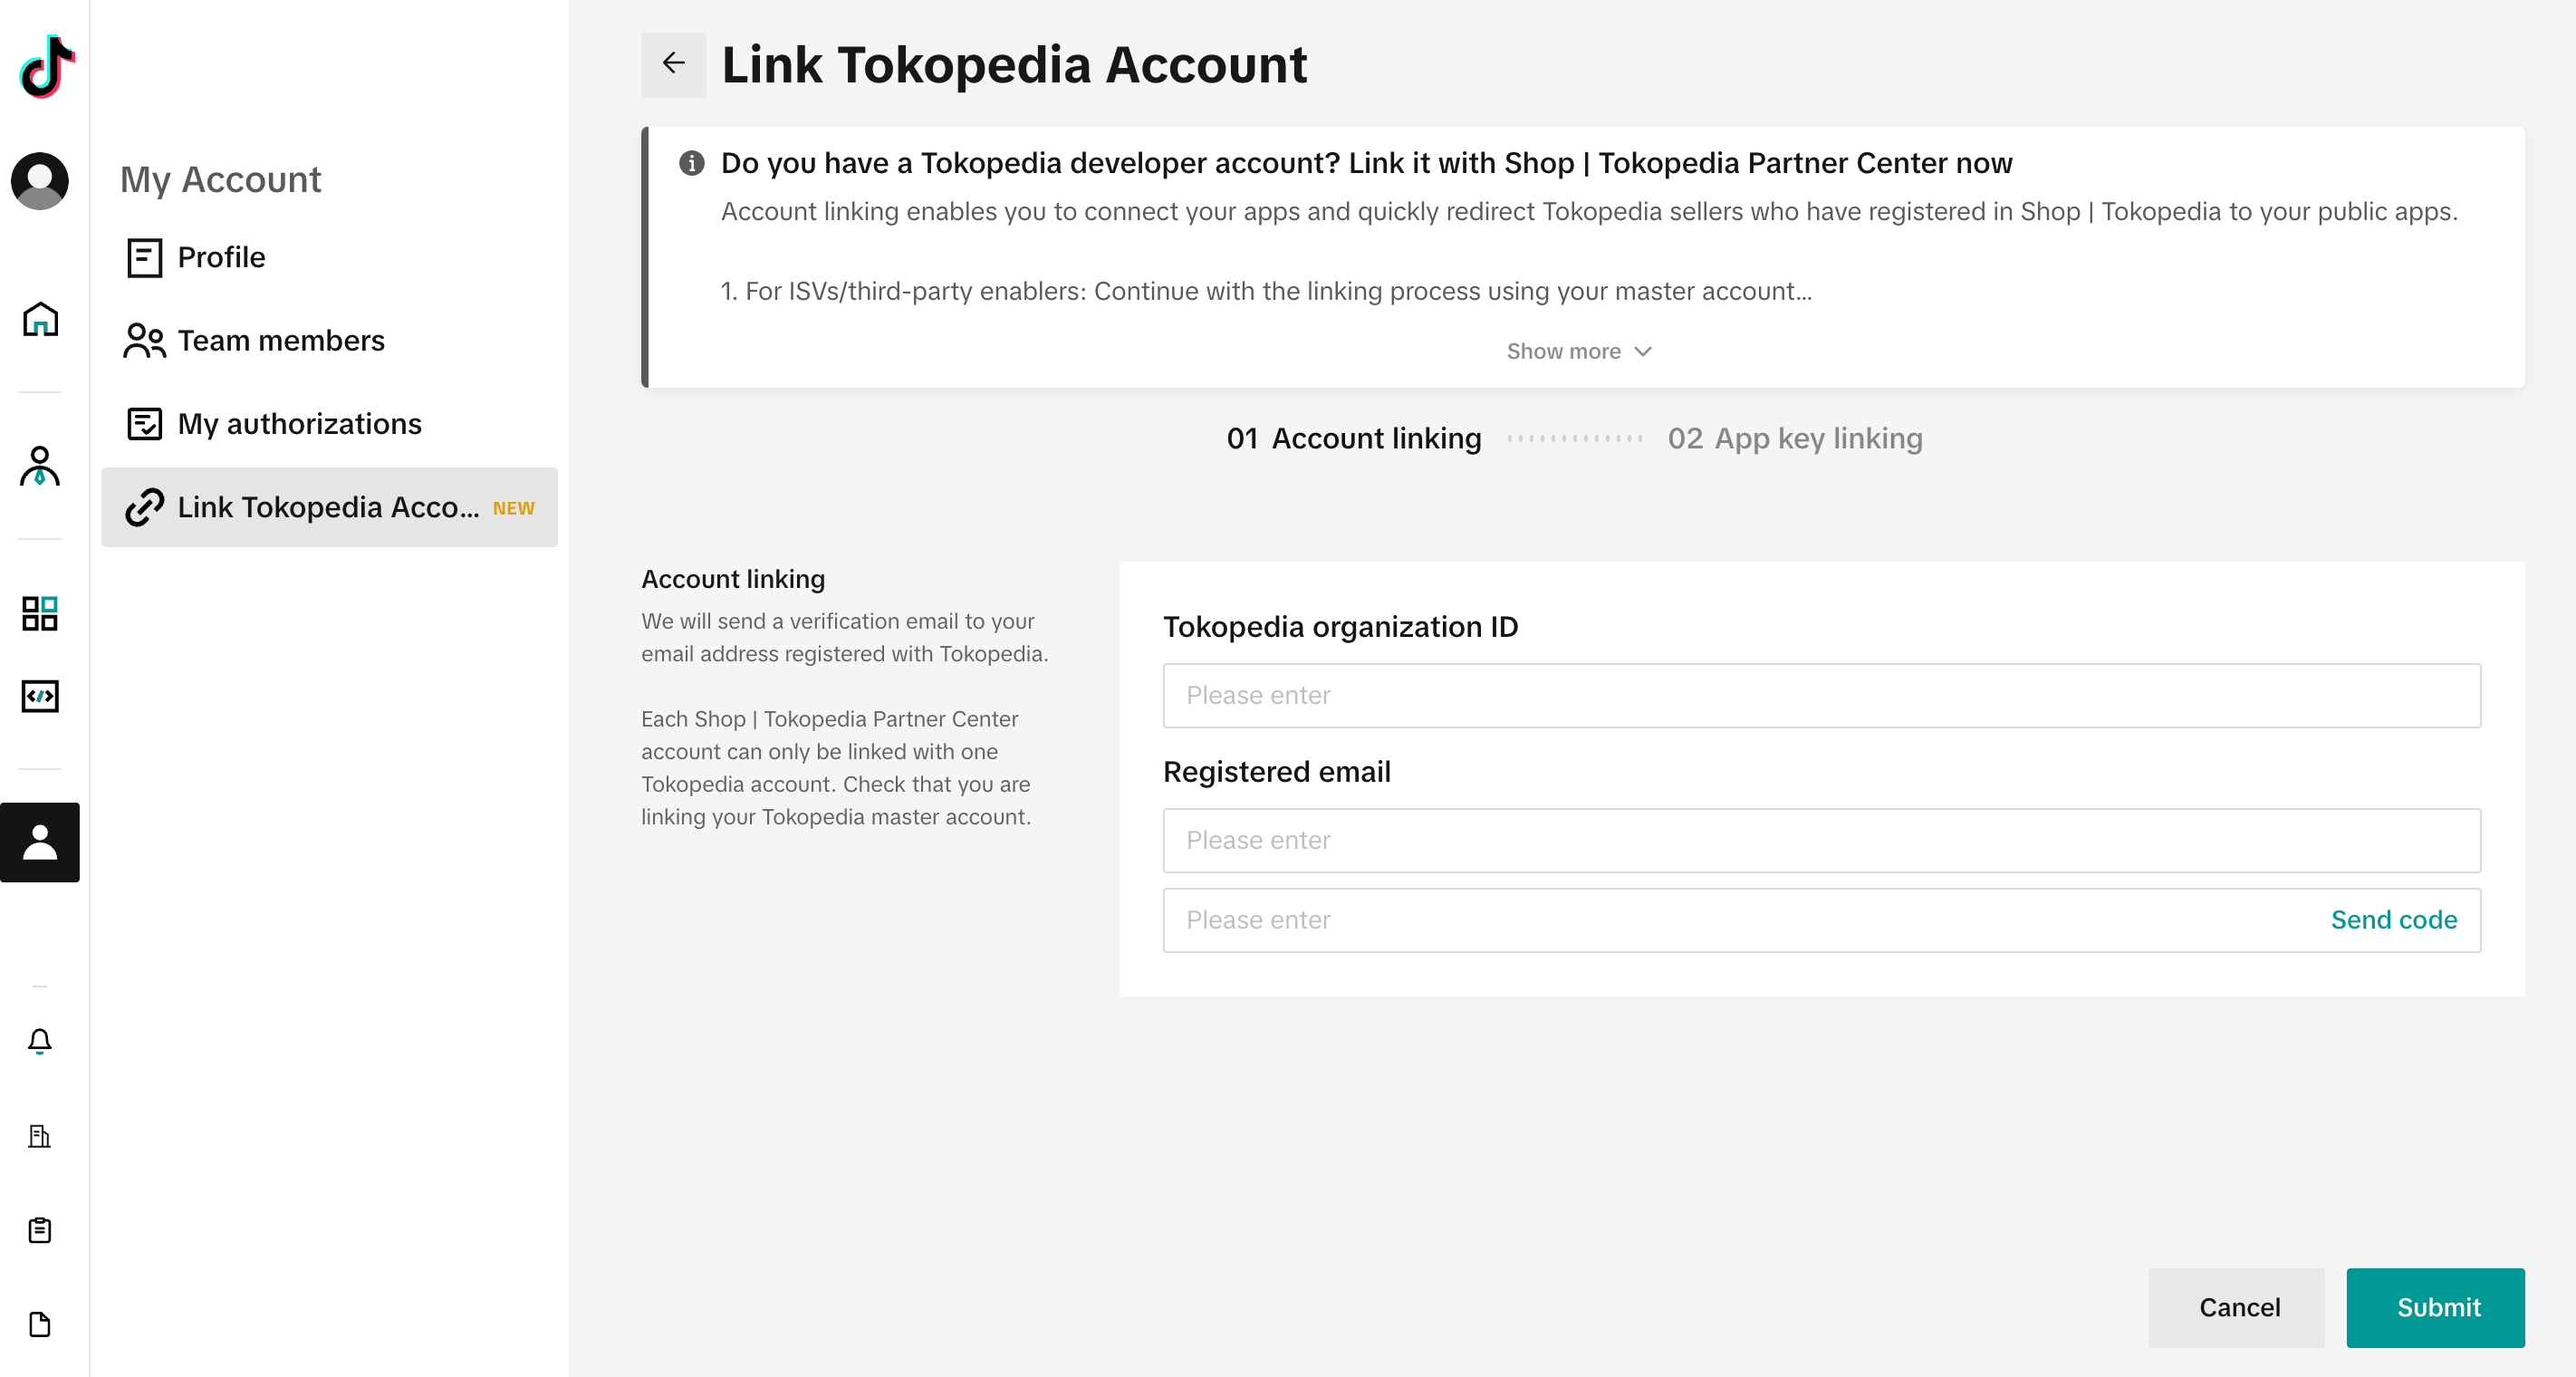 |
|
Step 3: Bind Tokopedia App and "Tokopedia & Shop" App
📌 After binding the App key, you will be able to query valuable information. For example, you can find out how many Tokopedia merchants have migrated to TTS and how many merchants have completed App authorization. This data will be very useful for you to better understand the market situation and plan your business strategies accordingly.
3.1 Find App ID in Tokopedia Open Platform
Go back to the Tokopedia Developer Portal to locate the App ID for the application you have integrated
3.2 Bind App
| # | Operation | Demo |
|---|---|---|
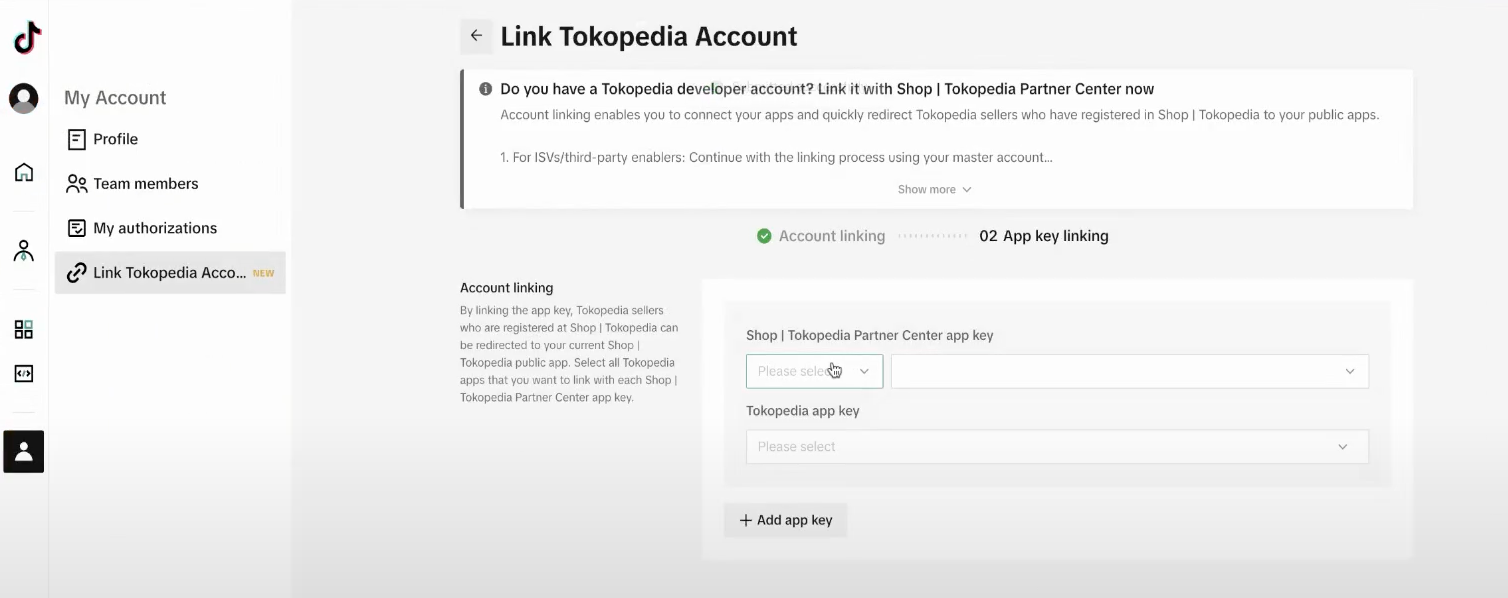
| Step 1 | When you finish the account binding, you will enter the App binding page automatically. | |
| You can also click "My Account - Link Tokopedia Account" to bind the Tokopedia App and "Tokopedia & Shop" App. |  | |
 | ||
| Step 2 | Choose "Tokopedia & Shop" App and Tokopedia App which you want to bind. |
📌Please note that:
- One "Tokopedia & Shop" Appkey can bind to multiple Tokopedia App IDs, but one Tokopedia App ID cannot be bound to multiple "Tokopedia & Shop" Appkeys.
- The status of "Tokopedia & Shop" App should be online |
 |
|
Step 4: Integrate with Tokopedia & Shop API
- By integrating with the new API, only one merchant portal (Tokopedia & Shop Seller Center) and one set of Open APIs (TikTok Shop APIs) will be available
- Both user Apps — Tokopedia and Shop|Tokopedia — will remain available
- Merchants can choose to sell products on one of these apps or both simultaneously. ISVs must use the Shop|Tokopedia APIs to manage merchant operations on both apps. Once the merchant migration is complete, all newly generated data can only be accessed through the Shop|Tokopedia APIs. Some historical data (such as merchant data) will be migrated to Shop|Tokopedia, while other historical data (such as orders and bills) will remain in Tokopedia.
Please click here to access to the API onepager to view more about:
- Data access via APIs: What APIs to use to access new data and integrate historical data of merchants migrating from Tokopedia to "Tokopedia & Shop"?
- Changes to Shop|Tokopedia APIs: What changes are made in Shop|Tokopedia APIs to suit the Indonesian market?
- Mapping of shops and products: How will the new shops and products from "Tokopedia & Shop" be mapped to those from Tokopedia?
Step 5: Test your App and Publish
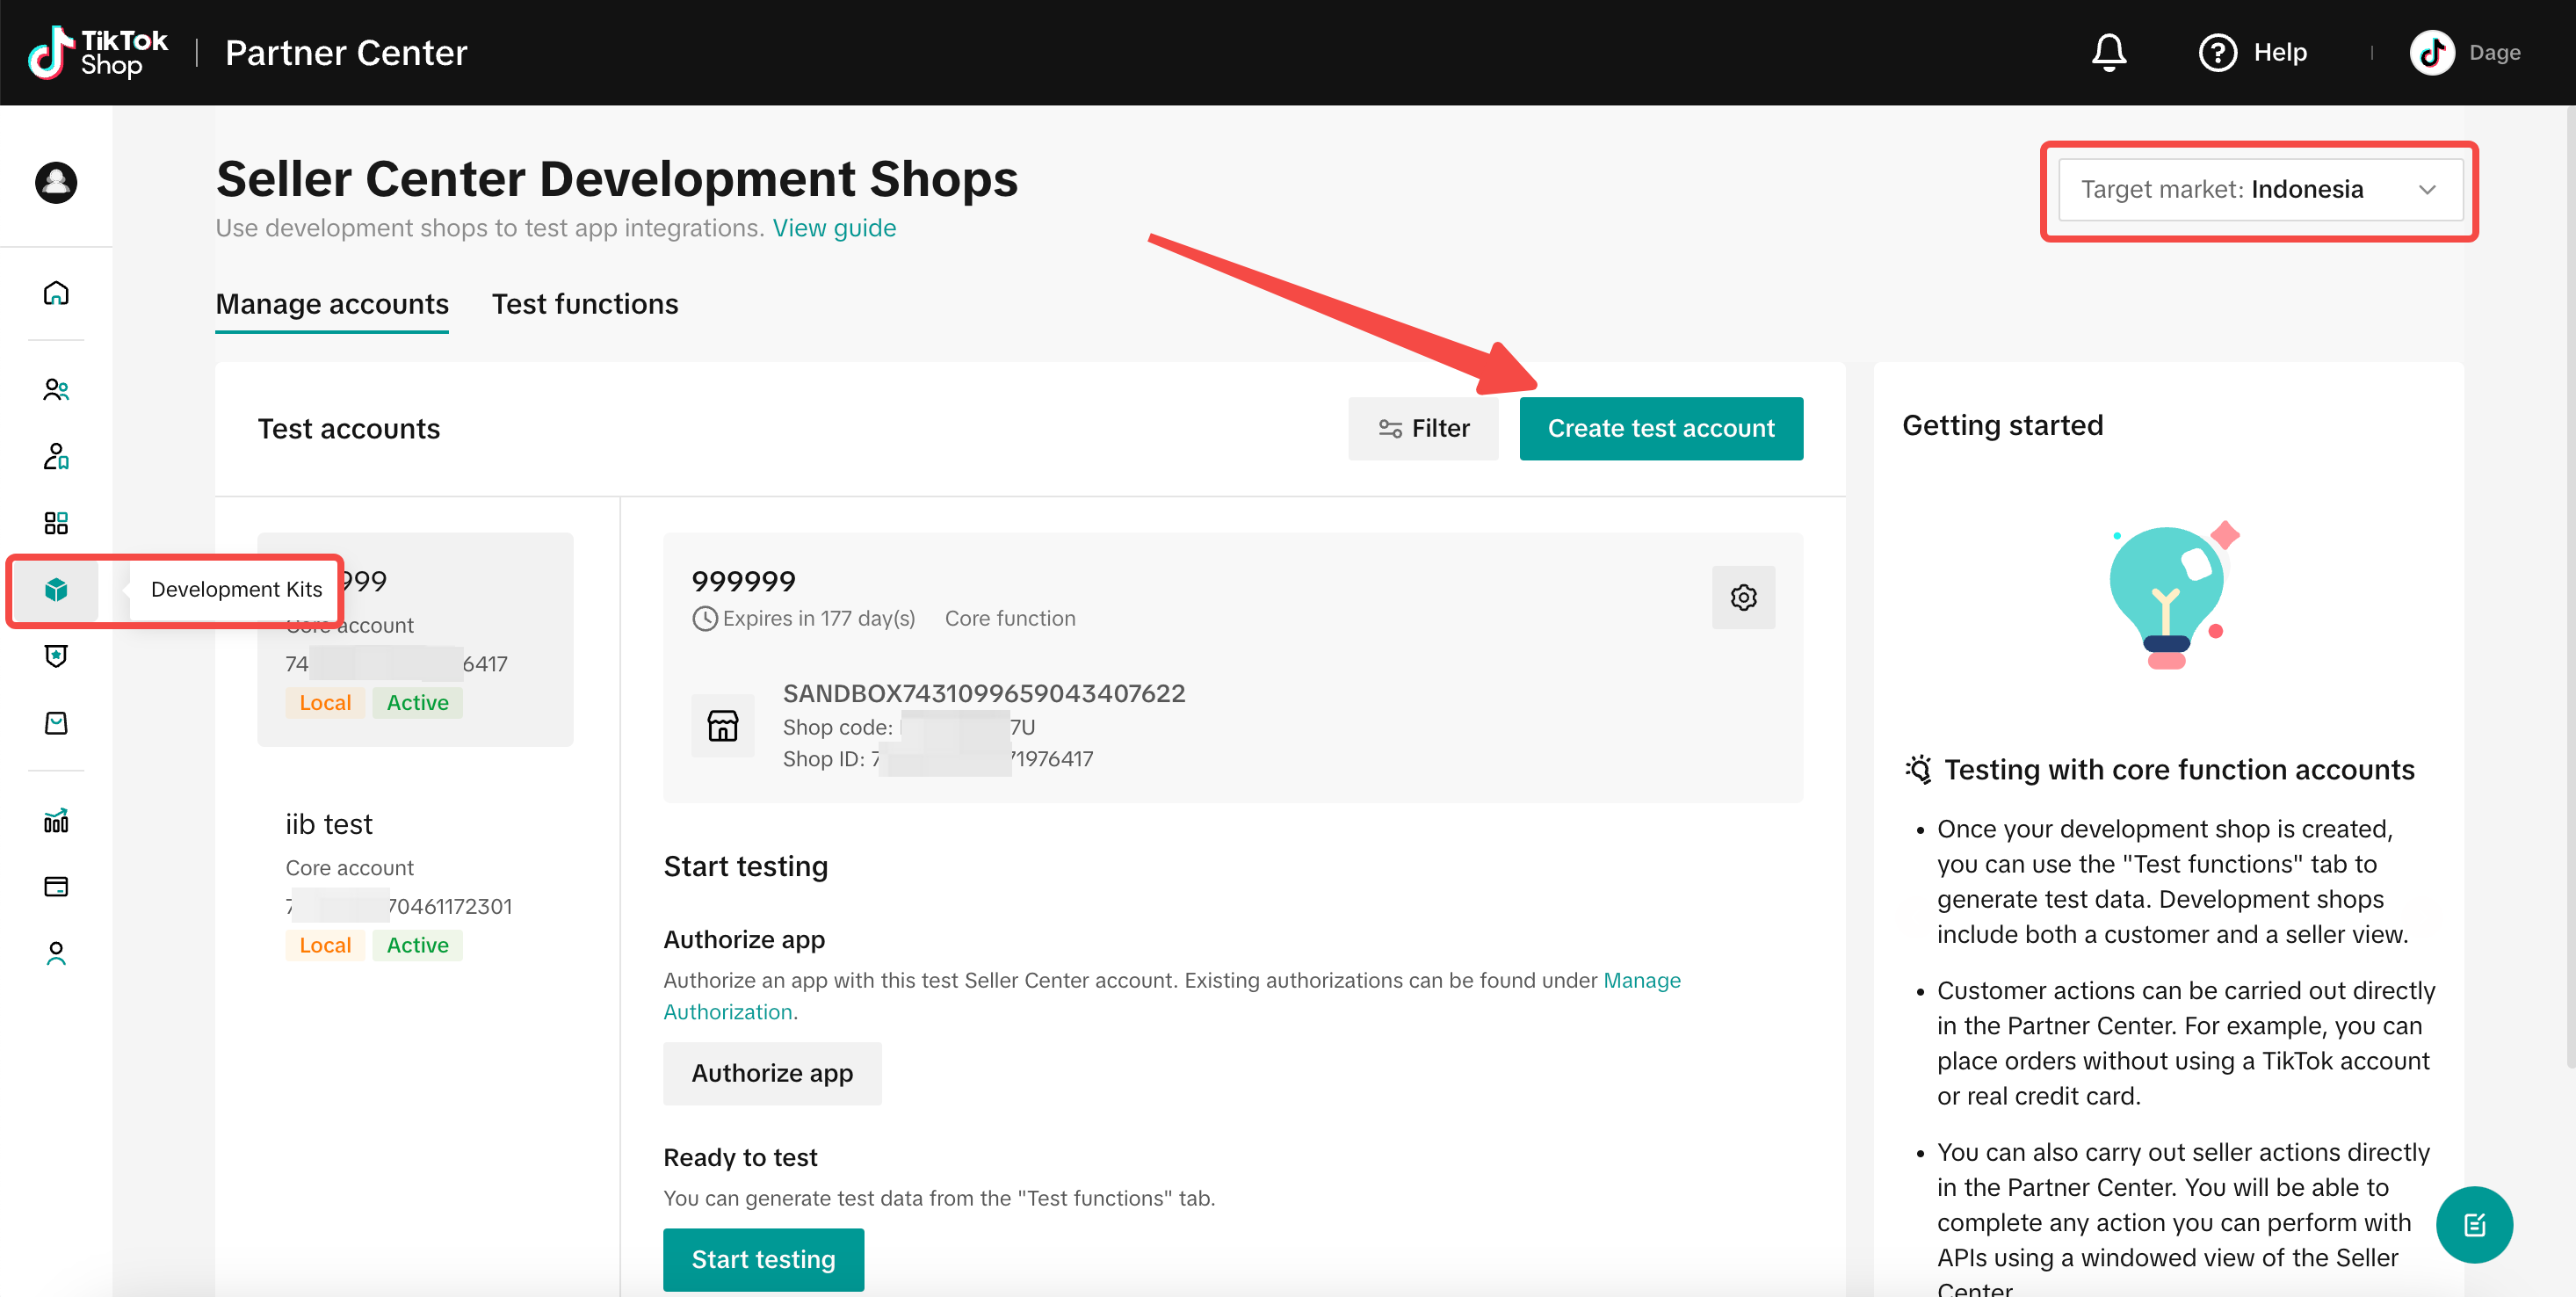
- Create a test account in Development Shop with "Target market: Indonesia"
- Use this test account to authorize your app:
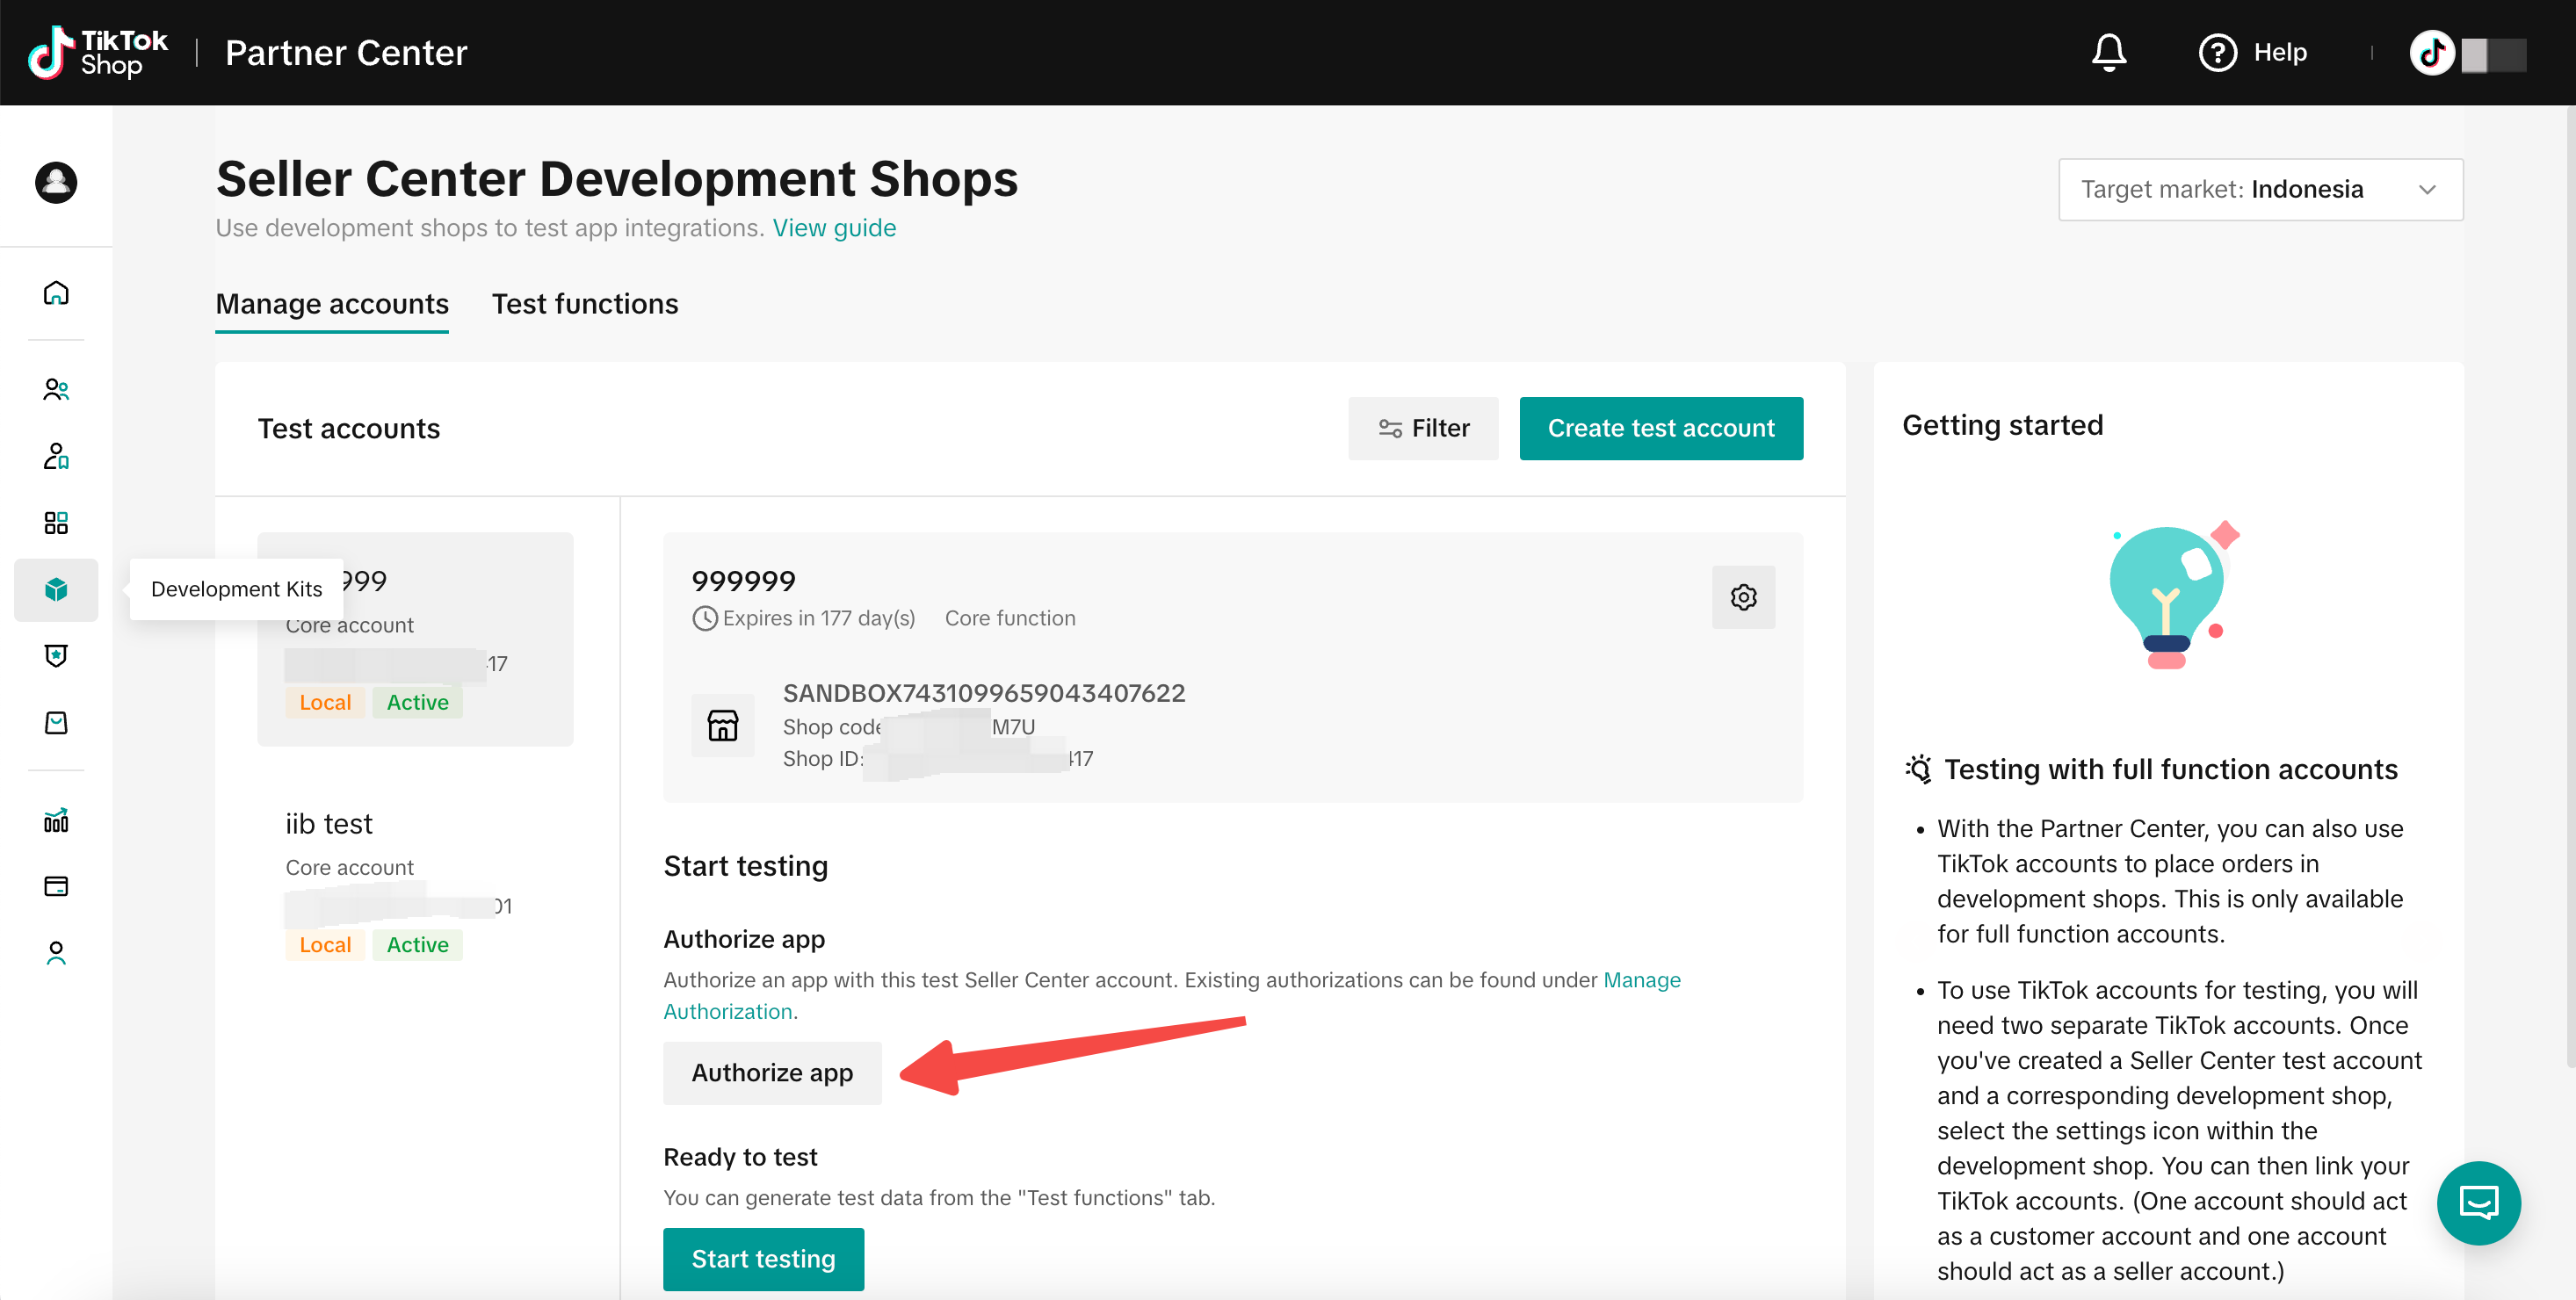
- After authorization, you should receive an "authorization_code", follow this instruction to get "access_token": https://partner.tiktokshop.com/docv2/page/678e3a3292b0f40314a92d75.
- Call [Get Authorized Shops] to get "shop_cipher"
- Use "access_token" and "shop_cipher" for further API calls.
- Start testing your app:
Test product listing
For product listing with API, please refer to this document. If you wish to list products manually, please use ModHeader. Use the below profile:
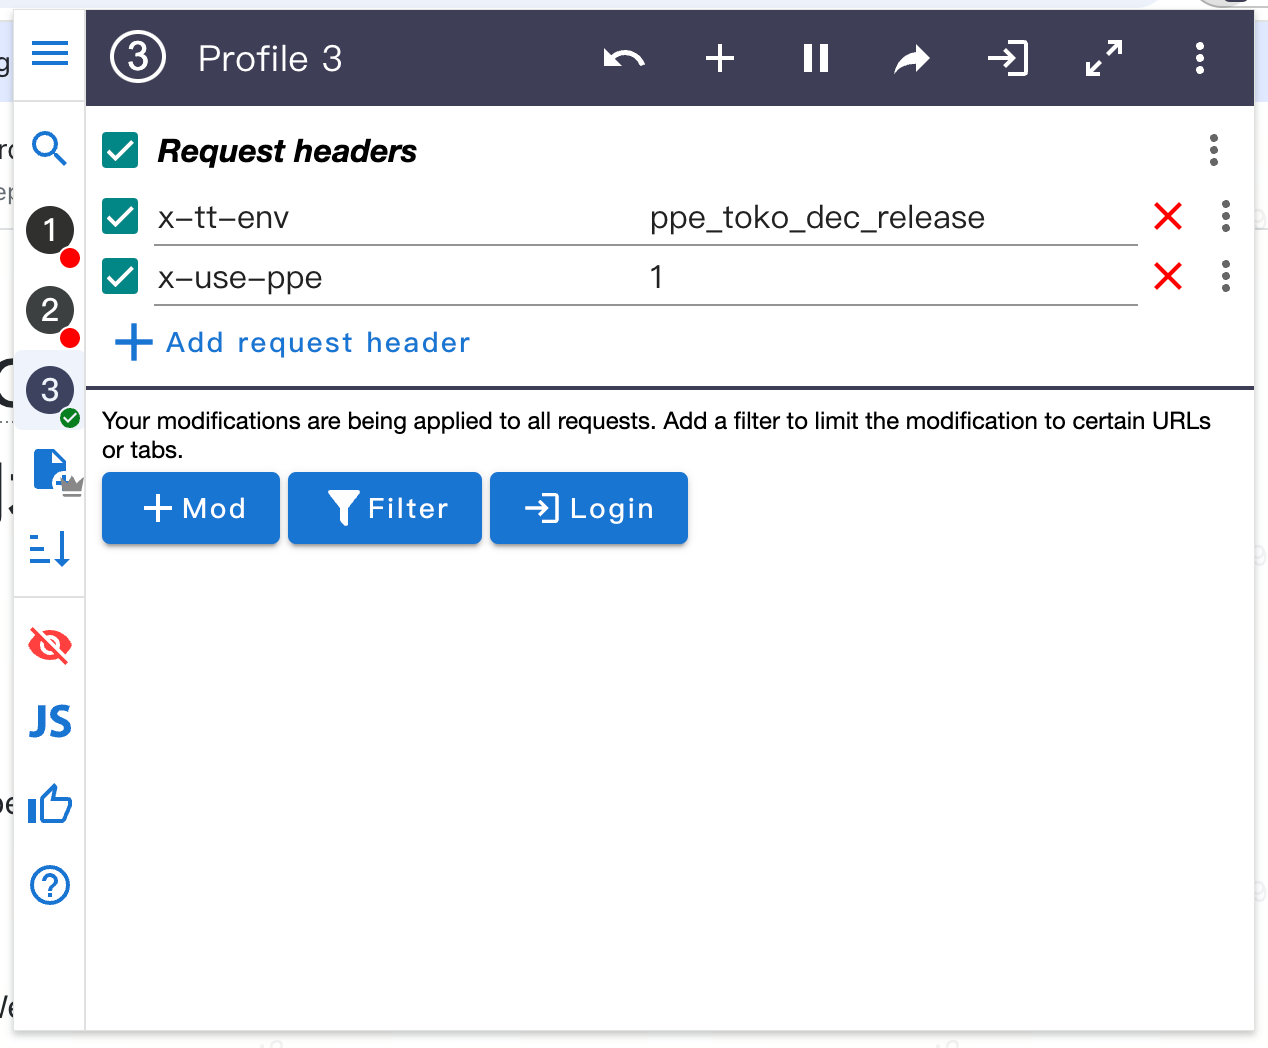
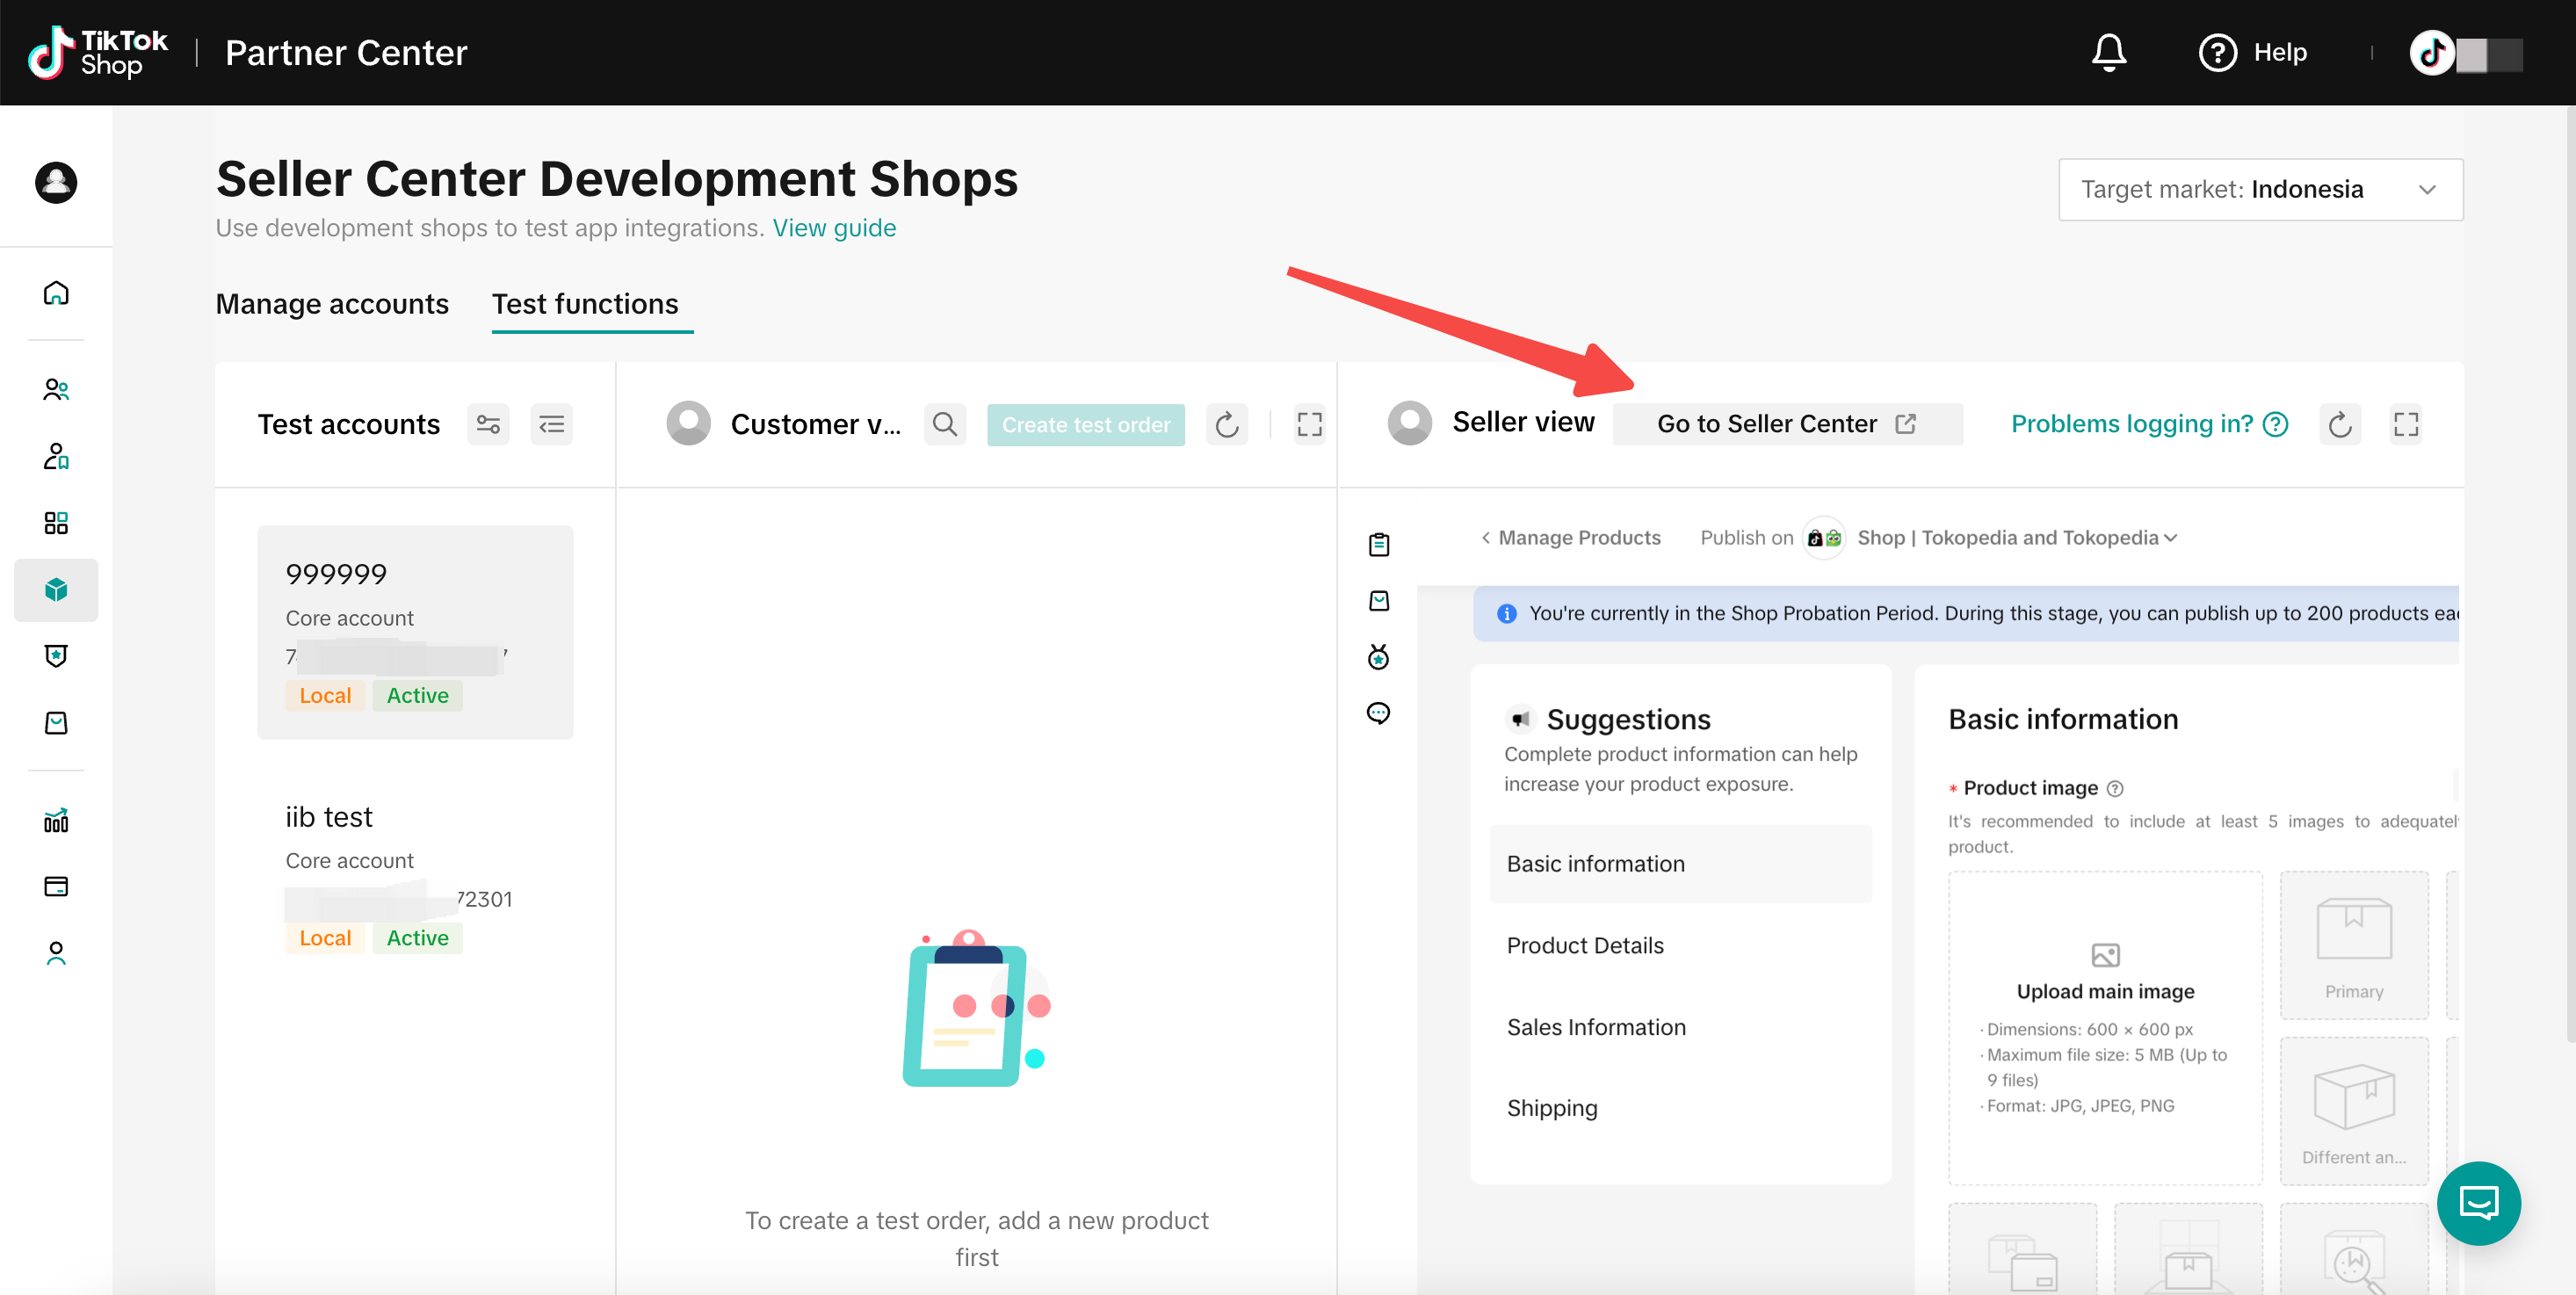
Then click "Go to Seller Center" for product listing:
Test order placement and fulfillment
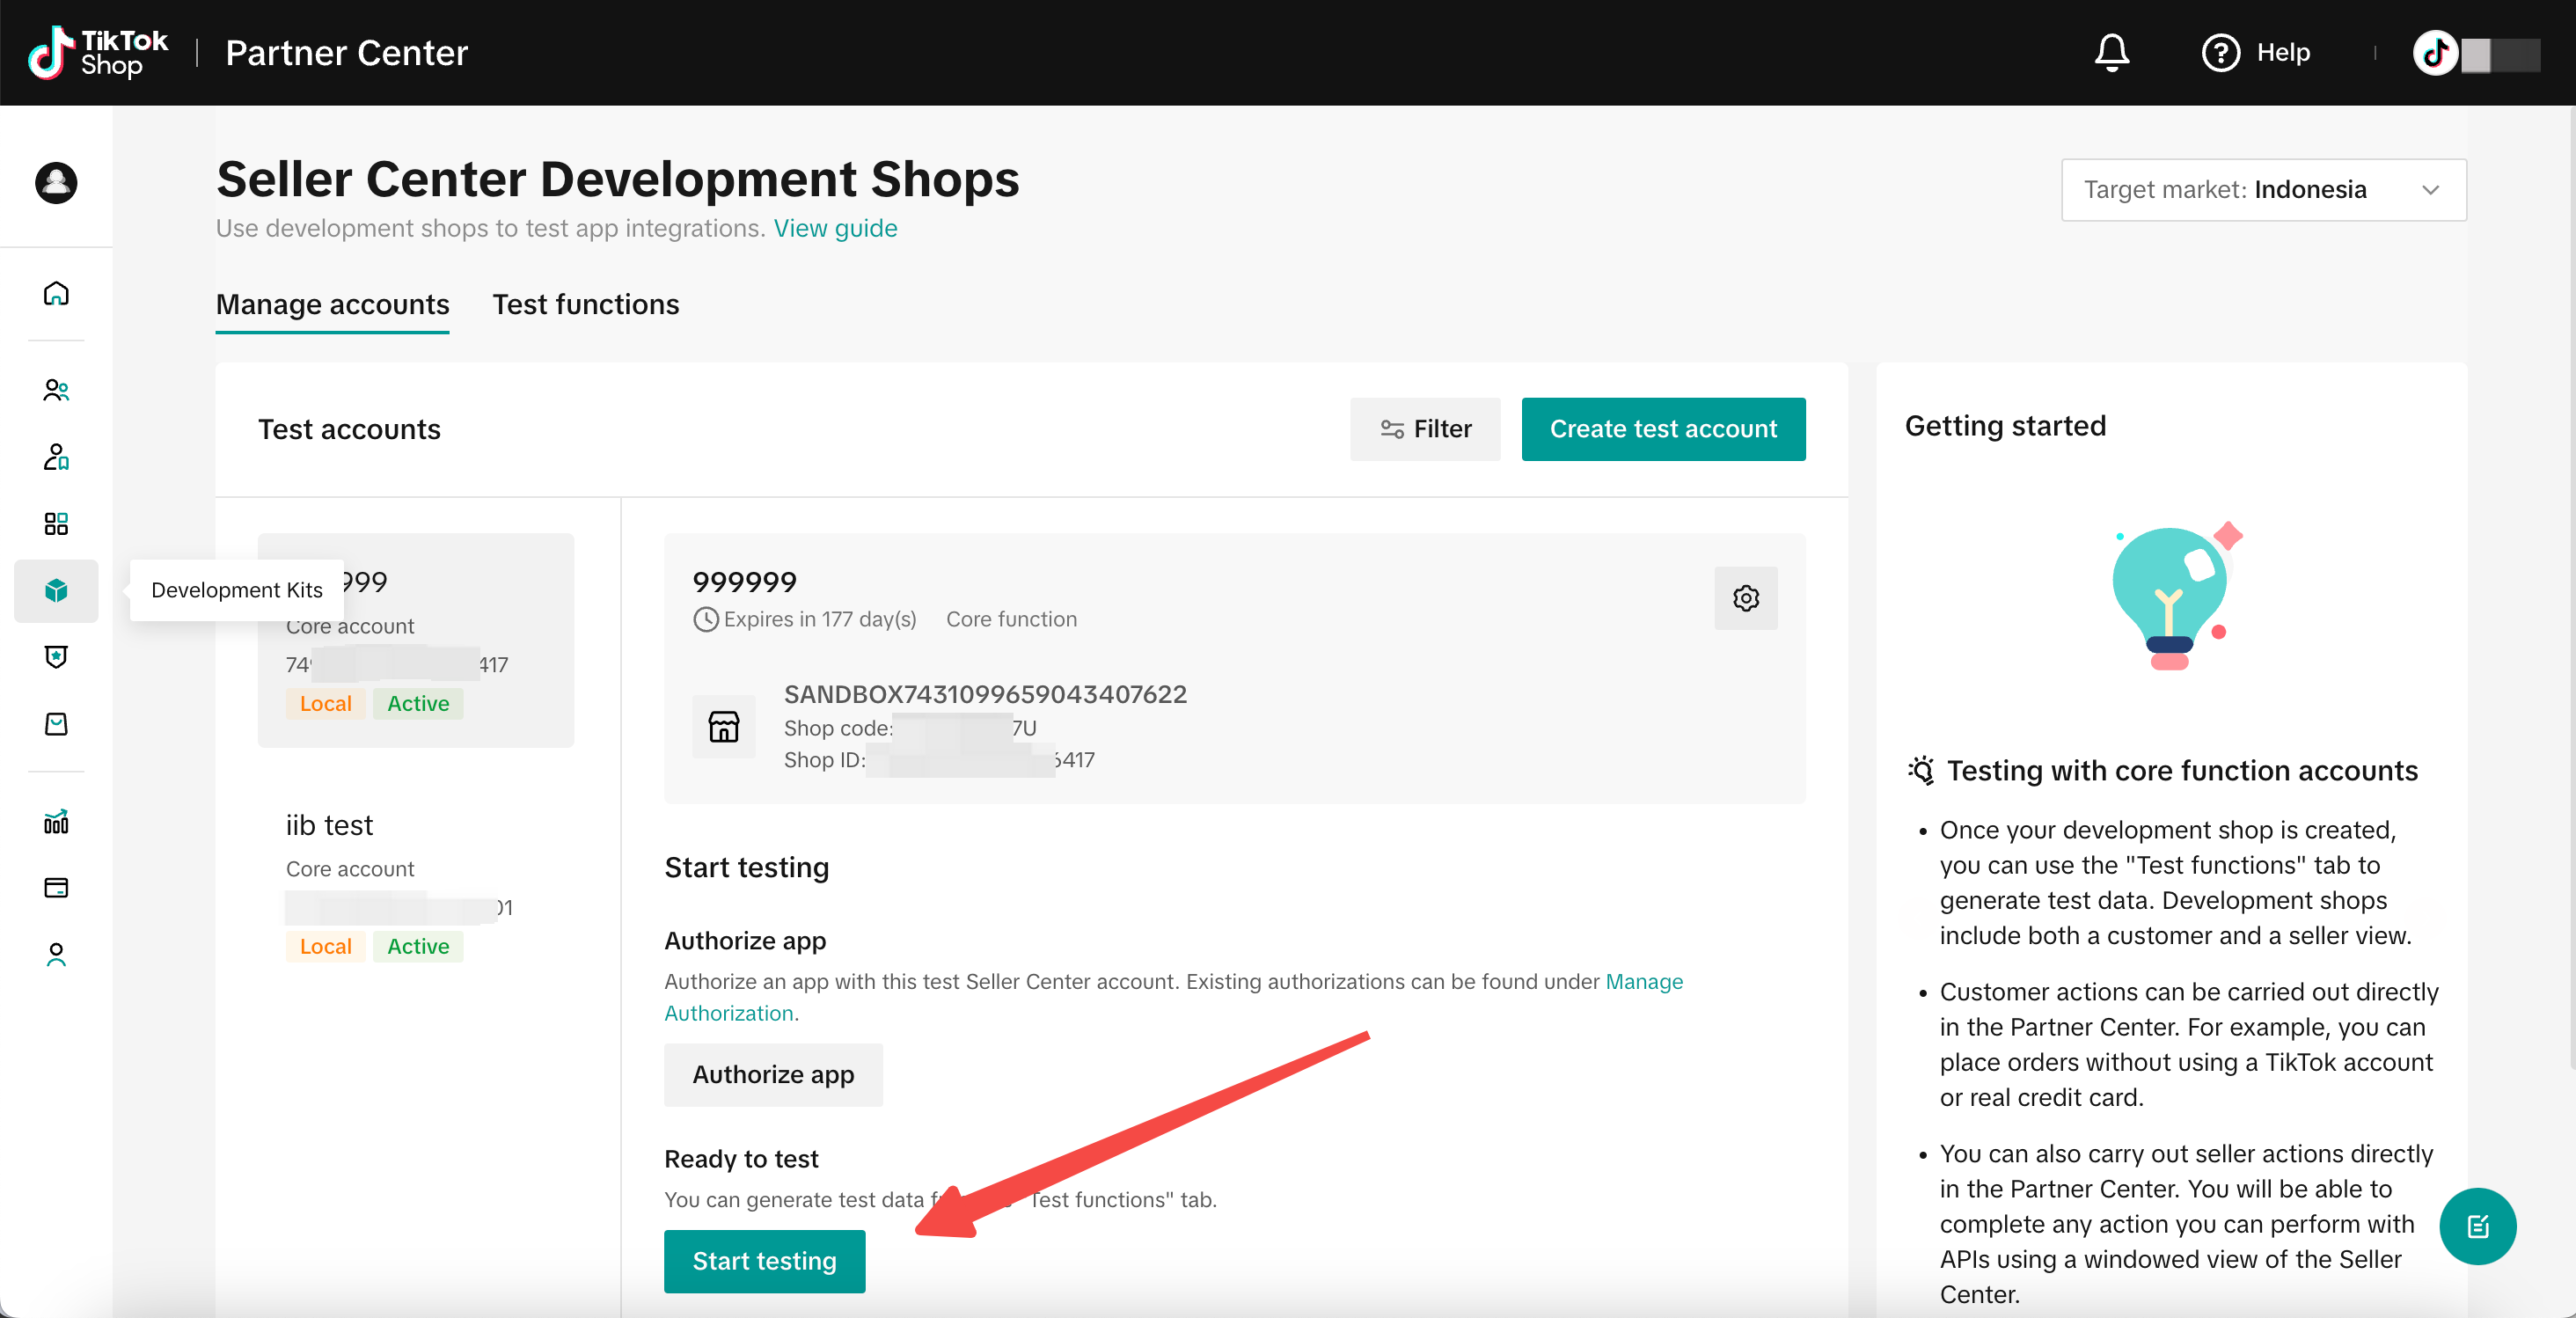
Before order placement, please make sure you have successfully listed the products for this shop, then click "start testing".
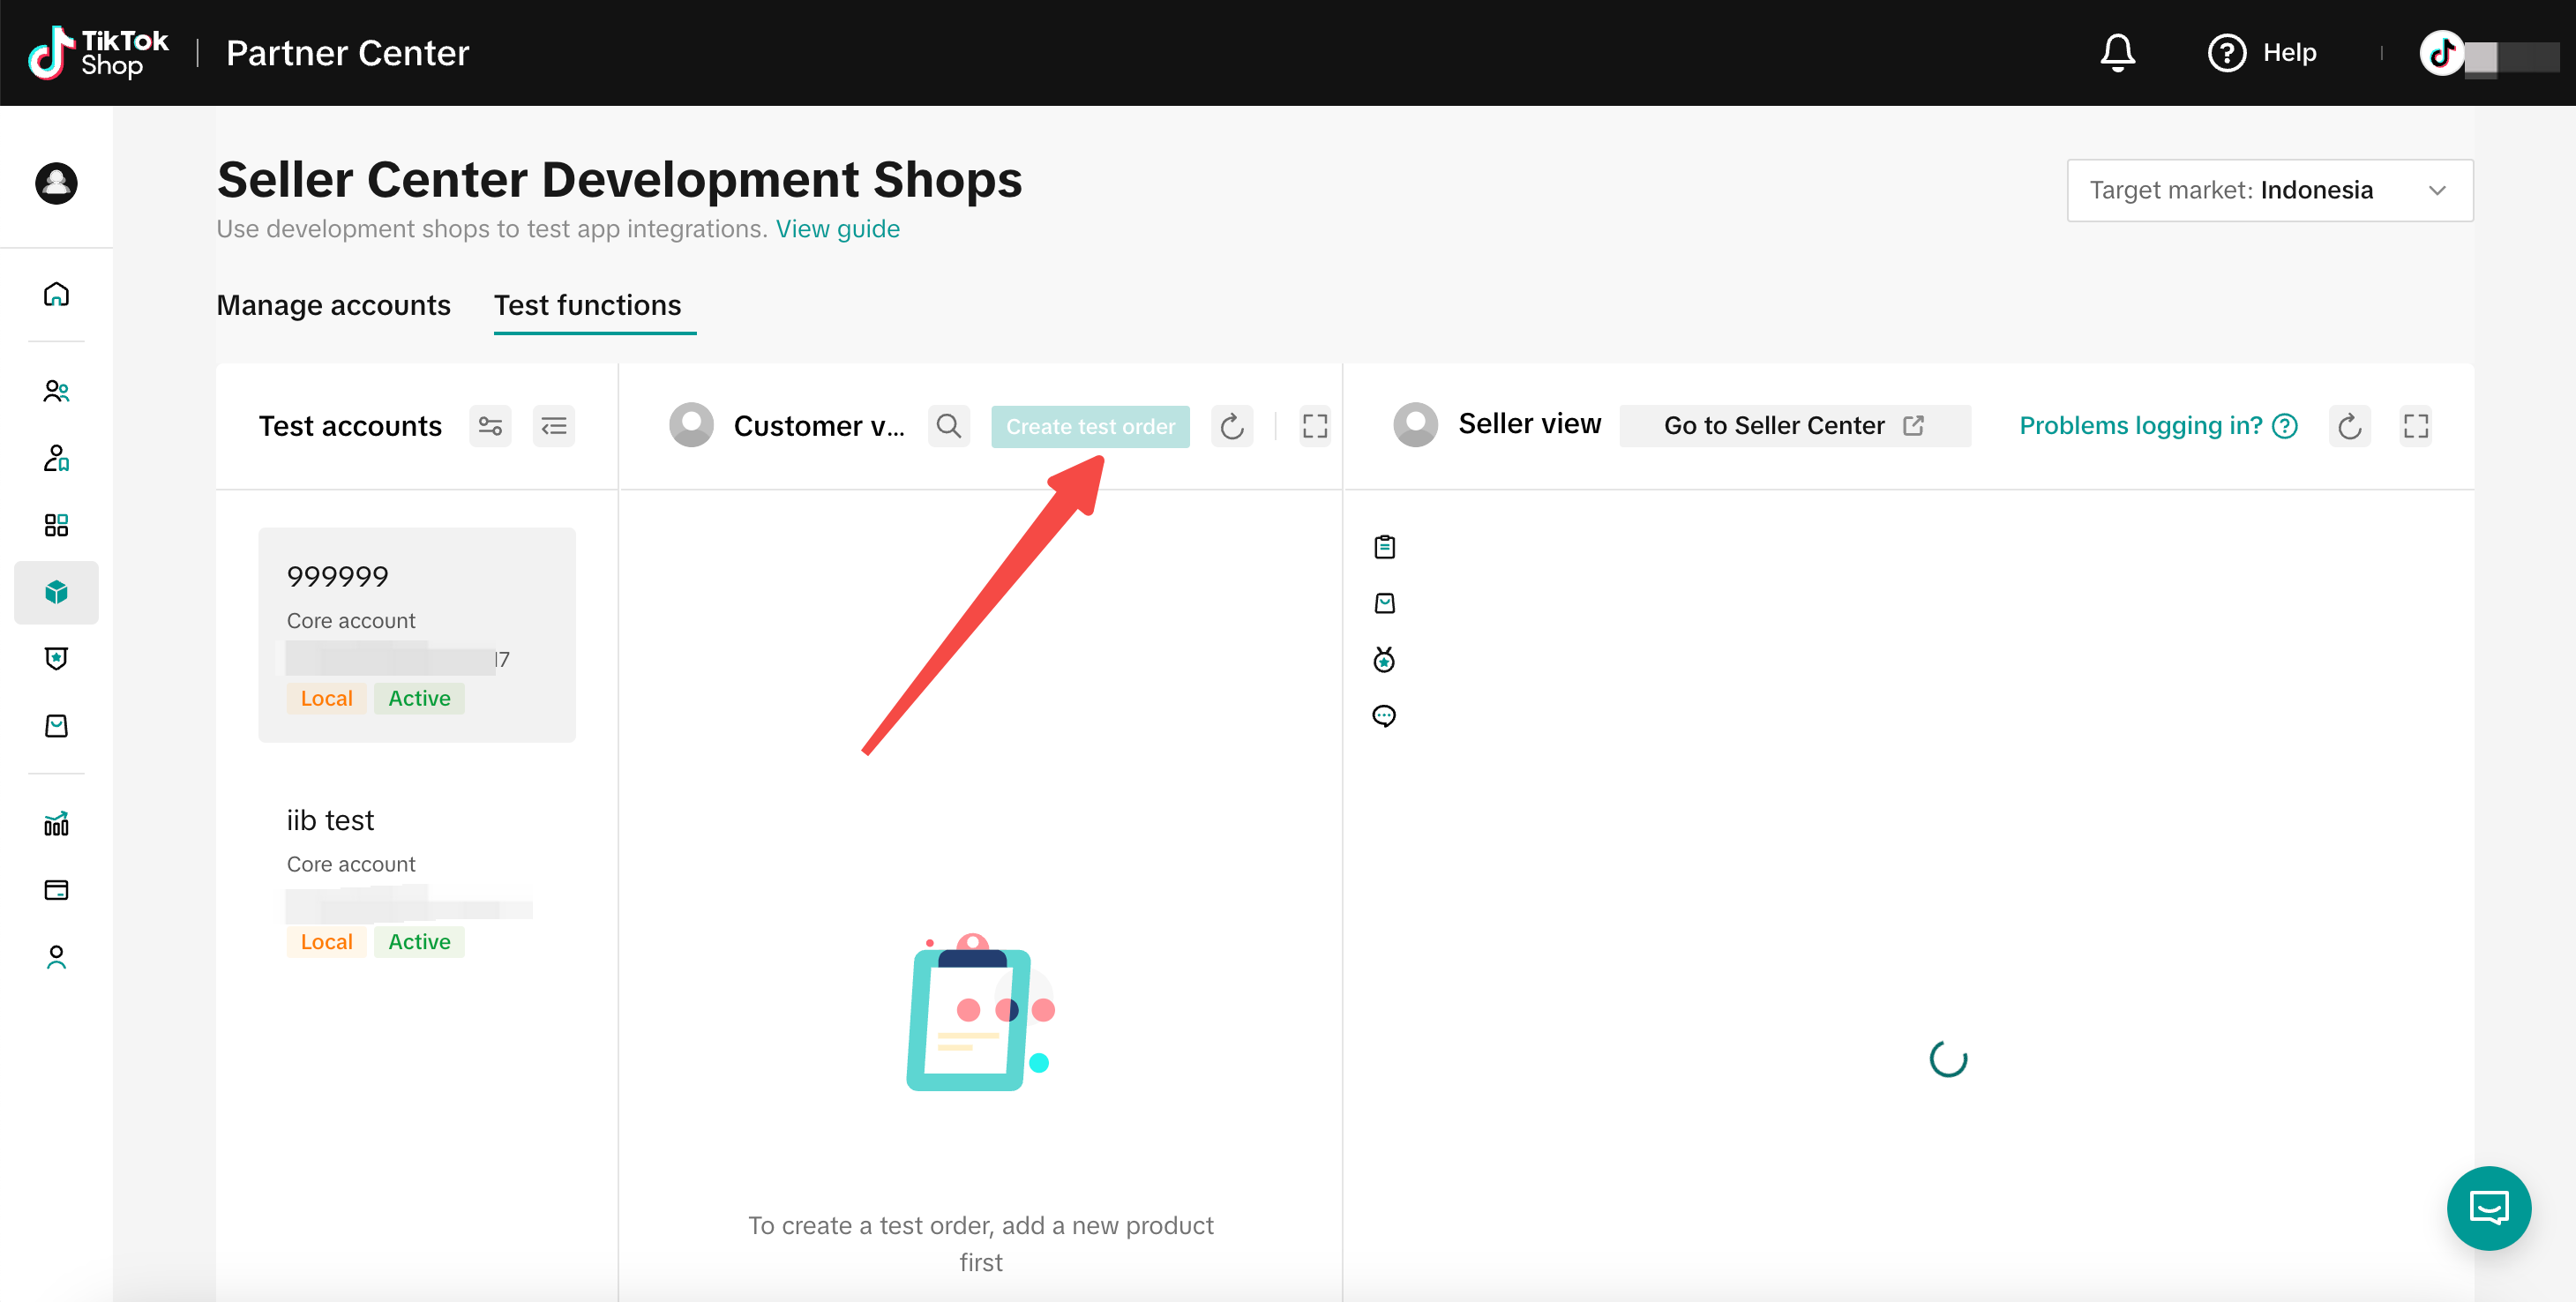
Click "Create test order" to mock order placement.
 Start testing your app: - Test product listing
For product listing with API, please refer to this document. If you wish to list products manually, please use ModHeader. Use the below profile:
Then click "Go to Seller Center" for product listing:
Test product listing
- For product listing with API, please refer to [this document](https://partner.tiktokshop.com/docv2/page/products-api-overview).
- If you wish to list products manually, please use [ModHeader](https://modheader.com/). Use the below profile:
Then click "Go to Seller Center" for product listing:
- Test order placement and fulfillment
Before order placement, please make sure you have successfully listed the products for this shop, then click "start testing".
Click "Create test order" to mock order placement.
📌 Please note: we only support test order placement from TikTok right now.
You should be able to get the order data from Orders API, then proceed to fulfillment API calls.
Case 2: If you only integrate with Tokopedia Open Platform, and not yet integrated with Tokopedia & Shop Partner Center
Tokopedia Open Platform: https://developer.tokopedia.com/
Tokopedia & Shop Partner Center: https://partner.tiktokshop.com/
Step 1: Create an account on Tokopedia & Shop Partner Center
📌 Access to Tokopedia & Shop Partner Center: https://partner.tiktokshop.com/
Set up an account on Partner Center. Provide your email address and, optionally, your phone number. Ensure your email address on Partner Center is current, as it is essential for receiving crucial updates from the Partner Center platform.
Step 2: Register as an App developer (ISV or Seller developer)
If you are ISV
| # | Description | Screenshot |
|---|---|---|
| 1 | After creating an account, you'll find a business guide tailored to different partner types. Pick App developer as your partner type from this guide, click on 'Start Business,' and it will lead you to the 'Get Started' page to initiate your application for your selected category. | 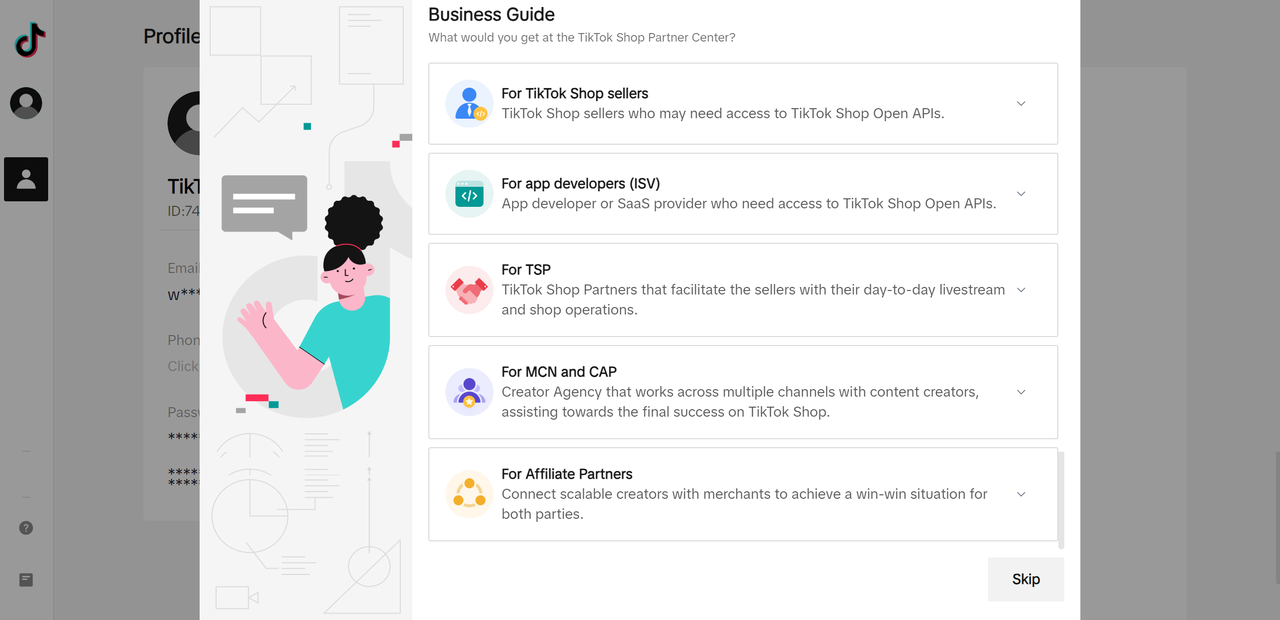 |
| 2 | Click on "Get started" to start your partner application. | 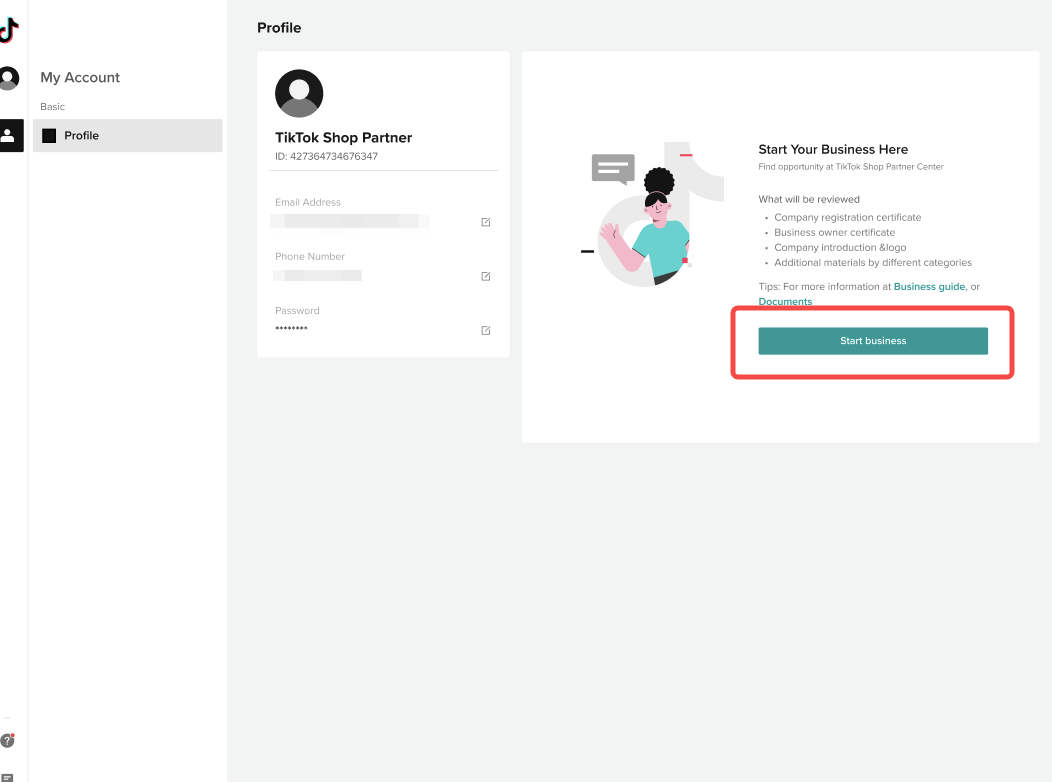 |
| 3 | As a first step, Tokopedia & Shop needs to know what type of Apps you plan to build for sellers. Please choose the target App category and target seller market. | |
| For example, you can choose "Enterprise Resource Planning" as the target category and "Indonesia" as the target market. | 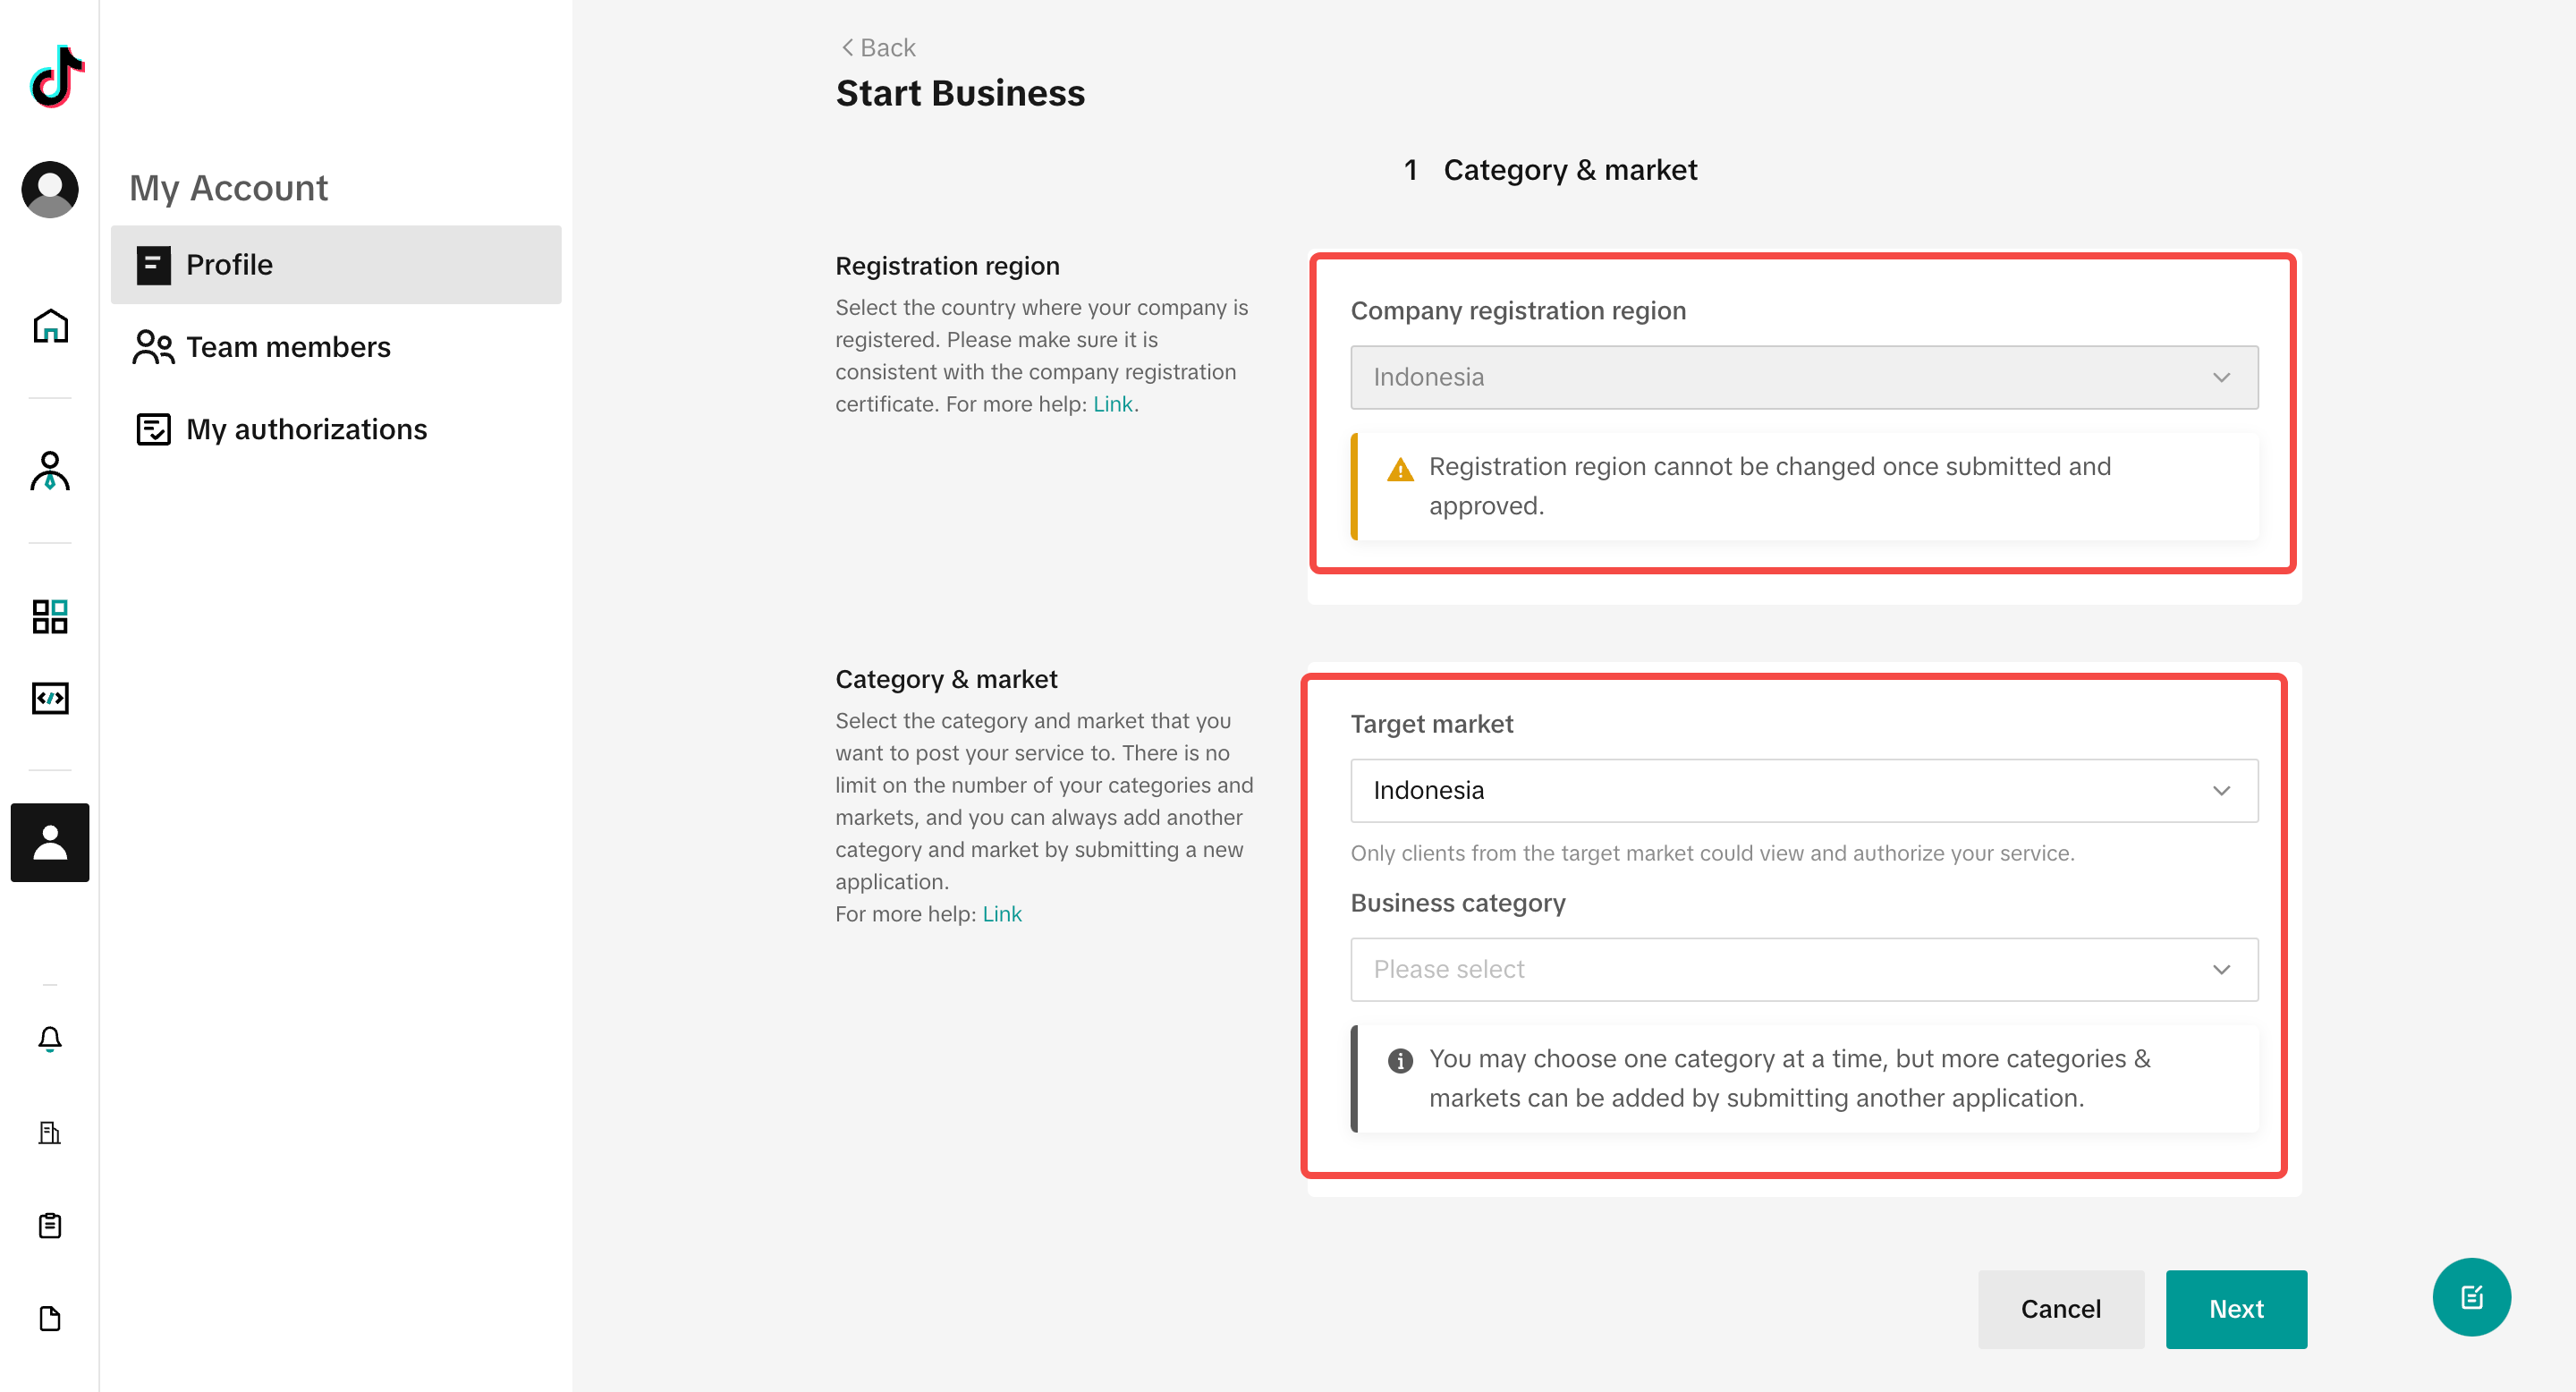 | |
| 4 | You can click "Get app key now" and complete your registration later. But you must come back and pass the certification review before the App published. | 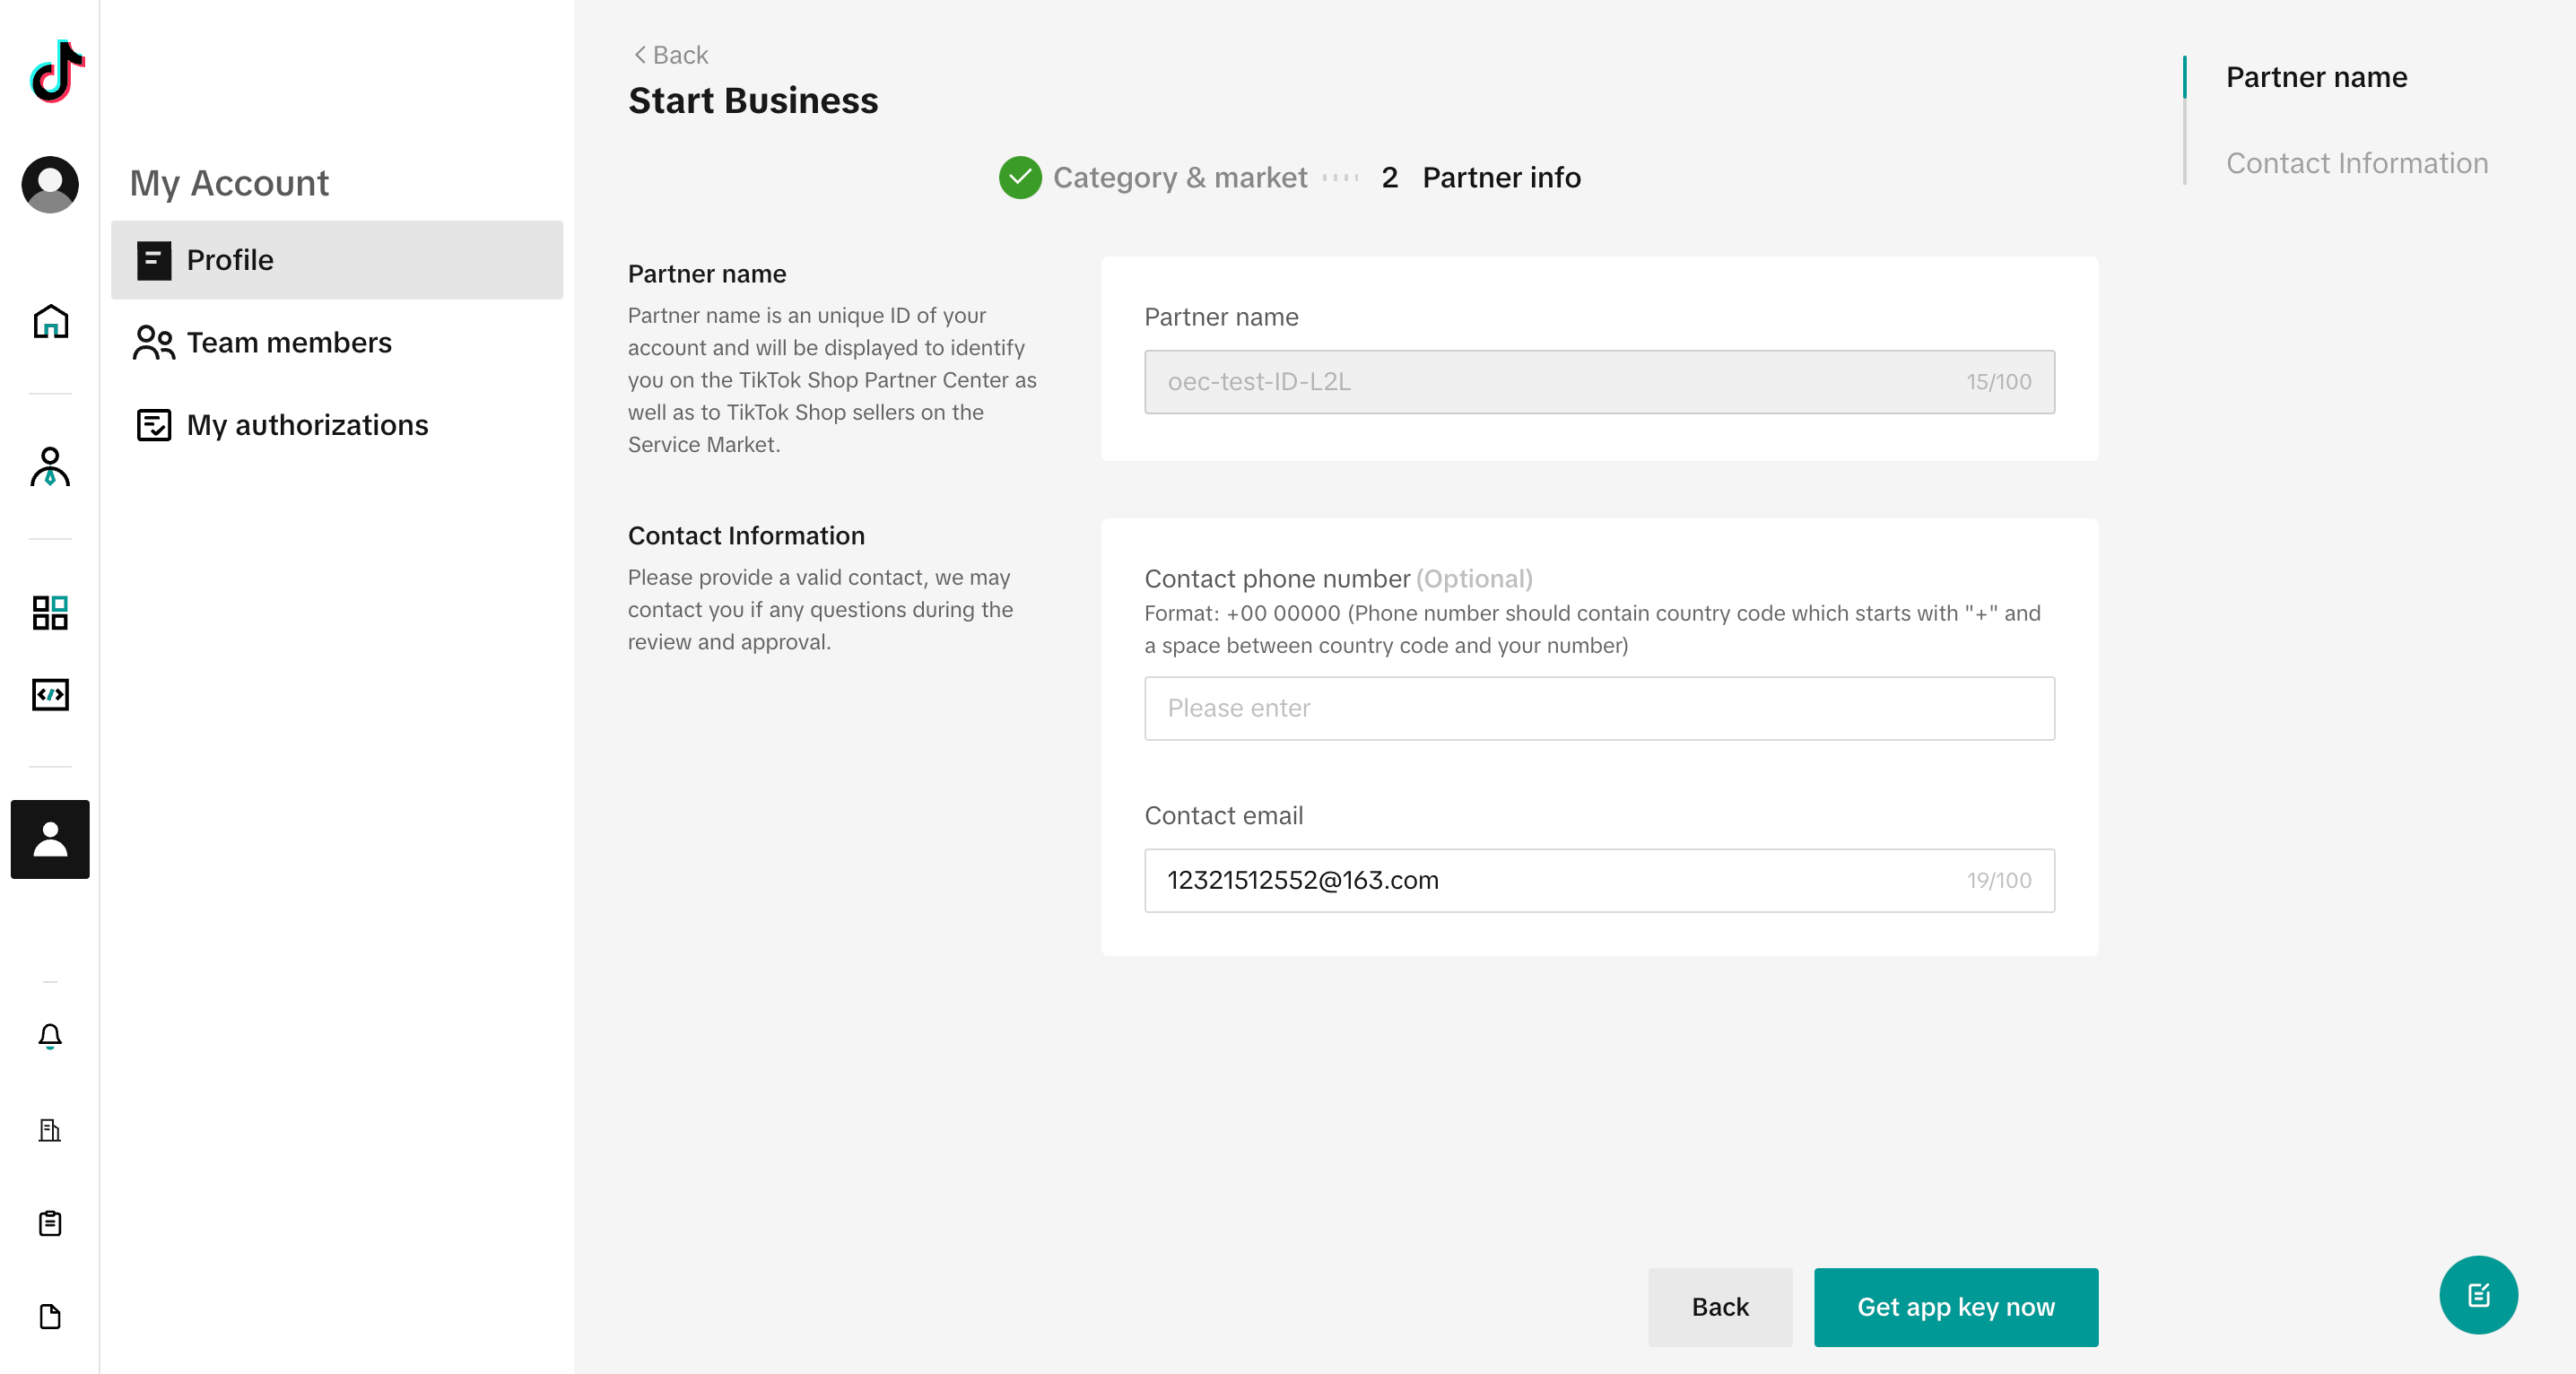 |
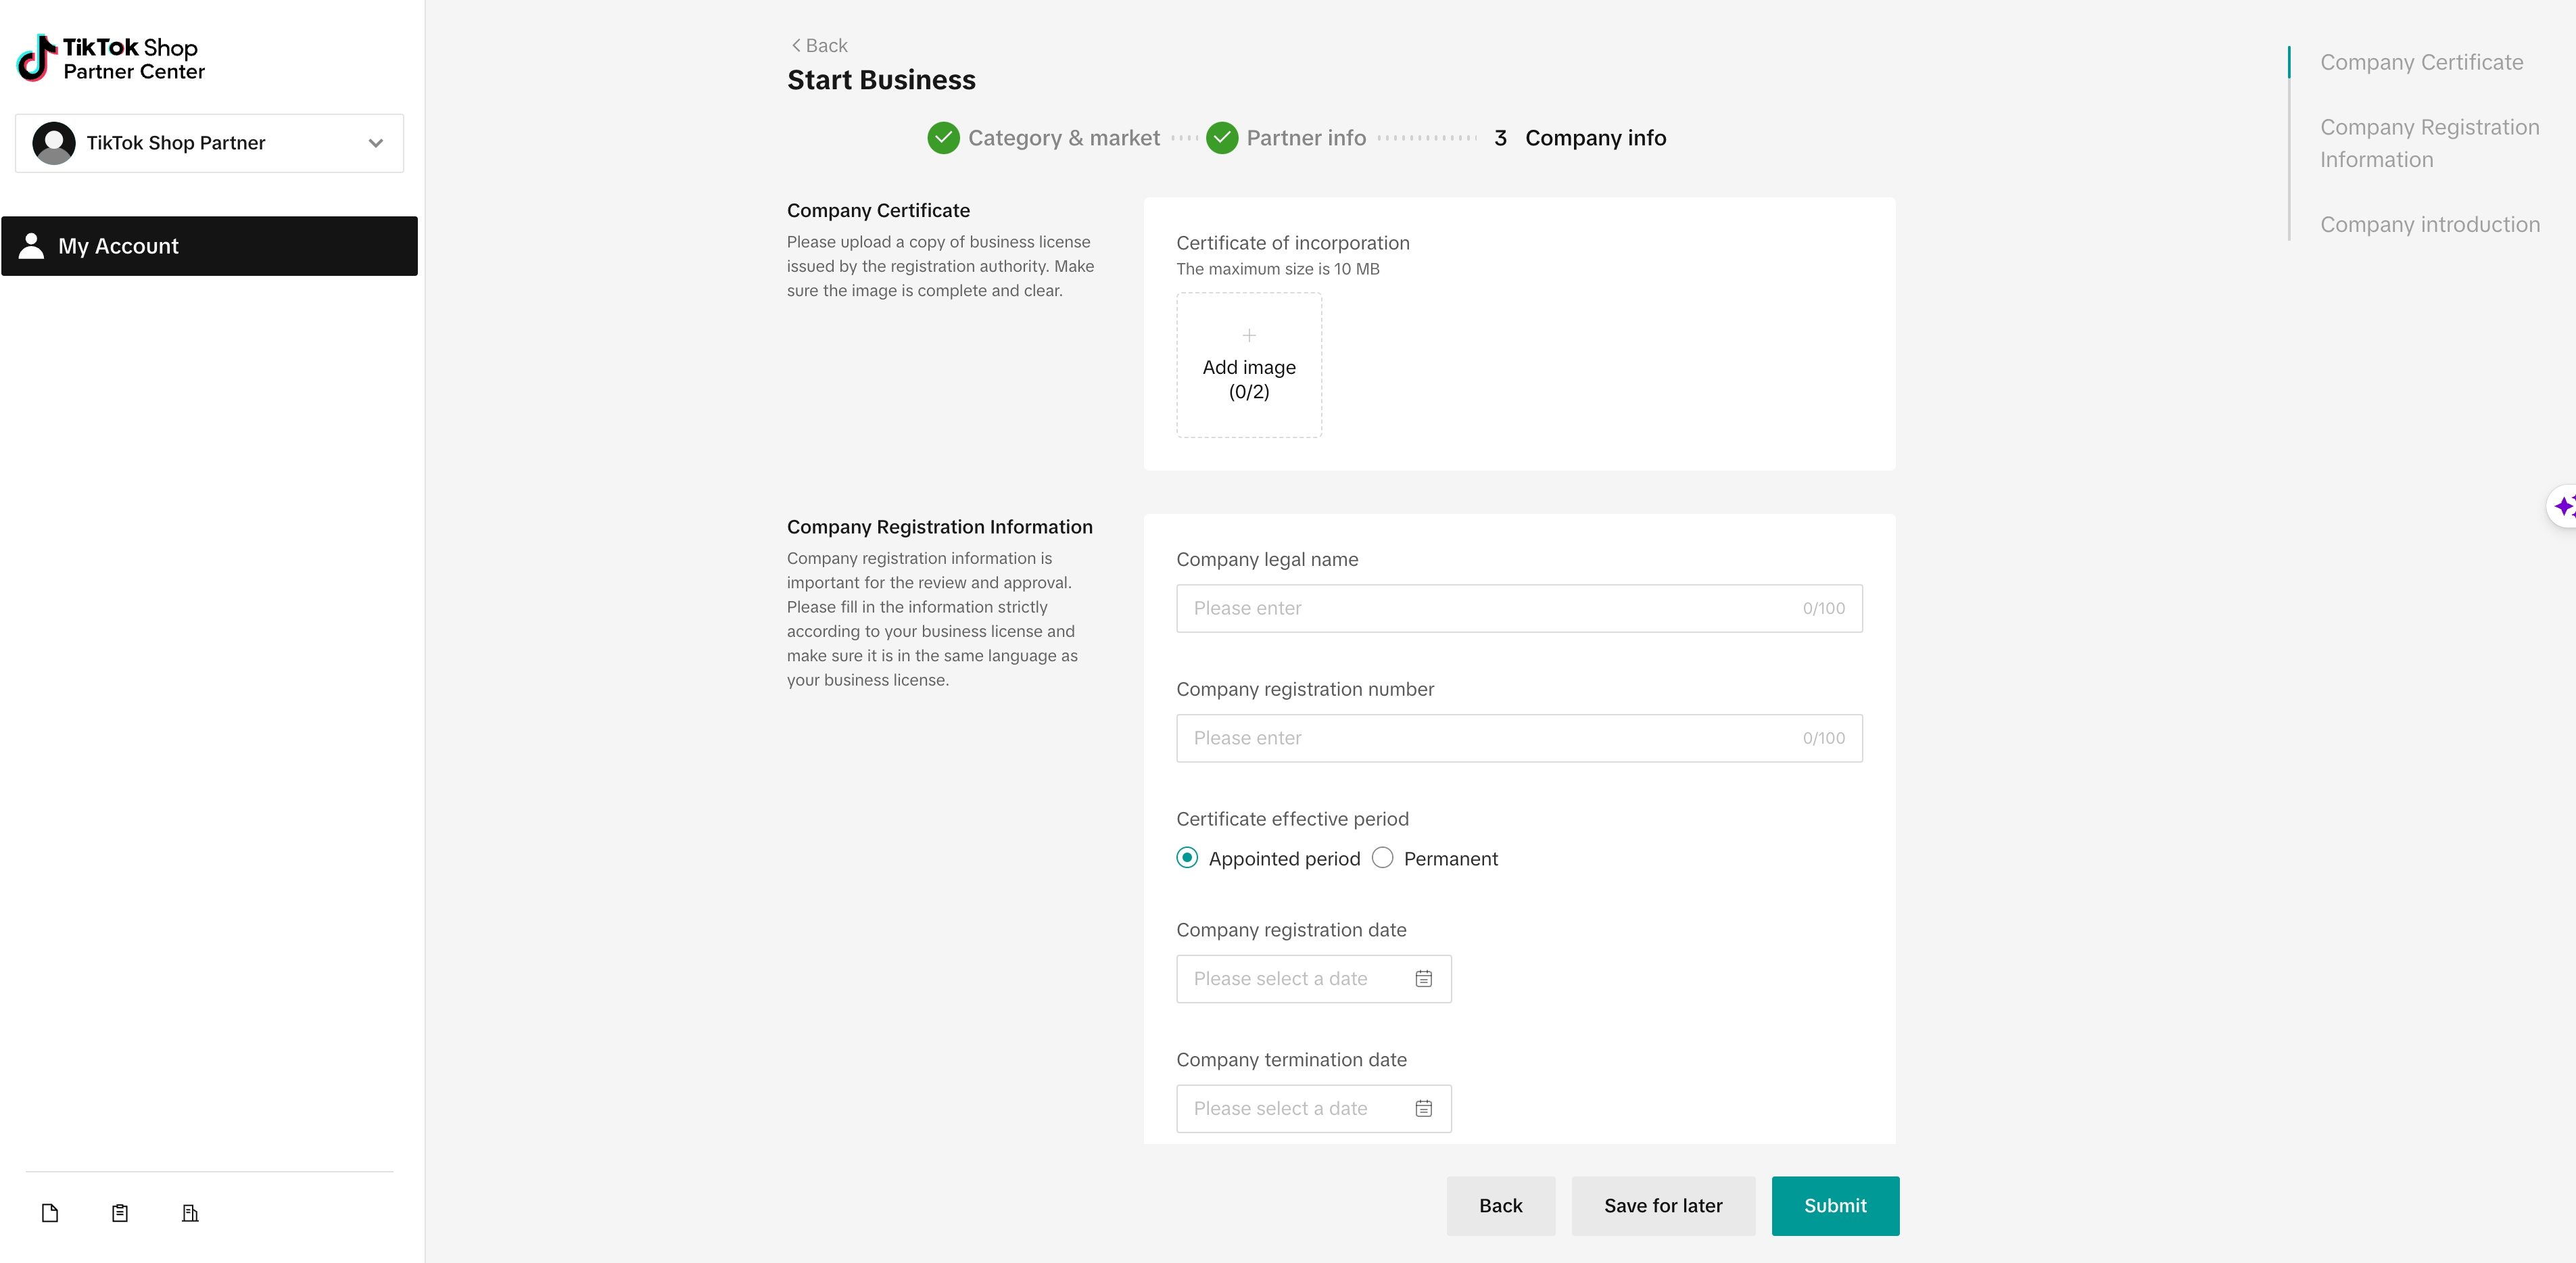
| 5 | You'll need to complete the necessary fields based on the category you've selected, including business license related information. Be sure to have your business license and related documents prepared in advance. | 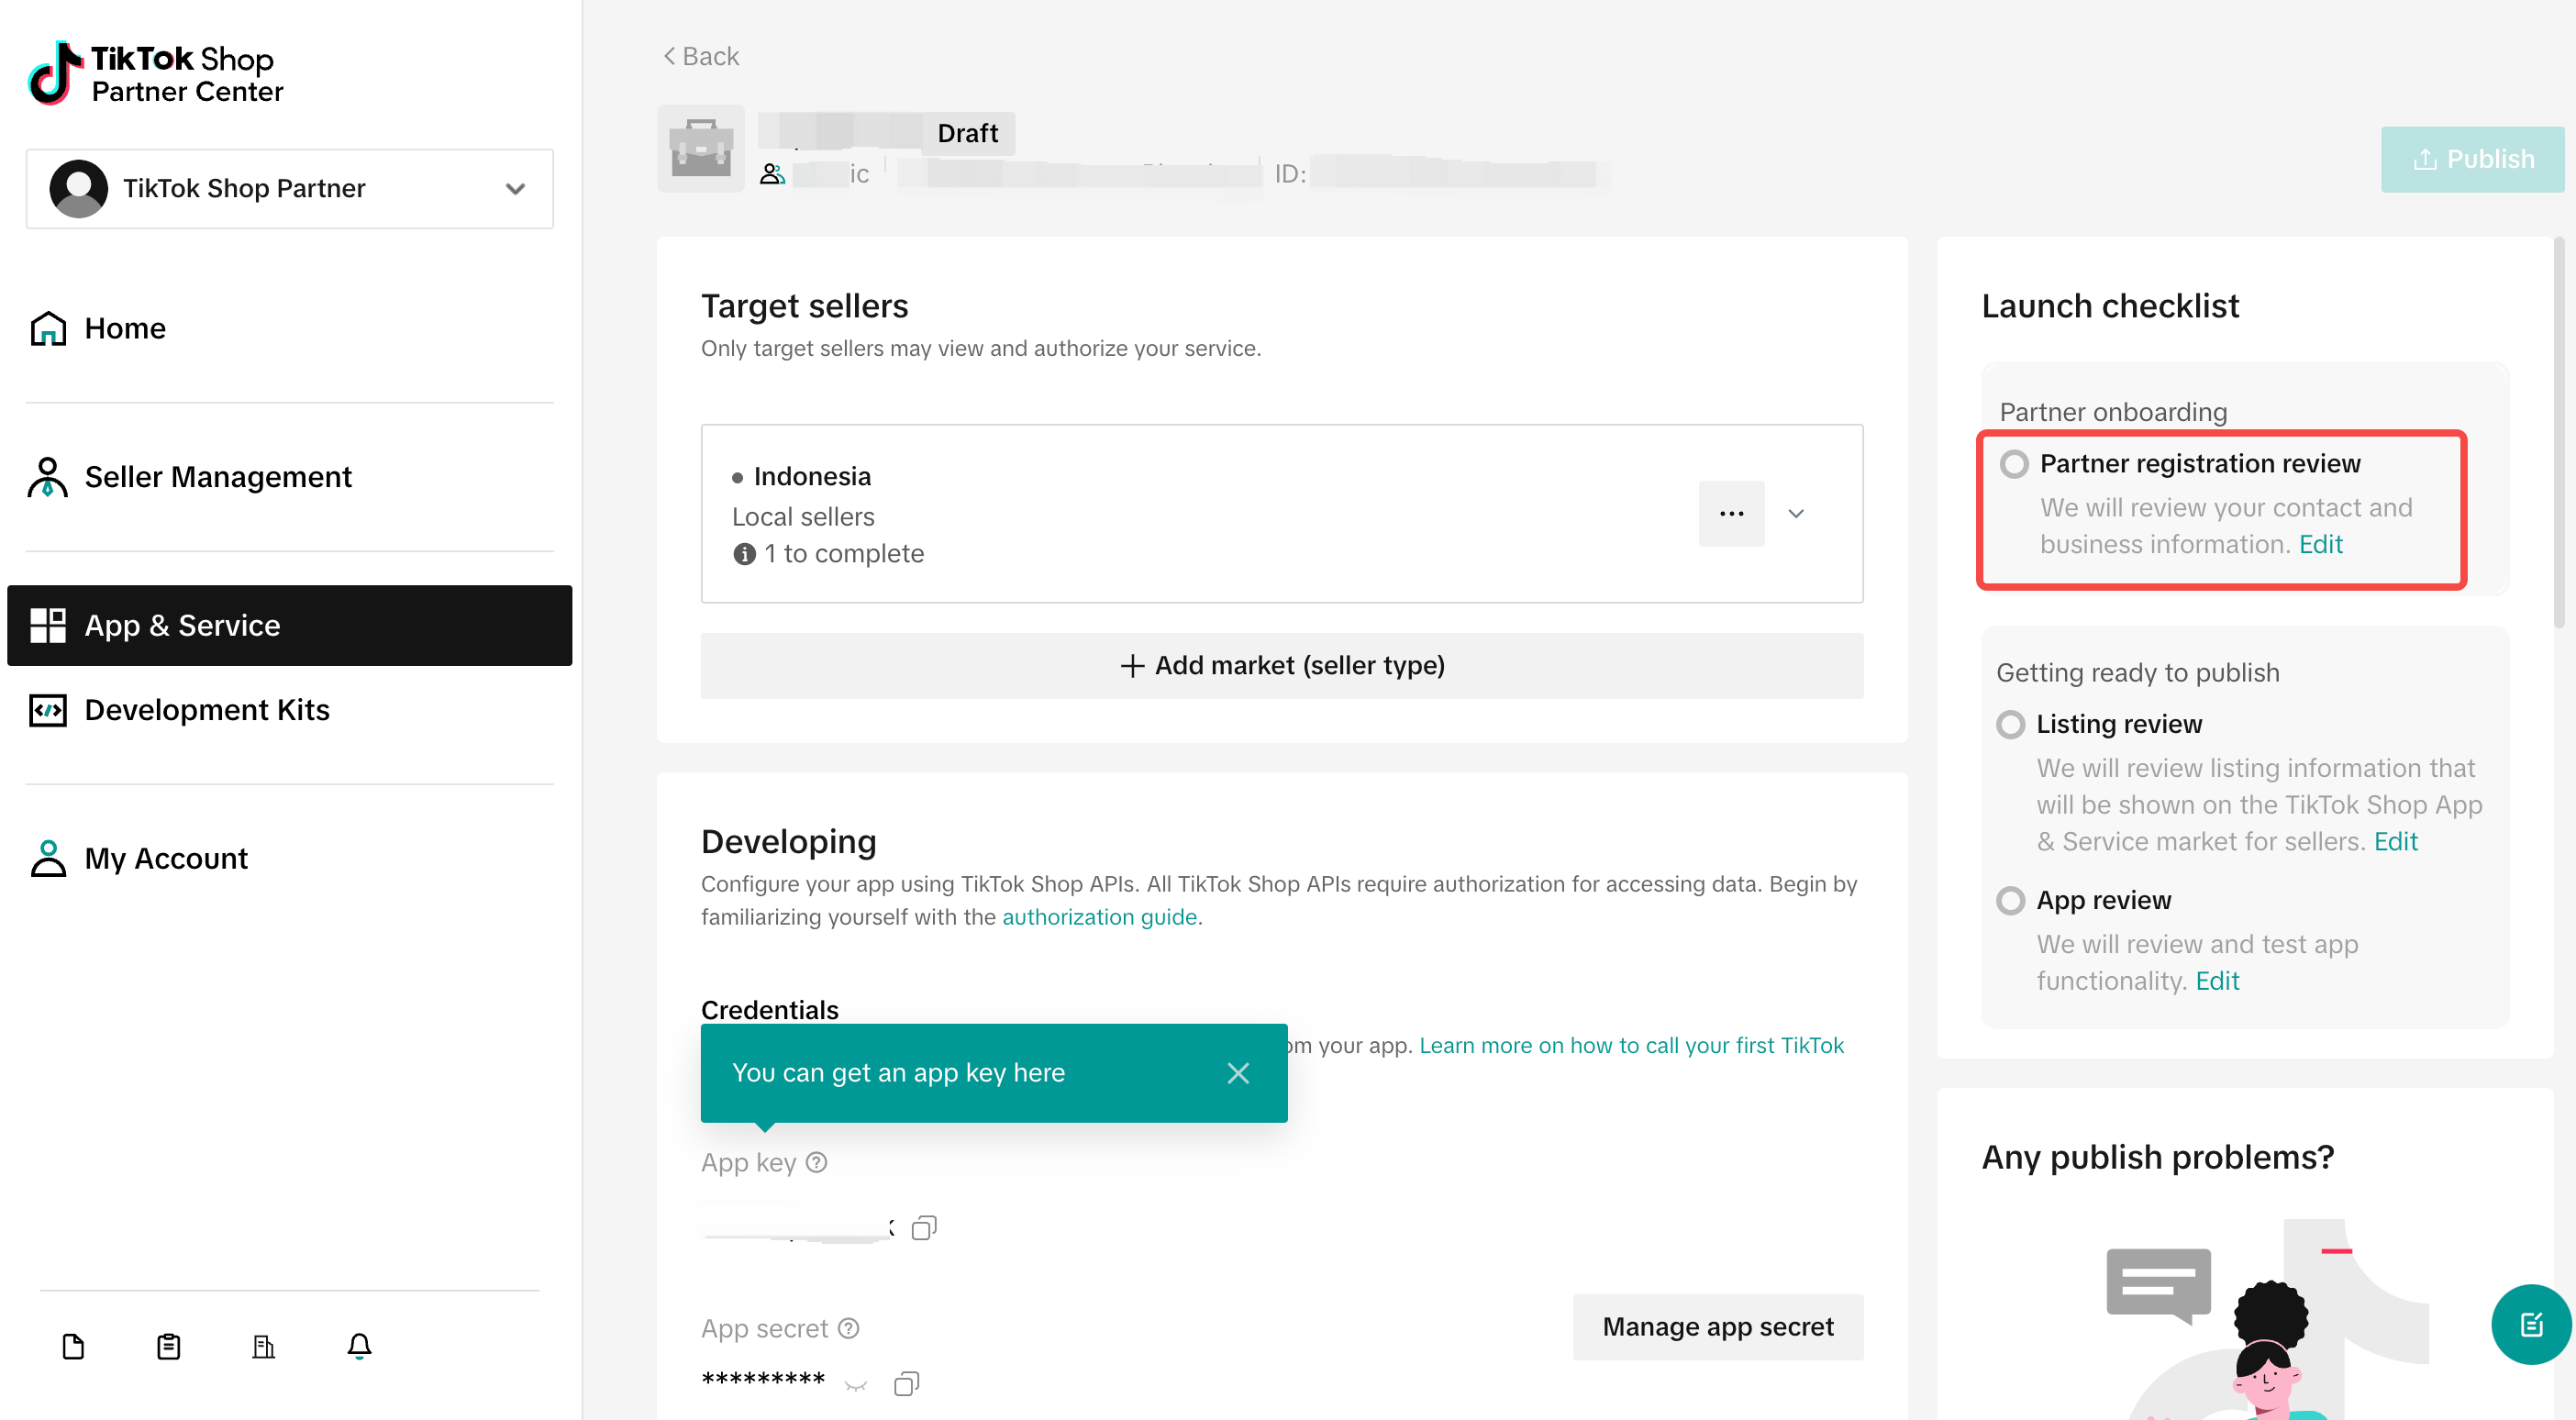 |
 |
If you are the seller developer
| # | Description | Screenshot |
|---|---|---|
| 1 | After creating an account, you'll find a business guide tailored to different partner types. Pick App developer as your partner type from this guide, click on 'Start Business,' and it will lead you to the 'Get Started' page to initiate your application for your selected category. | |
| 2 | Click on "Get started" to start your partner application. | |
| 3 | Please choose the target App category and target seller market. | |
| 📌 Please choose 「TikTok Shop Seller」as the business category |  | |
| 4 | Please verify your seller account with login and password (email or phone number). | |
| Tokopedia & Shop Partner Center will verify the account automatically. | 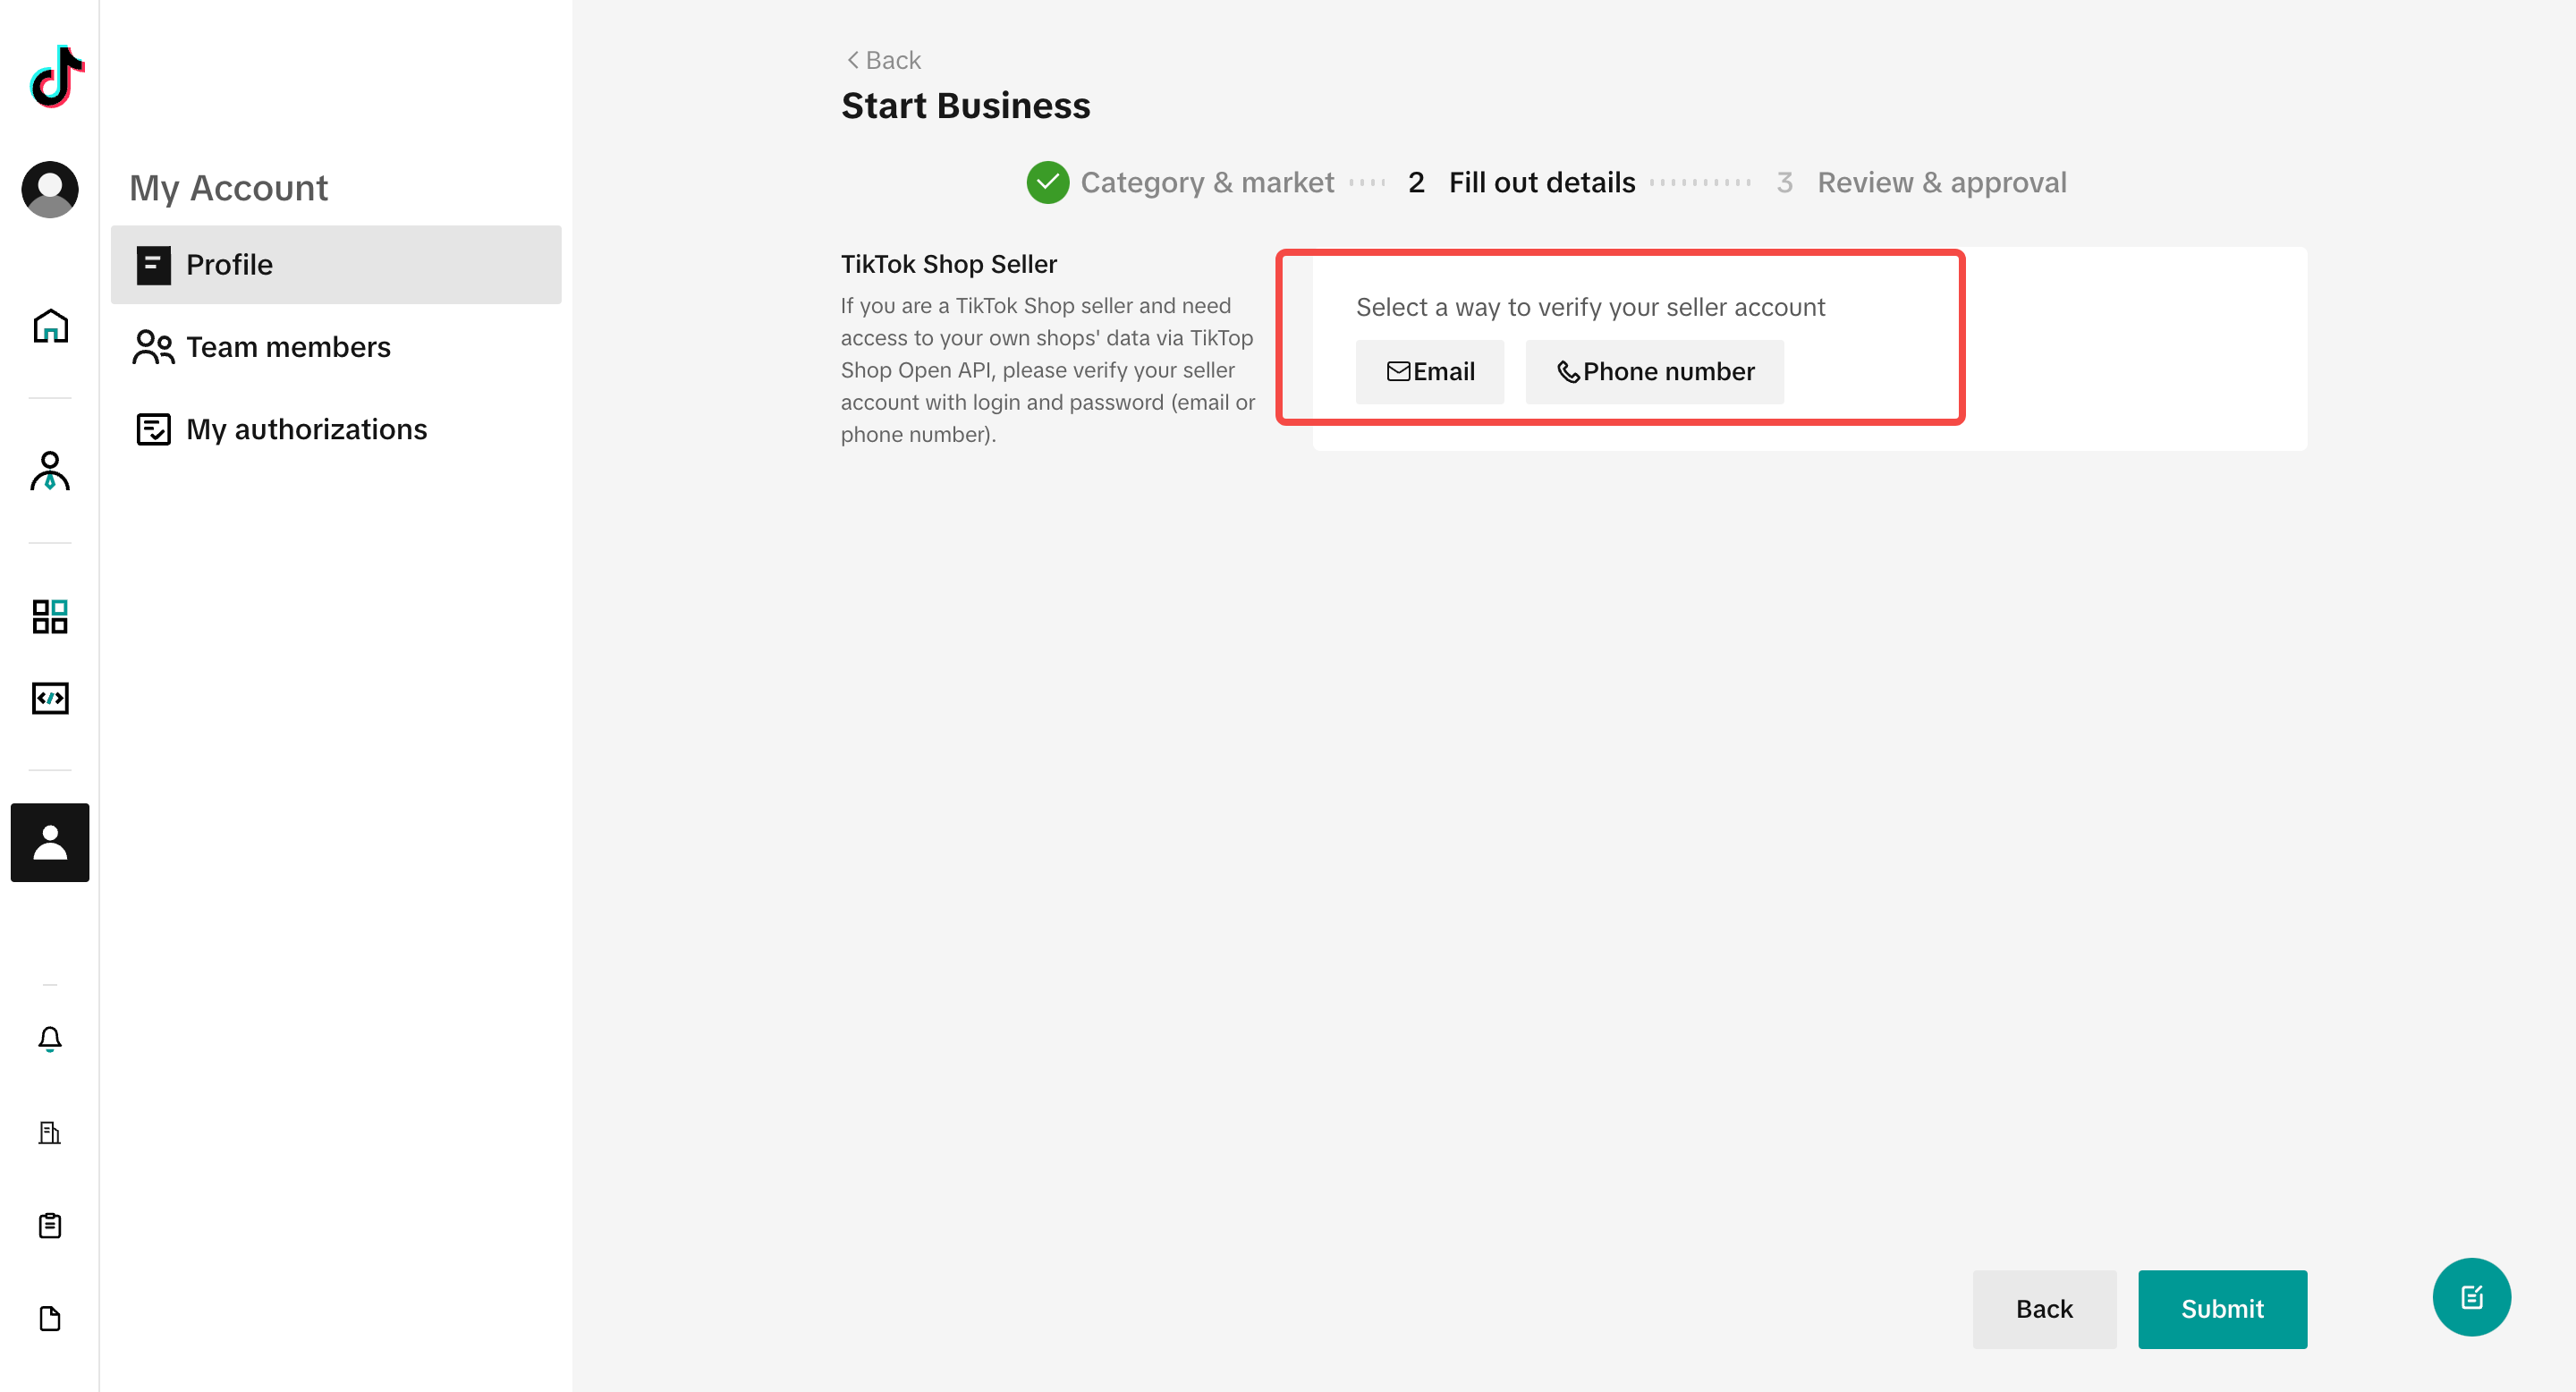 | |
| 5 | When you are verified, you will see the tag of "Tokopedia & Shop Seller" under My Account page. | |
| 📌 You should have a Tokopedia & Shop seller account first, no matter which market this account belongs to | 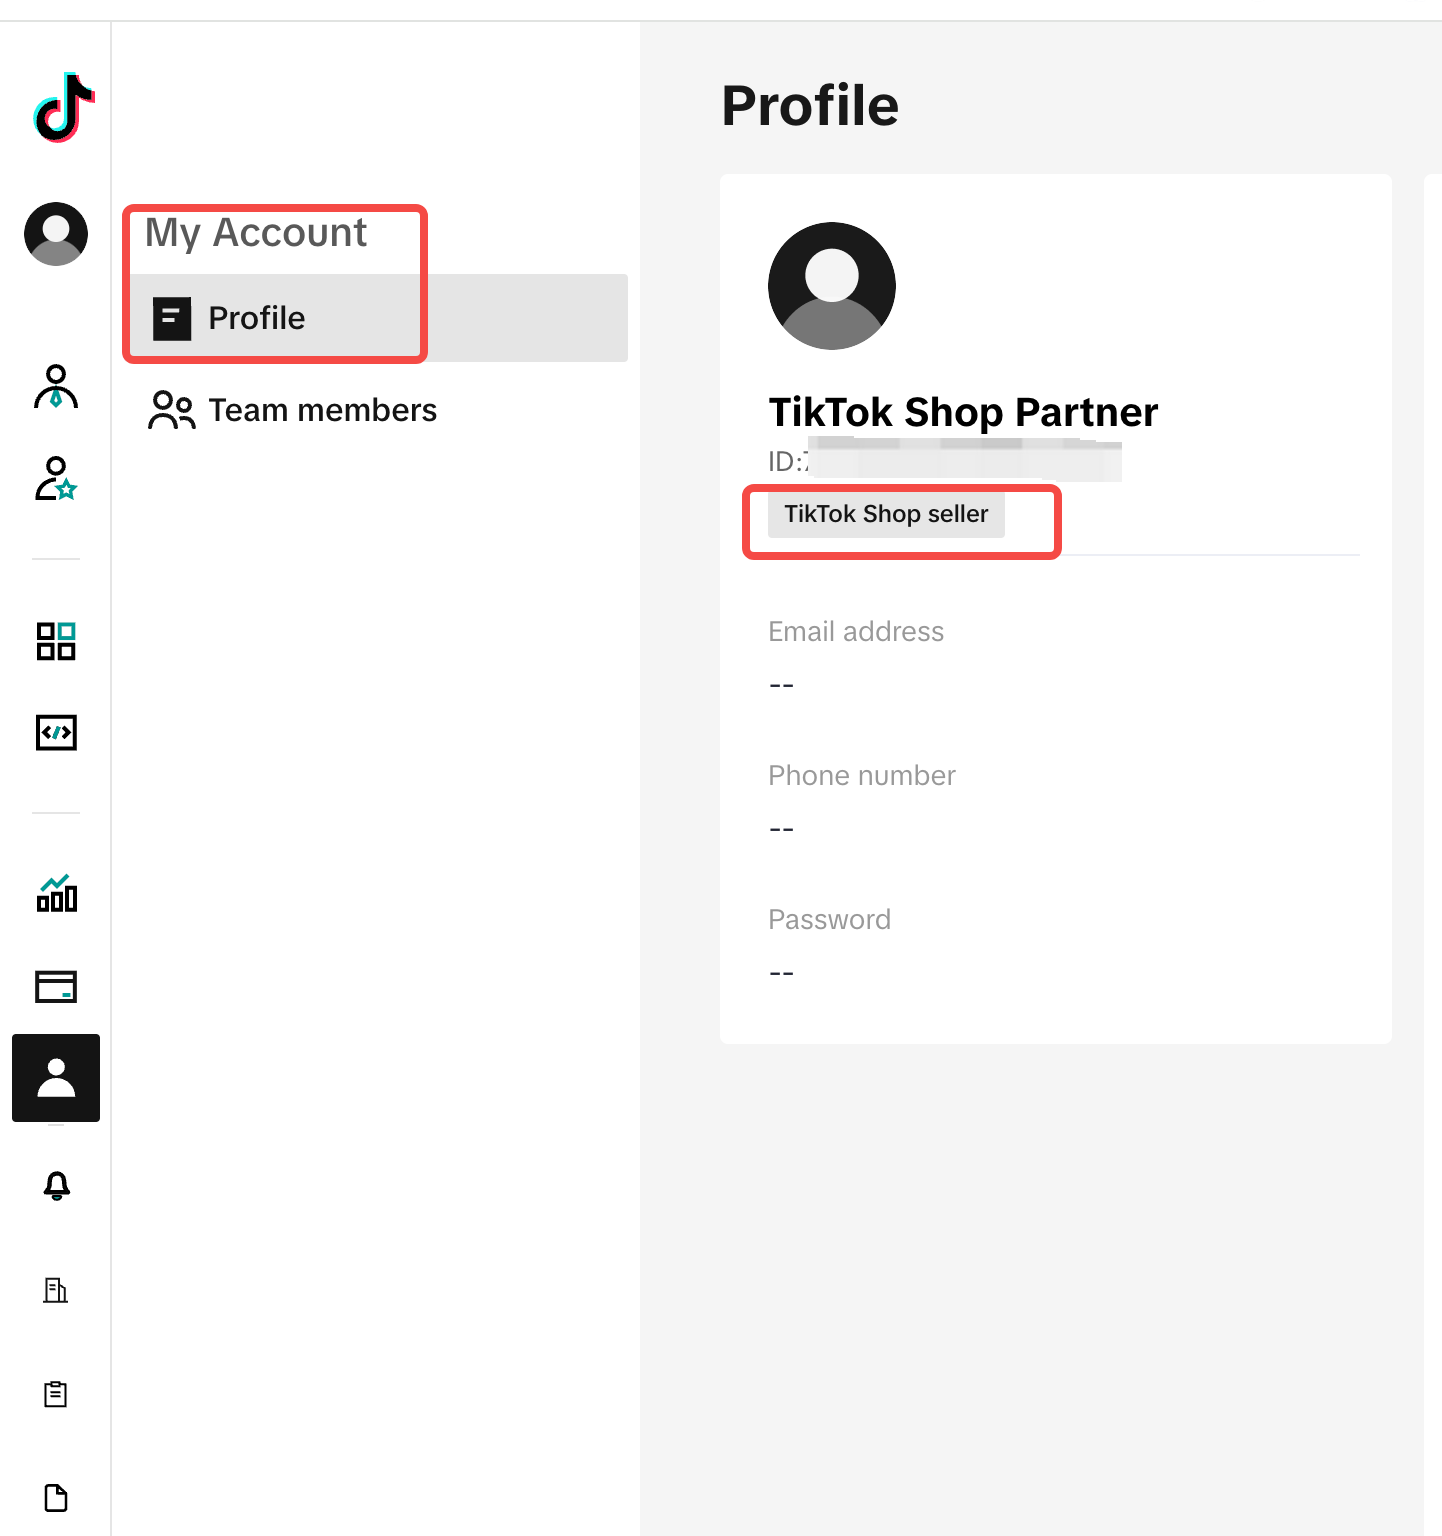 |
Step 3: Create an App
| # | Description | Screenshot |
|---|---|---|
| 1 | Determine what type of App to build | |
| There are two types of Apps you can build with Tokopedia & Shop APIs: public and custom. Each App type has its own workflows and requirements. |
- Public App: This type of App is publicly listed on the Tokopedia & Shop App Store and is discoverable by sellers. Sellers will authorize the App to connect their Tokopedia & Shop account. To list this App on Tokopedia & Shop App Store, the App must pass Tokopedia & Shop's App review process.
- Custom App: This type of App is typically developed for a particular seller. It is tailored to meet the specific business needs, requirements, or preferences of a seller. The App is not listed on Tokopedia & Shop App Store. You can distribute this App to individual sellers by sharing the App's authorization link.
📌 Note: Partner Center supports the ability to convert/upgrade a custom App to a public app. Refer to Publishing a custom App for more information on how to convert your published custom App. | 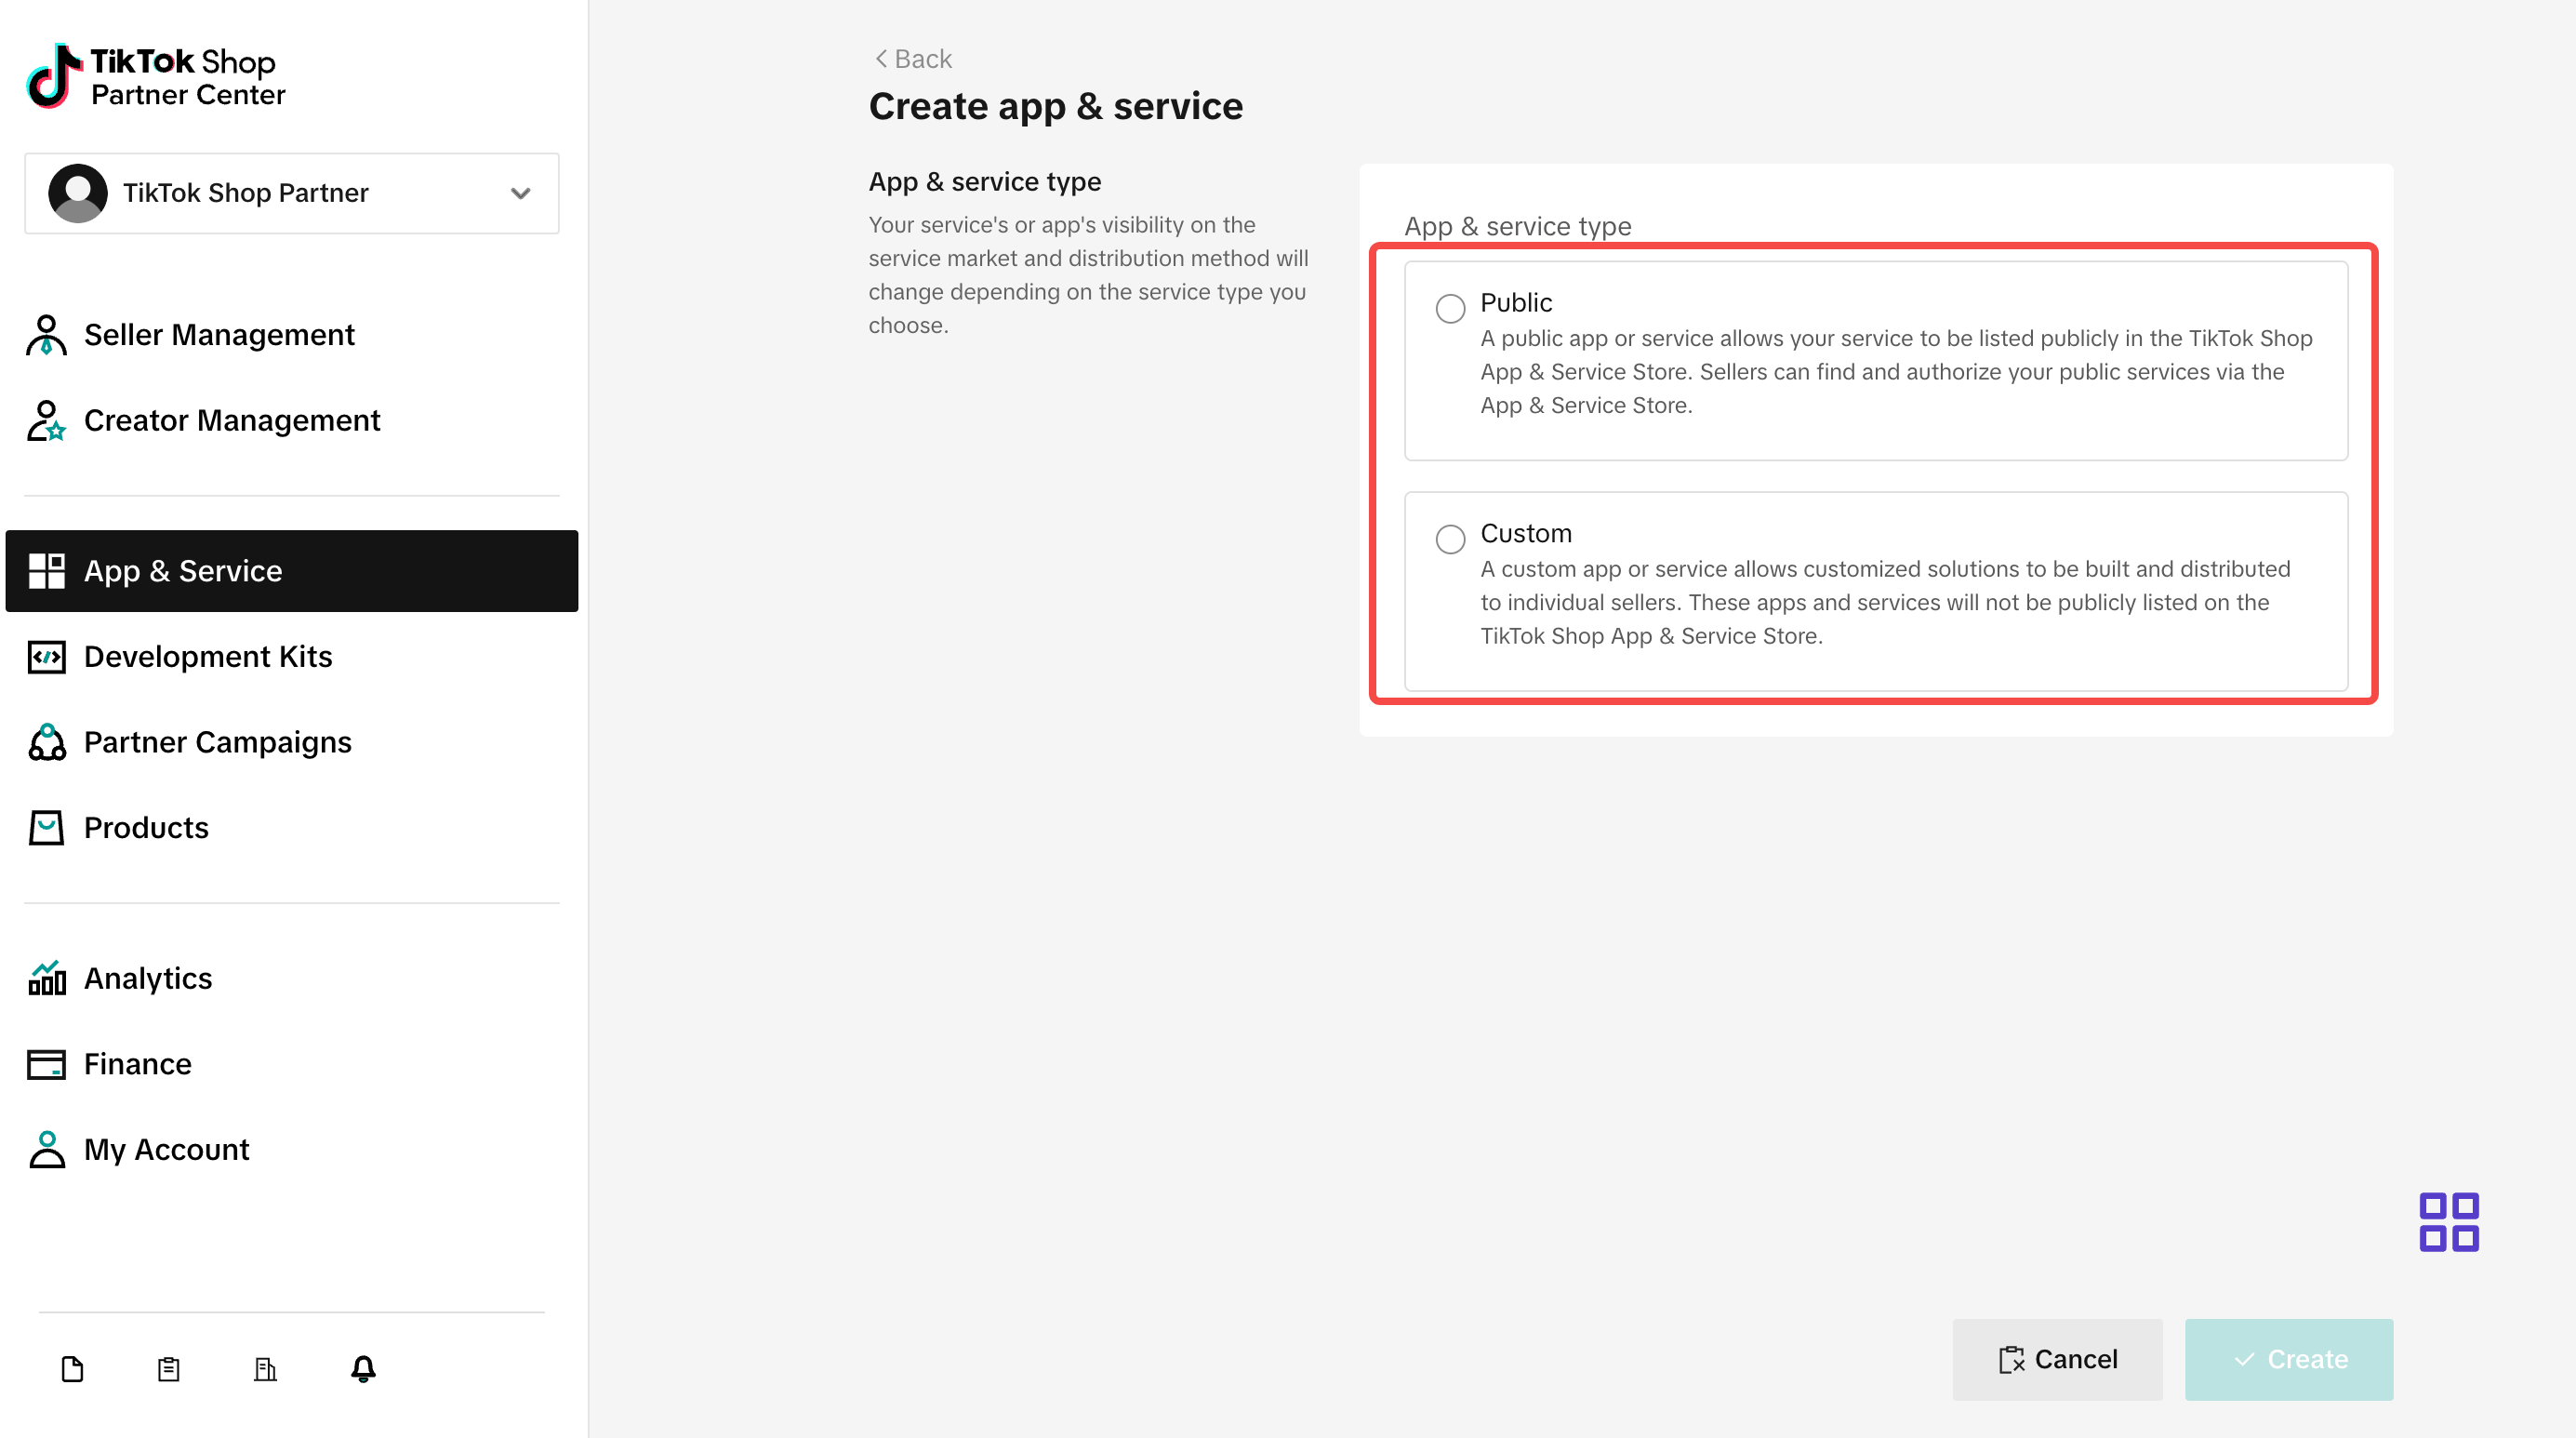 |
| 2 | Create your App
|
| 2 | Create your App
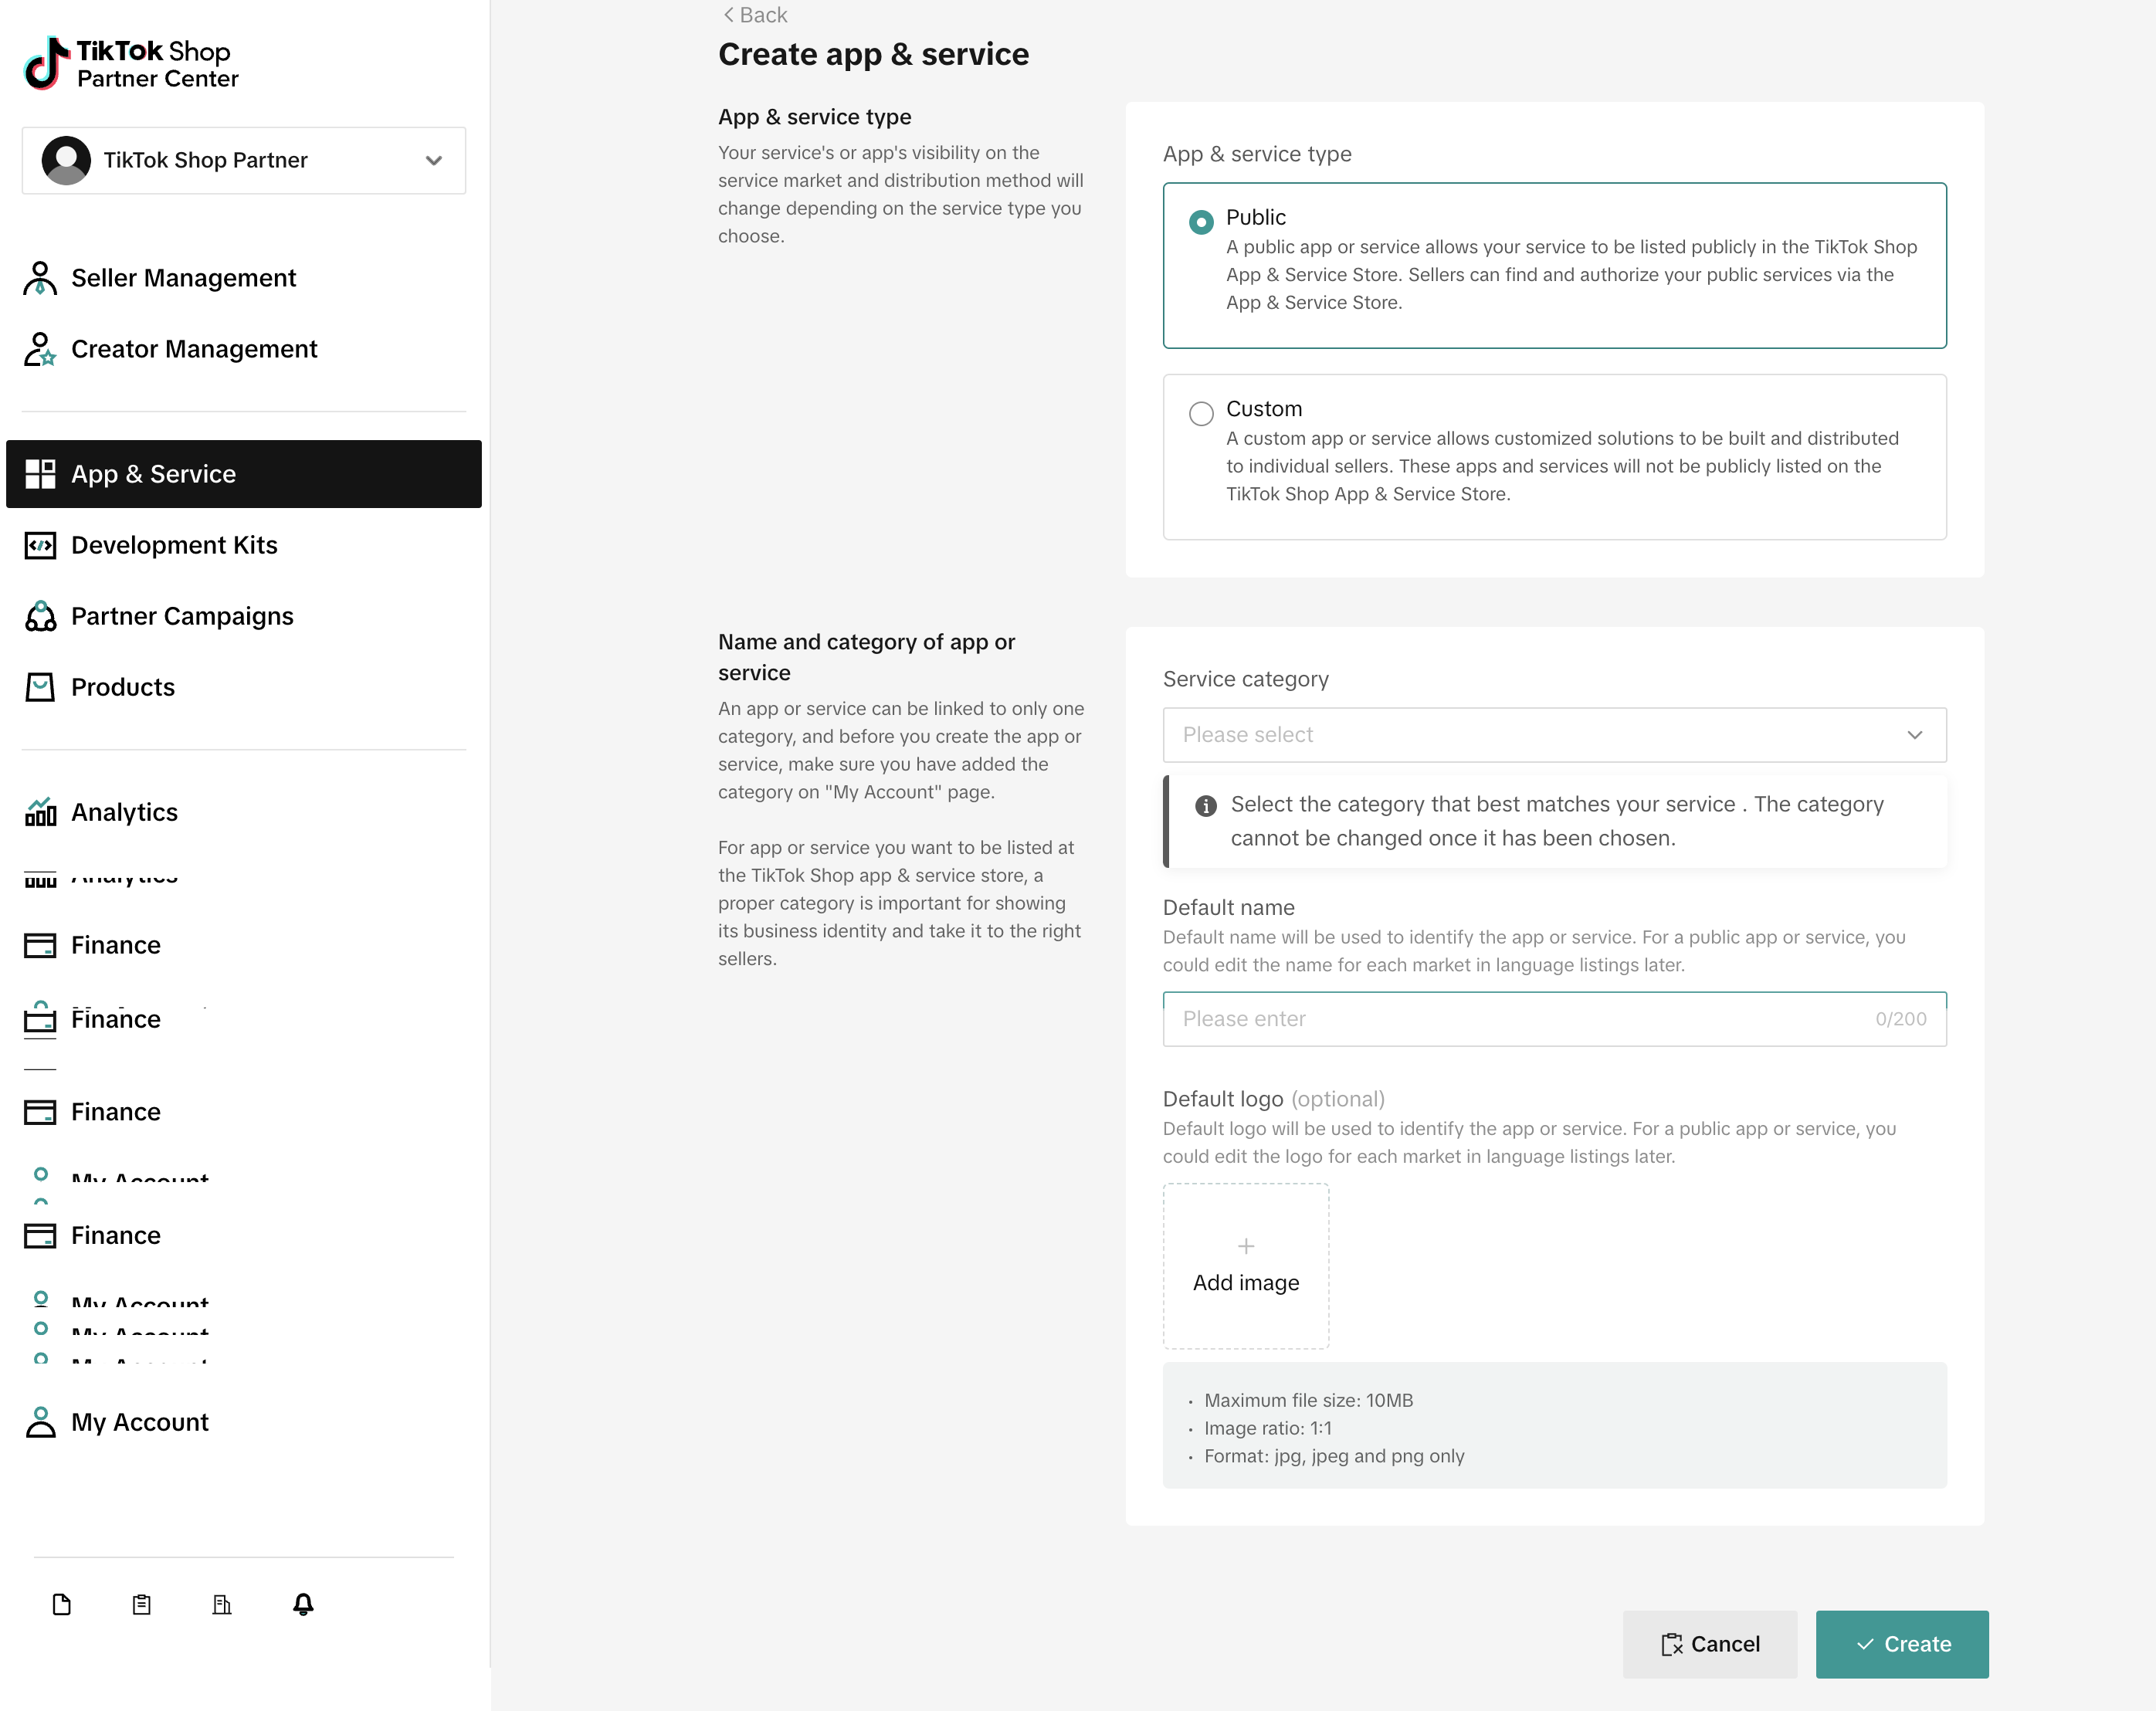
- Select App & Service from the navigation panel. The Partner Center displays the 「App & service」 page.
- Click the Create app & service button in the top right corner of the page. The Partner Center displays the「Create app & service」page.
- Select either Public or Custom, based on the type of App you wish to create.
- Select the Service category and set the default name of your App. Optionally, upload a logo for your App. 📌 Please note that you can only choose the category you chose in「Step2 Register as an App developer」
- Select the Market and set the seller type for your App. 📌 You can choose multiple seller market and seller type.
- Toggle the Enable API switch on and complete the following fields. Otherwise, skip to the next step.
- Redirect URL Enter the URL at which to receive your authorization code. After the seller authorize the App, it will jump to this URL (it can be the URL of your system's web page) and transmit the
auth_code, which you can use to get theaccess_token. - Webhook URL Optionally, enter the URL to receive push notifications (it can be the URL of your system). - Click Create to complete the process.
After you create your App, Partner Center displays the App and service detail page. Here you can access your App's unique App key and secret, which allow you to complete seller authorization and API calls.
- App Key - The unique identification of the service.
- App Secret - The application key generated by the platform when you create an App. You can use this secret to obtain the API access token. |
 |
|
Step 4: Bind「Tokopedia Open Platform」account and「Tokopedia & Shop Partner Center」account
Same asCase 1 - Step 2
Step 5: Bind「Tokopedia Open Platform」App and「Tokopedia & Shop Partner Center」App
Same as Case 1 - Step 3
Step 6: Integrate with Tokopedia & Shop API
Same as Case 1 - Step 4
Step 7: Test your App
Same as Case 1 - Step 5
Step 8: Ready to launch
For Public App
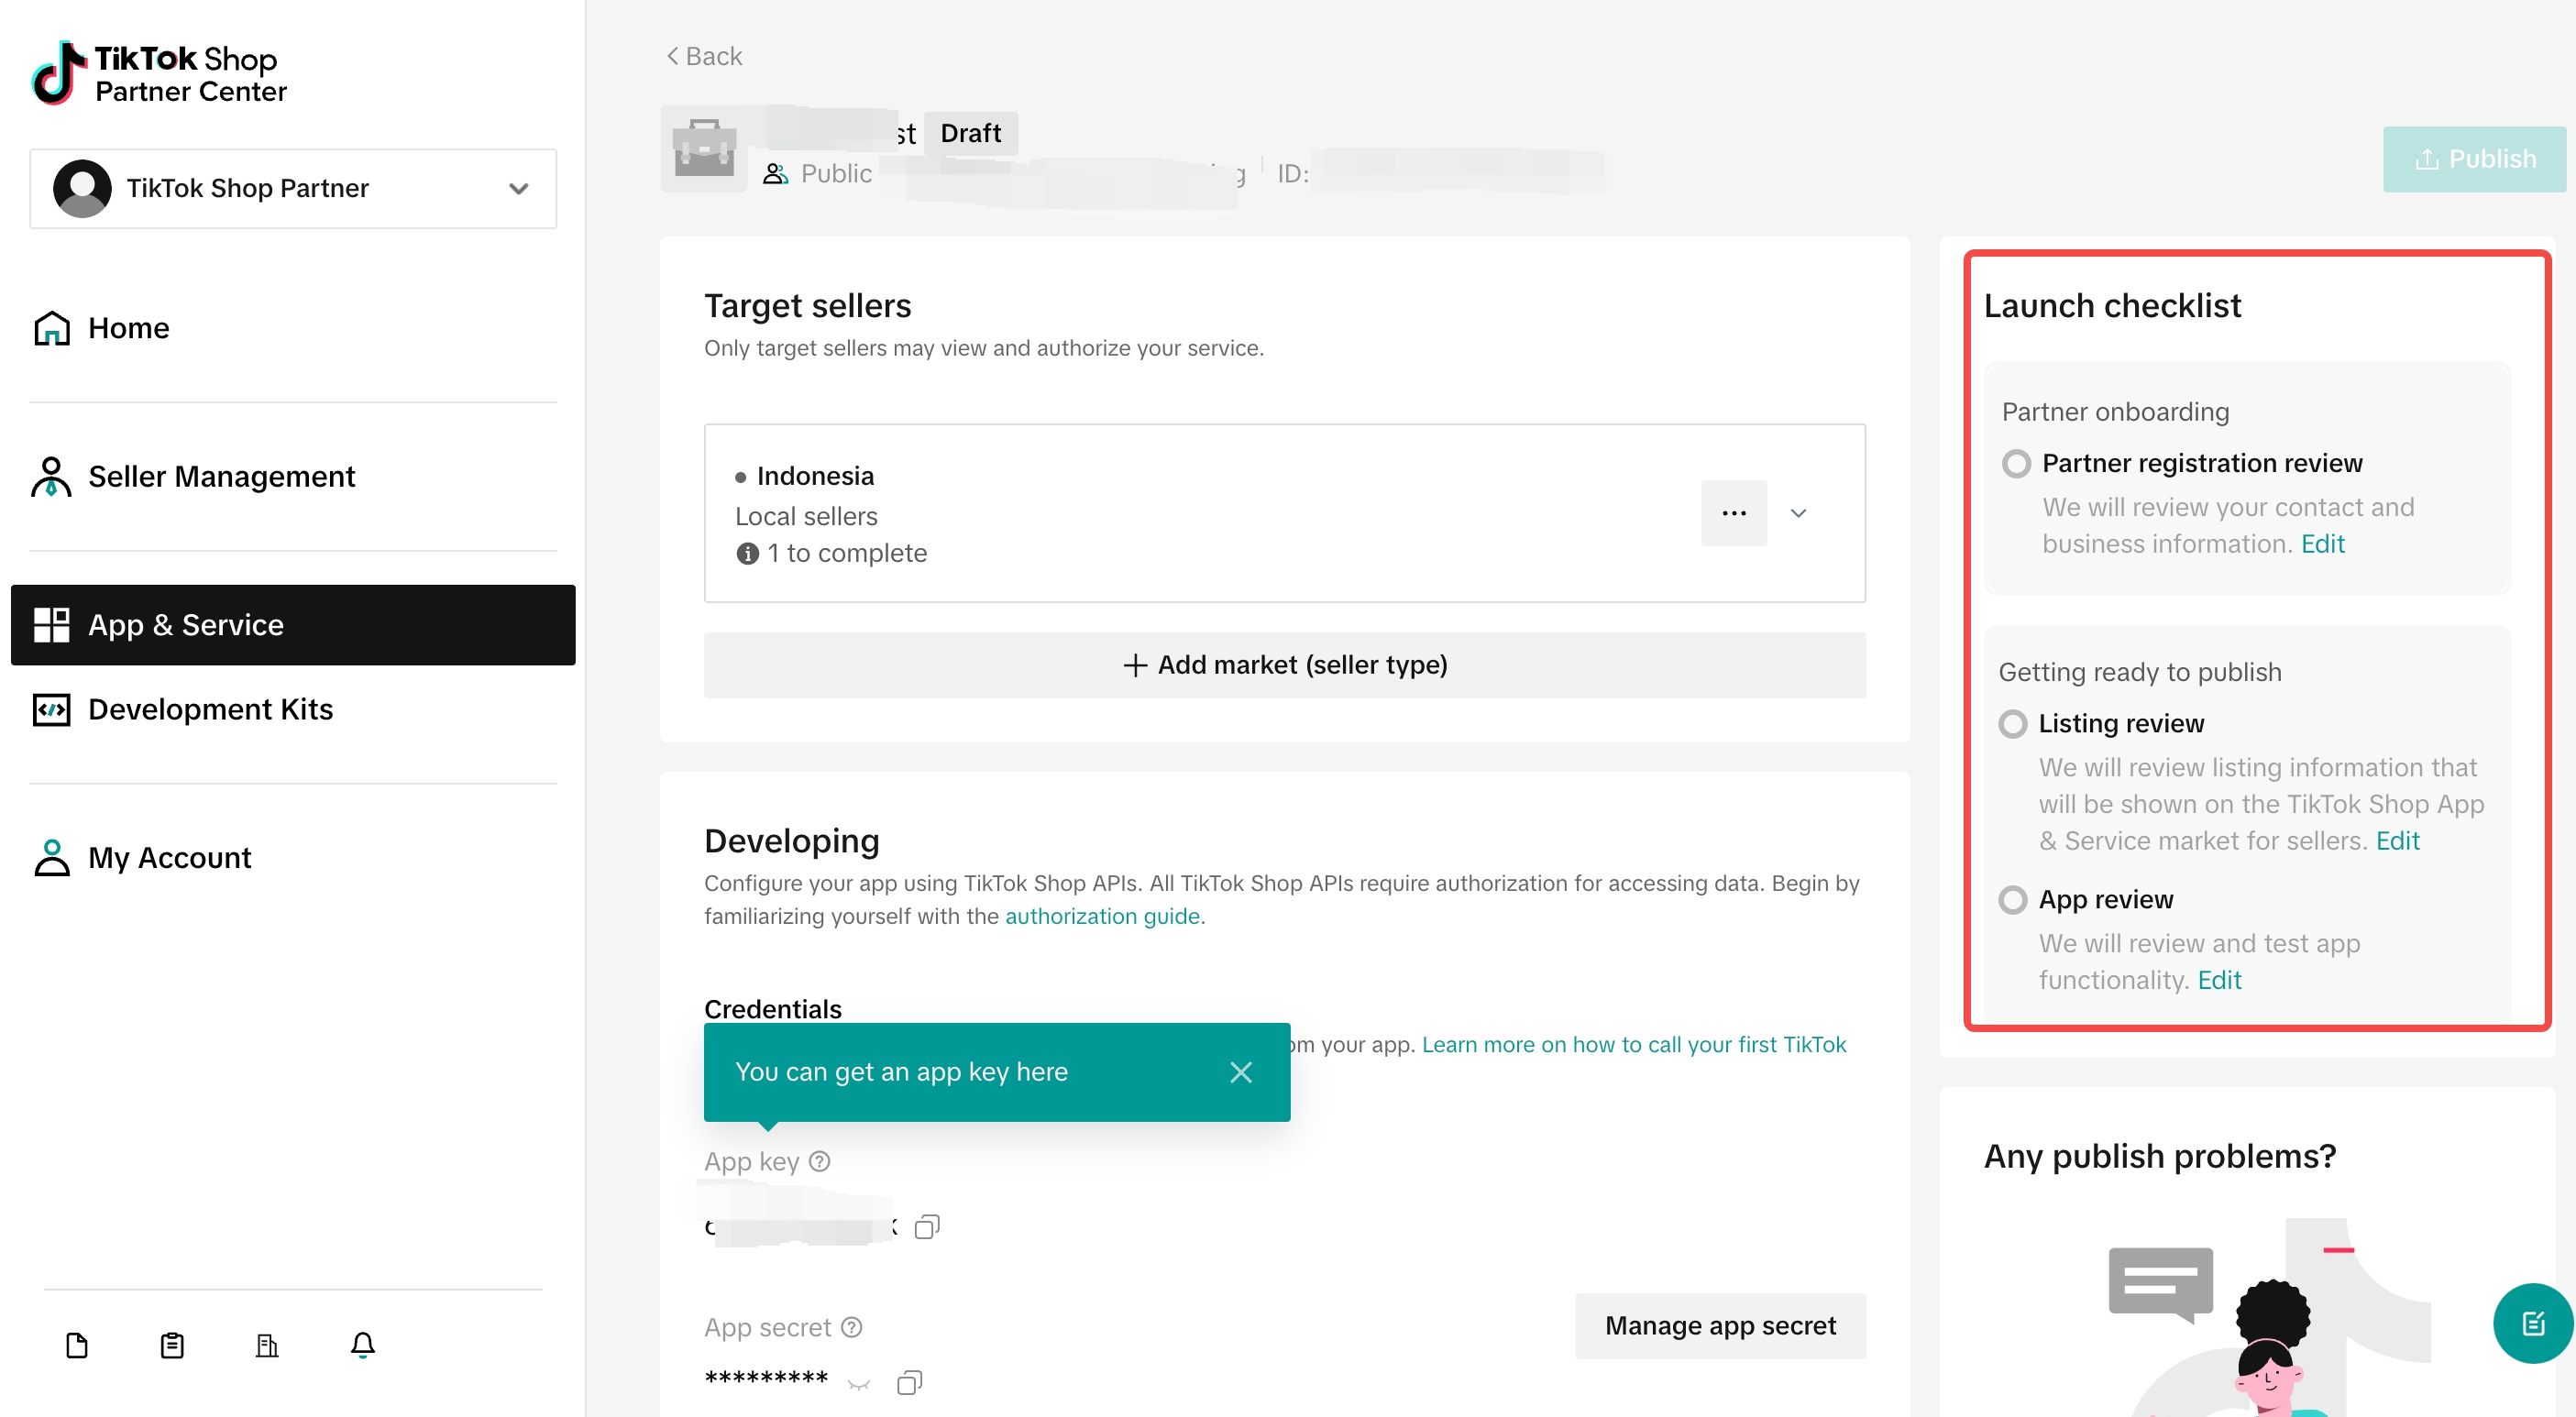
📌 Checklist: Once you're ready to launch your public App, you must go through review requirements before you can make your App live:
- Pass the registration review
- Complete and submit your language listing form for review.
- Initiate and complete your App review.
- If required by your case, ensure you've passed the compliance and legal review you initiated during onboarding.
Initiate and complete the App review form (Only for public App)
Fill out the App Review form to initiate the app review process. To access the App Review form scroll down to the App Review section of the app and service detail page and click Submission materials for review. Alternatively, you can hover over Publish on the app and service detail page and click Modify.
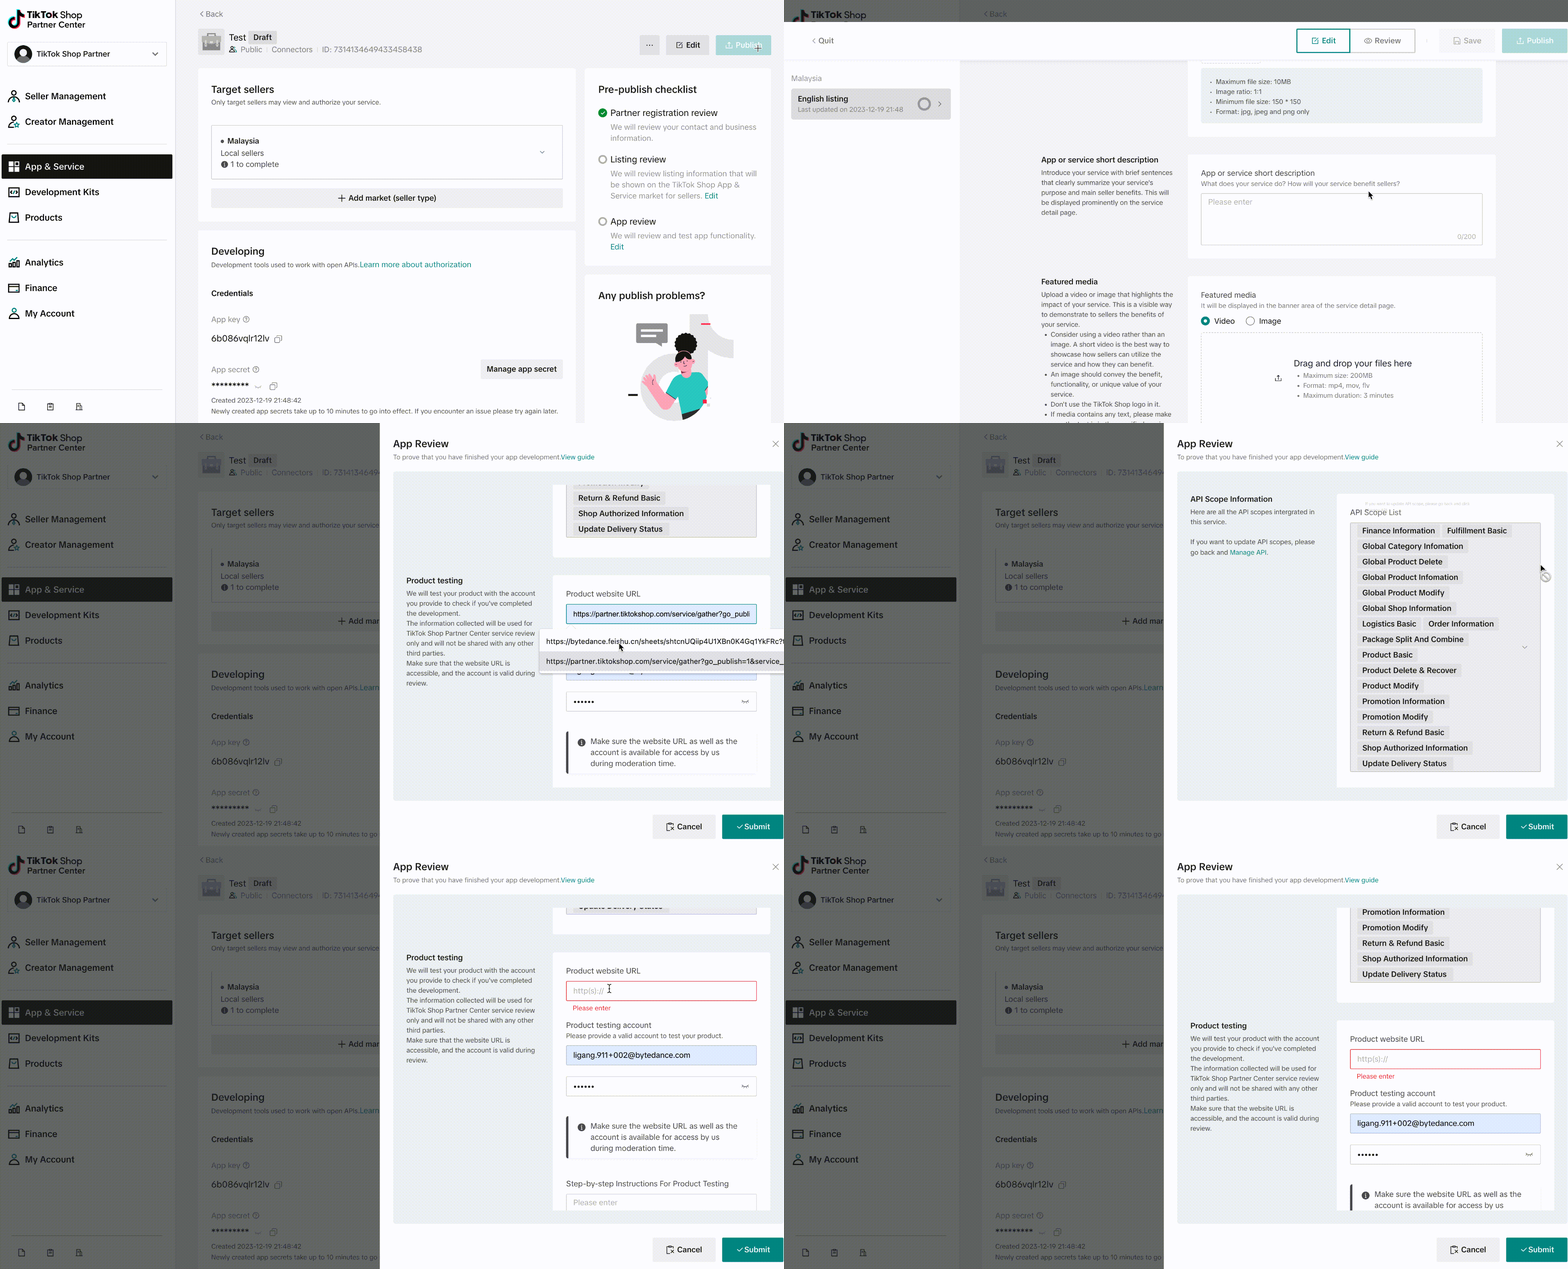
Complete the following steps to submit the form:
- In the API Scope Information section, ensure the APIs integrated with your app are listed correctly. Modify the APIs as necessary.
- In the Product testing section, provide the information necessary for us to test and review your product. Enter the information that identifies your app, such as the URL of your product, the account you used for testing, and any testing instructions.
- In the Product screenshots section, provide a brief explanation of what features your app has, what it can do, and who it serves. Include screenshots and, optionally, videos of your app as necessary.
- In the Required Product Design section, provide the design document you used to plan out the design of your app.
- Click Submit to initiate the app review process.
Note: Once you submit the form, you can't edit it during the review process. You are able to edit the app review form and resubmit if we reject your app.
Fill in the listing information and initiate listing review (Only for public App)
📌 Please fill in carefully. The listing information that will be shown on the Tokopedia & Shop App Store for sellers.
You must complete a language listing form to set the language of your app listing according to the target market. The specific market(s) in which your app is accessible necessitates distinct language requirements for its listing. The table below describes the language listing requirements based on market and seller type.
| Target market | Seller Type | Language required for listing |
|---|---|---|
| Indonesia(ID) | Local | Bahasa Indonesia |
Completing and submitting the language listing form initiates a review for the market in which you're listing your app. You must complete a language listing form for each market your app targets.
To access the language listing form, click the market name under the Target Sellers section of the app and service detail page and then click Edit. Alternatively, you can click Edit next to the Publish button.
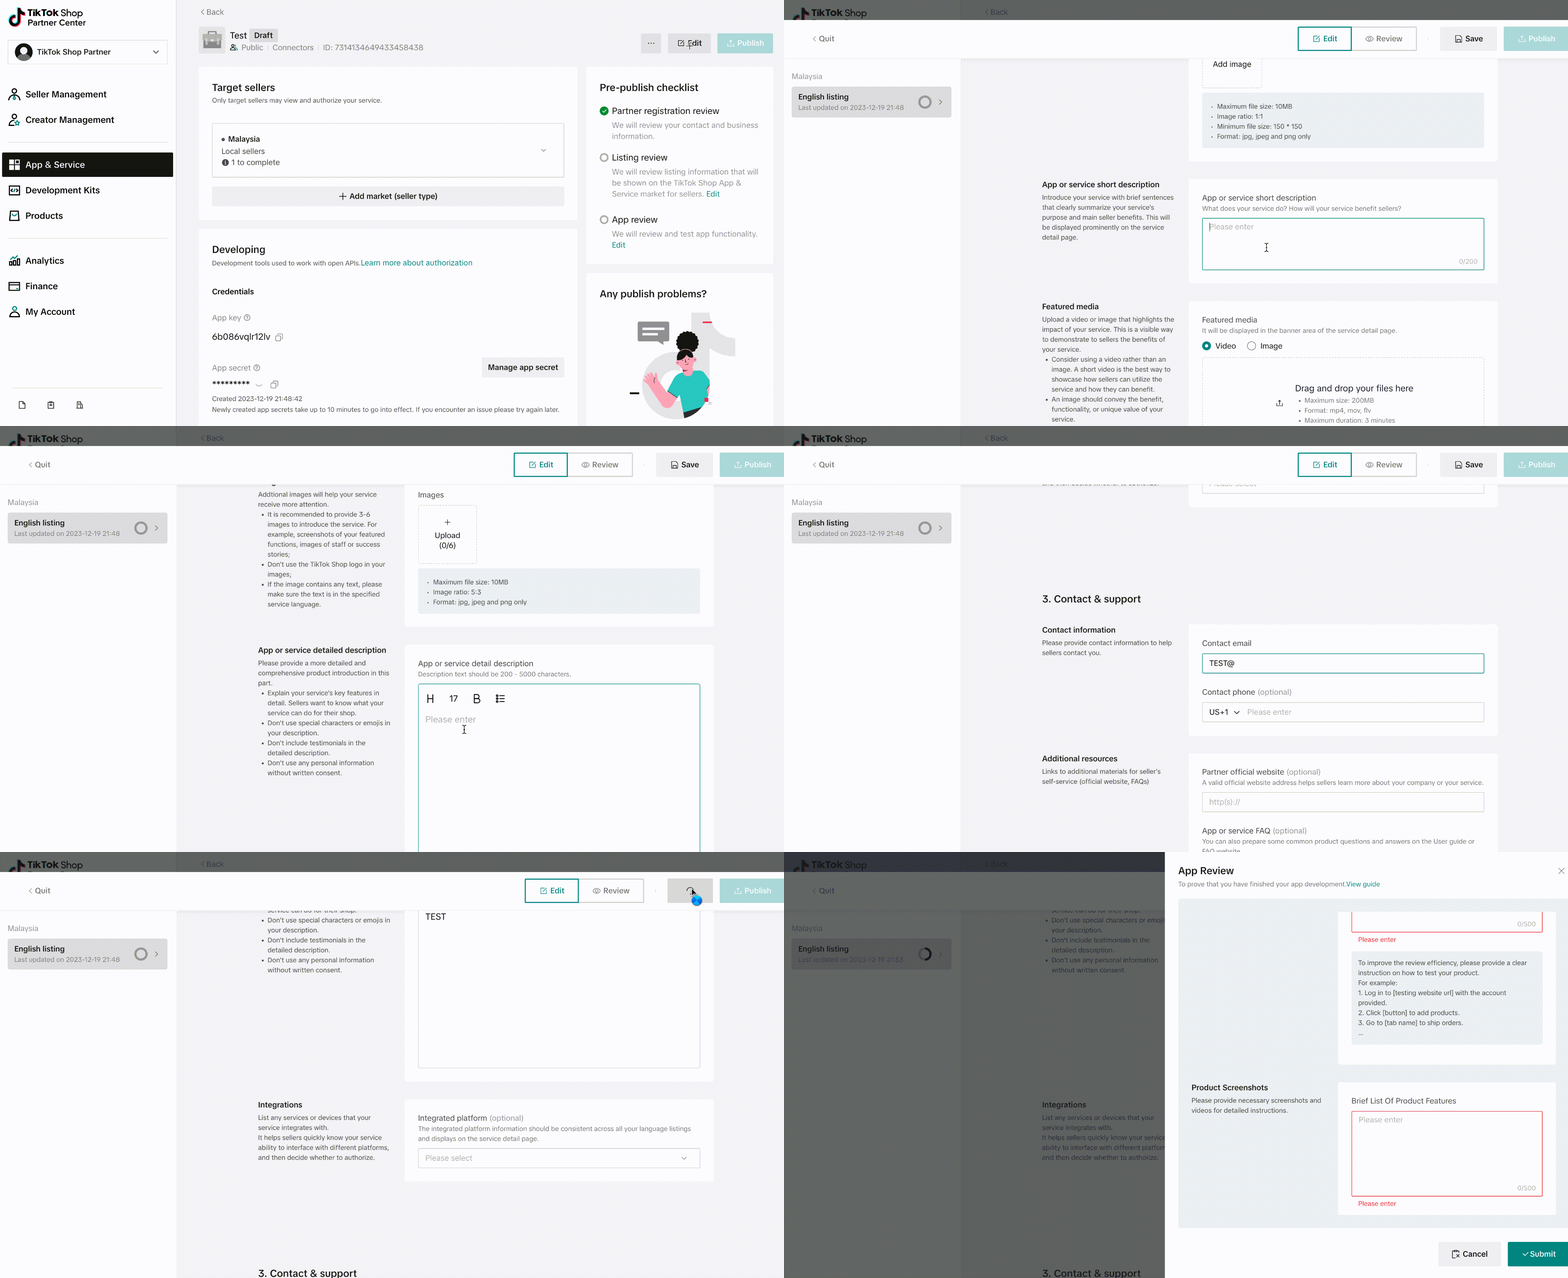
Notes:
- If you have already finished a language listing form for another market, you can use the translate and import from feature to auto-fill the listing form. Refer to the Translate and import your listing section below for more information.
- You can click Save at the top of the form to save your progress.
Complete the following steps for each market in which you wish to list your App:
- In the Service overview section, provide an overview of your app, including:
The name of your App. A concise name helps to attract more sellers. It's the first thing sellers will see when browsing the App Store. The logo for your App. If your logo contains any text, please ensure that the text is in the same language as the App. A short introductory description of your App. Media (images or video) that highlights your app's functionality and benefits. You should choose at least one image or one video to describe your service. We highly recommend providing a video rather than an image. In the Service overview
section, provide an overview of your app, including: - The name of your App. A concise name helps to attract more sellers. It's the first thing sellers will see when browsing the App Store.
- The logo for your App. If your logo contains any text, please ensure that the text is in the same language as the App.
- A short introductory description of your App.
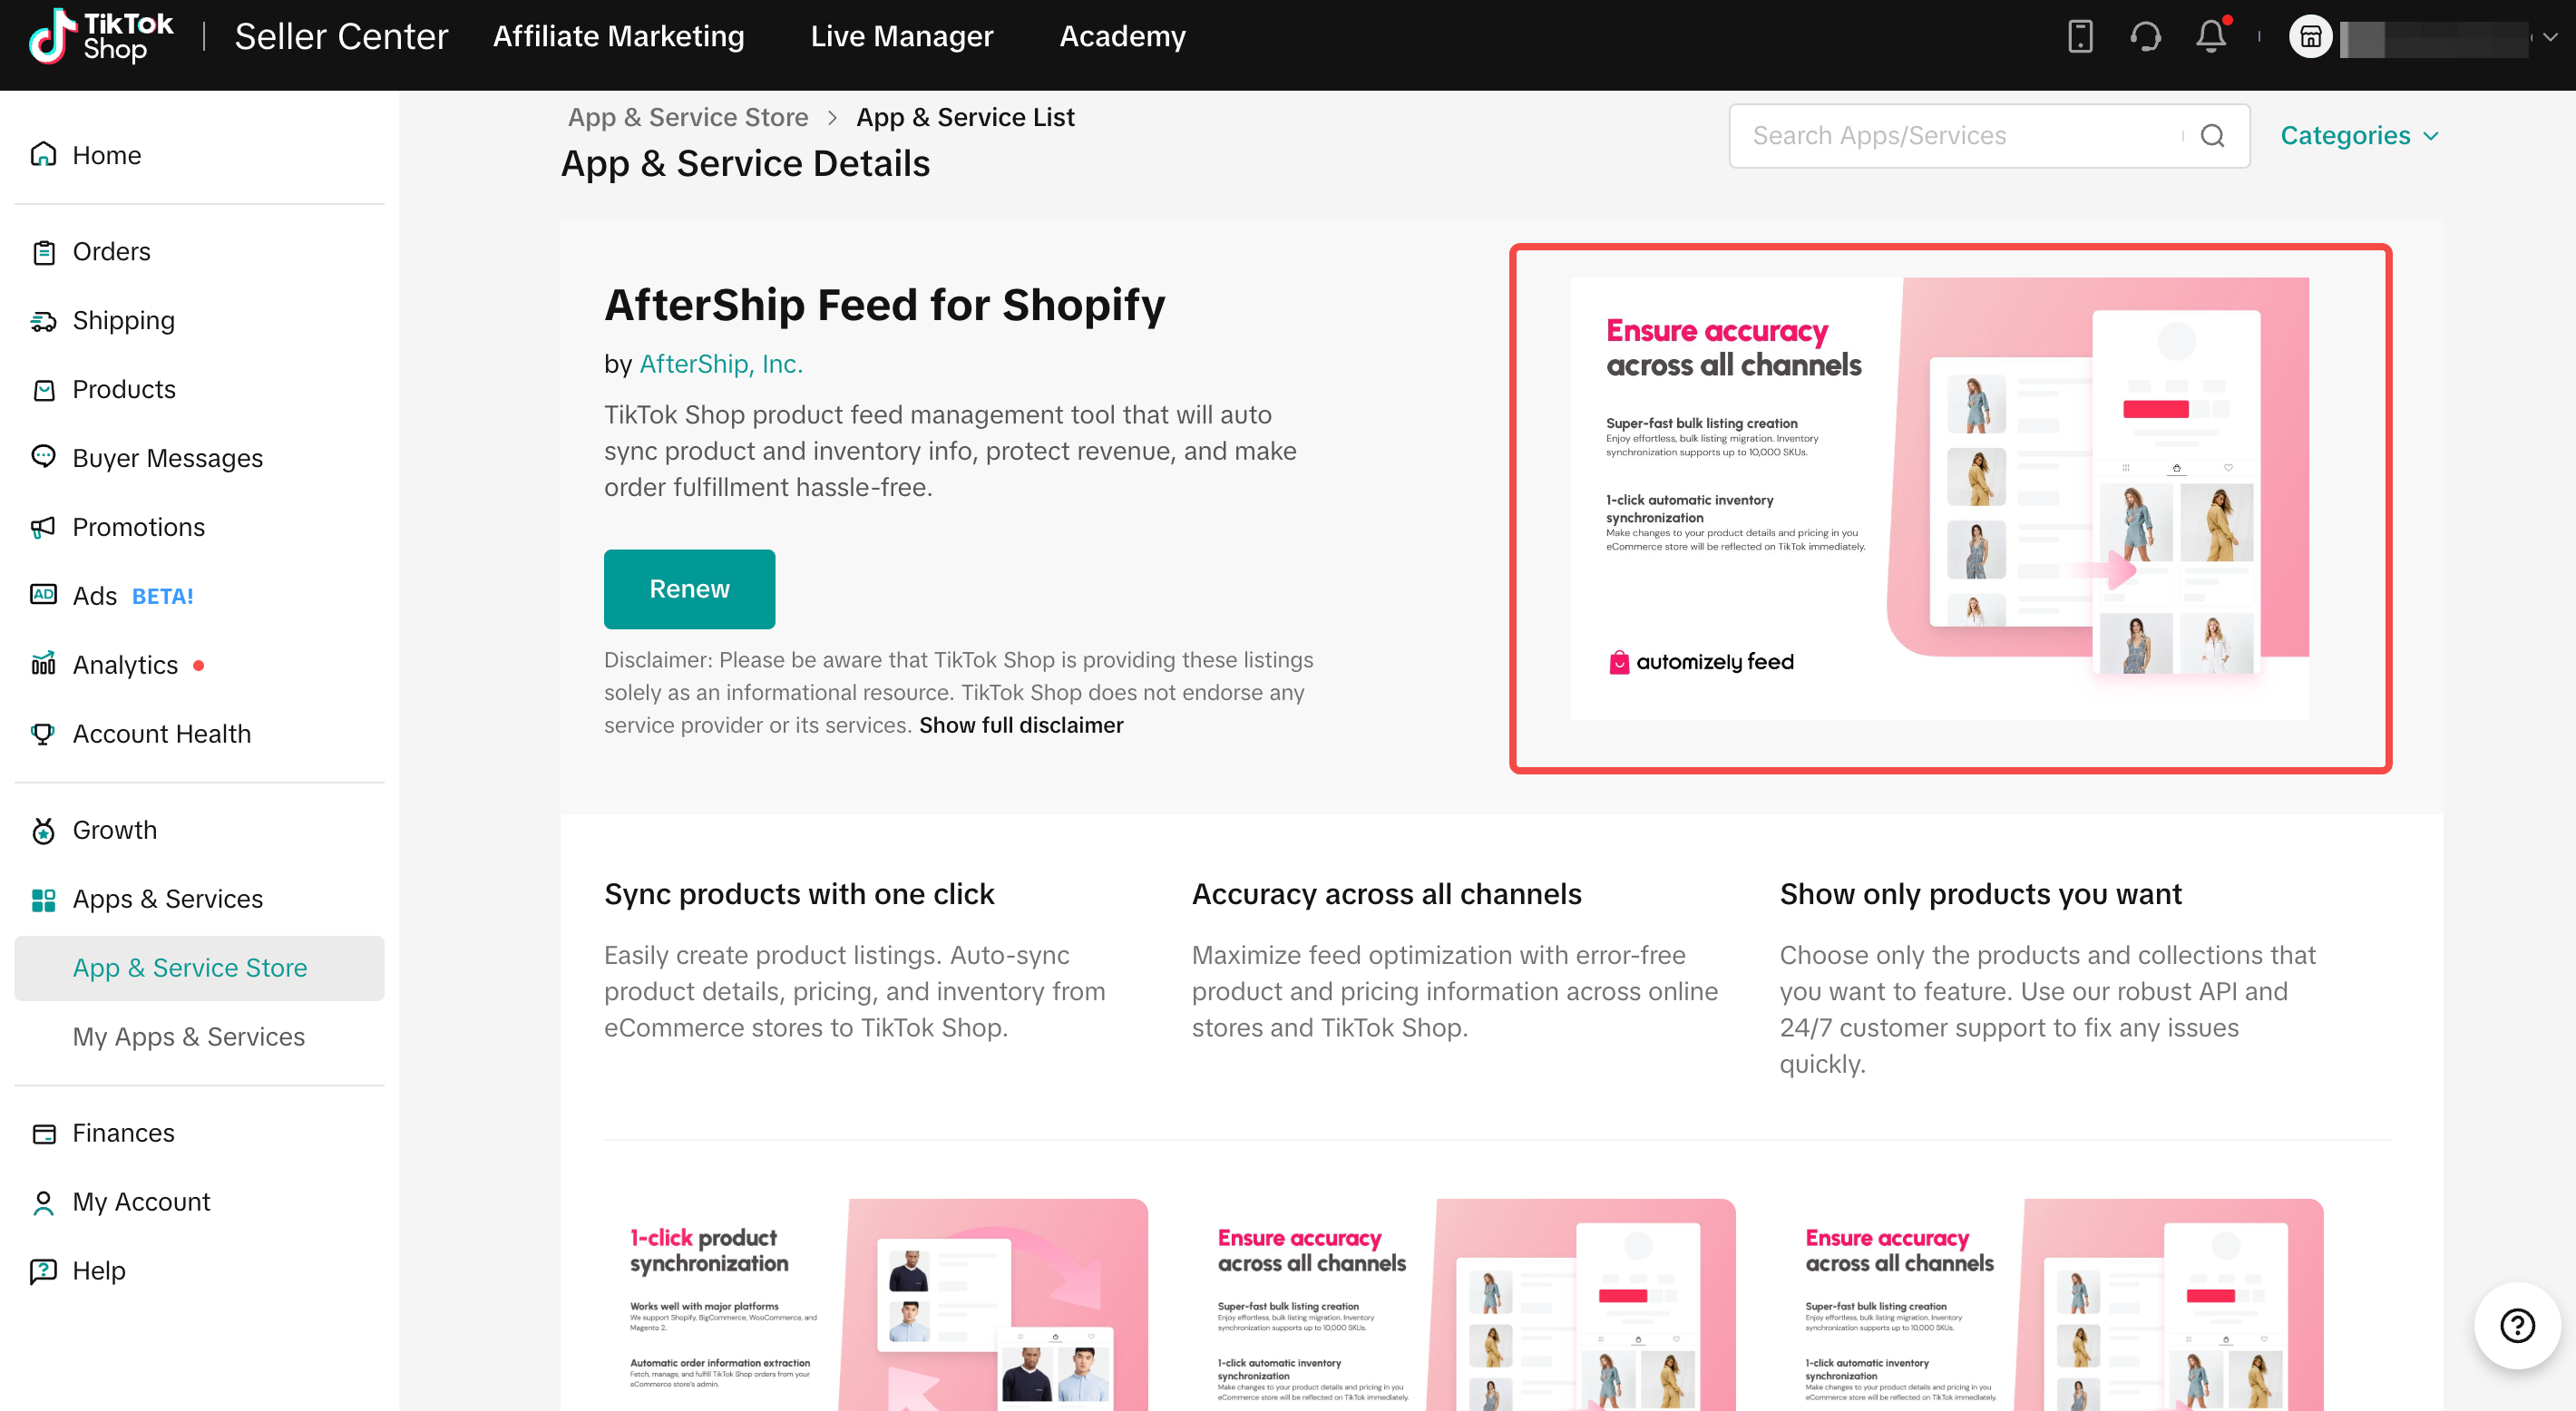
- Media (images or video) that highlights your app's functionality and benefits. You should choose at least one image or one video to describe your service. We highly recommend providing a video rather than an image.
| Field Name | Type | Field Description | Requirements | Screenshot | Seller-side Demo |
|---|---|---|---|---|---|
| App or service name | Mandatory | Please provide an app name. | |||
| 💡A concise name will help you to attract more sellers. It's the first thing sellers will see when browsing the App & Service Store. | Format: Text, less than 100 characters. | 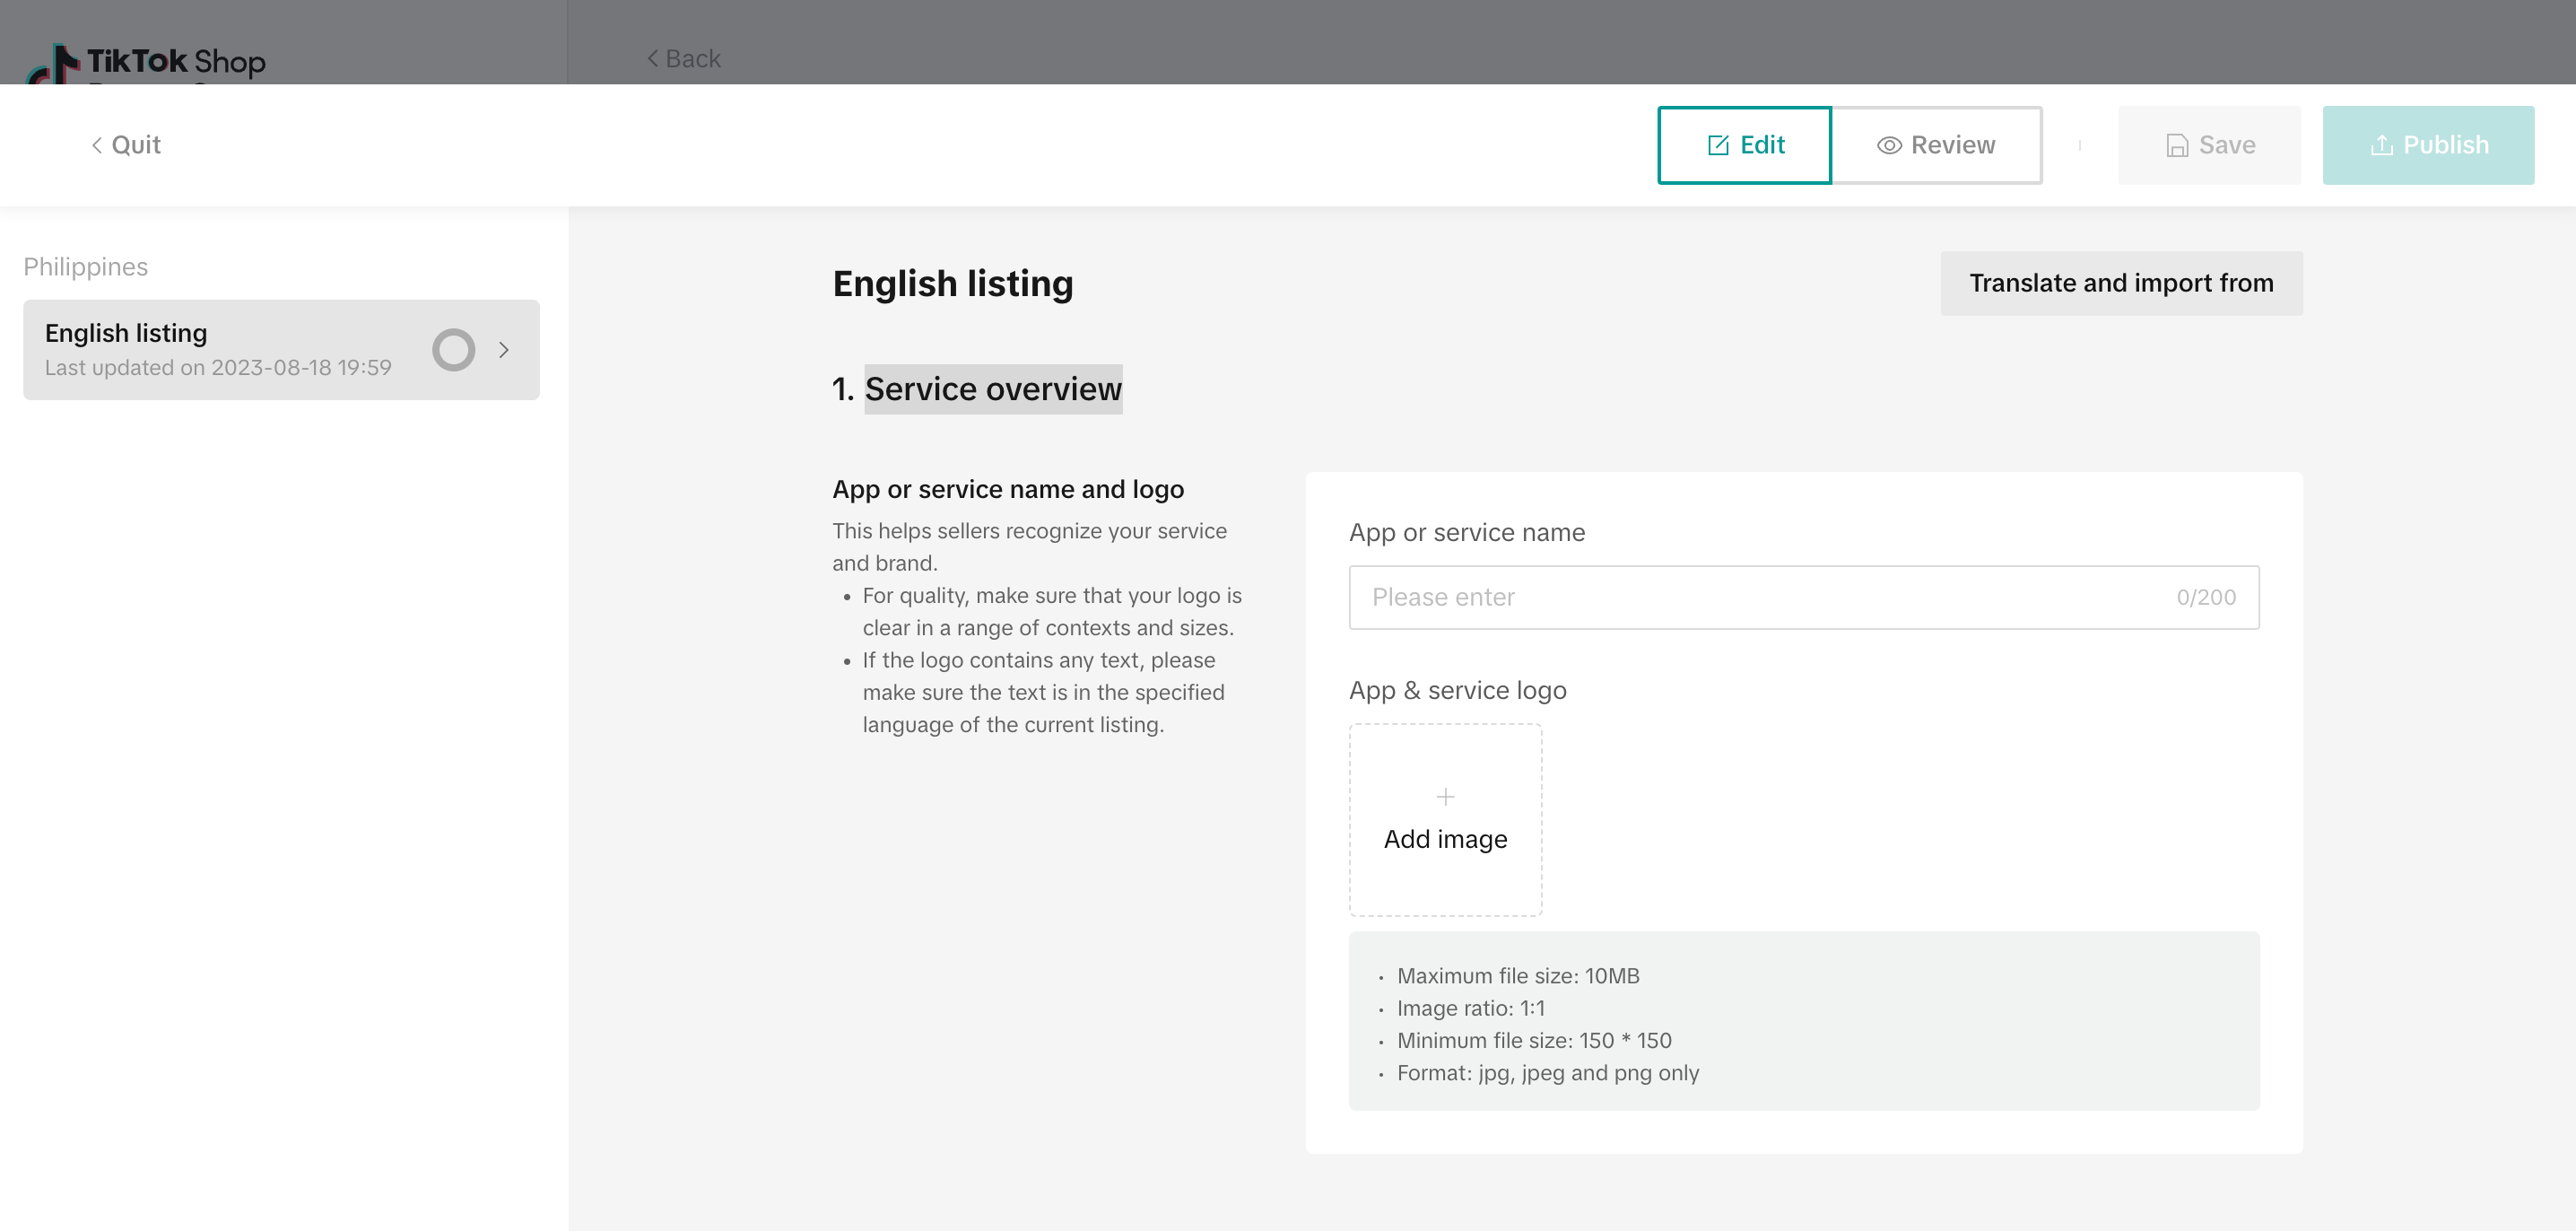 | 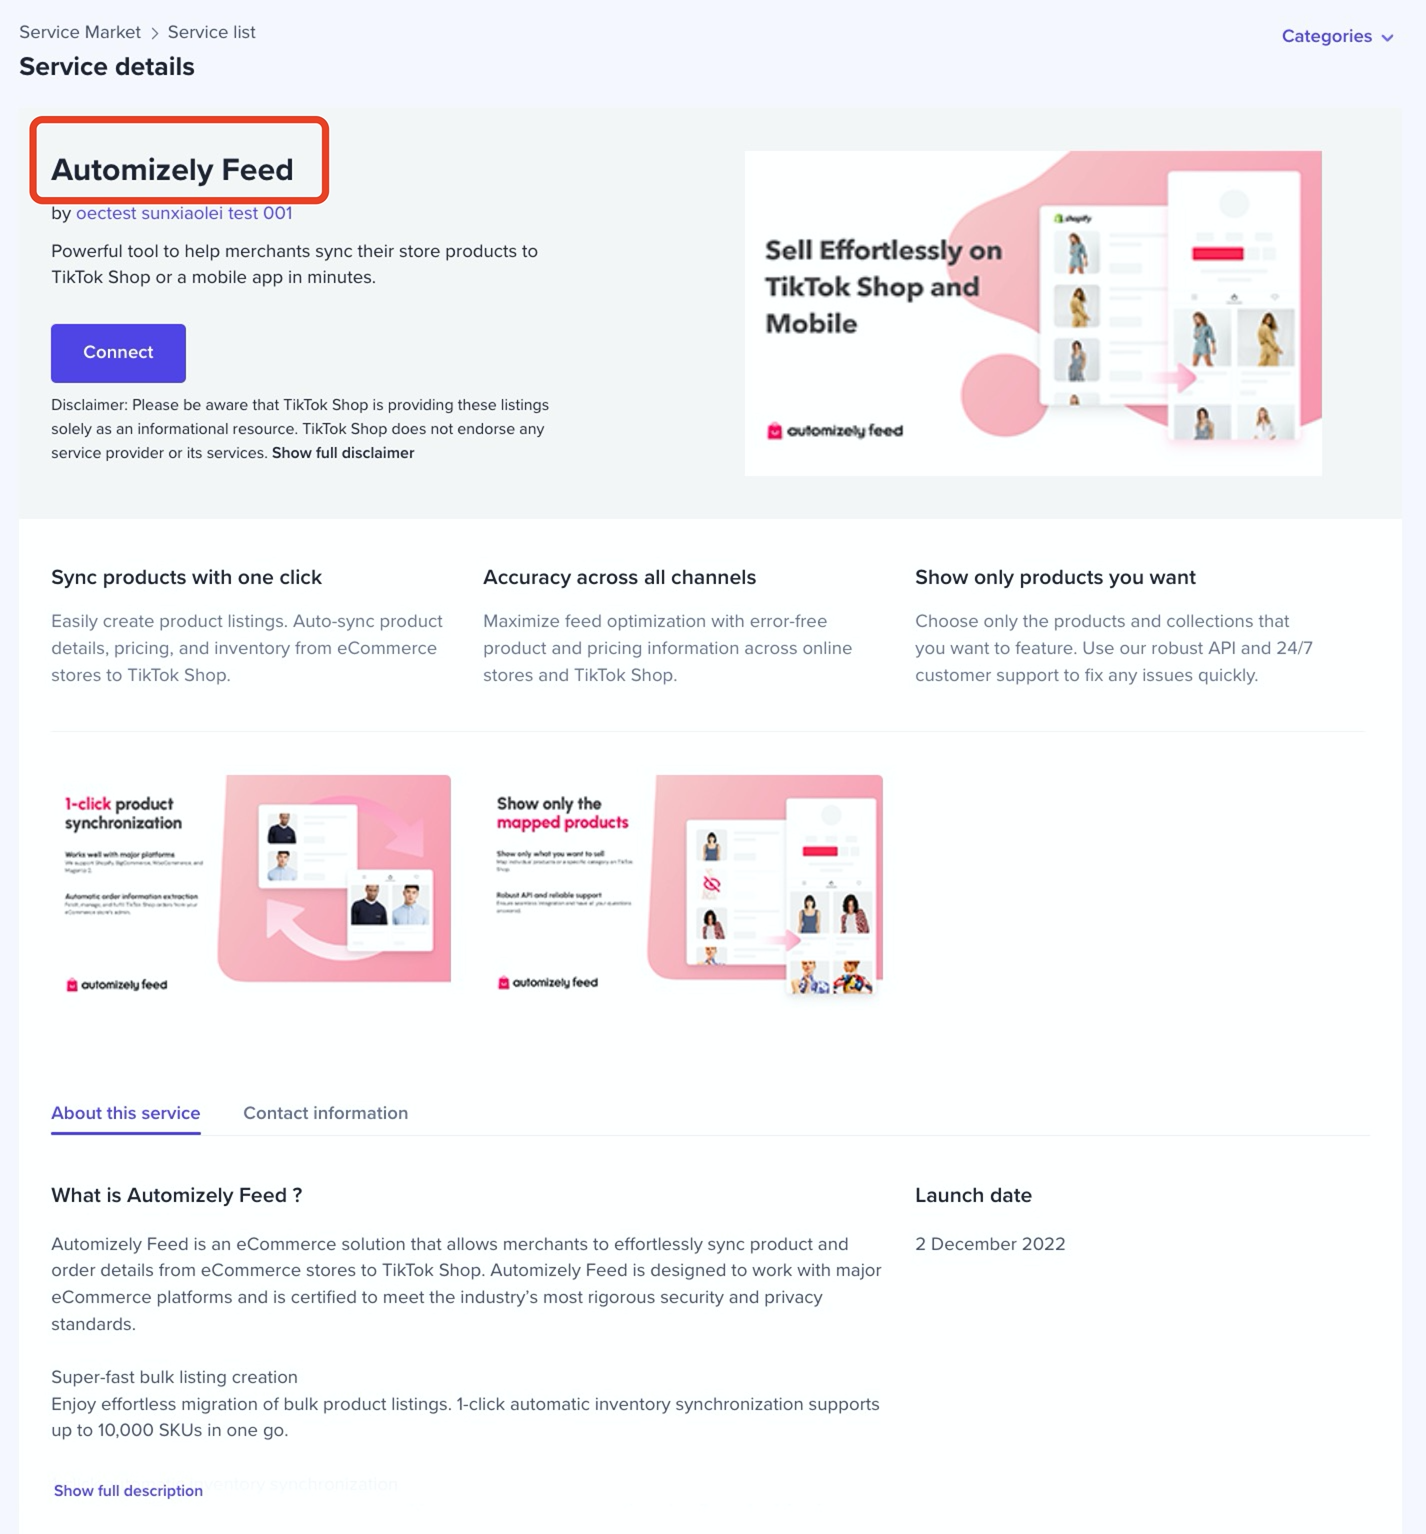 | ||
| App or service logo | Mandatory | Please upload a logo to help sellers recognize your app and brand. |
📌 If your logo contains any text, please ensure that the text is in the same language as the app. | A logo to help sellers recognize your service and brand.
Size: < 10MB
Ratio: 1:1
Dimensions: 150 * 150
Format: jpg, jpeg, png | | 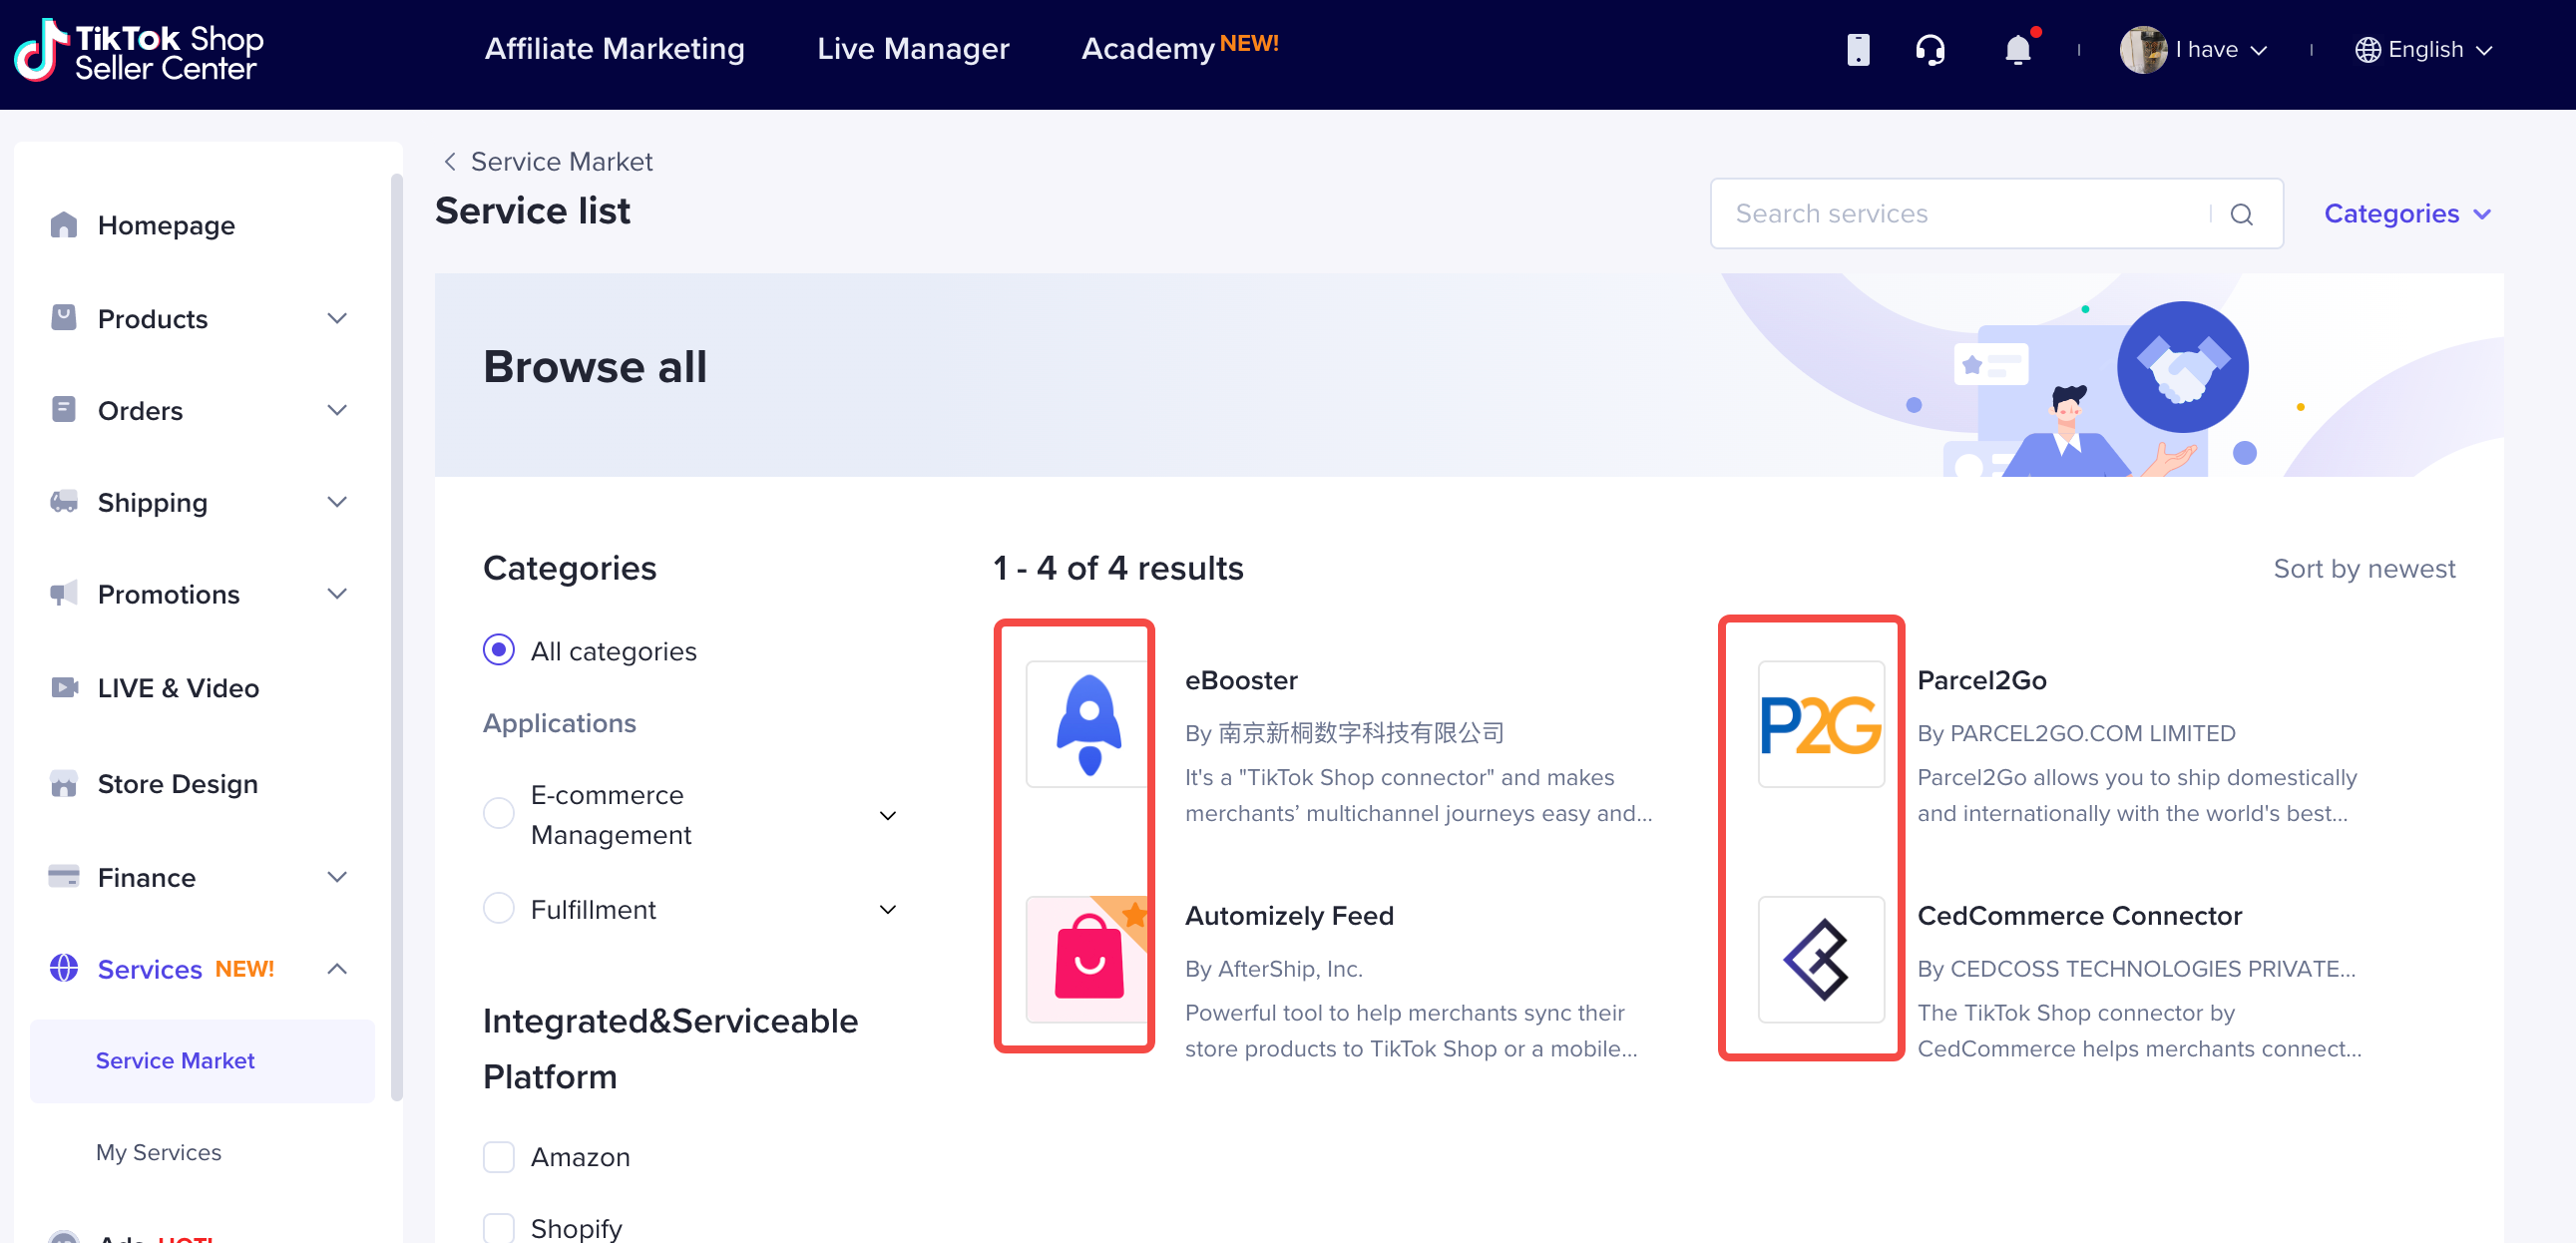 |
| App or service language | Mandatory | In order to enable local businesses to better understand your services, please fill out the service information according to the specified target market service language.
|
| App or service language | Mandatory | In order to enable local businesses to better understand your services, please fill out the service information according to the specified target market service language.
To facilitate a clear understanding of your app among sellers, kindly complete the service listing information in accordance with the specified target market service language. | | 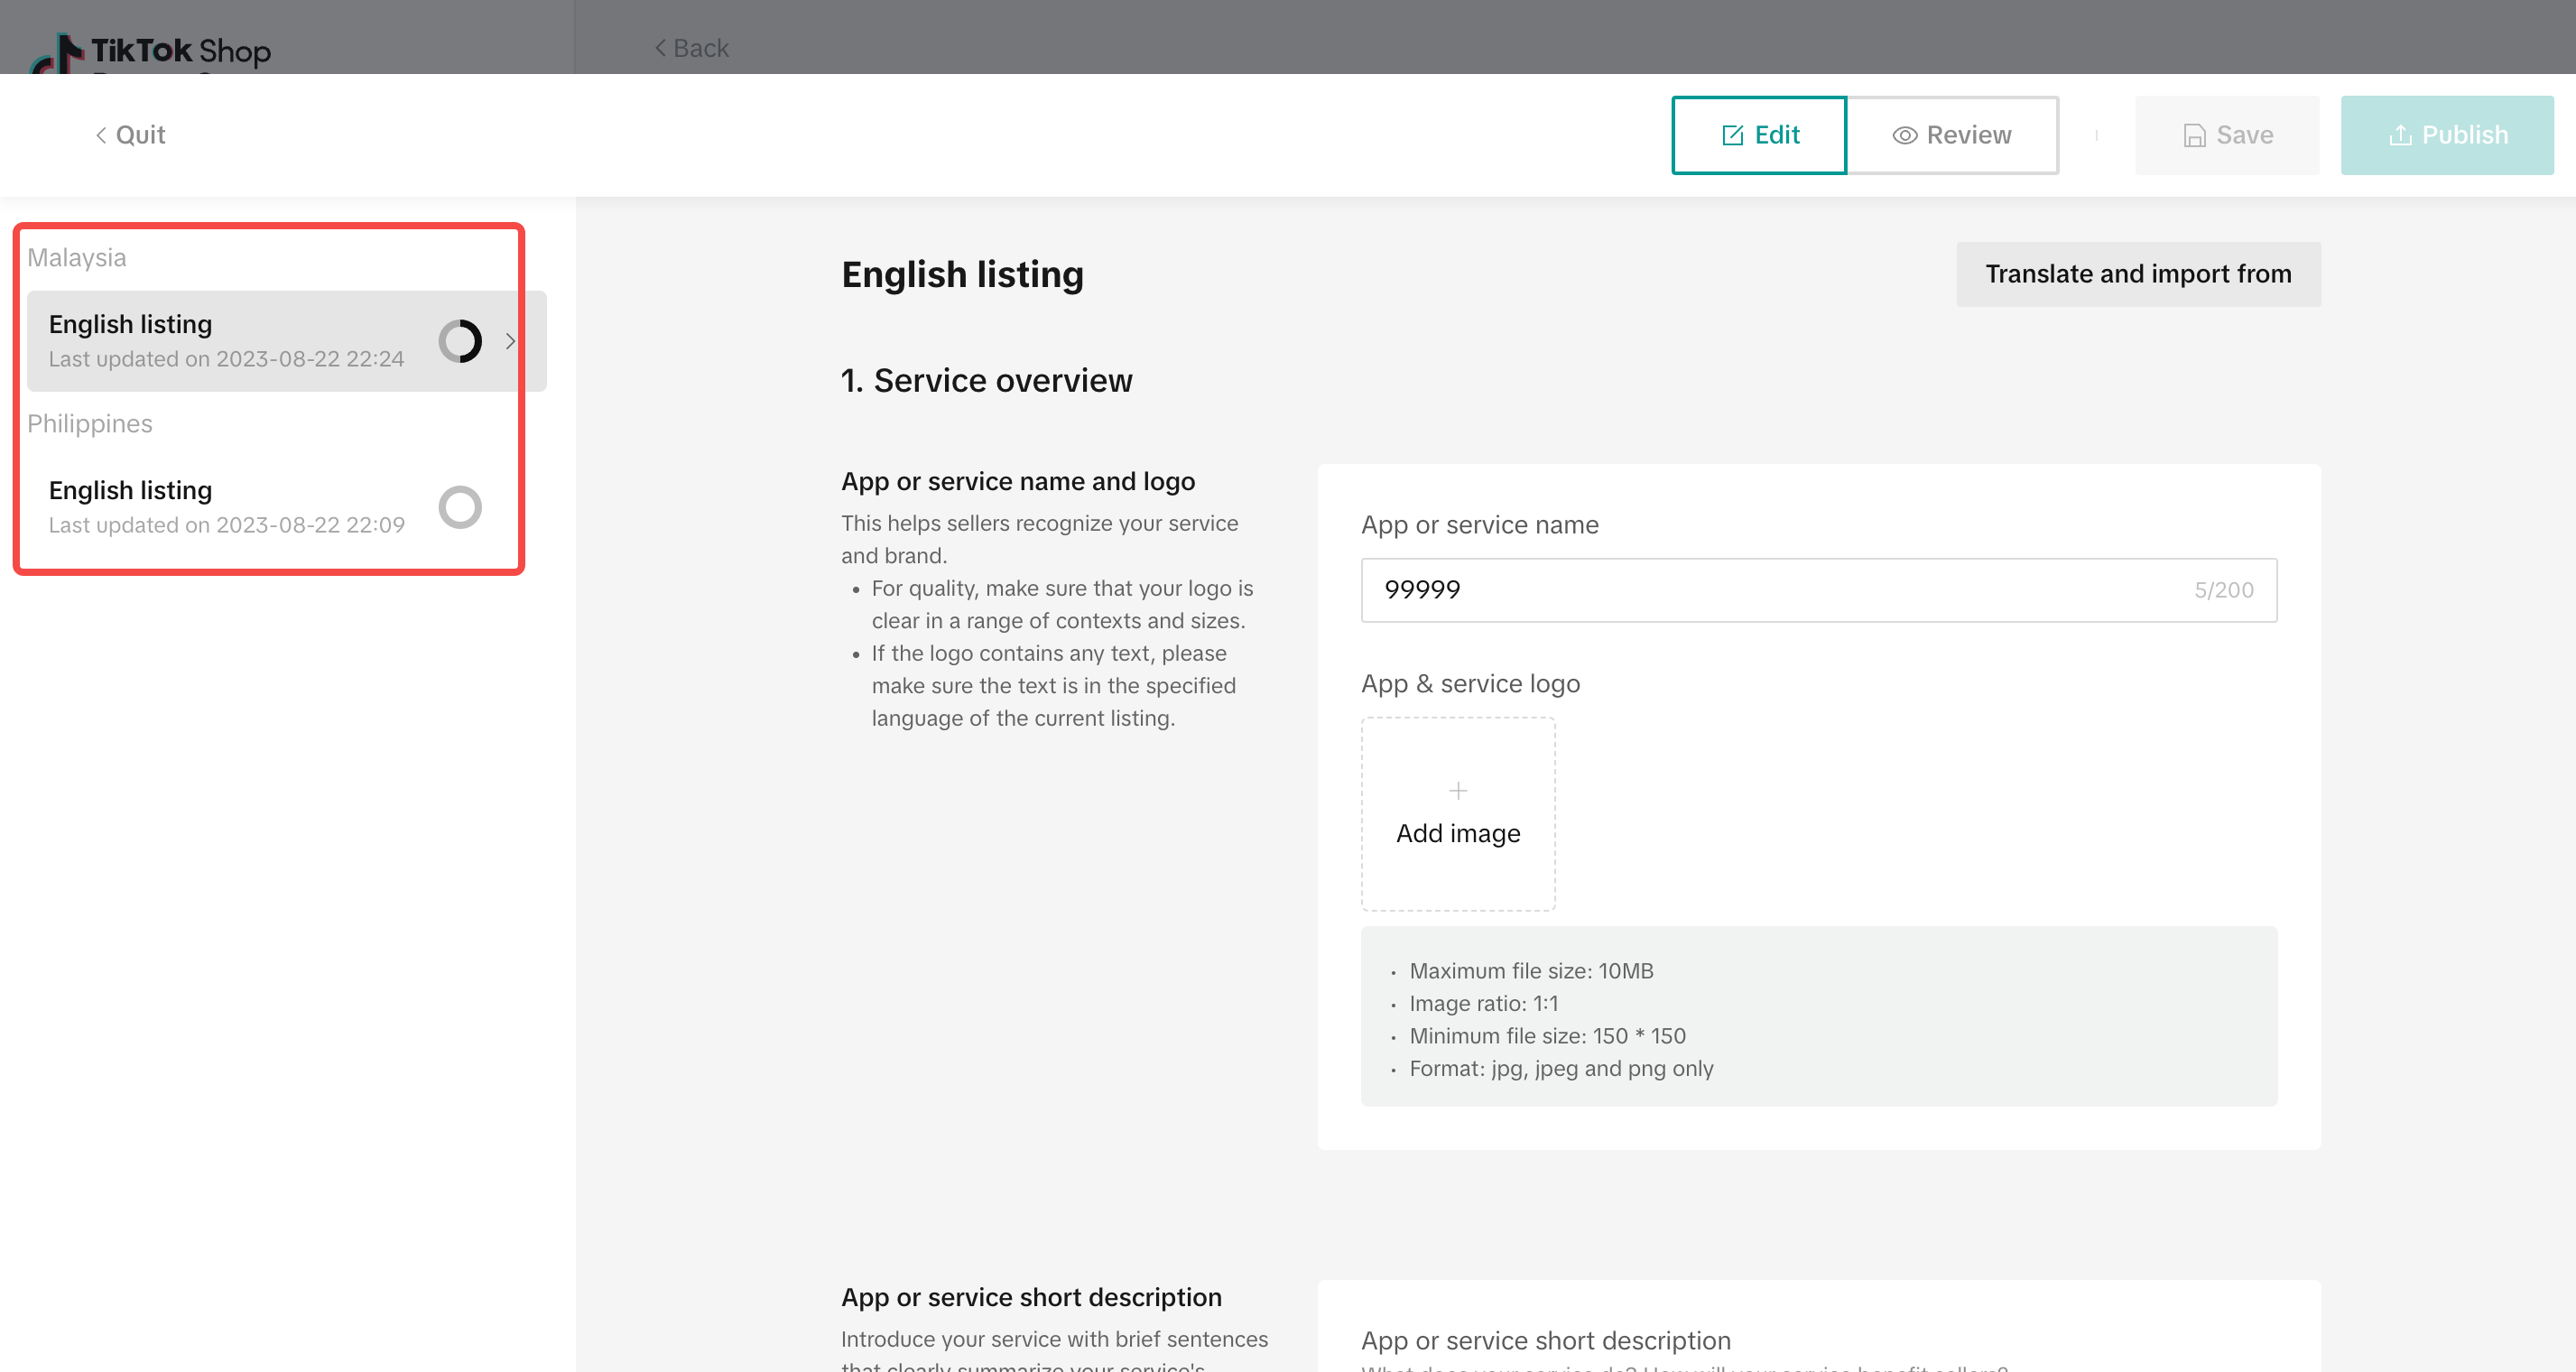 | |
| App or service short description | Mandatory | Give a short description to introduce your service | Format : Text, less than 200 characters |
| |
| App or service short description | Mandatory | Give a short description to introduce your service | Format : Text, less than 200 characters | 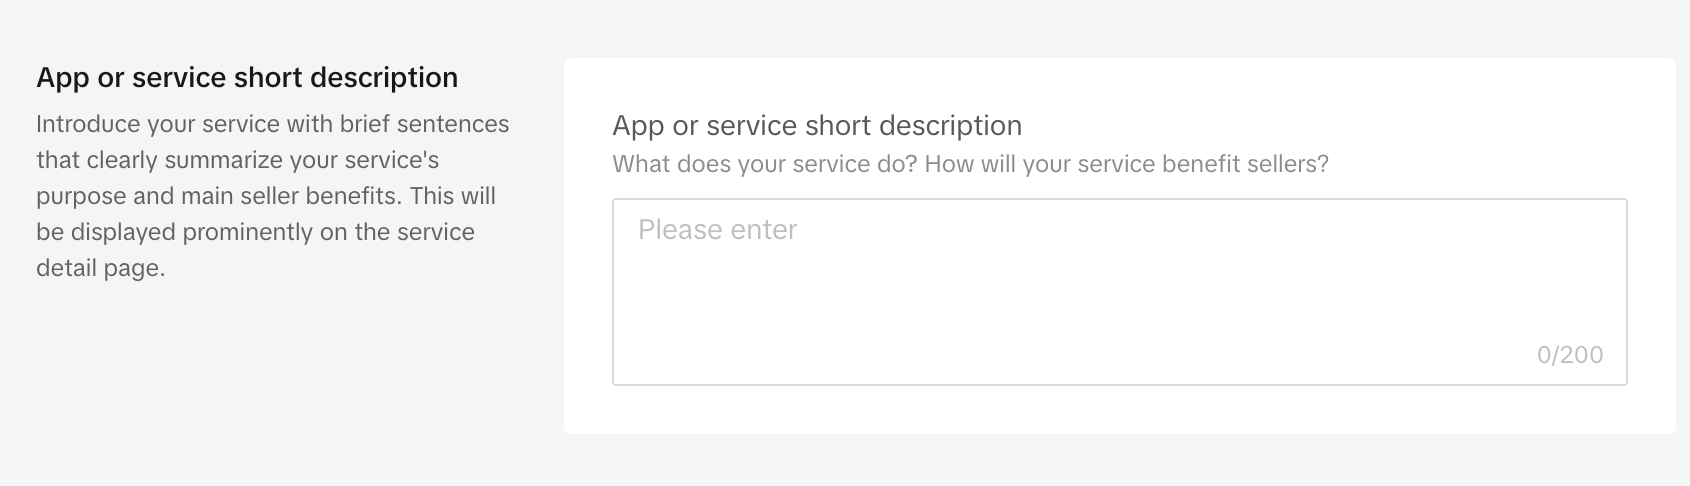 |
| 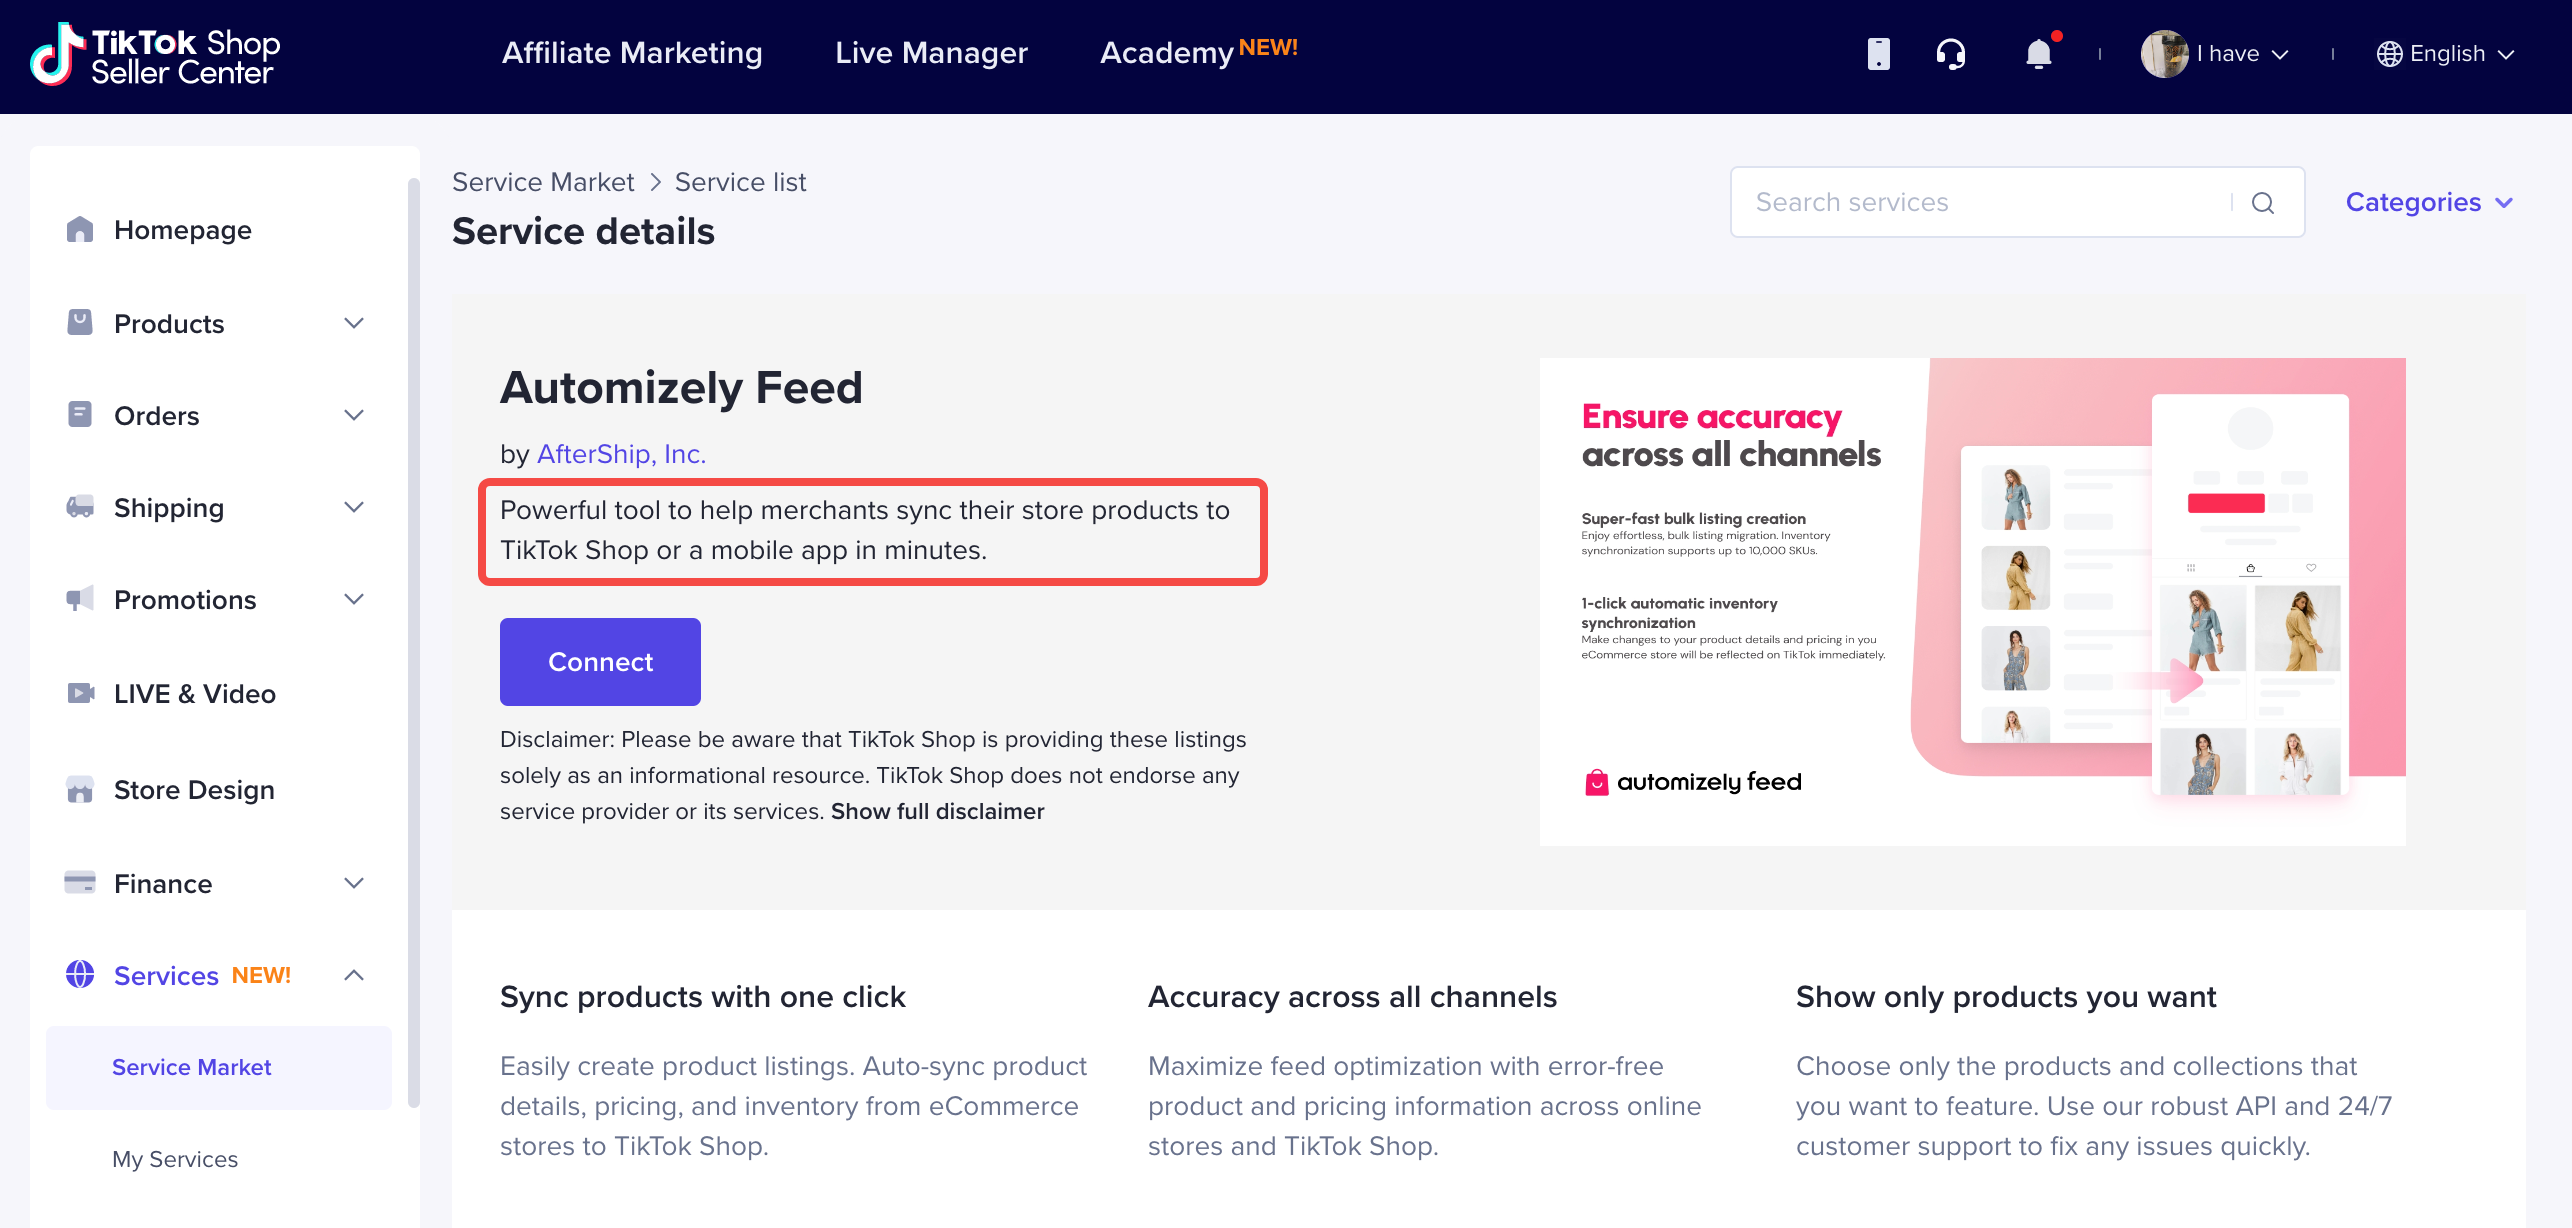 |
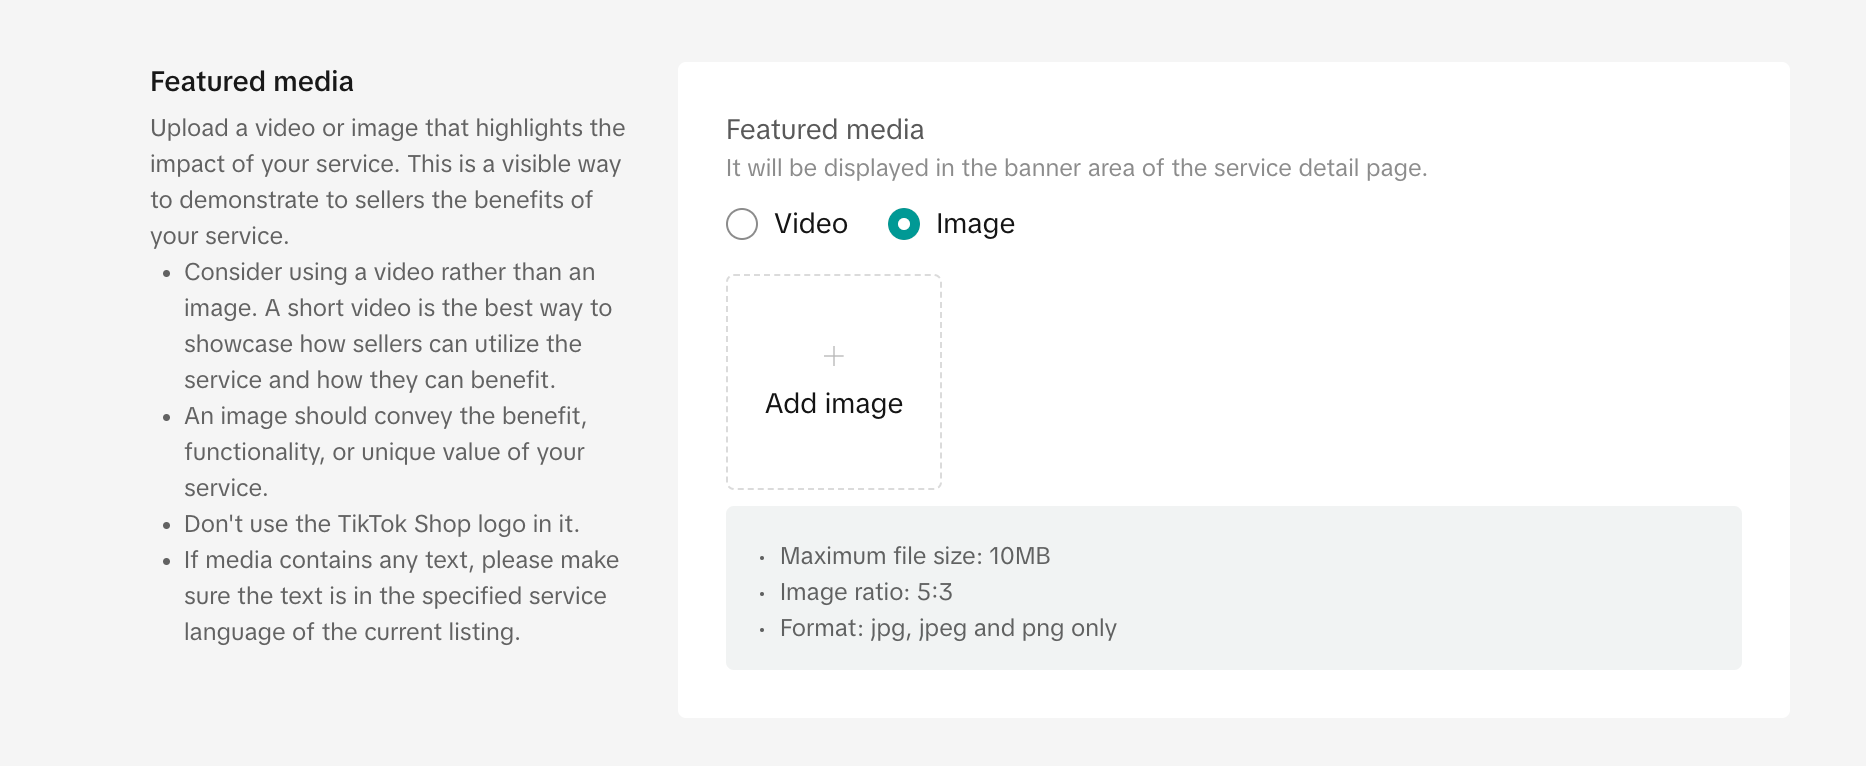
| Video or main image | Mandatory | Upload a video or image that highlights the impact of your app. This is a visible way to demonstrate to sellers the benefits of your app. You need choose at least 1 image or 1 video to describe your service.
|
| Video or main image | Mandatory | Upload a video or image that highlights the impact of your app. This is a visible way to demonstrate to sellers the benefits of your app. You need choose at least 1 image or 1 video to describe your service.
💡It's better to provide a video rather than an image. | Video Format: mp4, mov, flv Size: < 200MB
Image
Size: <= 10MB
Ratio: 5:3
Format: jpg, jpeg, png | 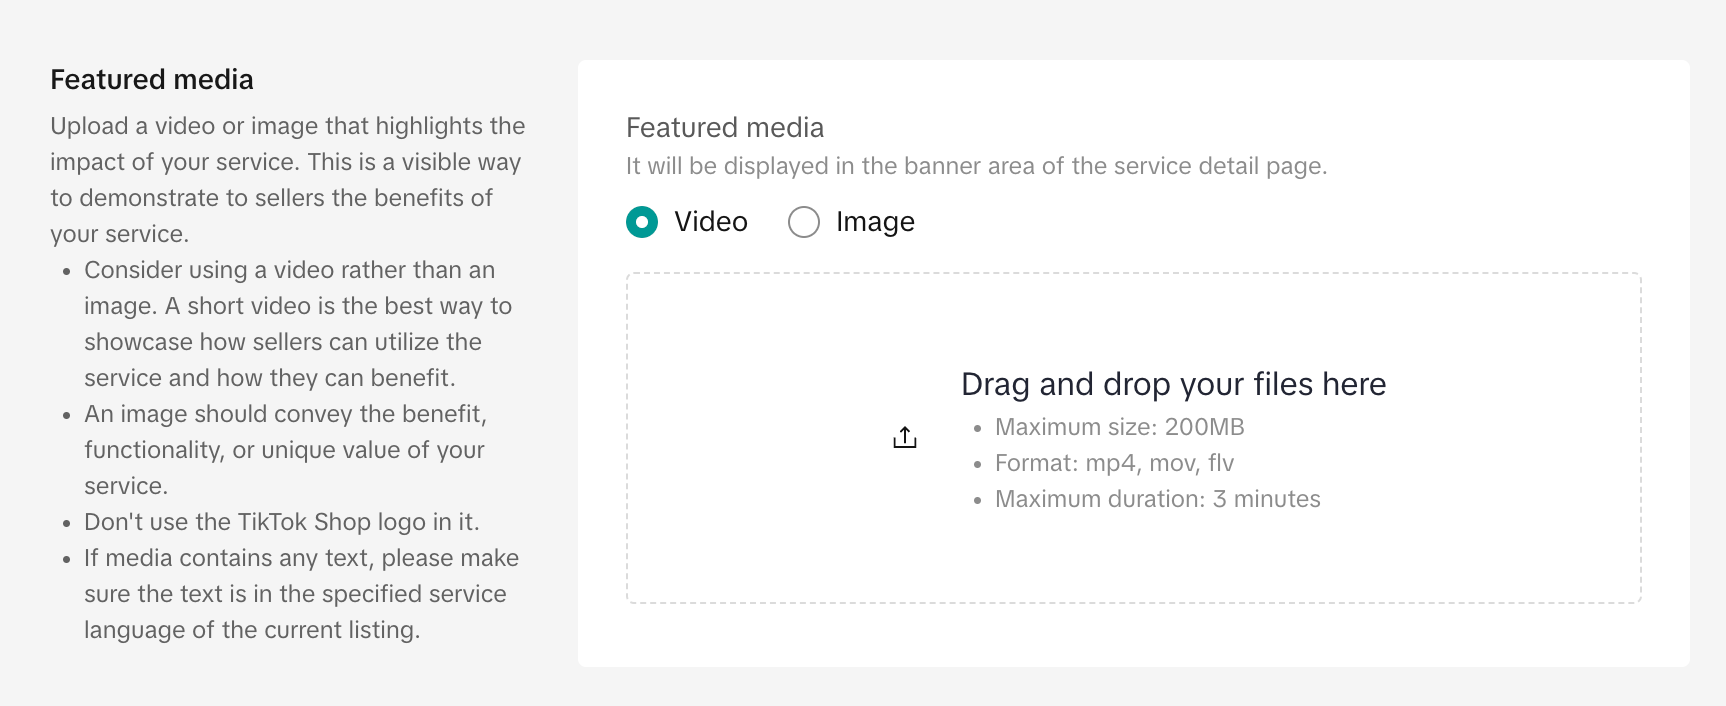
 |
|  |
|
- In the Detail introduction section, provide the functional details of your App, including:
Three key benefits of your App. We recommend that you use this space to address the requirements of sellers, focusing on their needs, rather than how a particular feature works. Additional images of your App to attract sellers. We recommend providing at least three images that introduce your App's featured functions, images of staff, or success stories. A detailed and comprehensive description of your App's key features and what sellers can do with your app. A list of platforms/services with which your App can integrate. This information allows sellers to quickly determine whether your App is compatible with the platform(s) they are using. In the Detail introduction
section, provide the functional details of your App, including: - Three key benefits of your App. We recommend that you use this space to address the requirements of sellers, focusing on their needs, rather than how a particular feature works.
- Additional images of your App to attract sellers. We recommend providing at least three images that introduce your App's featured functions, images of staff, or success stories.
- A detailed and comprehensive description of your App's key features and what sellers can do with your app.
- A list of platforms/services with which your App can integrate. This information allows sellers to quickly determine whether your App is compatible with the platform(s) they are using.
| Field Name | Type | Field Description | Requirements | Screenshot | Seller-side Demo |
|---|---|---|---|---|---|
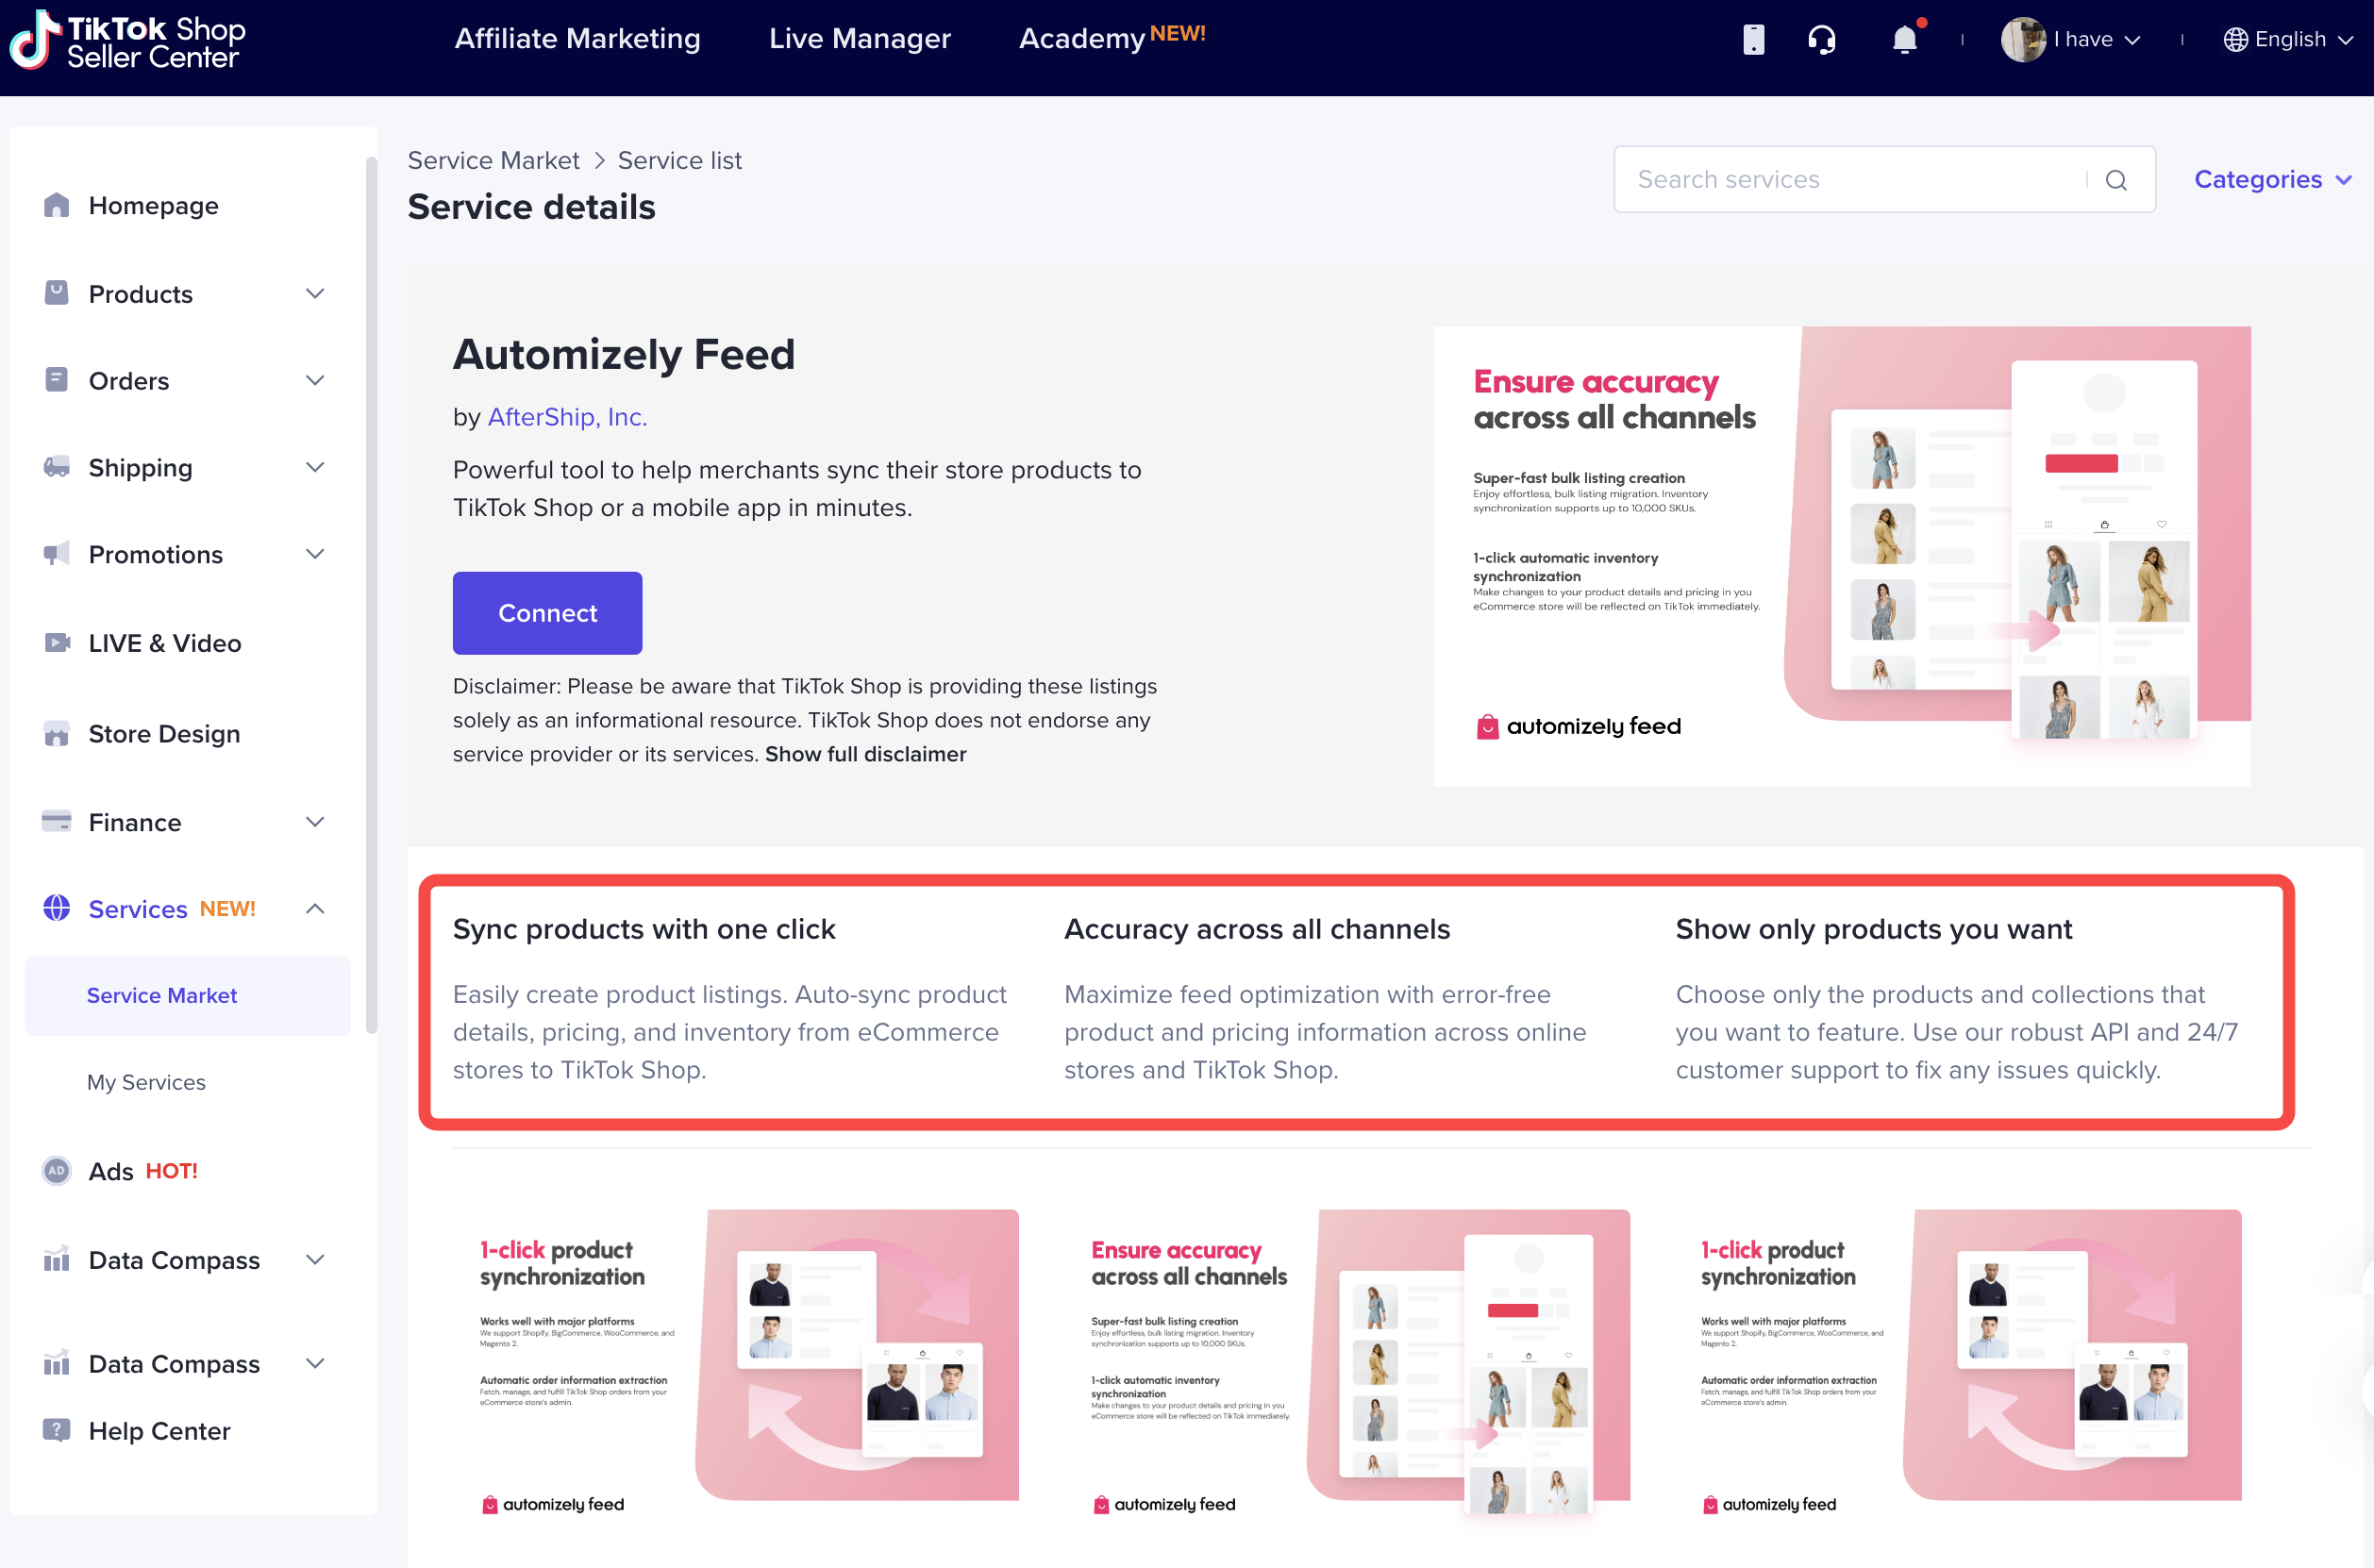
| Key benefits | Mandatory | Provide three key highlights of your app. Each highlight must include a title and description. |
Leverage this space to address the requirements of sellers, focusing on their needs, rather than how a particular feature works.
📌 All 3 sets are required. | Format: Text
Title (50 characters or less) & Description (150 characters or less) | 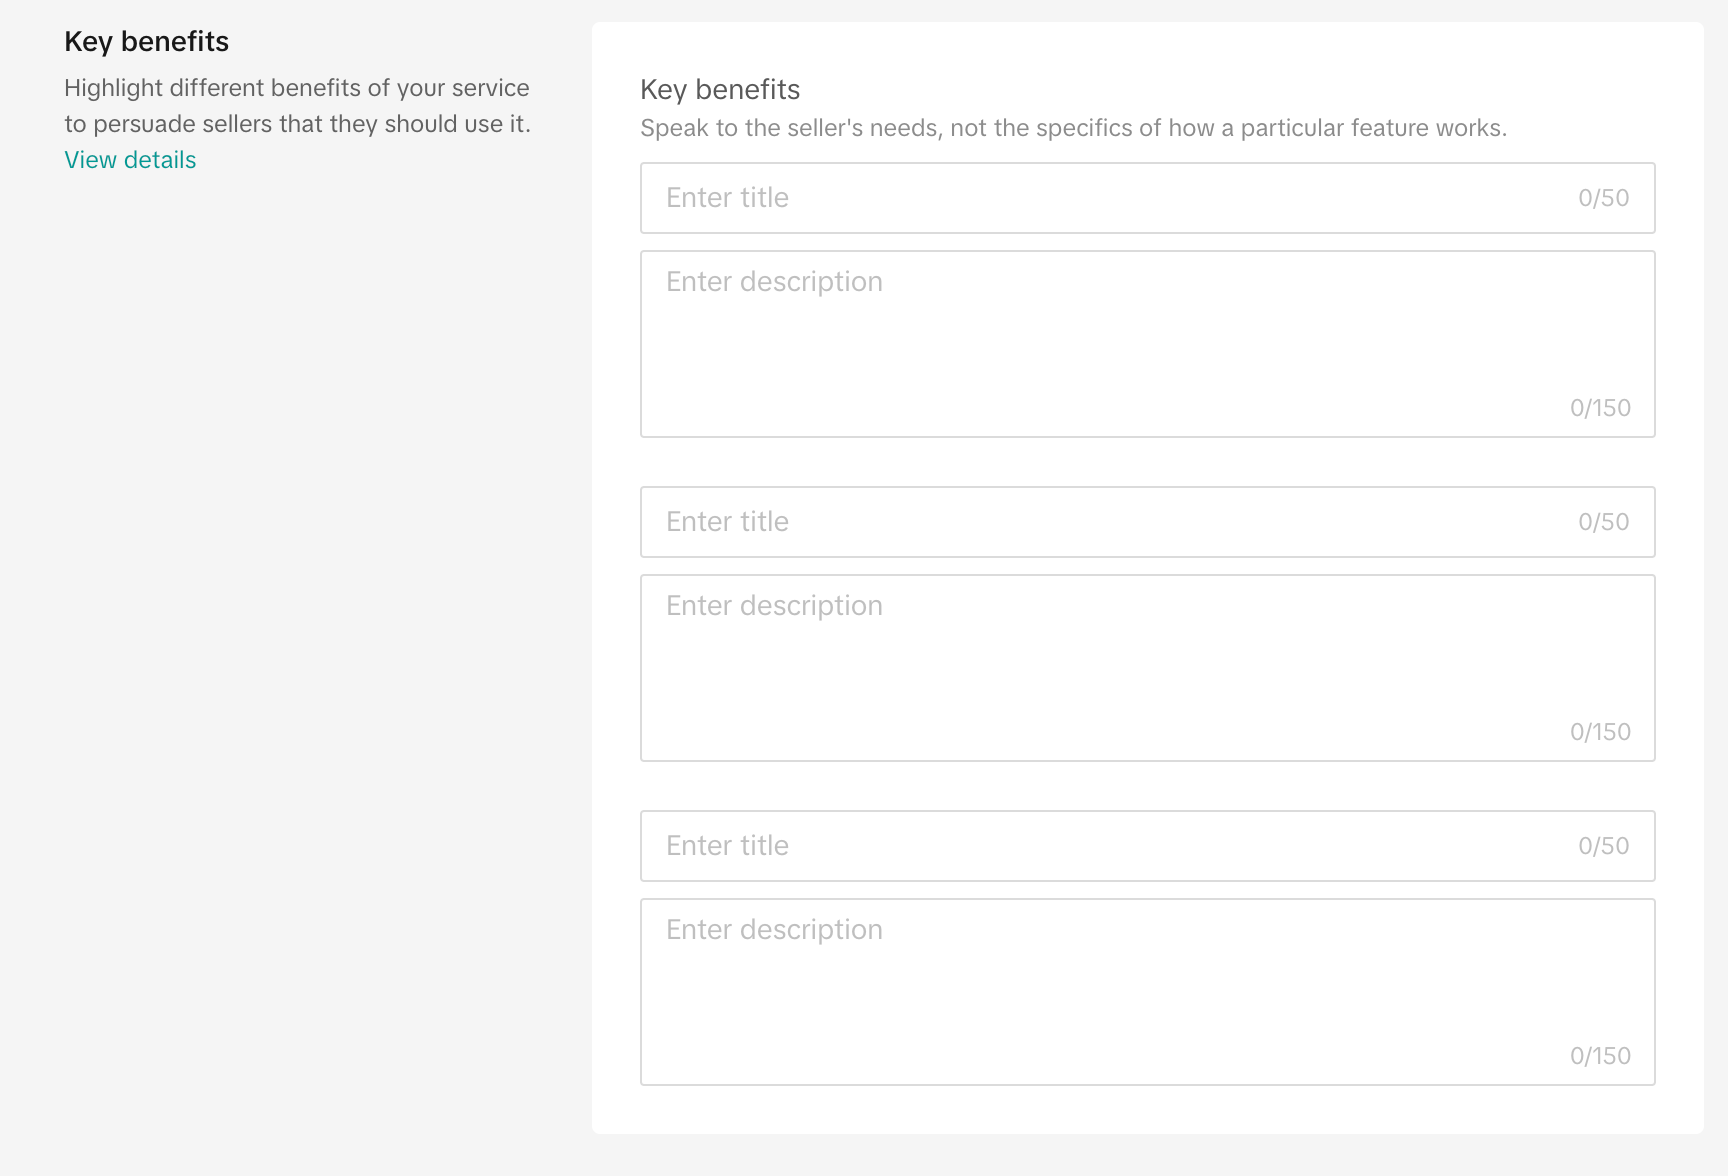 |
|  |
| Image | Mandatory | You can add additional images to prove your abilities and attract sellers. Recommend 3-6 pictures to introduce the service. For example, screenshots of your featured functions, images of staff or success stories. | jpg, jpeg and png only.
Ratio of length to width:5:3, within 10MB
|
| Image | Mandatory | You can add additional images to prove your abilities and attract sellers. Recommend 3-6 pictures to introduce the service. For example, screenshots of your featured functions, images of staff or success stories. | jpg, jpeg and png only.
Ratio of length to width:5:3, within 10MB
*Please provide at least one Featured Image, but it is better to have 3-6 images | 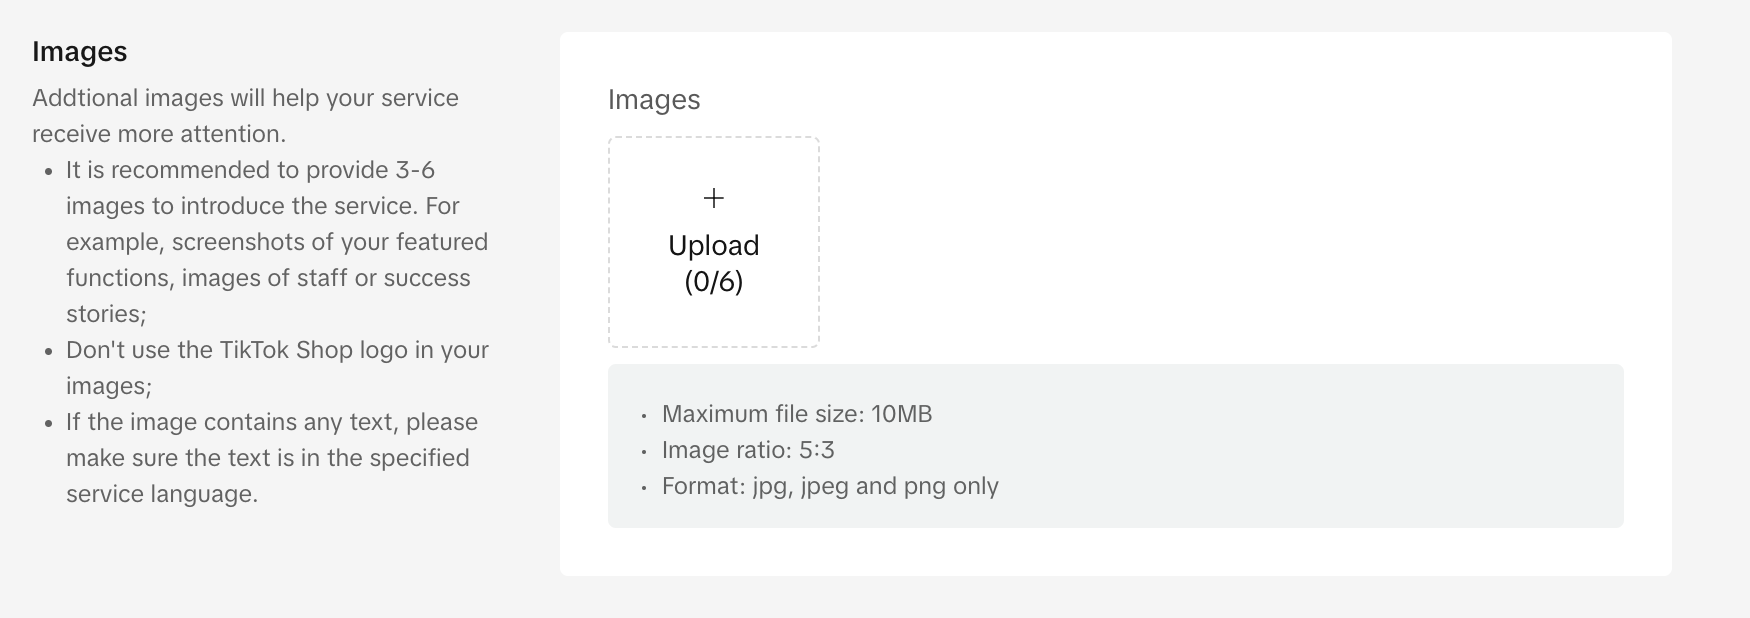 |
| 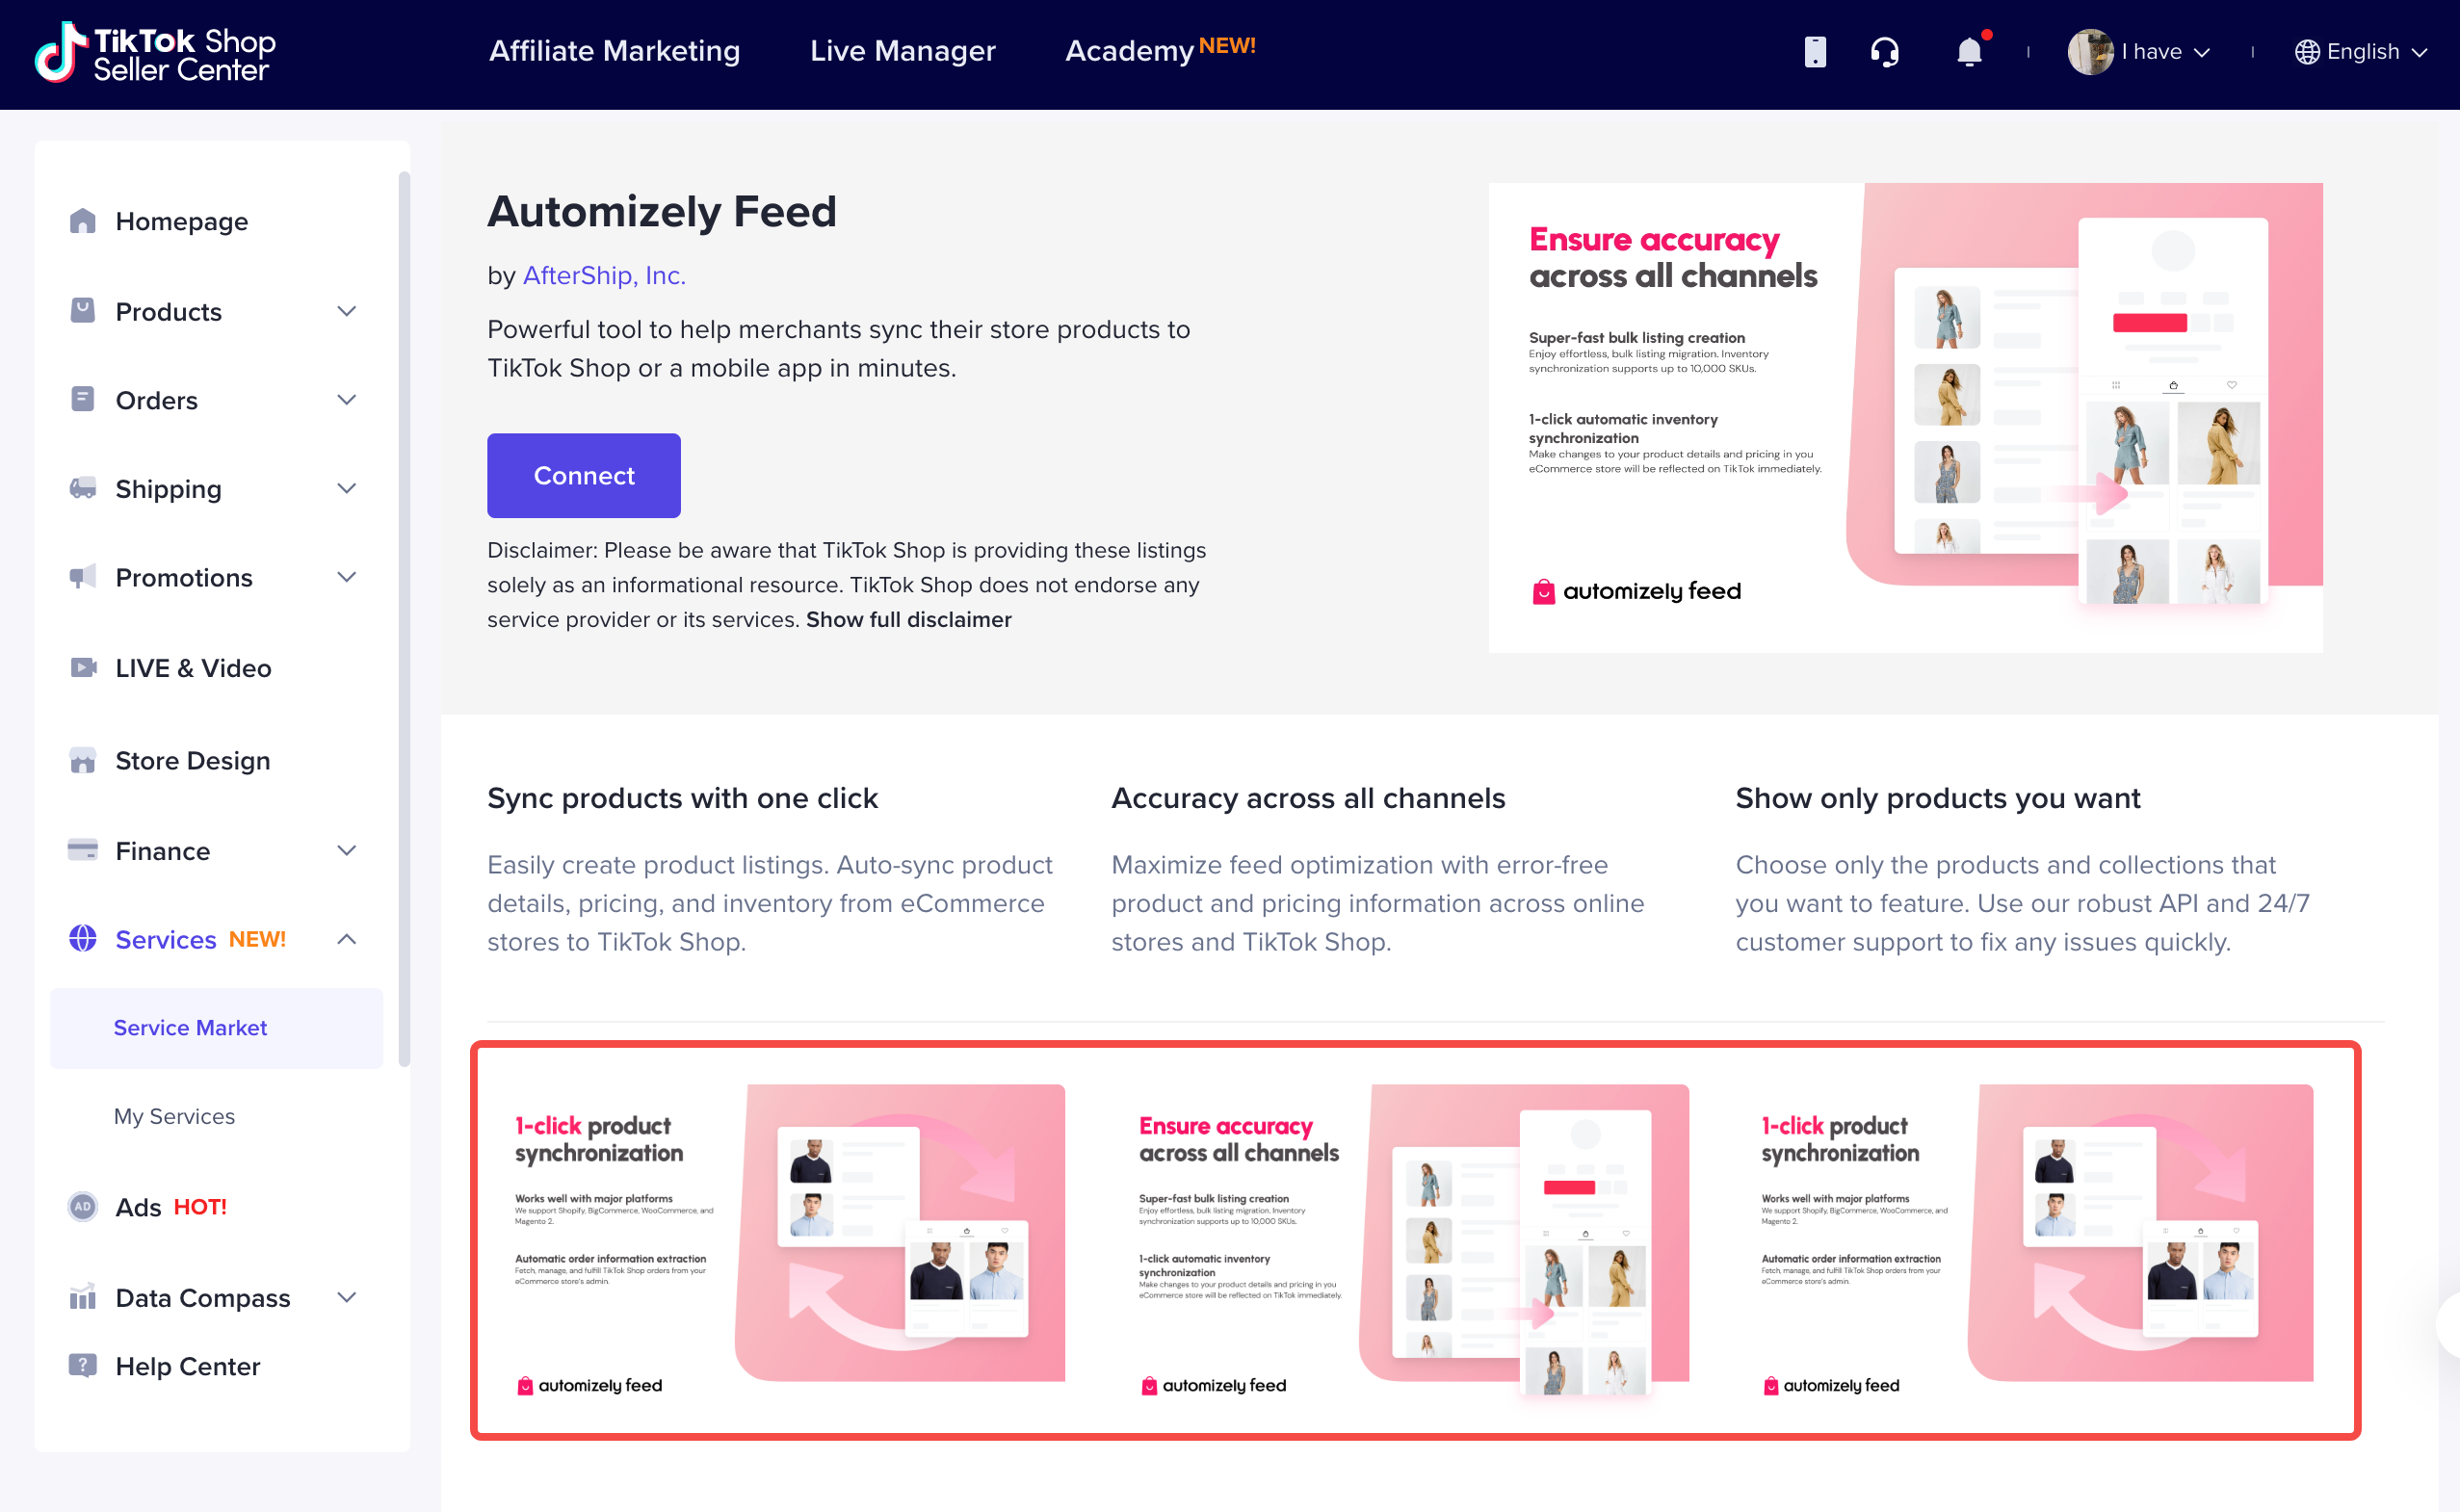 |
| App or service detail description | Mandatory | Please provide a more detailed and comprehensive product introduction in this part.
Explain your service's key features in detail. Sellers want to know what your service can do for their shop.
|
| App or service detail description | Mandatory | Please provide a more detailed and comprehensive product introduction in this part.
Explain your service's key features in detail. Sellers want to know what your service can do for their shop.
- Don't use special characters or emojis in your description.
- Don't include testimonials in the detailed description.
- Don't use any personal information without written consent. | Format: Text and URL links
2000 characters or less allowed, 500 or less recommended |
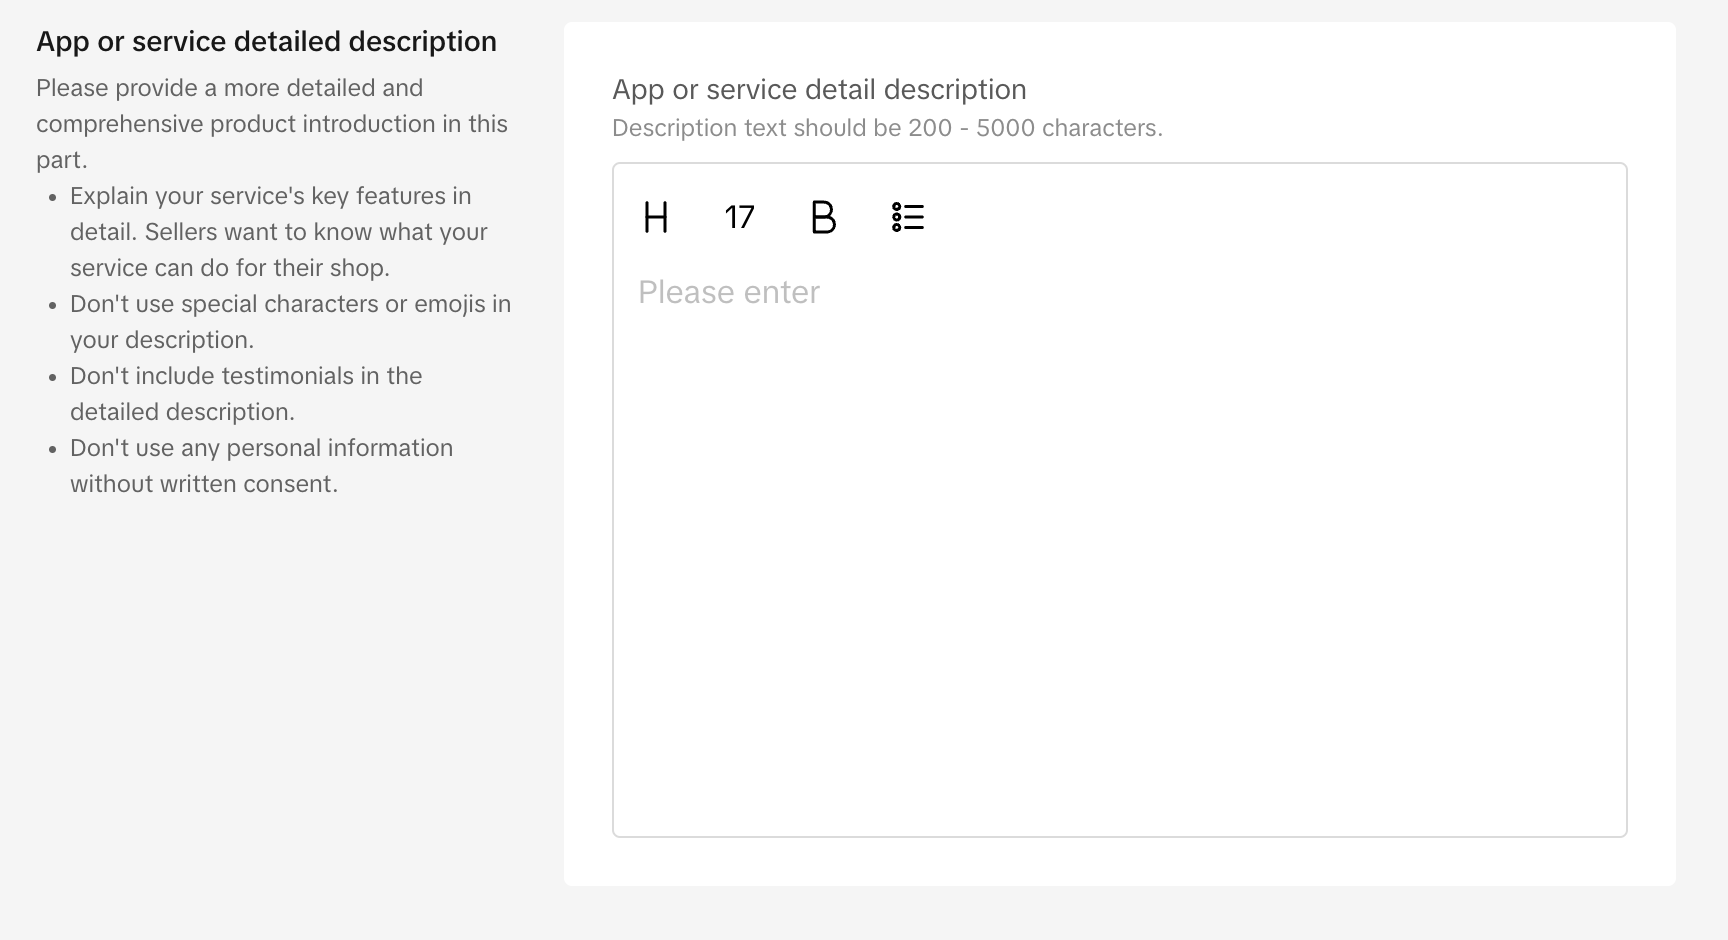 |
| 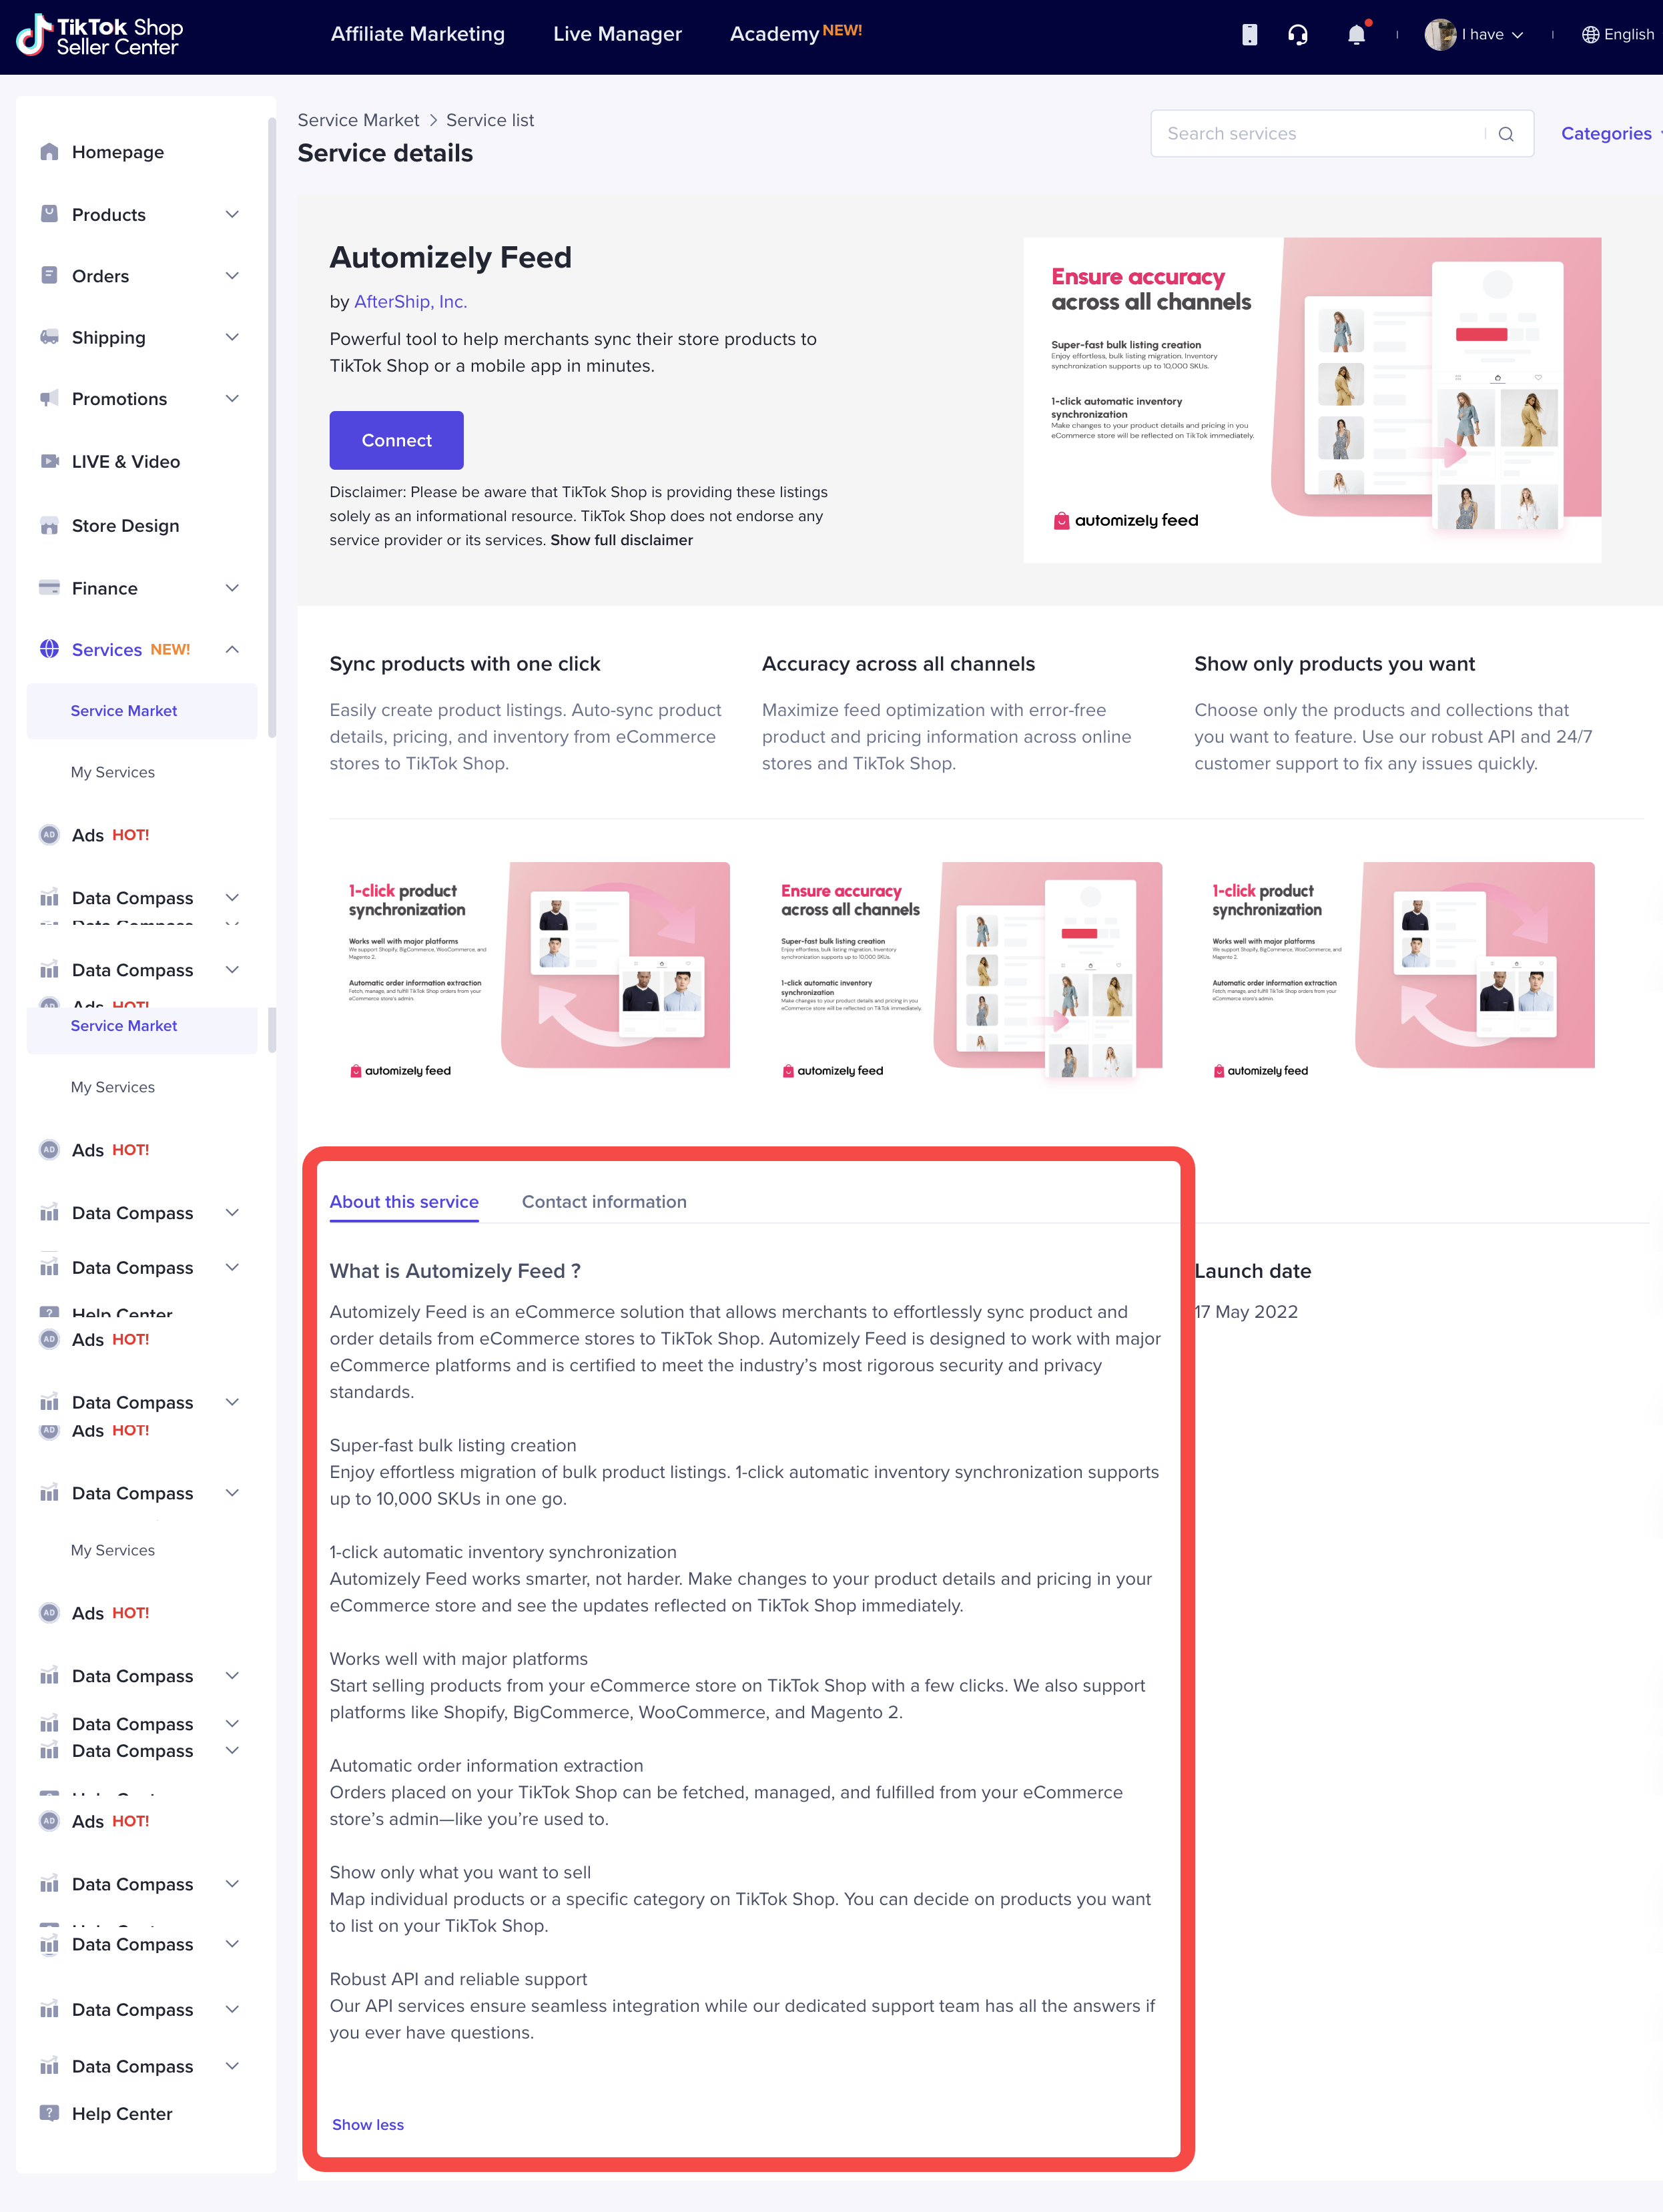 |
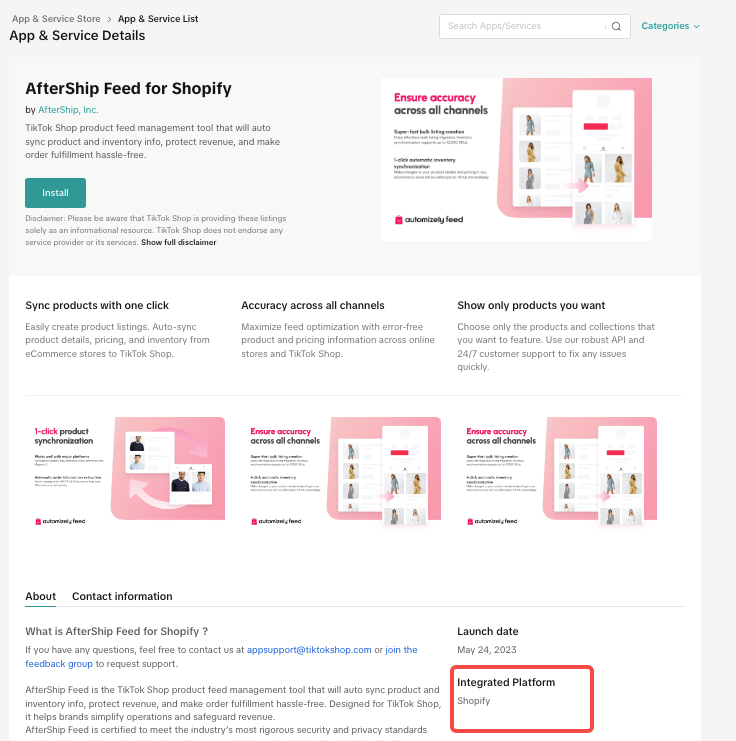
| Integrations | Mandatory | List any platforms that your app integrates with.
Sellers can quickly determine whether your app is compatible with the platform they are using and quickly make a decision on installing your app. | For example, Shopify, WooCommerce, Magento, BigCommerce, Amazon... |
|
| Integrations | Mandatory | List any platforms that your app integrates with.
Sellers can quickly determine whether your app is compatible with the platform they are using and quickly make a decision on installing your app. | For example, Shopify, WooCommerce, Magento, BigCommerce, Amazon... | 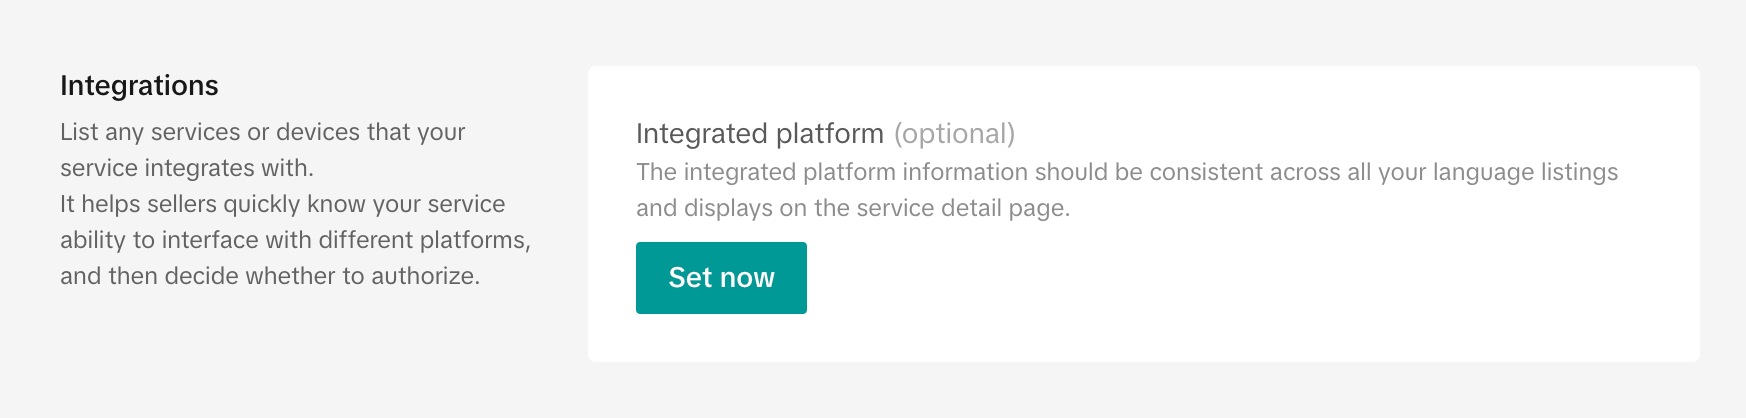 |
|  |
|
- In the Contact & support section, provide contact information and help resources to support sellers using your app, including:
A valid email address and, optionally, a phone number. Optionally, links to your official website and app FAQs, user guide, etc. In the Contact & support
section, provide contact information and help resources to support sellers using your app, including: - A valid email address and, optionally, a phone number.
- Optionally, links to your official website and app FAQs, user guide, etc.
| Field Name | Type | Field Description | Screenshot | Seller-side Demo |
|---|---|---|---|---|
| Phone | Optional | Leave your phone number for sellers to contact you | ||
| 📌 Local phone number is recommended. | 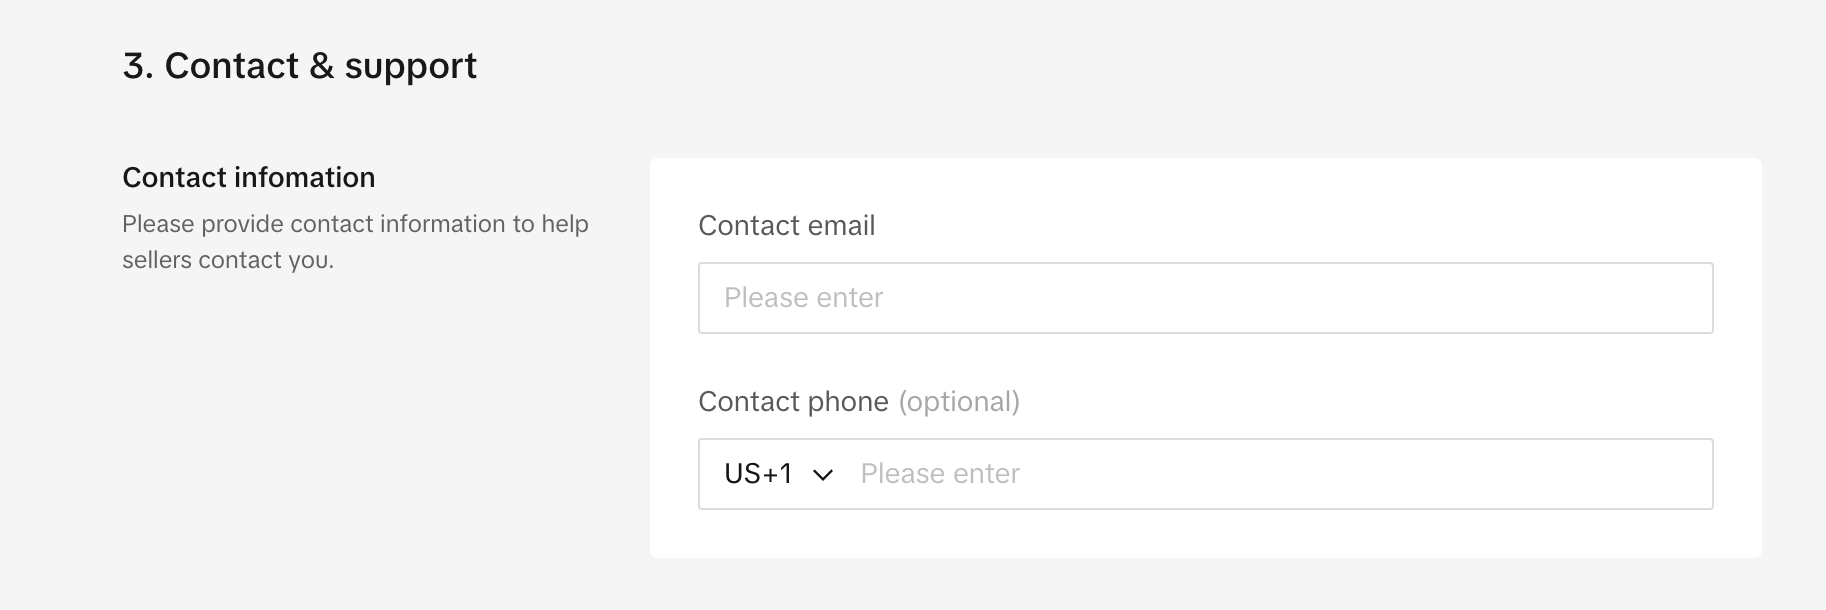 | 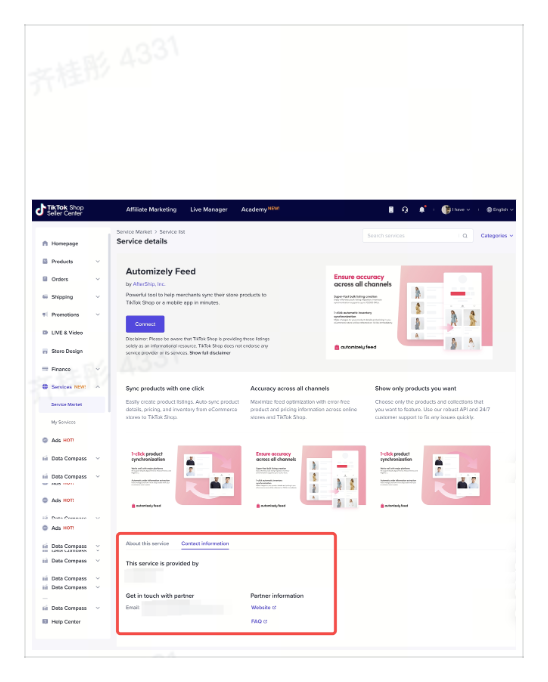 | ||
| Email address | Mandatory | Provide your email to help the seller contact you | ||
| Website | Optional | If there is an official website, you can fill in a valid official website address here. | 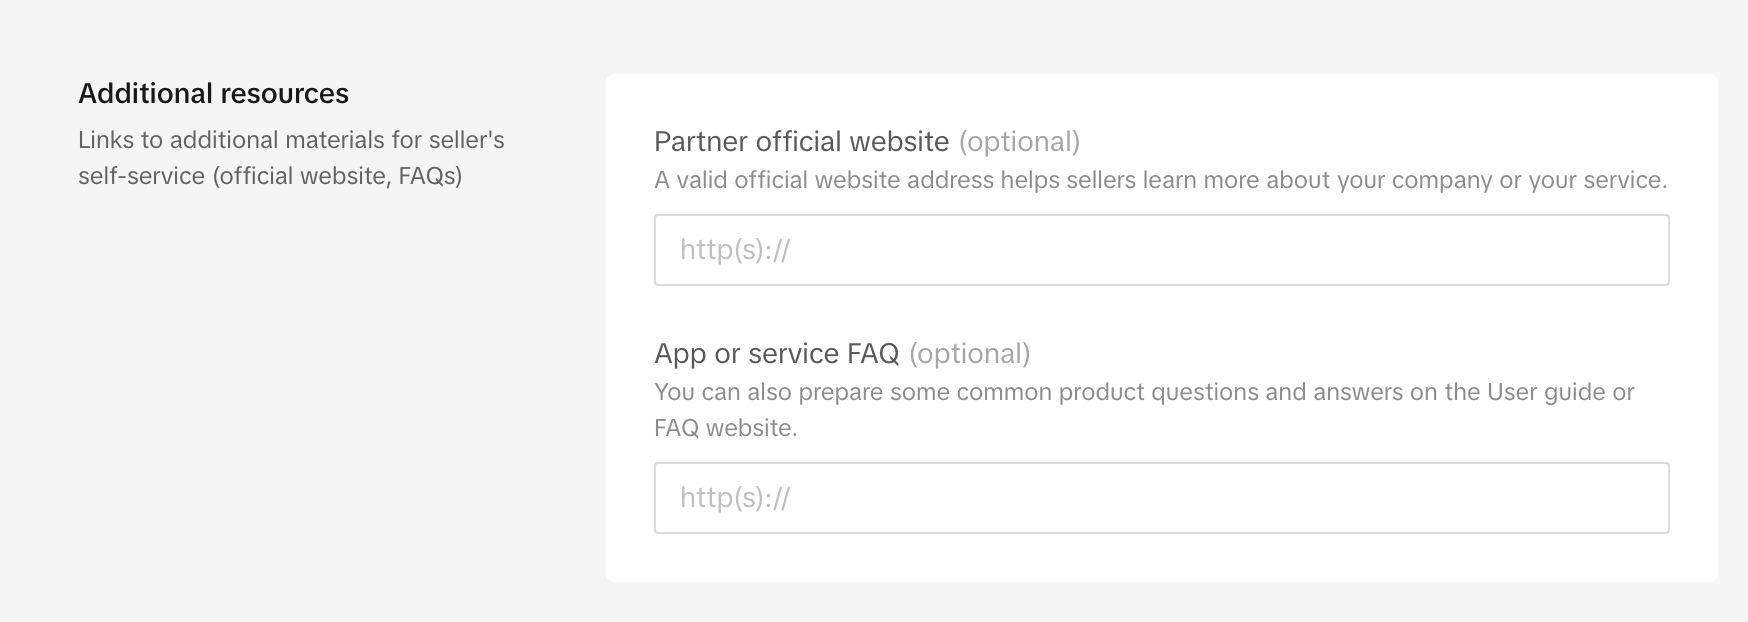 | |
| App Userguide or FAQ | Optional | If you have the user guidebook or some common product questions and answers, please provide the URL link. |
- Click Next listing to submit your App listing for review and move to the next listing (if applicable).
Note: Once you submit the form, you can't edit it during the review process. You are able to edit the language listing form and resubmit if we reject your listing.
For Custom App (seller developer's App also included)
📌 Checklist: Once you're ready to launch your custom App, you must go through registration review before you can make your App live
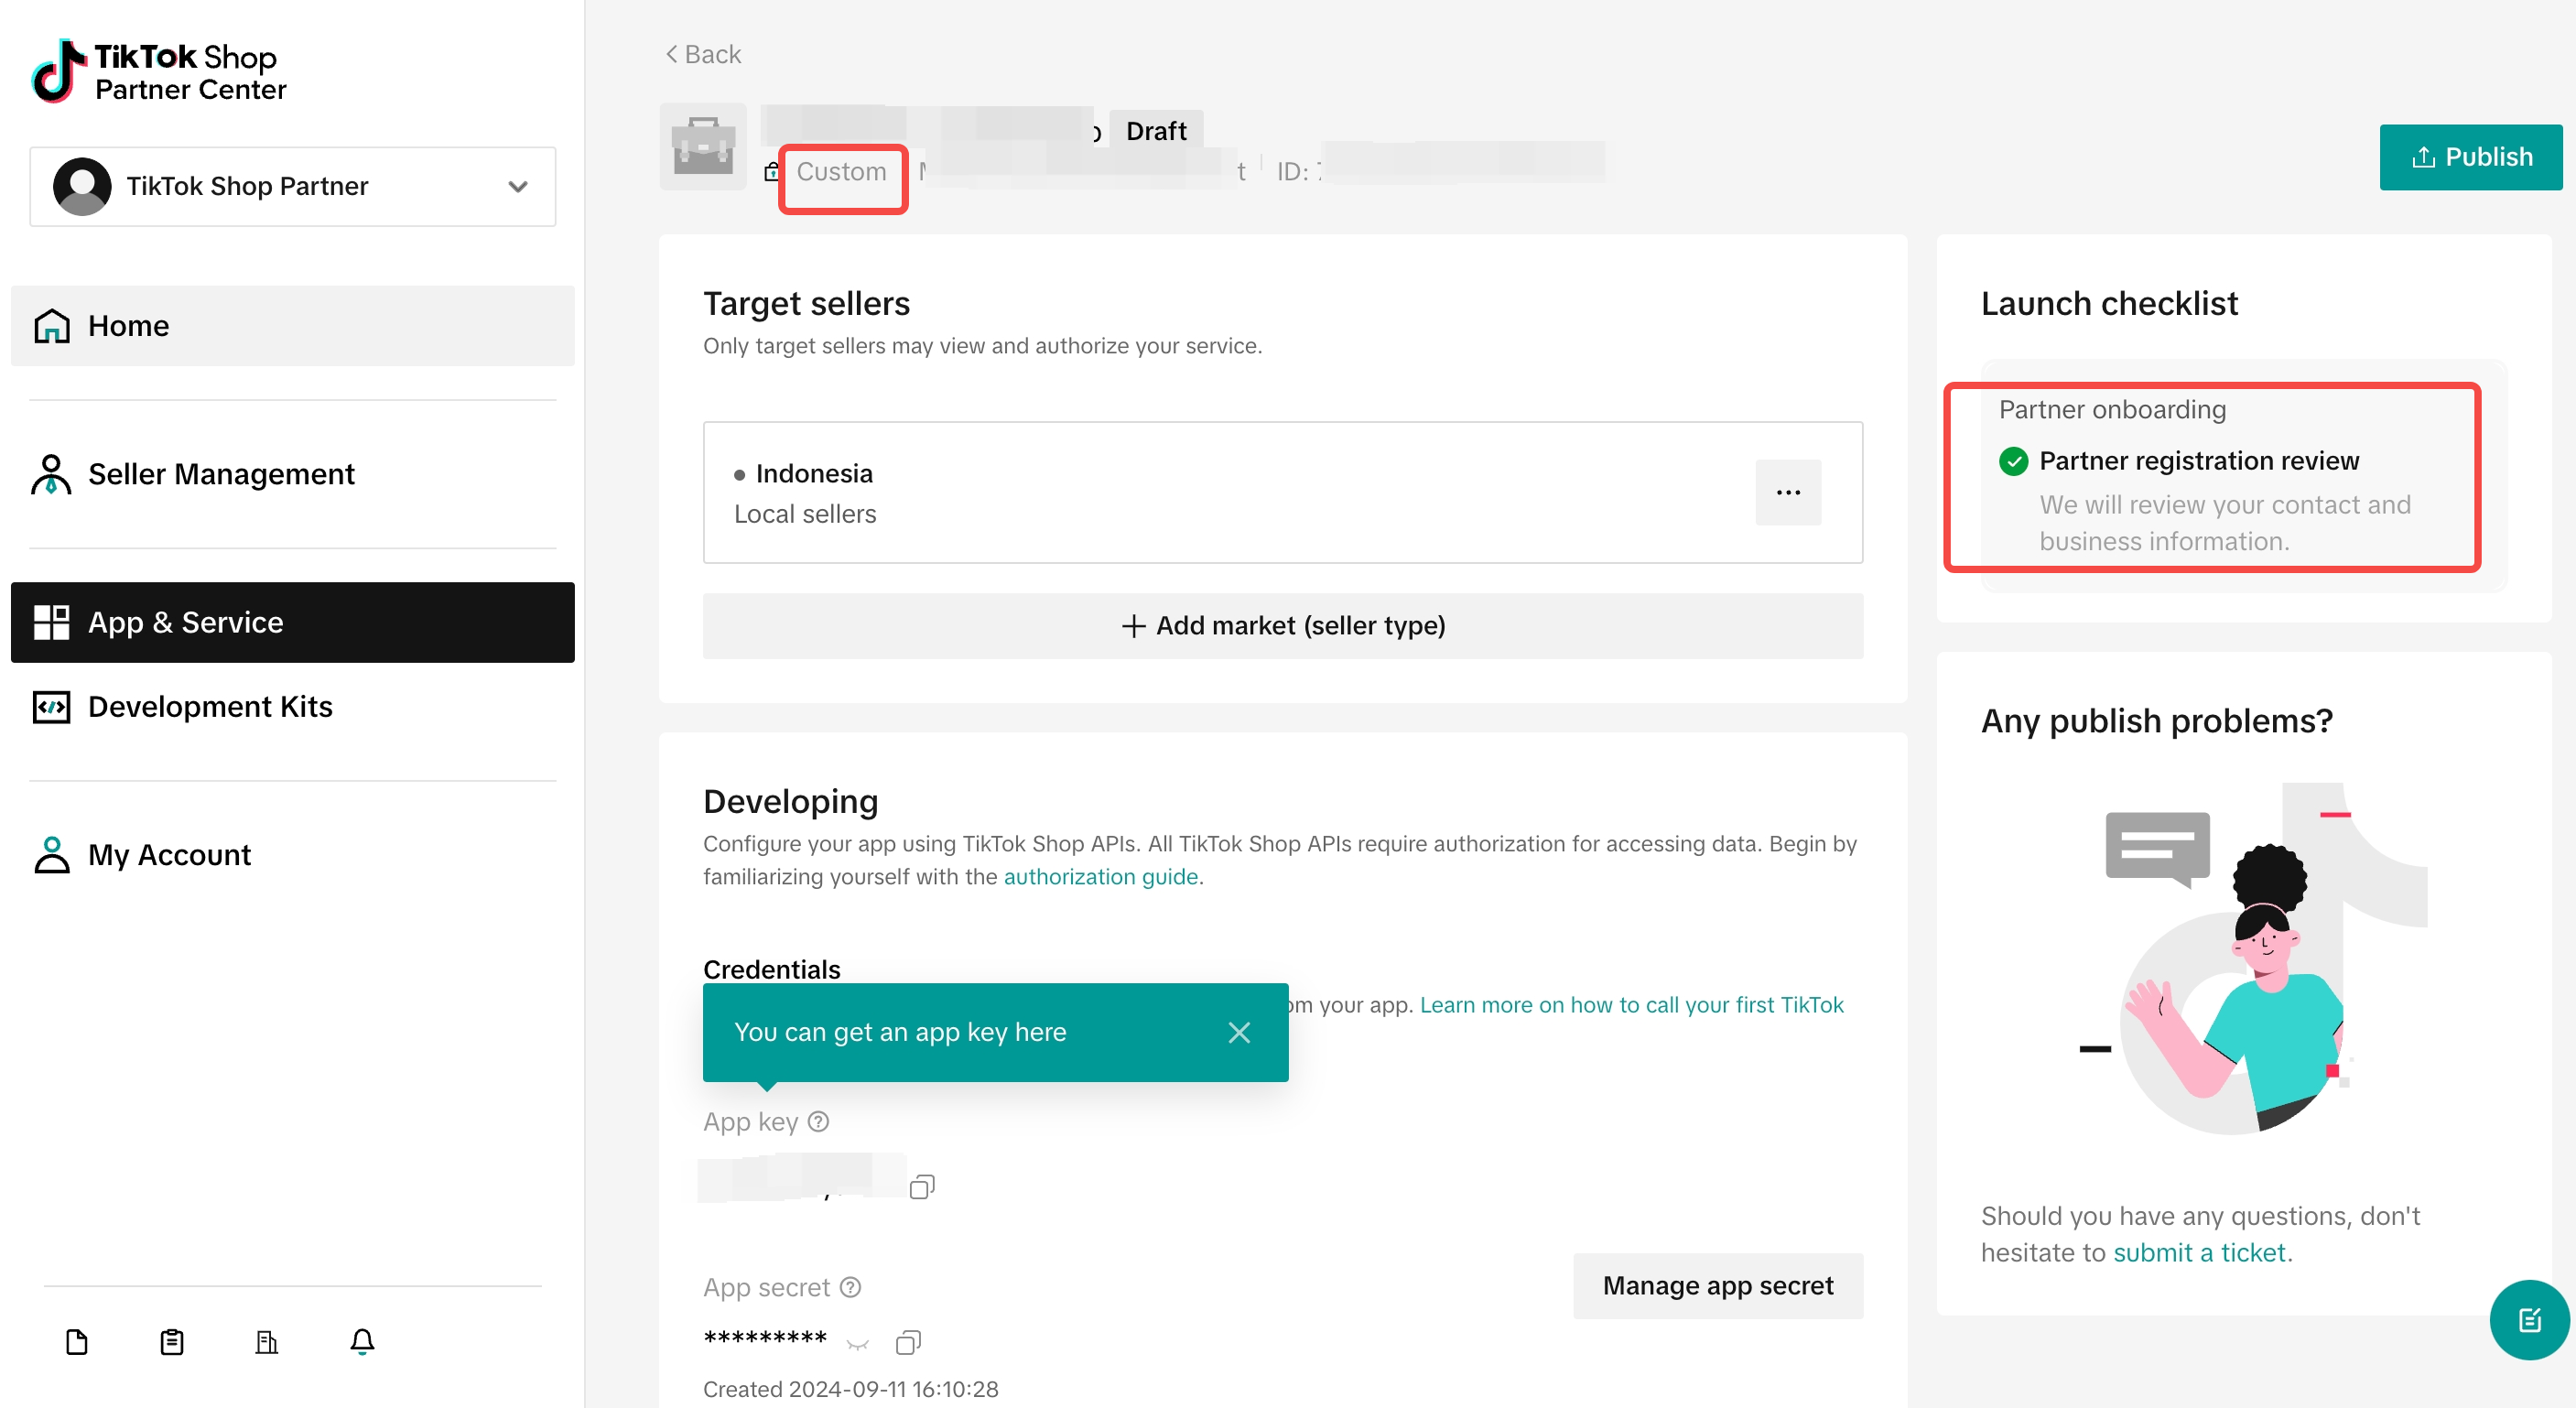
Step 9: Publish App
- For Public Apps: Public App will be published in the Tokopedia & Shop App Store. Sellers can browse and authorize the App(s) in the App Store.
- For Custom Apps: Custom App is typically developed for a particular seller. It is tailored to meet the specific business needs, requirements, or preferences of a seller. The App is not listed on Tokopedia & Shop App Store. You can distribute this App to individual sellers by sharing the App's authorization link.
For Public App
After you complete and submit the app review and language listing forms, and ensure you've passed the compliance review, you have finished all the steps necessary to publish and list your public app.
You can check the publishing status of your app on the app and service detail page.
- If Tokopedia & Shop approves your app, we will automatically make it available on the App and Service Store for sellers to authorize. In addition, we will provide you with an "Authorize link" you can copy and share with sellers individually.
- If Tokopedia & Shop rejects your app, click Edit to view our reasoning, make adjustments, and resubmit your app for further review.
For Custom App
After you complete registration and integration, you have finished all the steps necessary to publish your custom app. Please click 「Publish」and then the App will be published automatically.
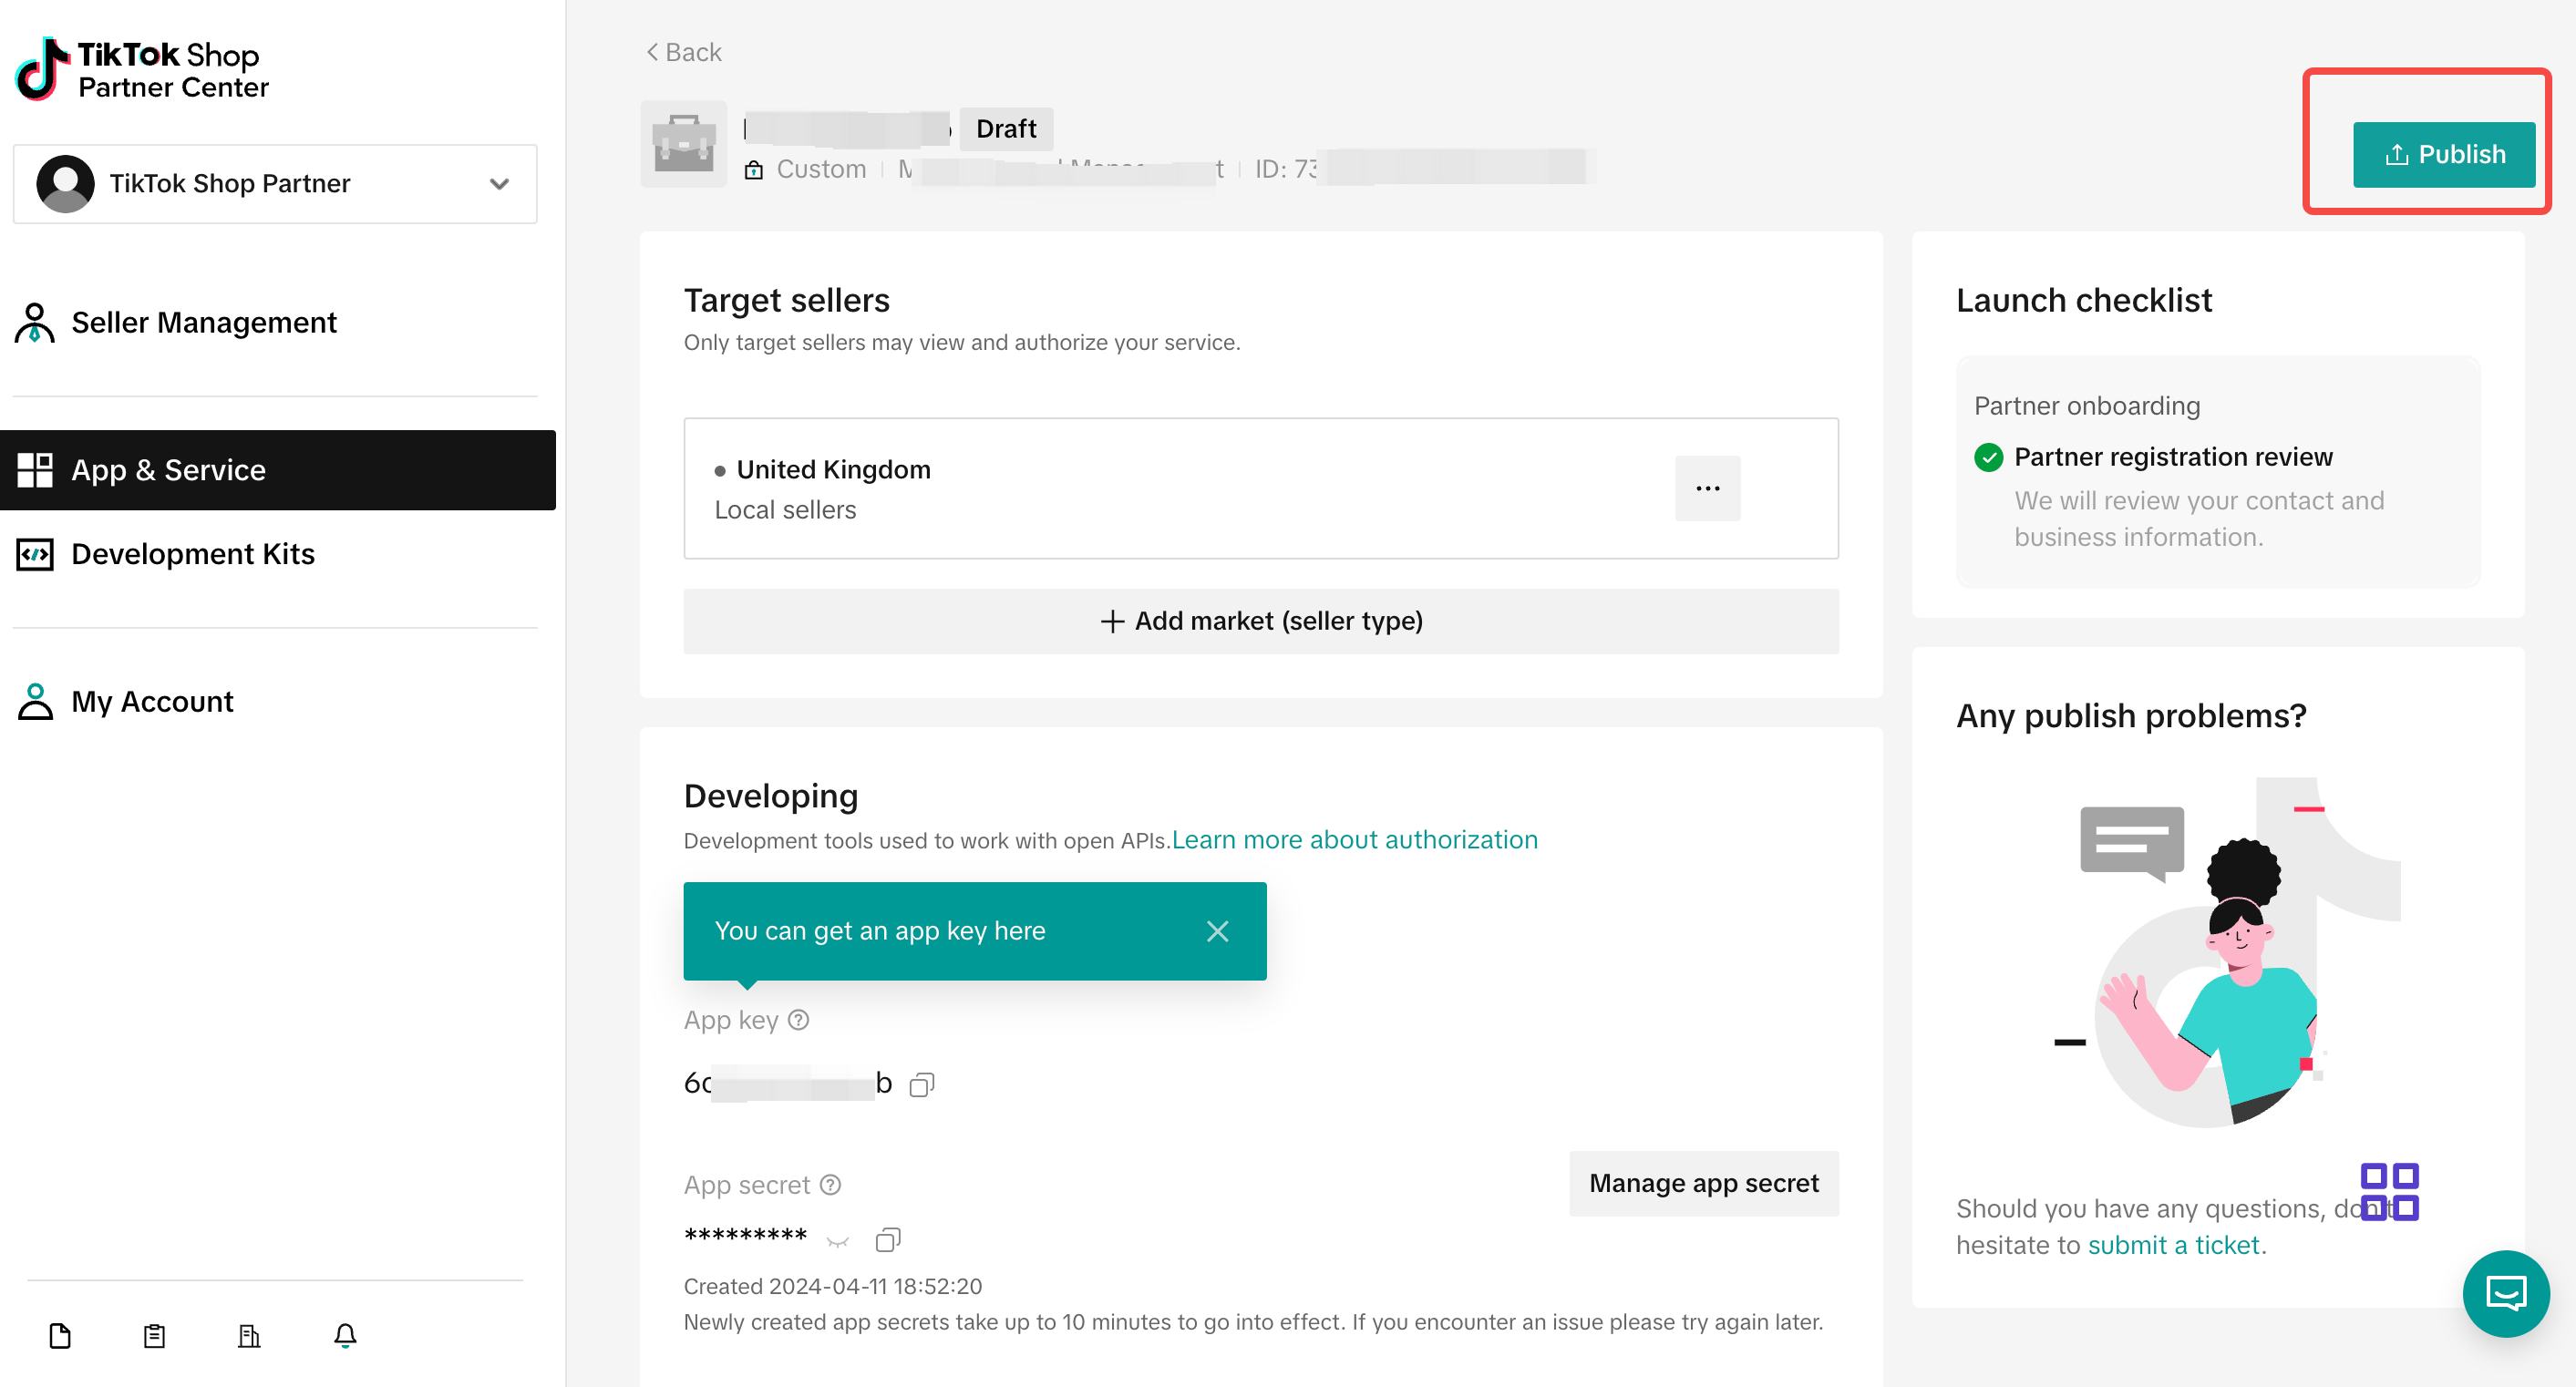
Step 10: Authorized by seller
For Public App
There are two ways for sellers to authorize your App.
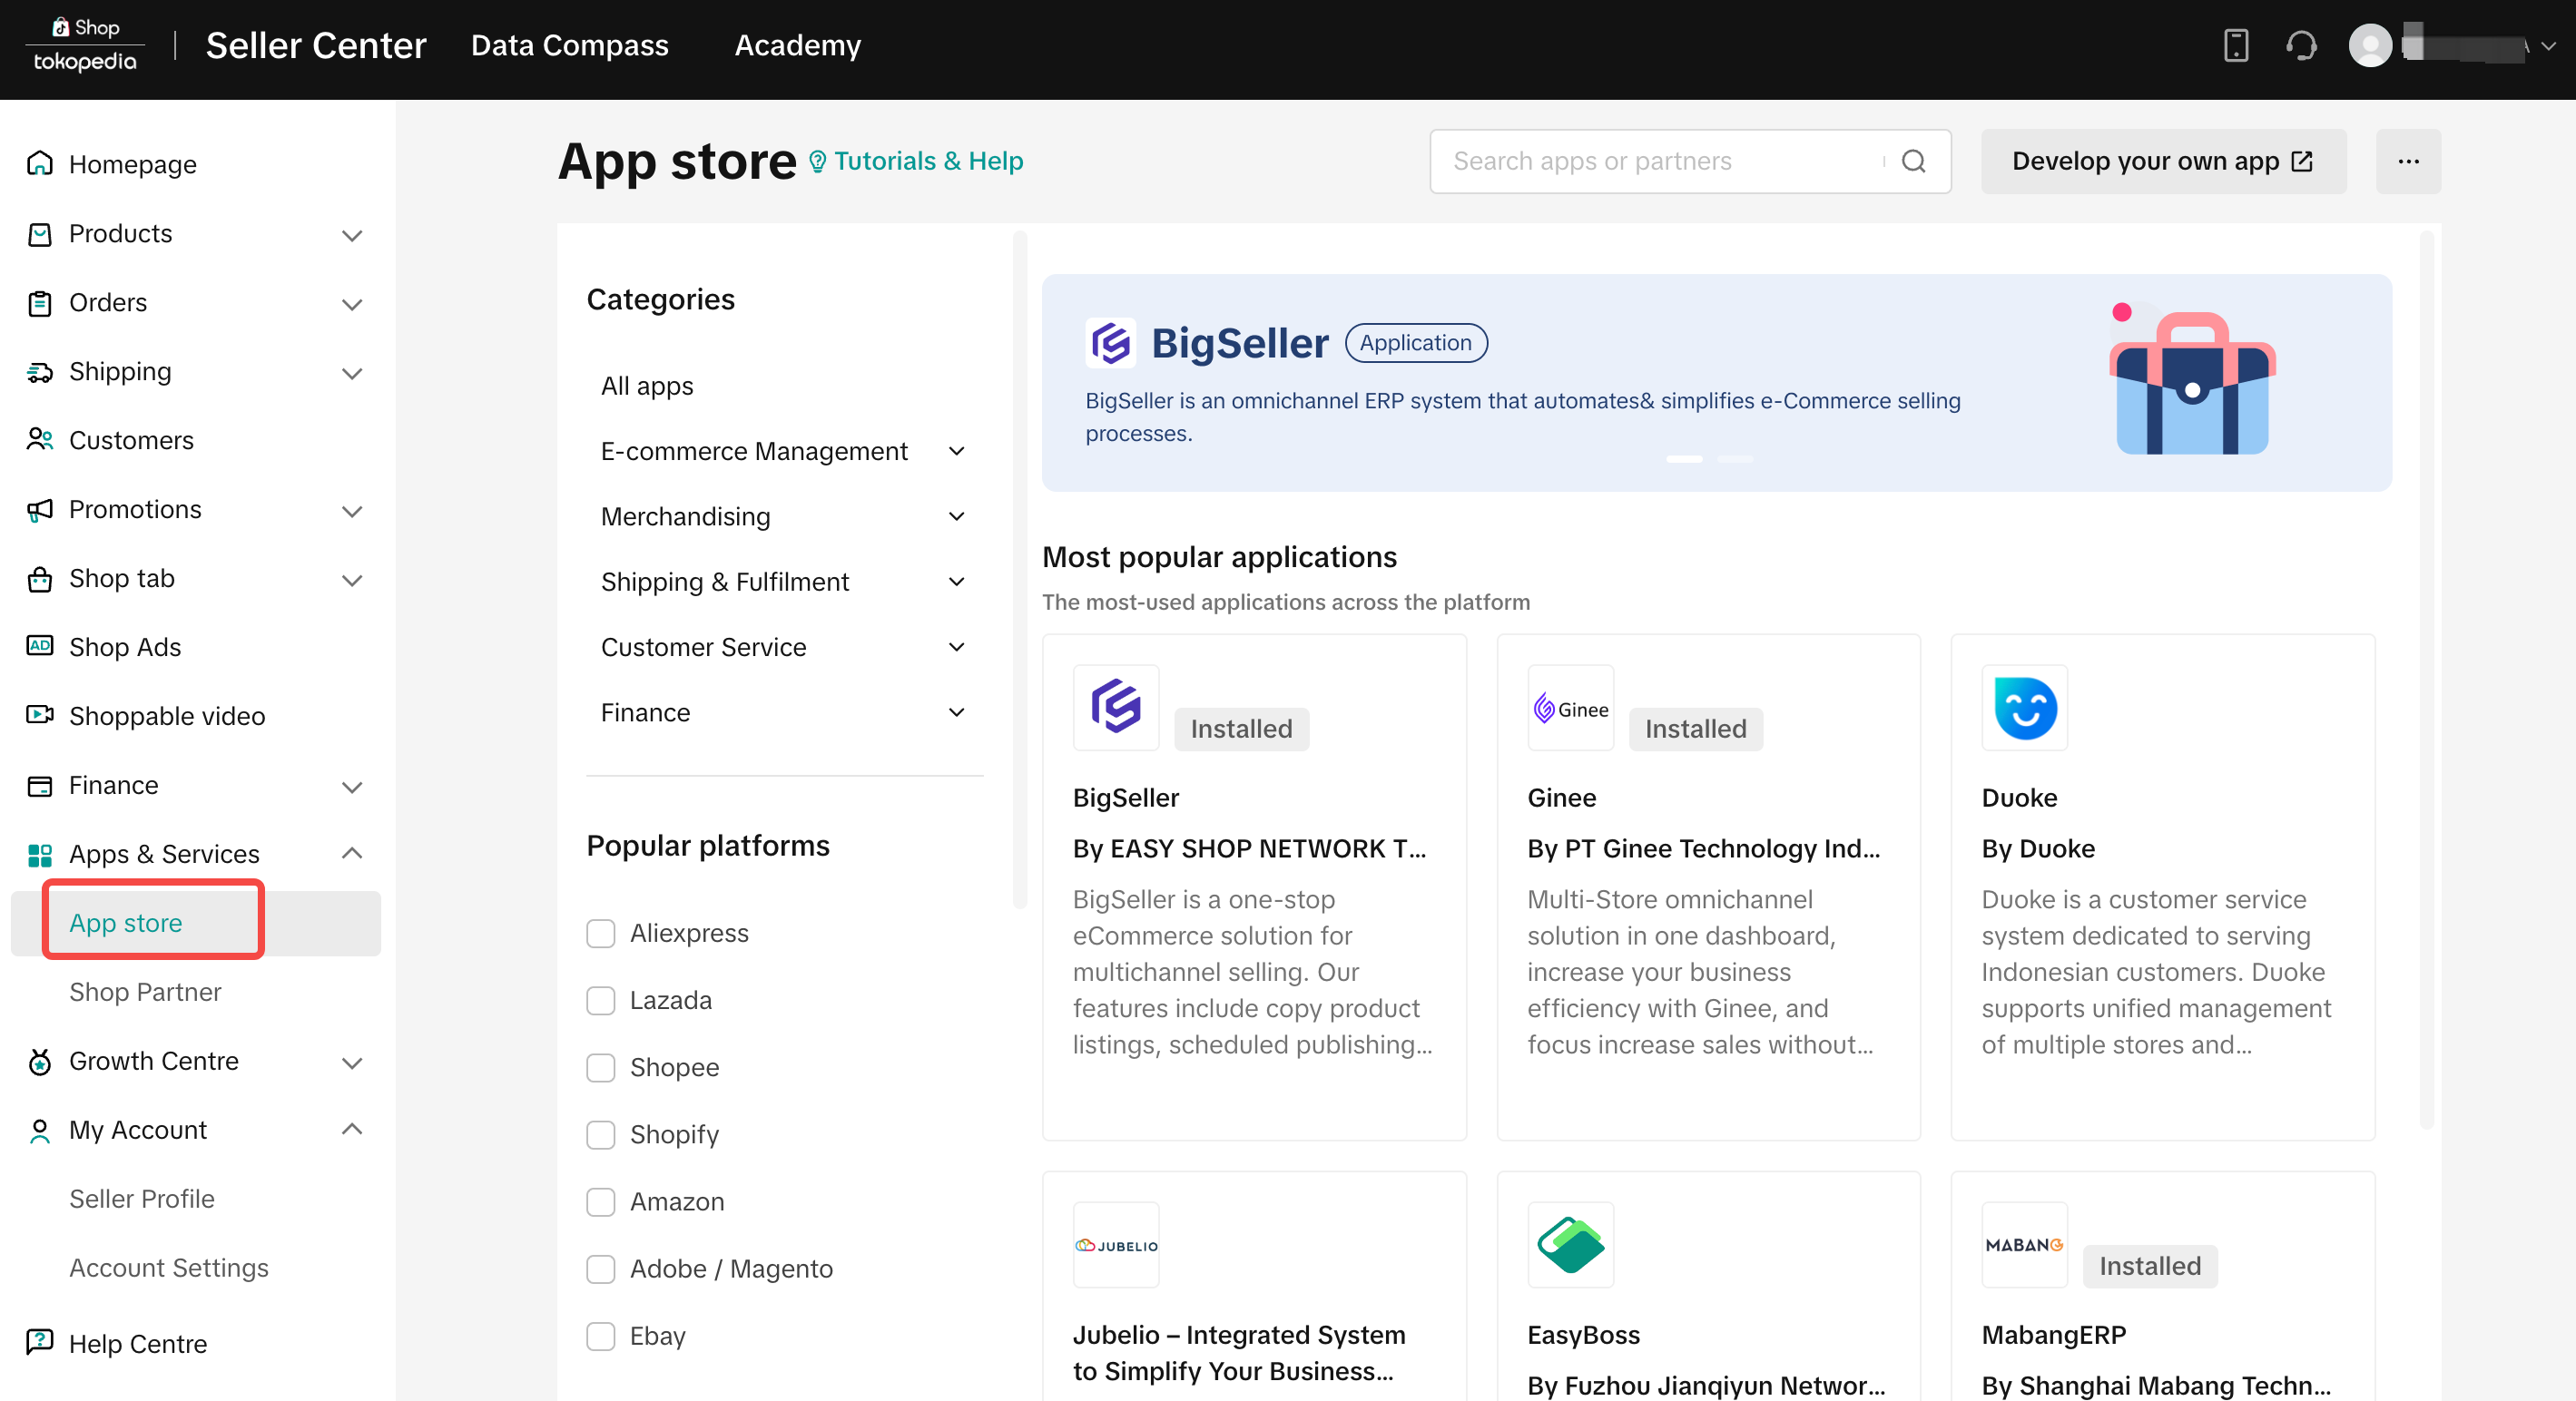
- Sellers browse and authorize the App in the App Store
Sellers can go to [Seller Center] > [Apps store] and finish the authorization.
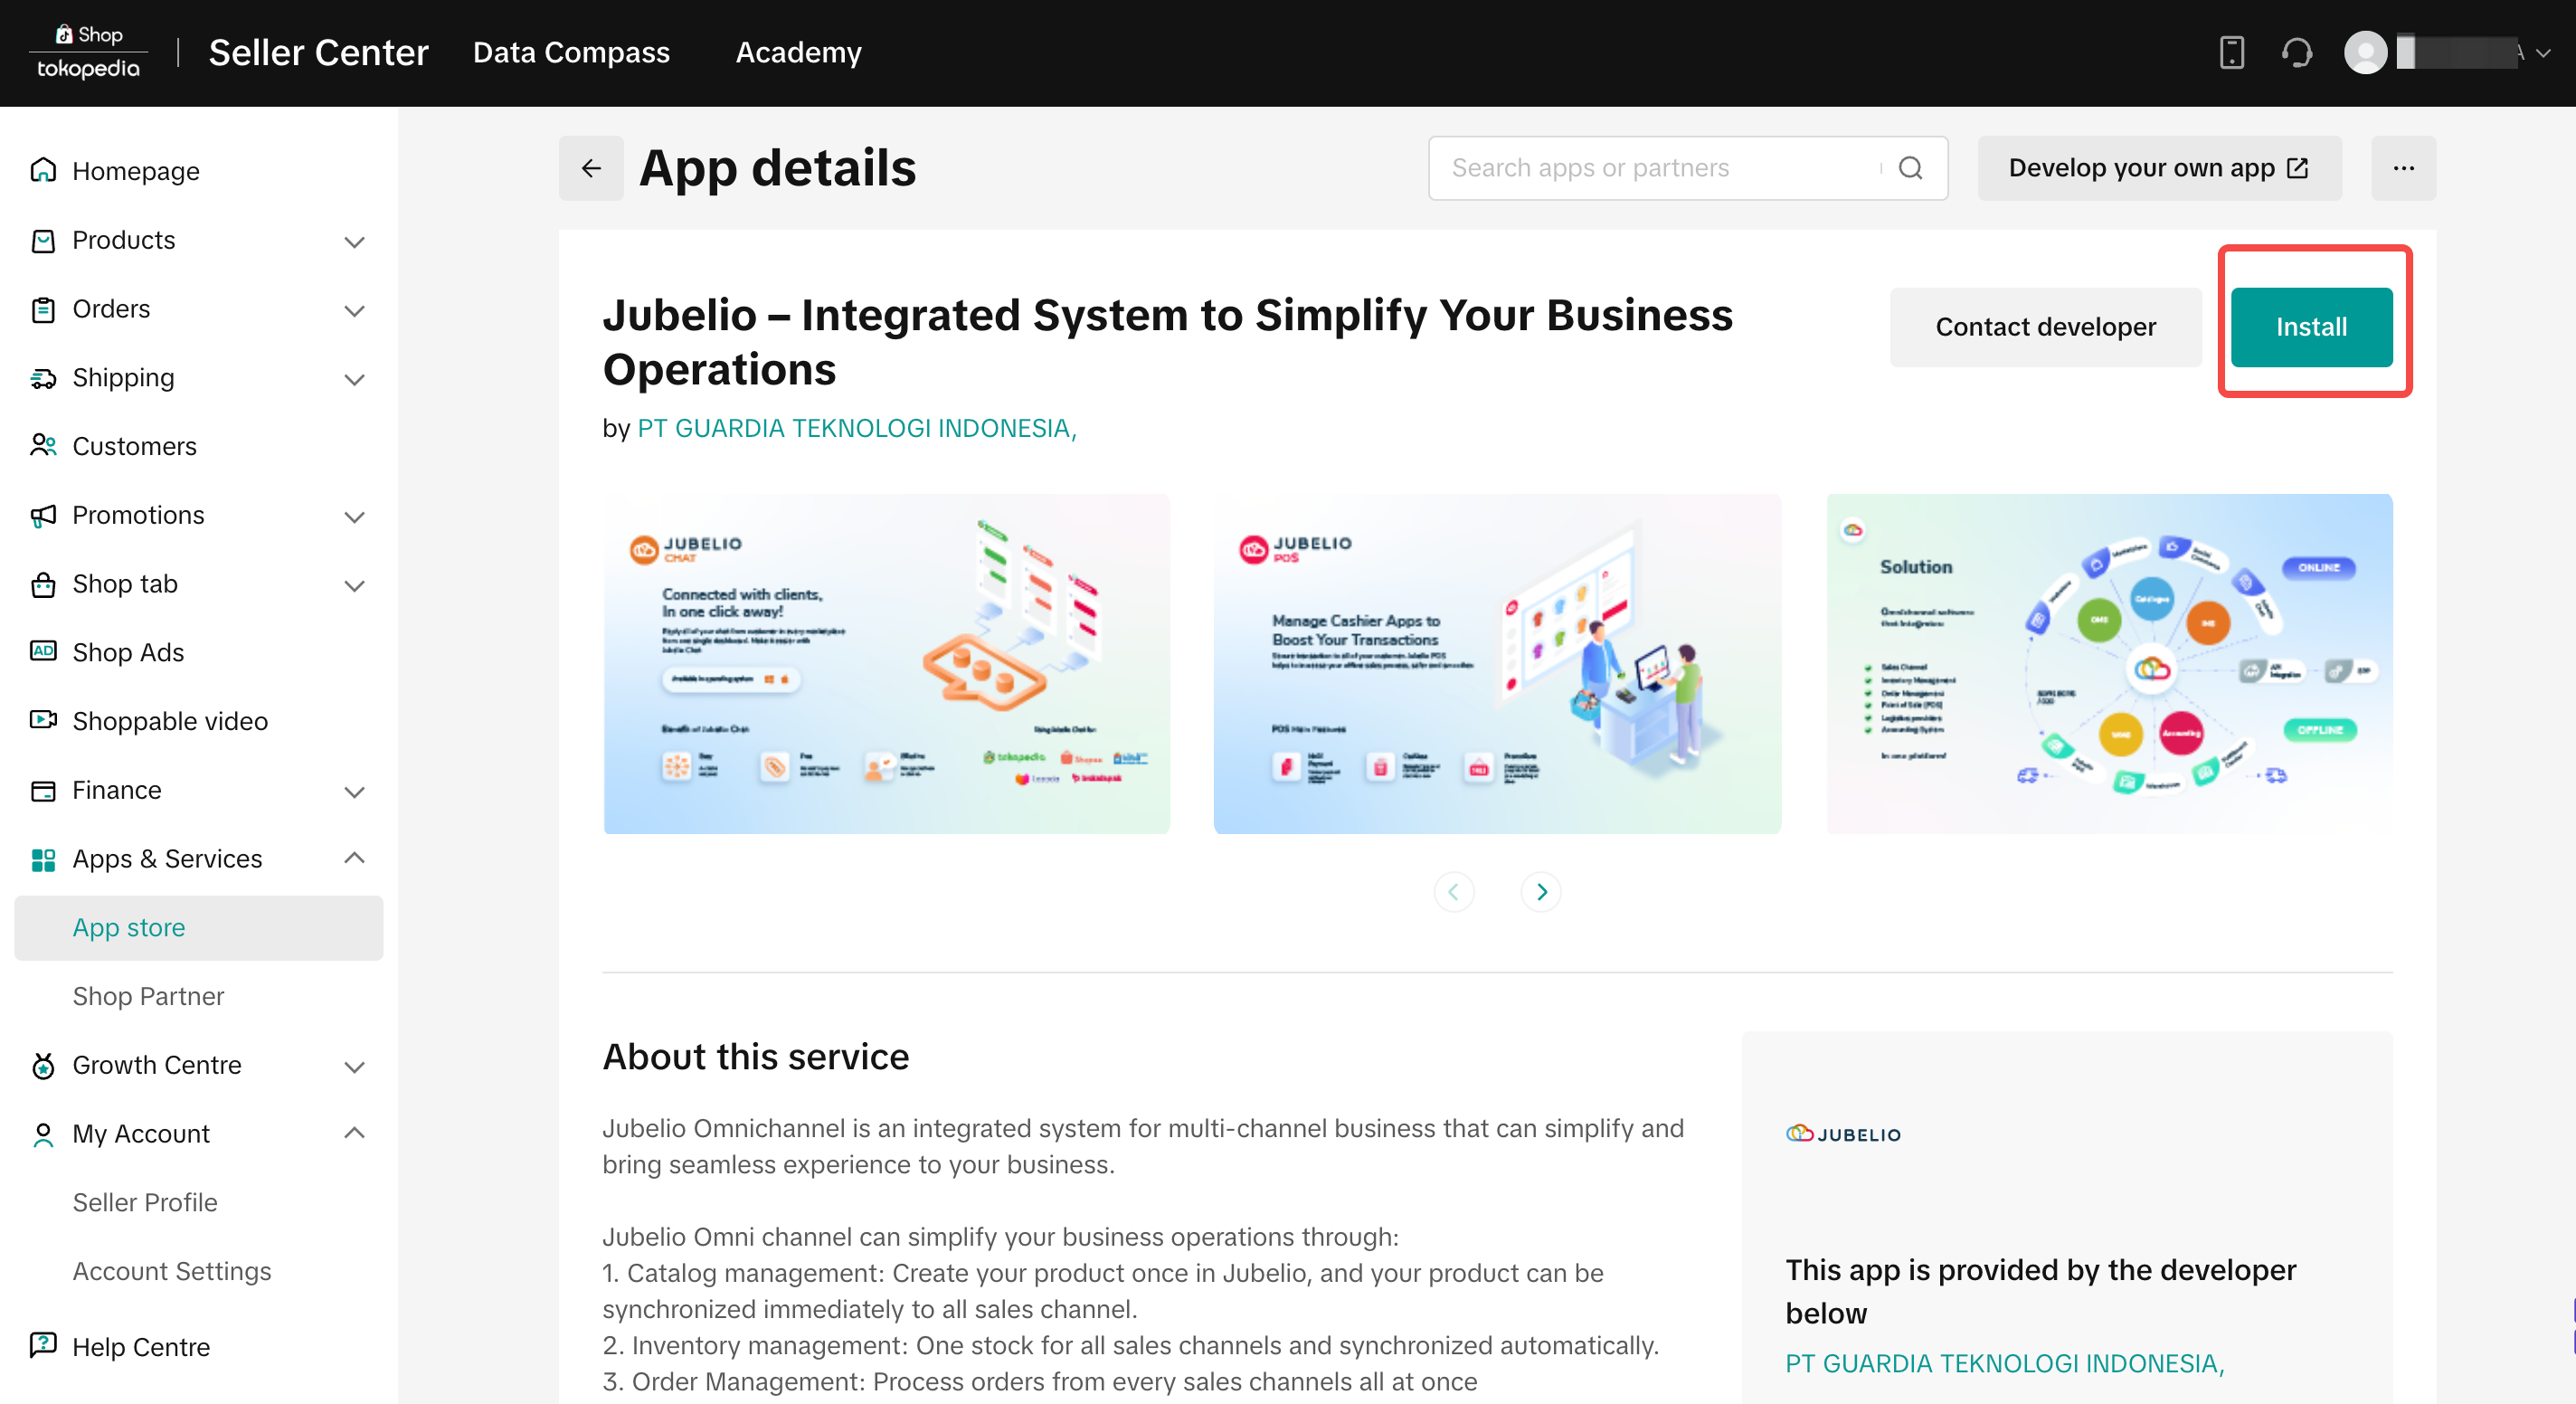
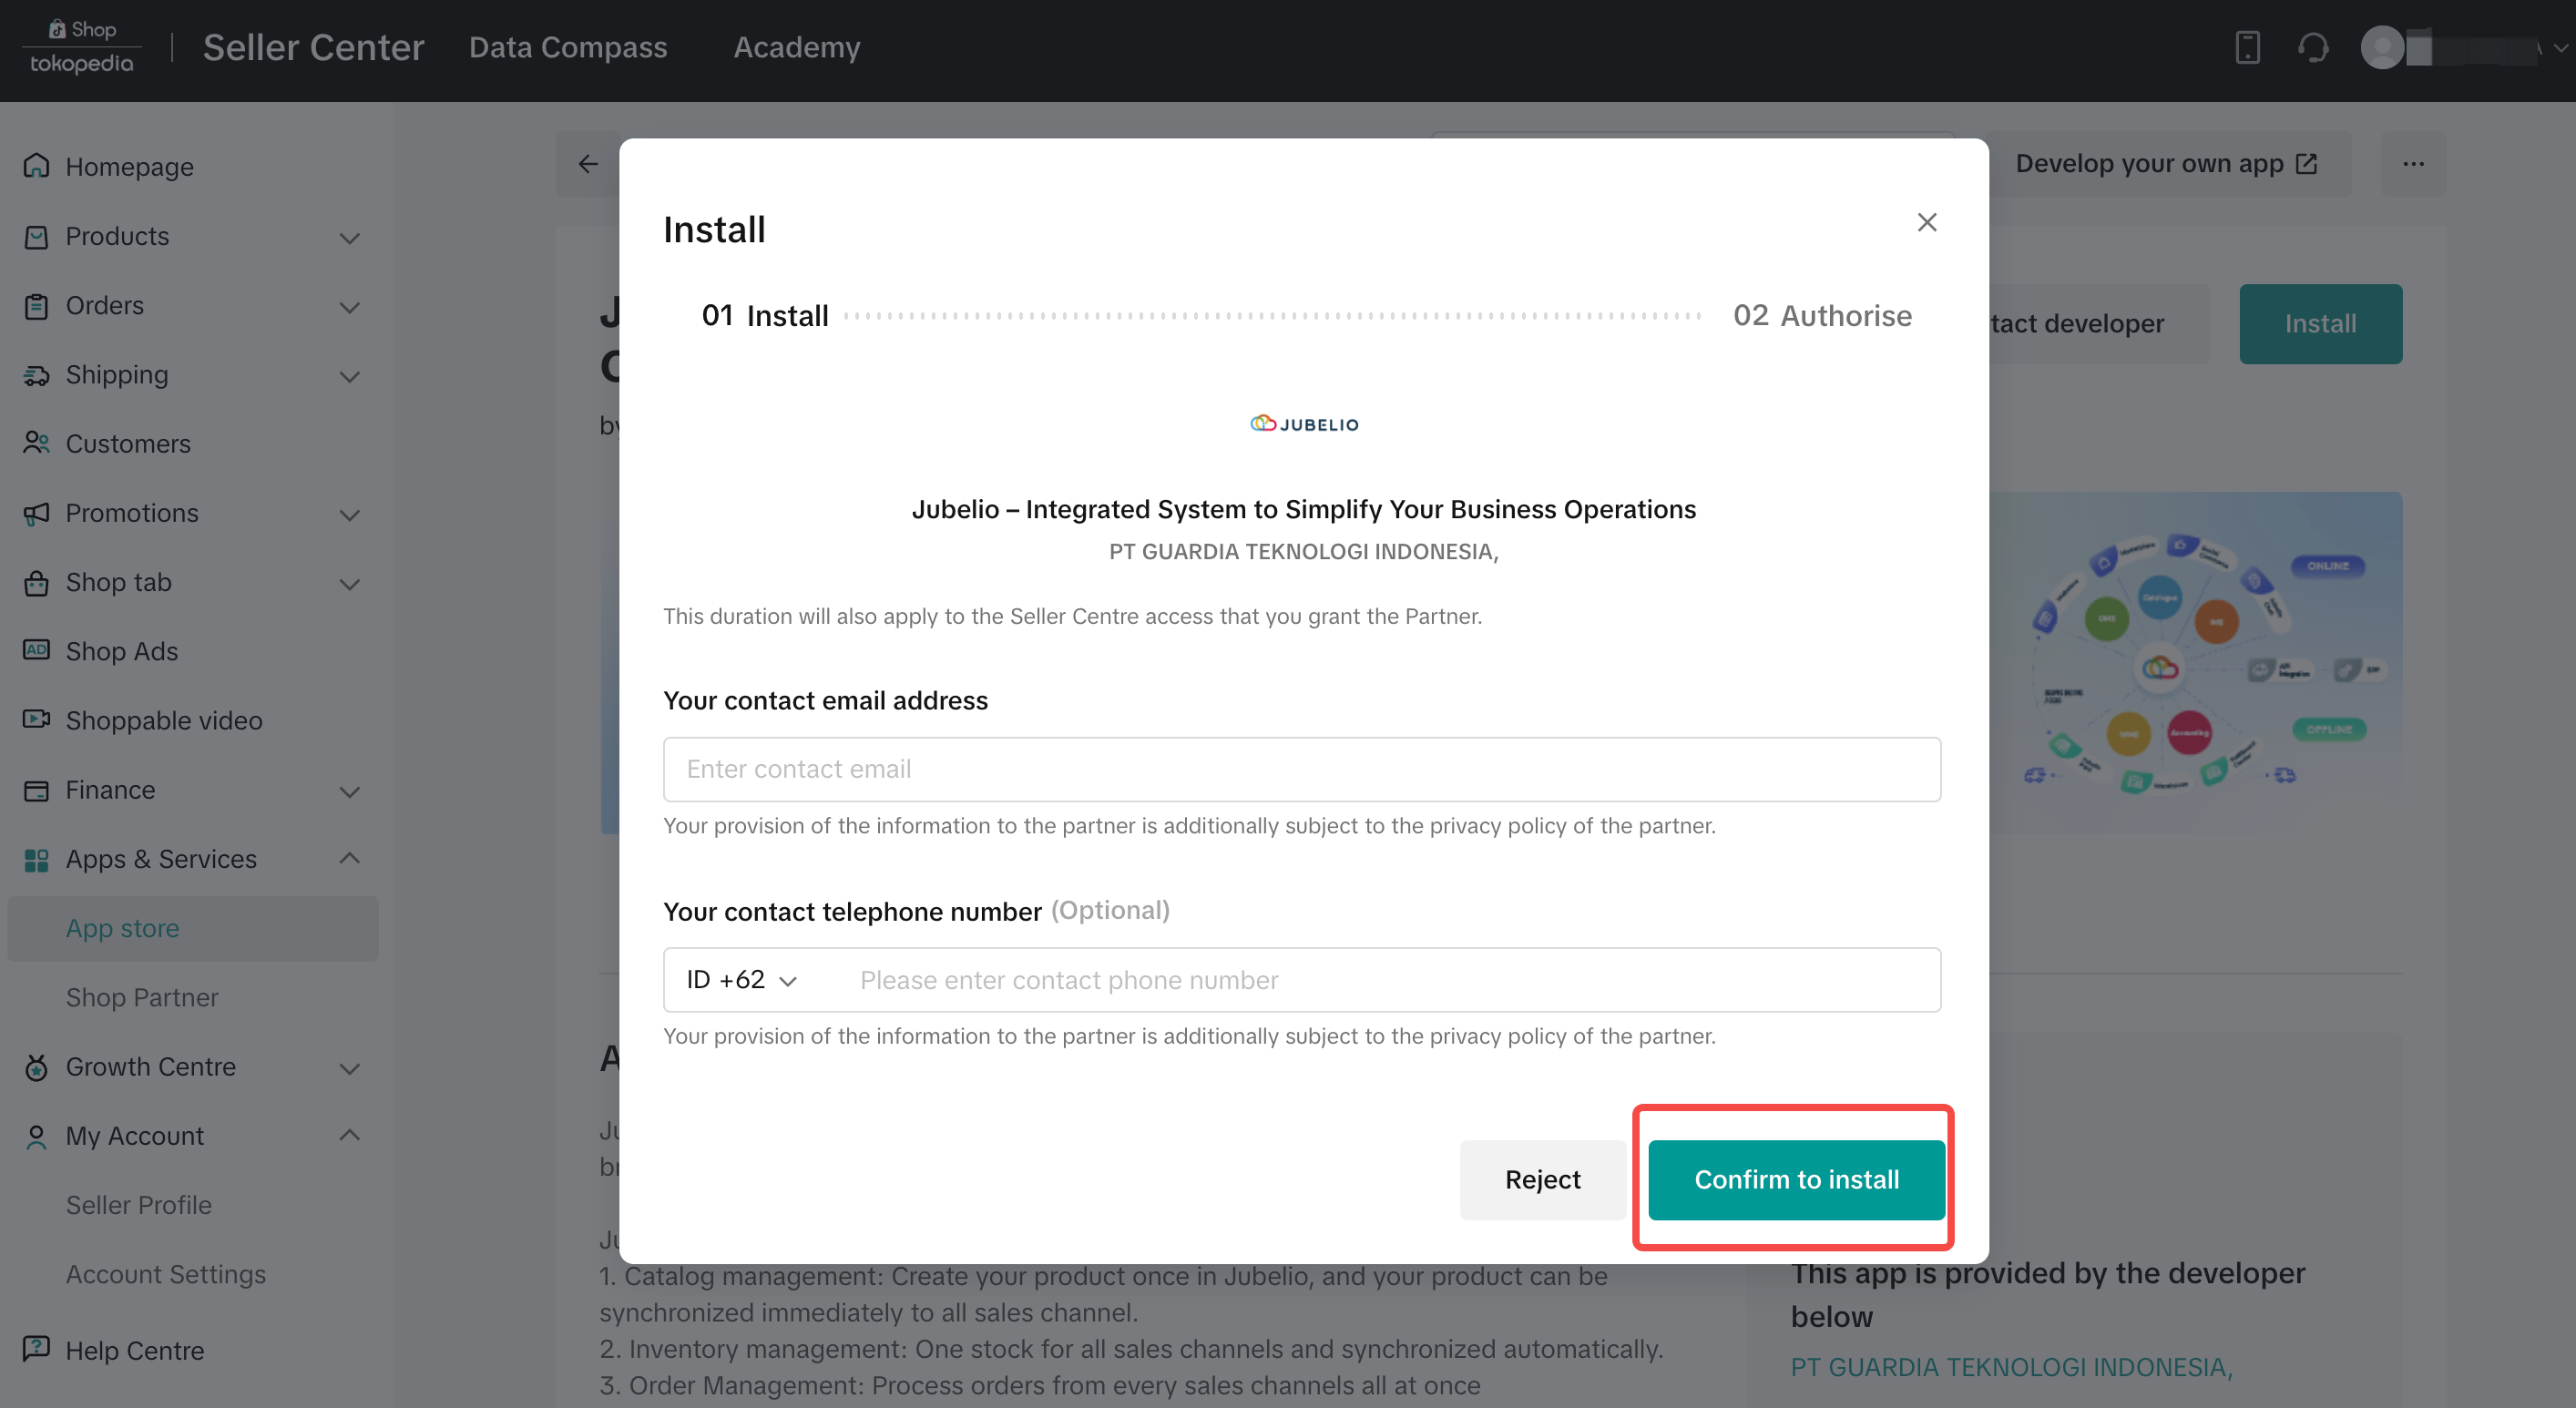
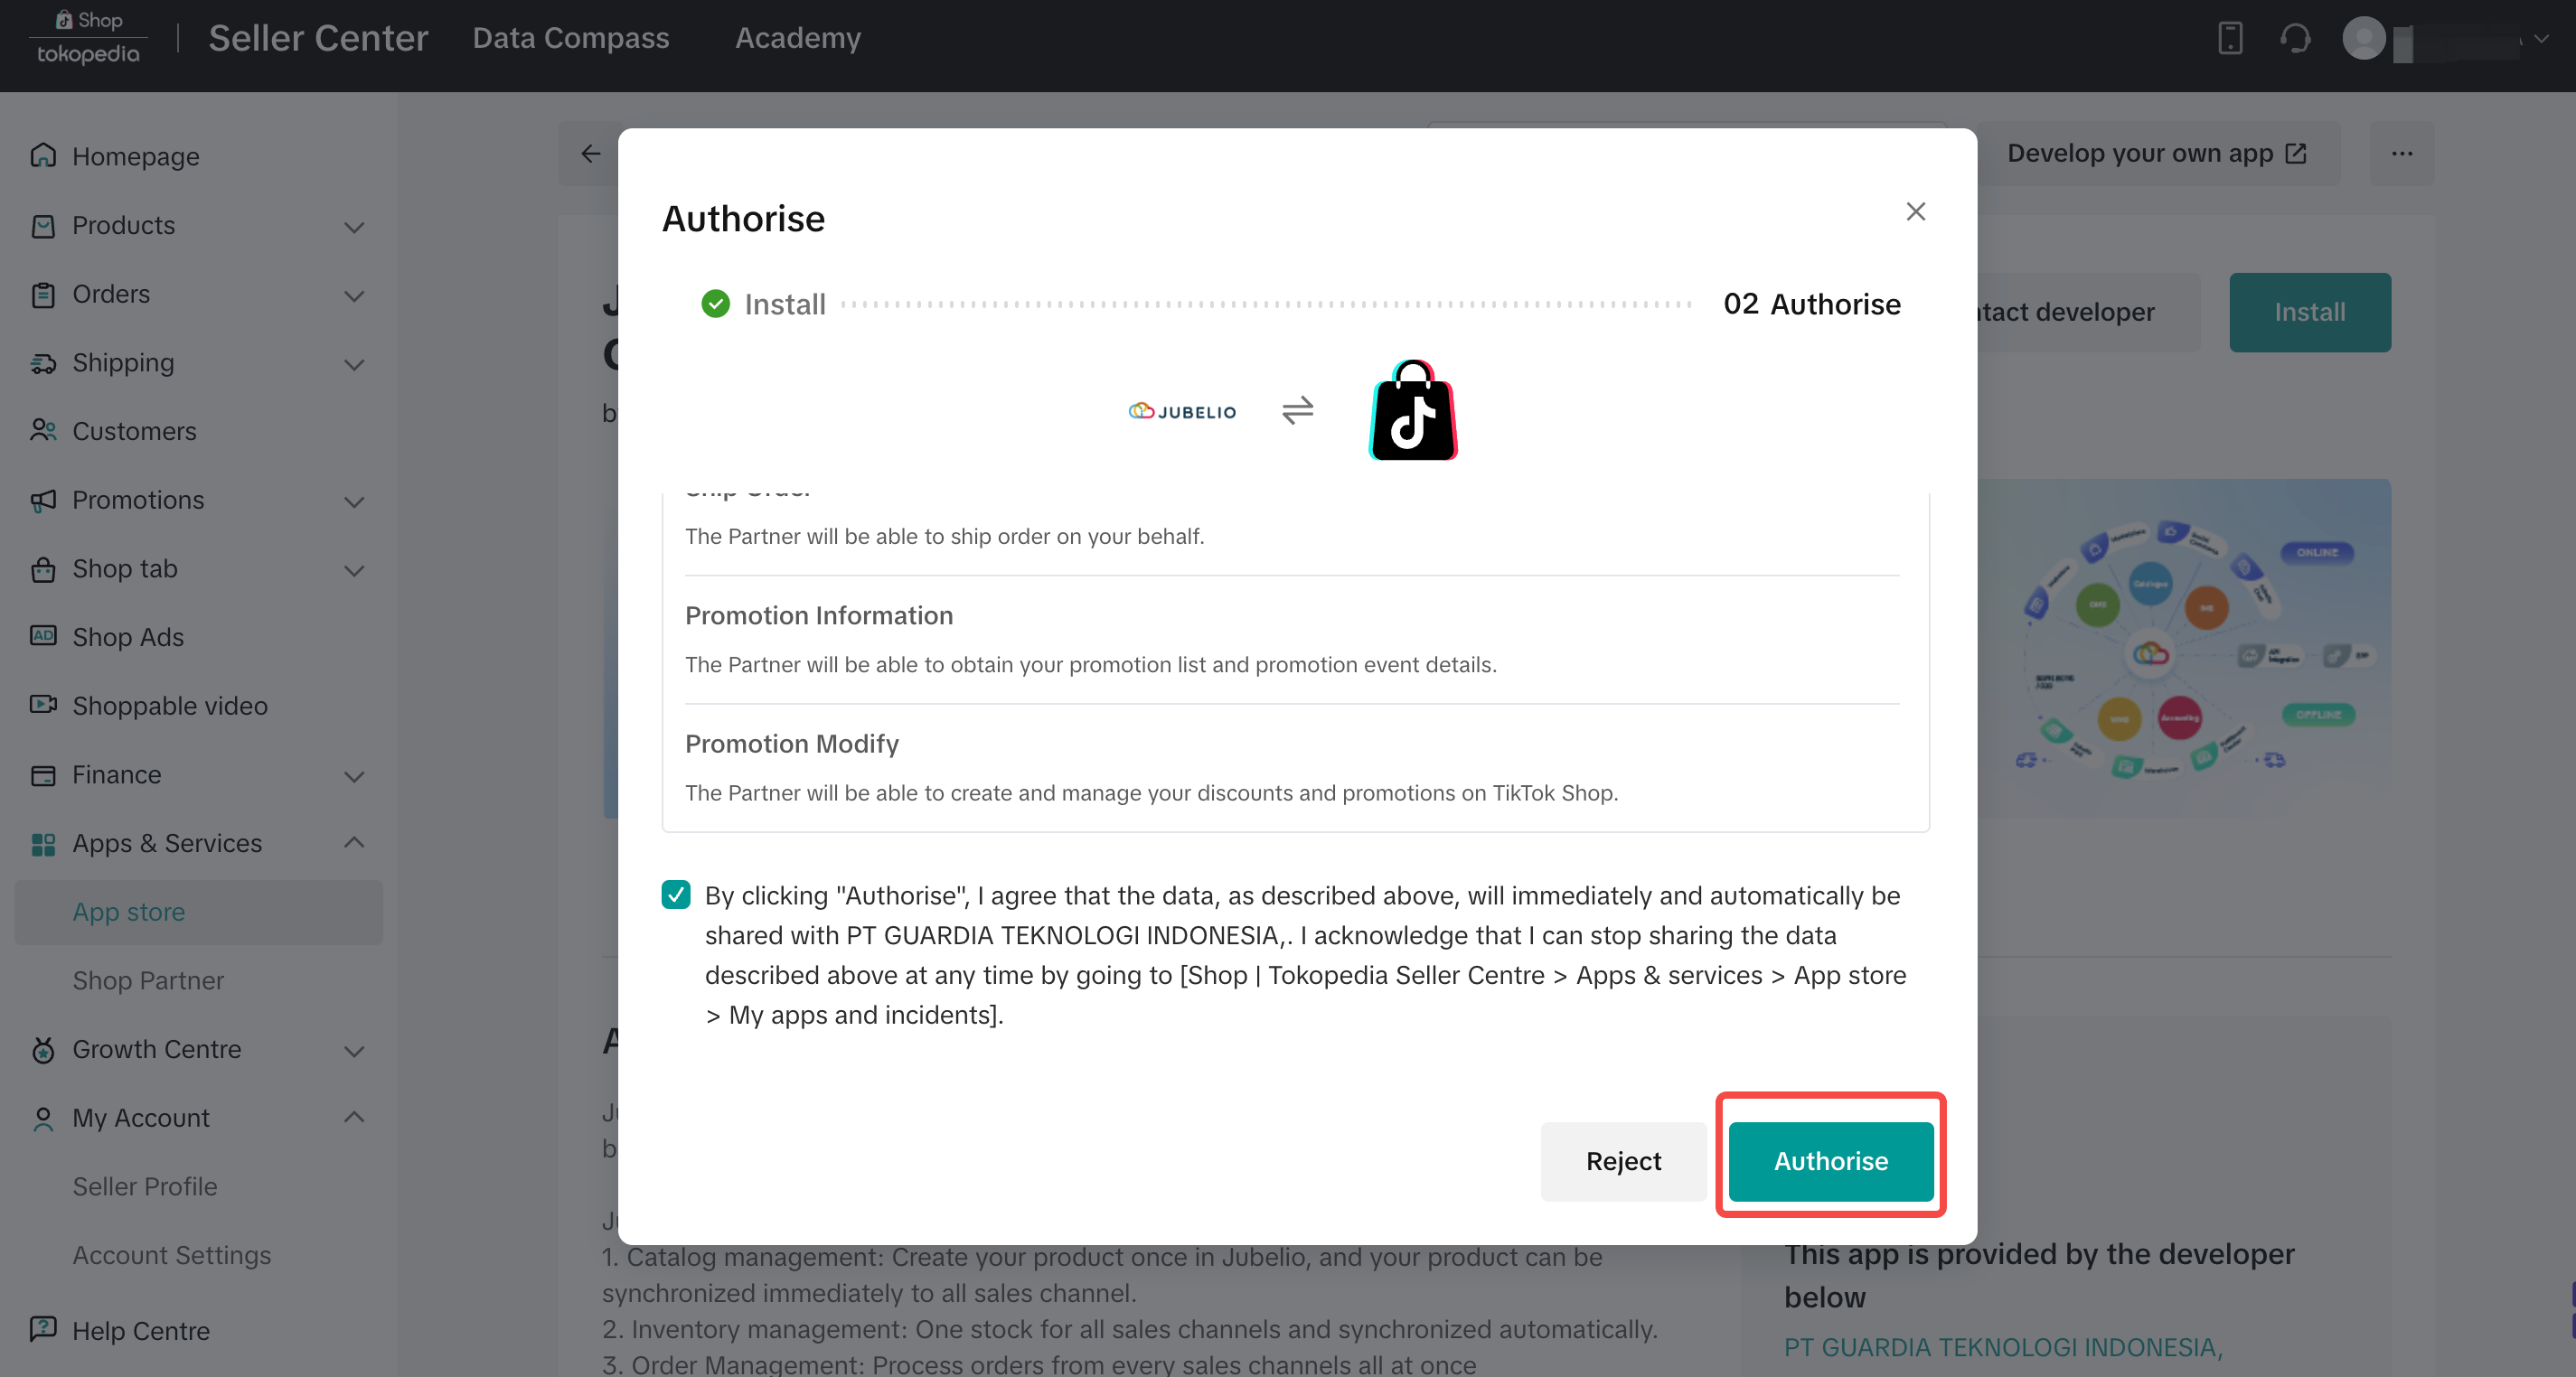
- Sellers authorize the App by the authorization link directly
Alternatively, you can send the authorization link to target sellers. Sellers can open the authorization link directly and authorize shops. This link serves as a means for sellers to authorize your application in a more personalized and targeted manner.
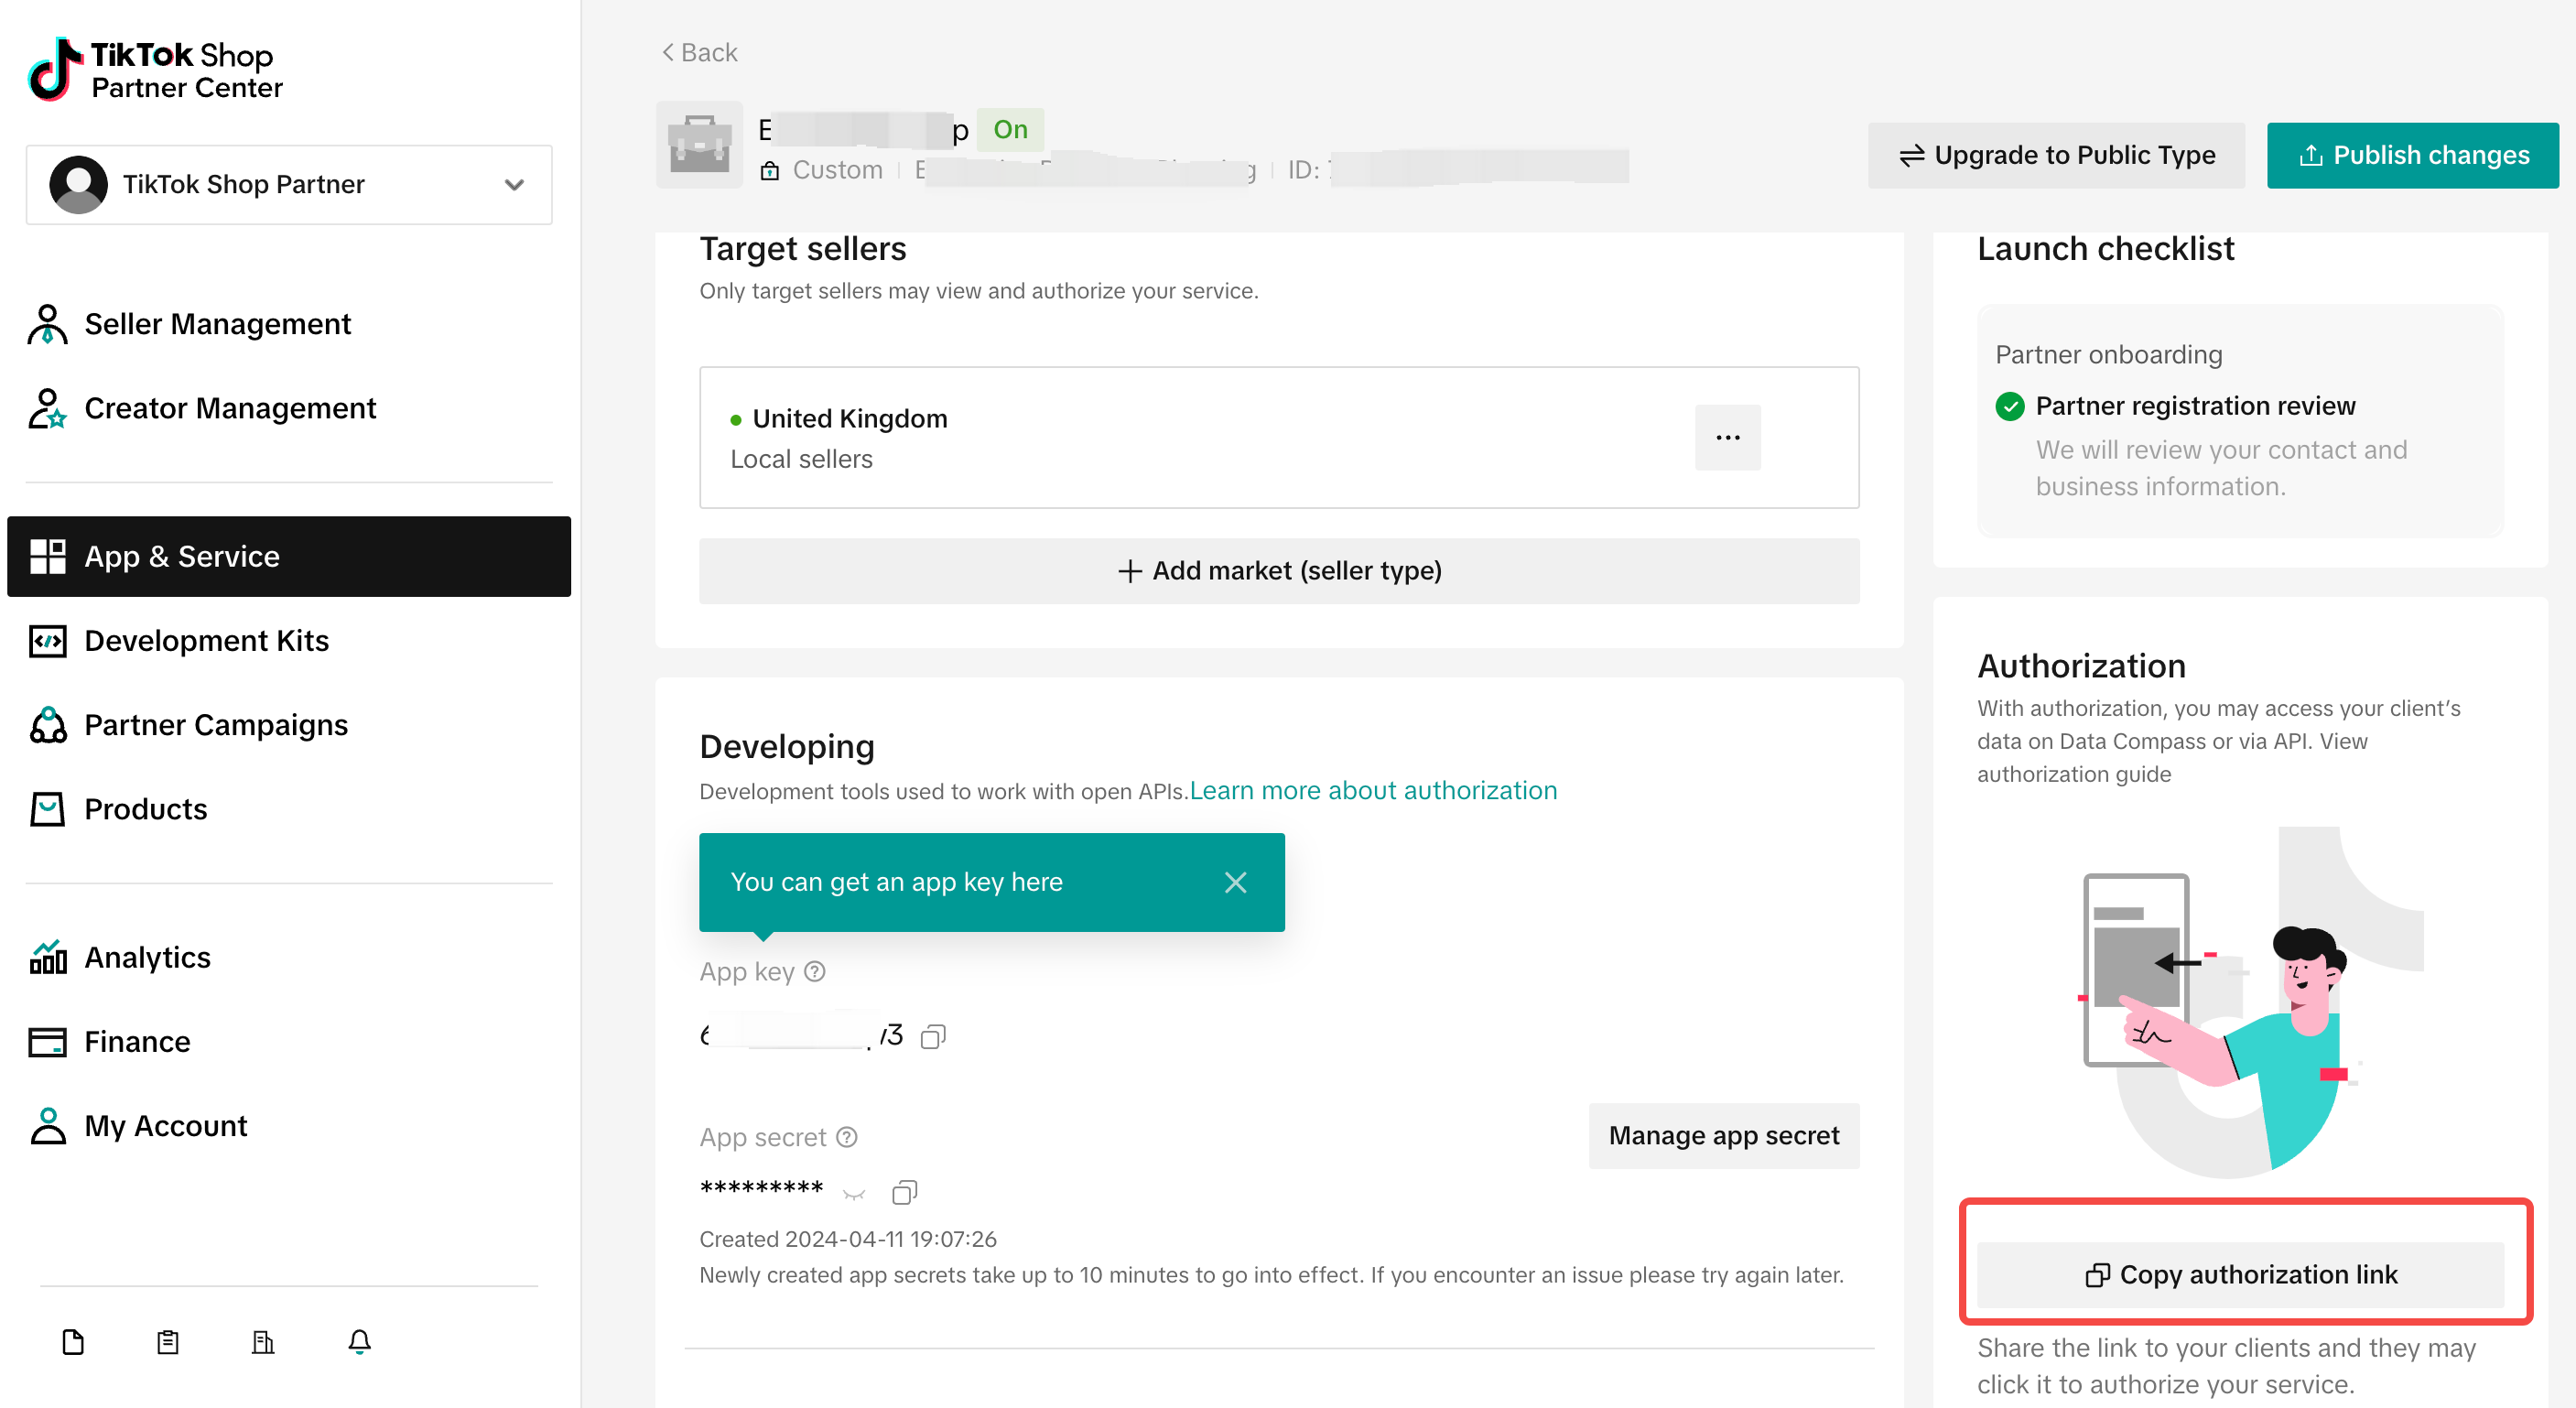
For Custom App
📌 Sellers can only authorize the App by the authorization link
Alternatively, you can send the authorization link to target sellers. Sellers can open the authorization link directly and authorize shops. This link serves as a means for sellers to authorize your application in a more personalized and targeted manner.
FAQ
1. Can I convert my custom app to a public app
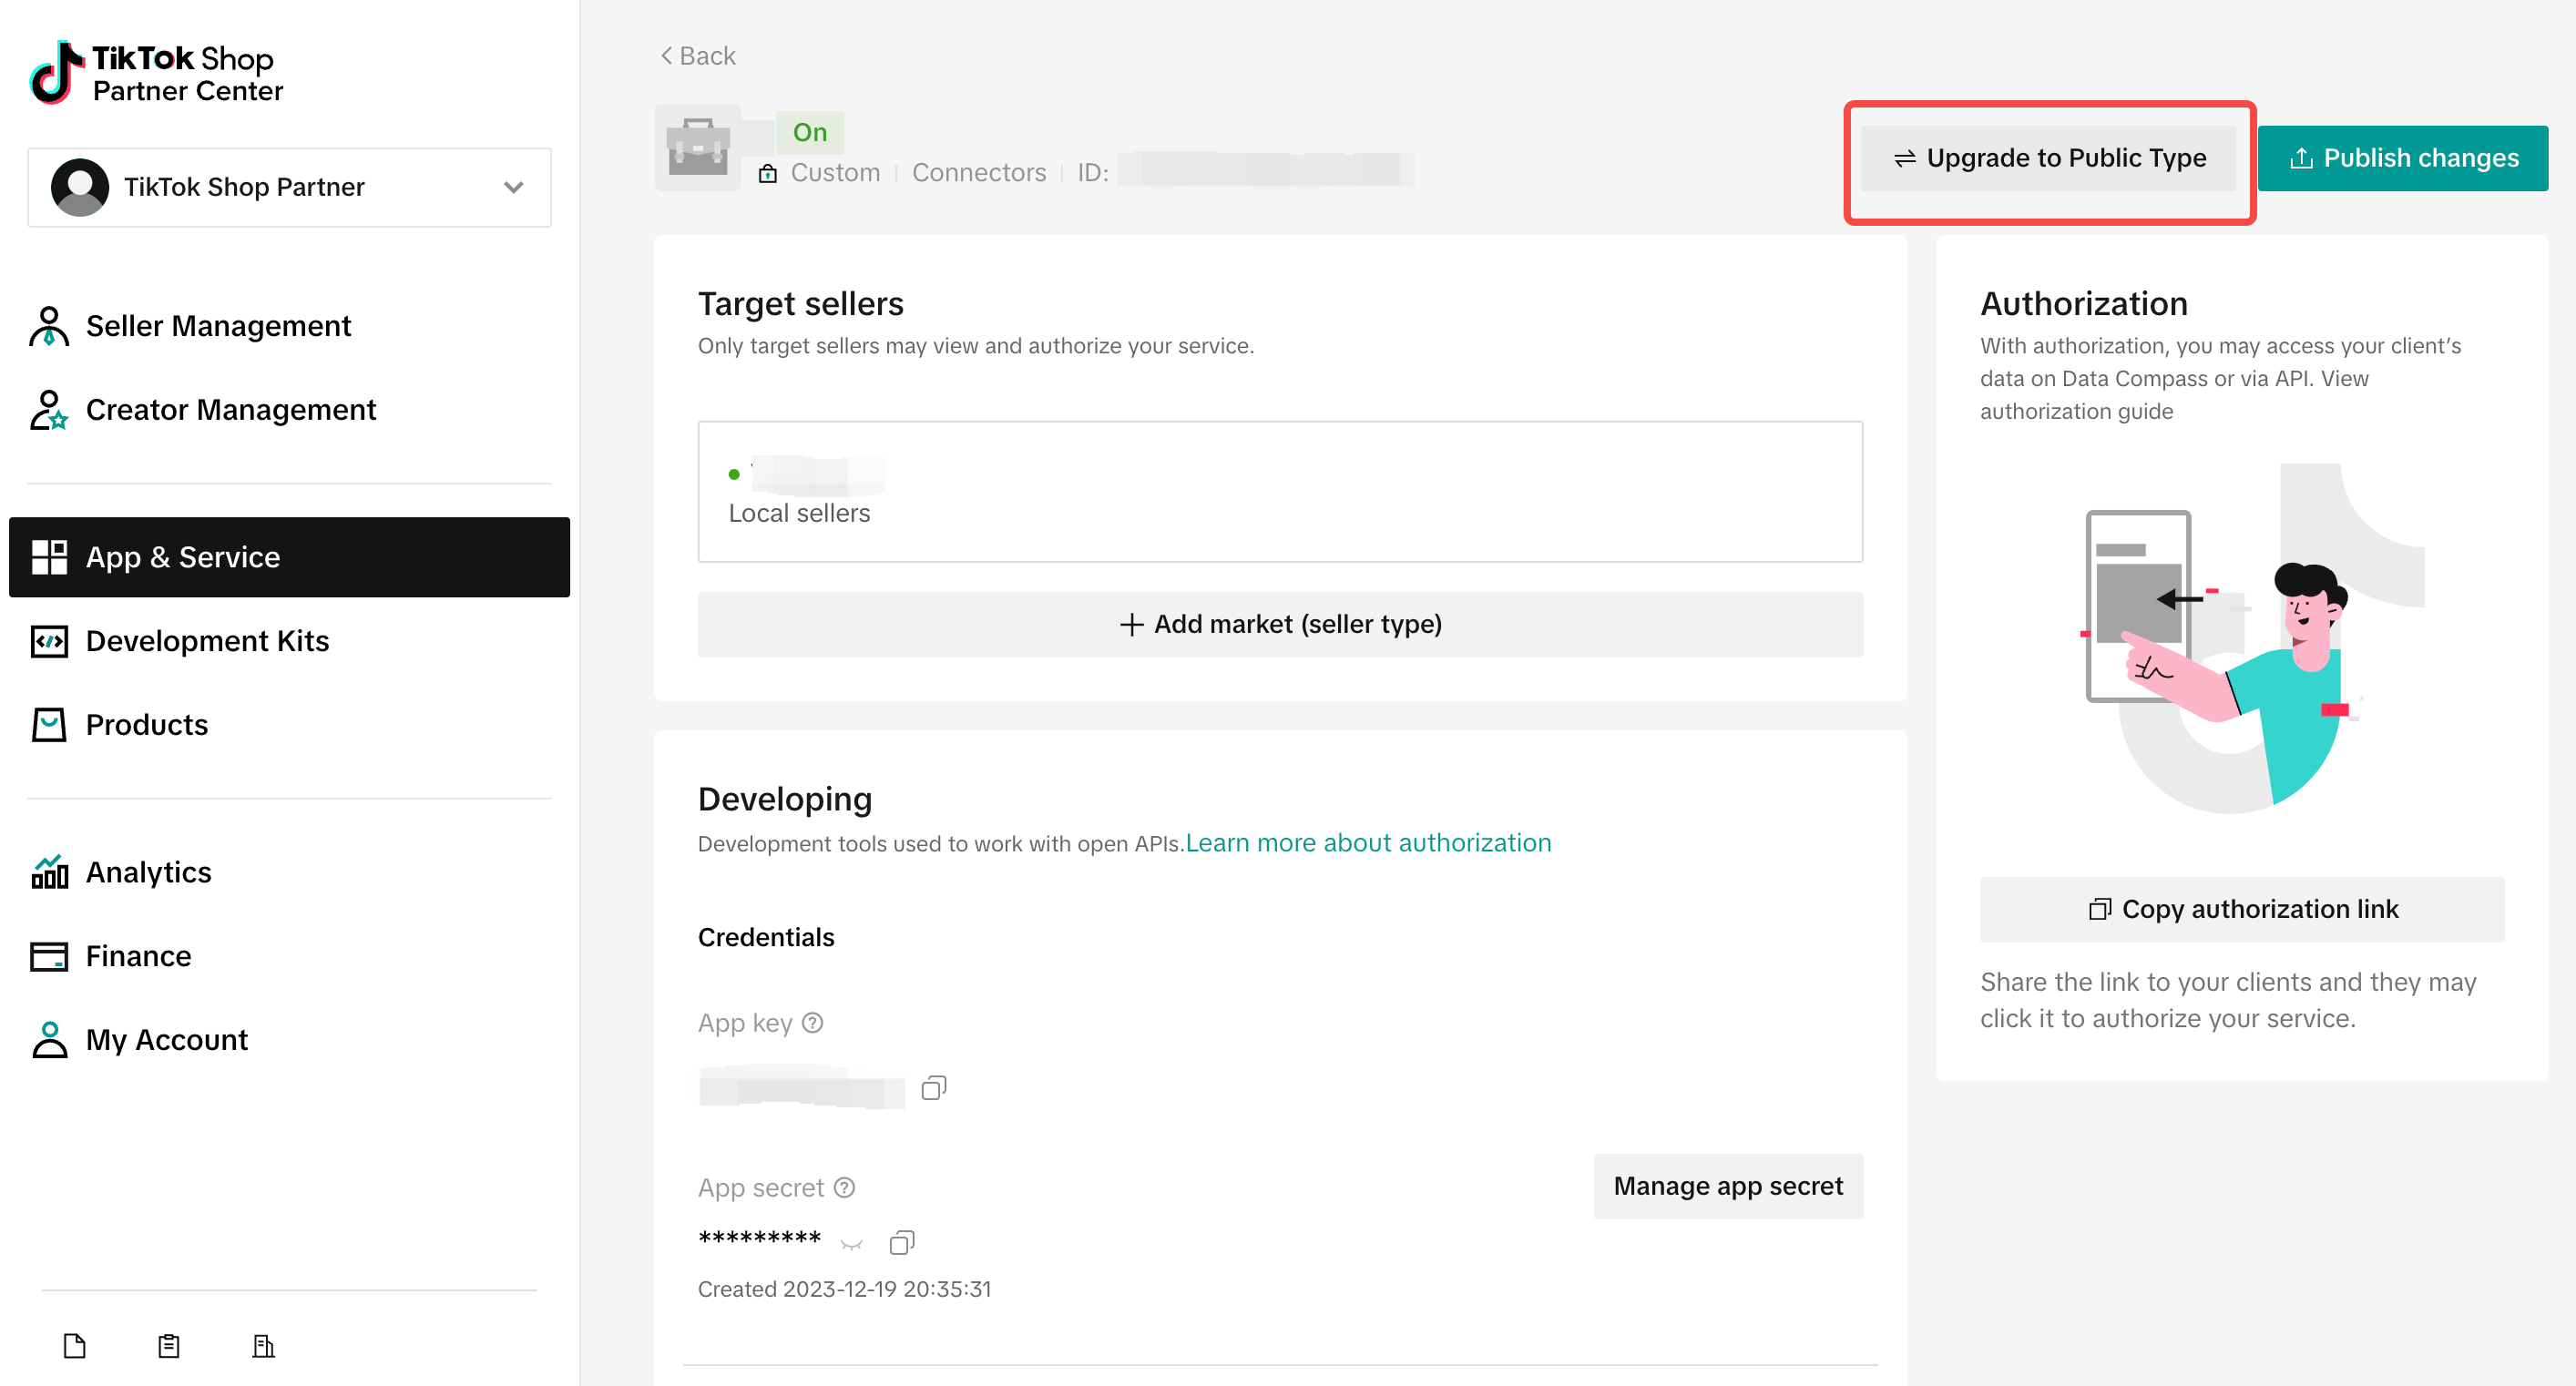
If you determine that your published custom app can offer value to sellers outside your app's original seller scope, Partner Center offers the ability to convert your custom app to a public app. This allows you to make your app available on the Tokopedia & Shop App Store.
For a published custom app, you can click Upgrade to Public Service to convert your app from custom to public. Please note this is a beta feature on a gray test, and you may not see the button if you are not on the test invite list.
Important:
- You can't upgrade a custom App to public if you have not published the app yet.
- You can't change the target sellers (i.e. the market and seller type) when converting the app type from custom to public.
- You'll need to fill in all language listings before you can submit the custom app for upgrade review.
- The app type will remain custom until the app passes the upgrade review and reviews for all selected markets.
2. What APIs can I integrate with?
Please click here to access to the API onepager to view more about:
- Data access via APIs: What APIs to use to access new data and integrate historical data of merchants migrating from Tokopedia to "Tokopedia & Shop"?
- Changes to "Tokopedia & Shop" APIs: What changes are made in "Tokopedia & Shop" APIs to suit the Indonesian market?
- Mapping of shops and products: How will the new shops and products from "Tokopedia & Shop" be mapped to those from Tokopedia?
3. Can I unbind「Tokopedia Open Platform」and「Tokopedia & Shop Partner Center」account?
Yes. After the binding is successful, developers are allowed to perform the [Unbind] or [Rebind after Unbinding] operation.
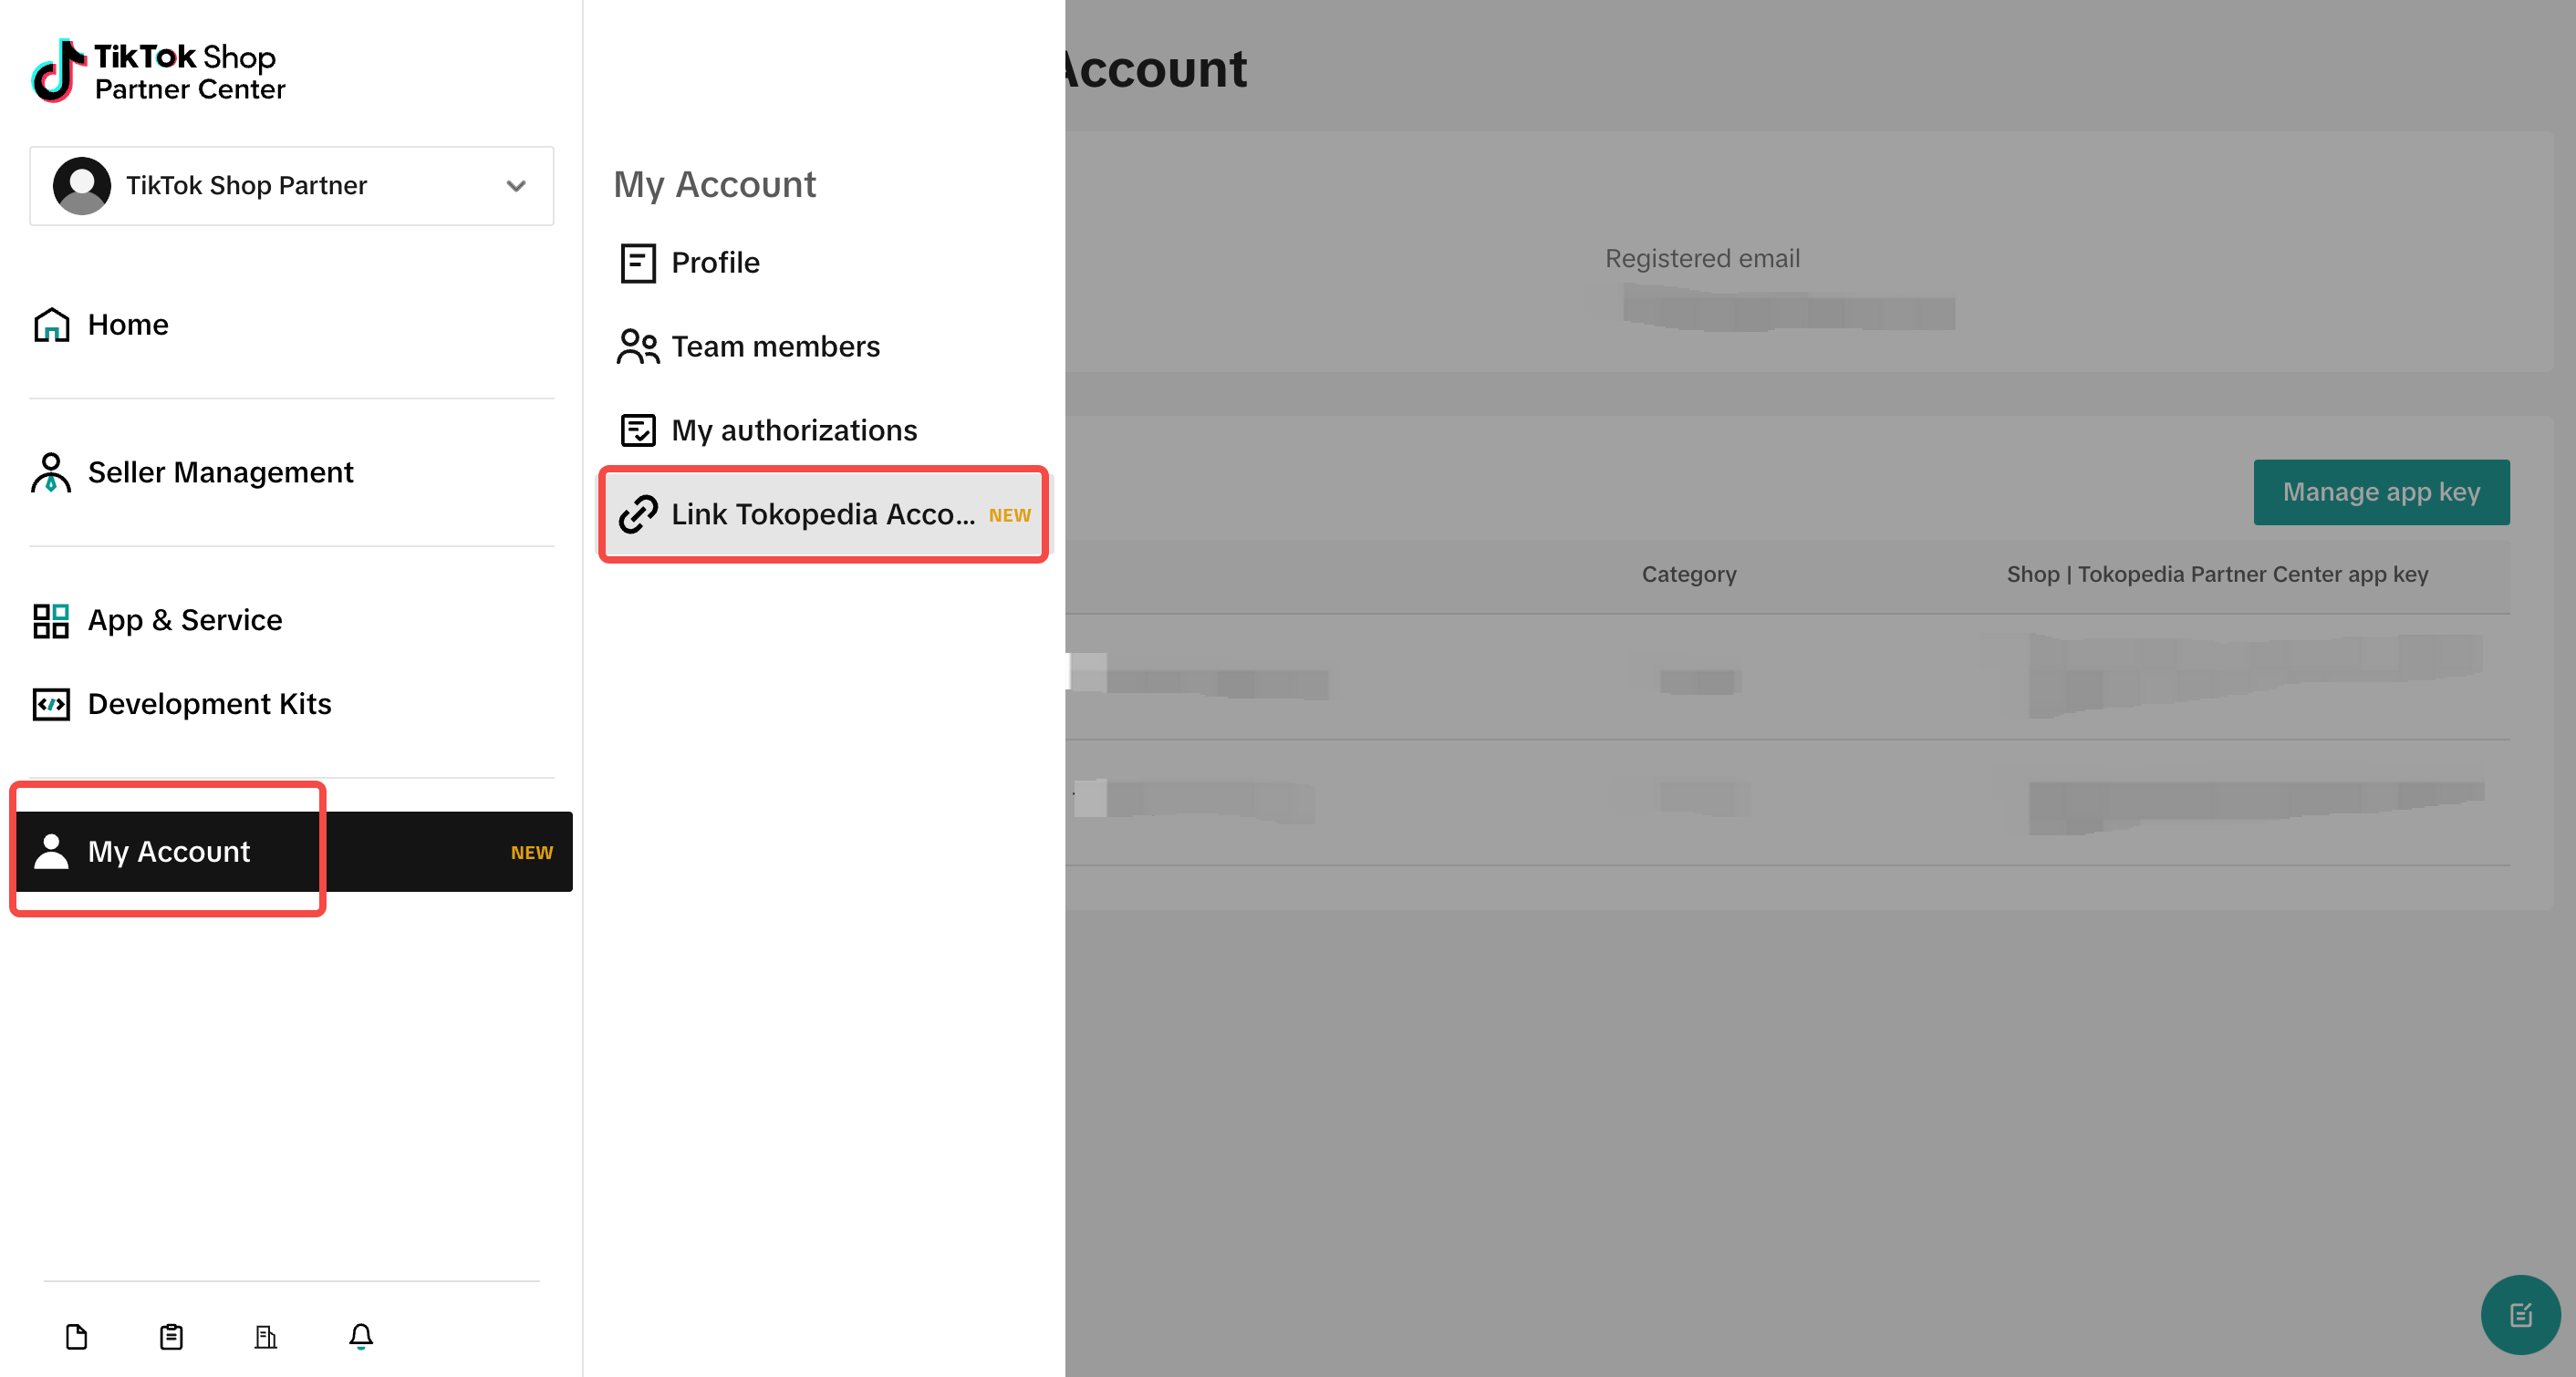
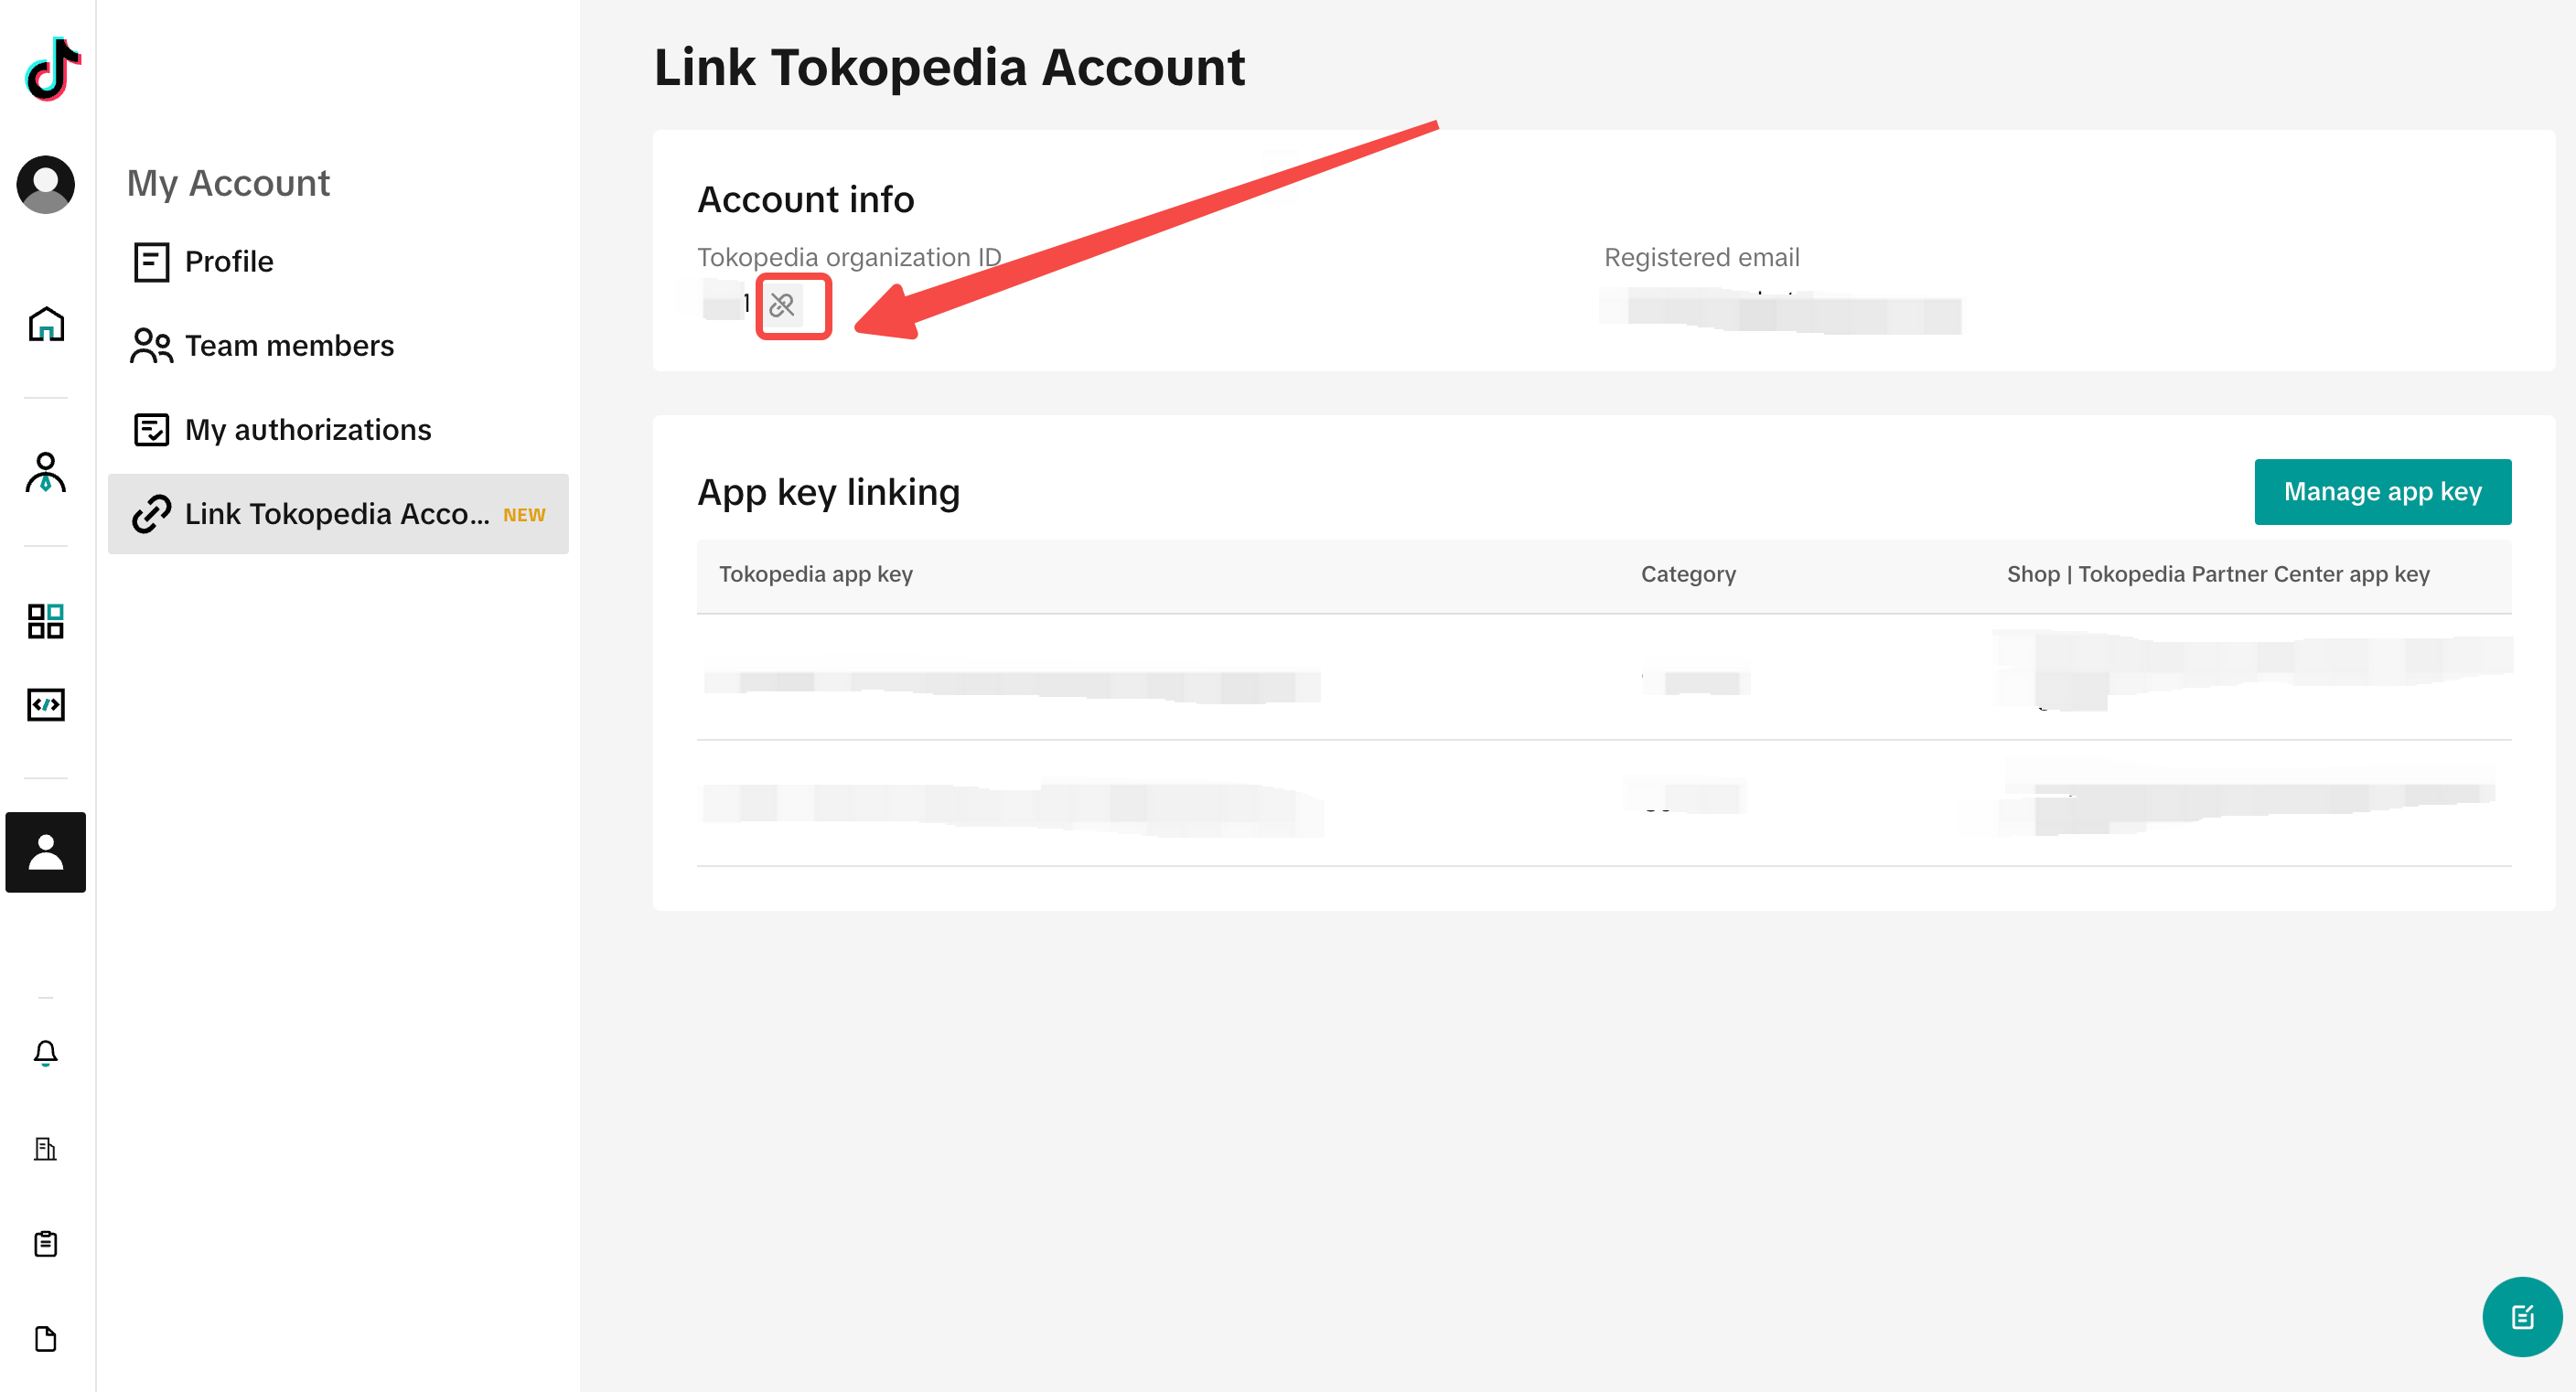
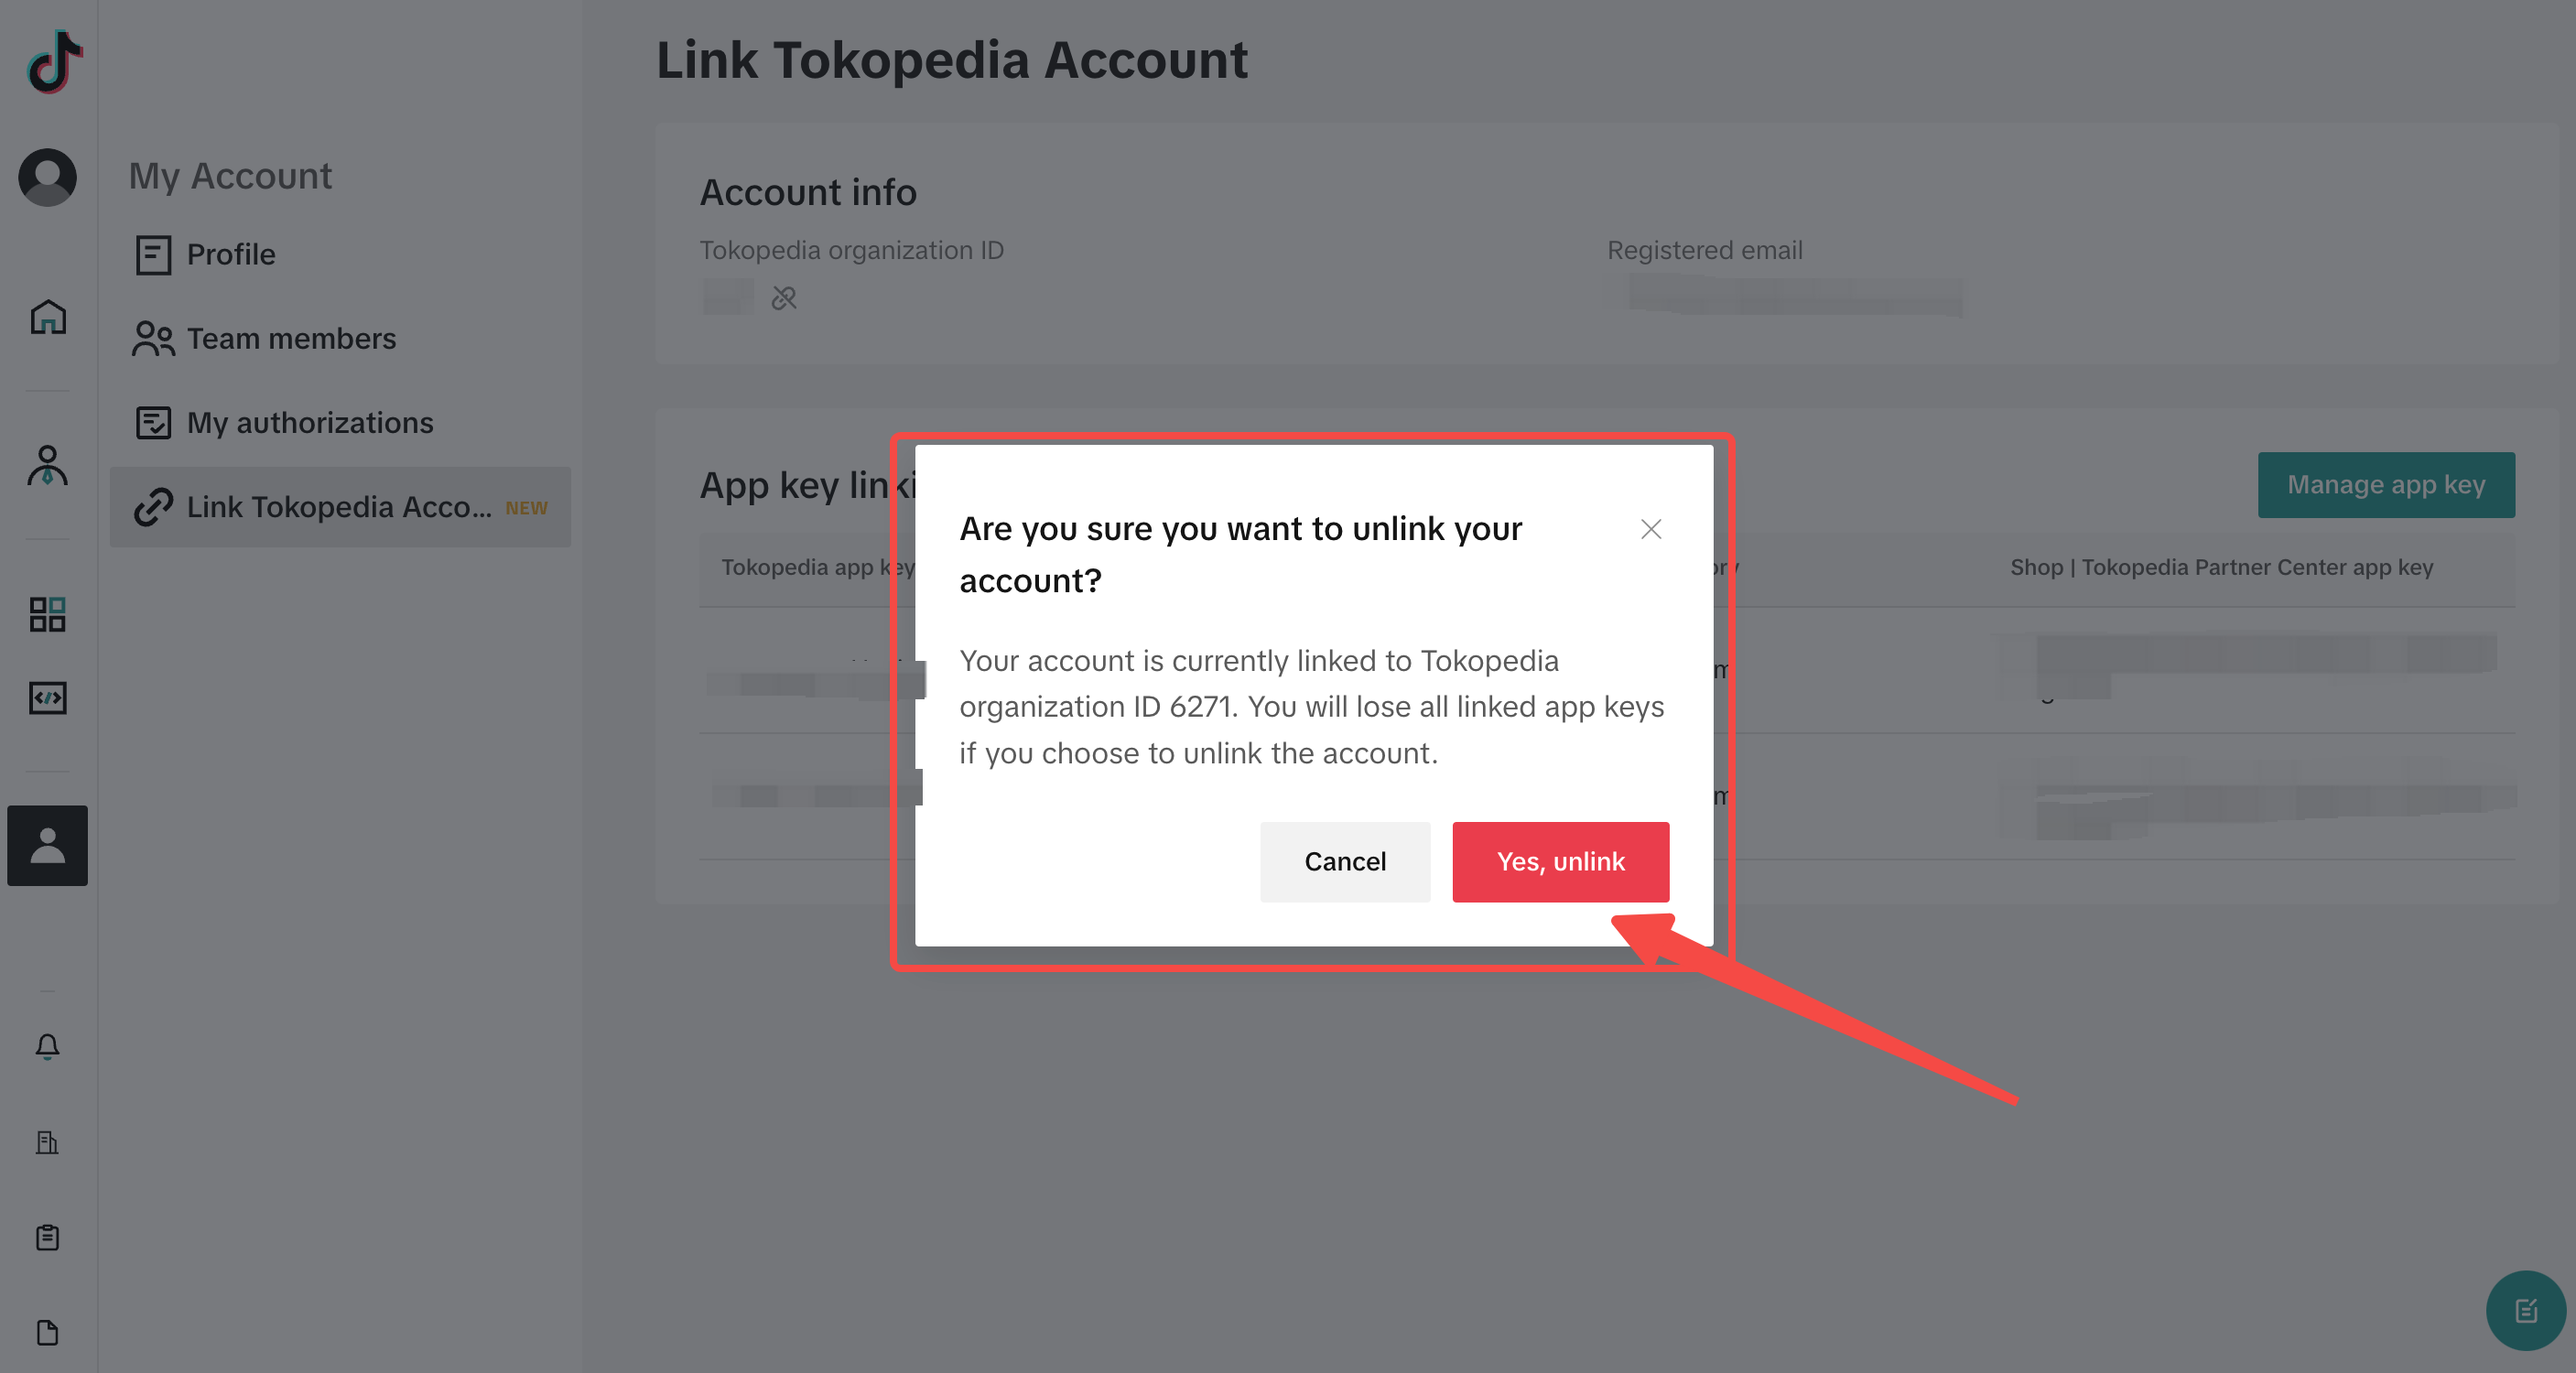
After unbinding, developers are allowed to bind again: Initiating the binding process again is consistent with the first binding process, and information input and email verification need to be completed.
4. Can I unbind Tokopedia App and Tokopedia & Shop App?
No. Appkey does not support rebinding or unbinding
5. If I have questions, where can I contact Tokopedia & Shop?
Please access the Help Center https://partner.tiktokshop.com/ticket/landing
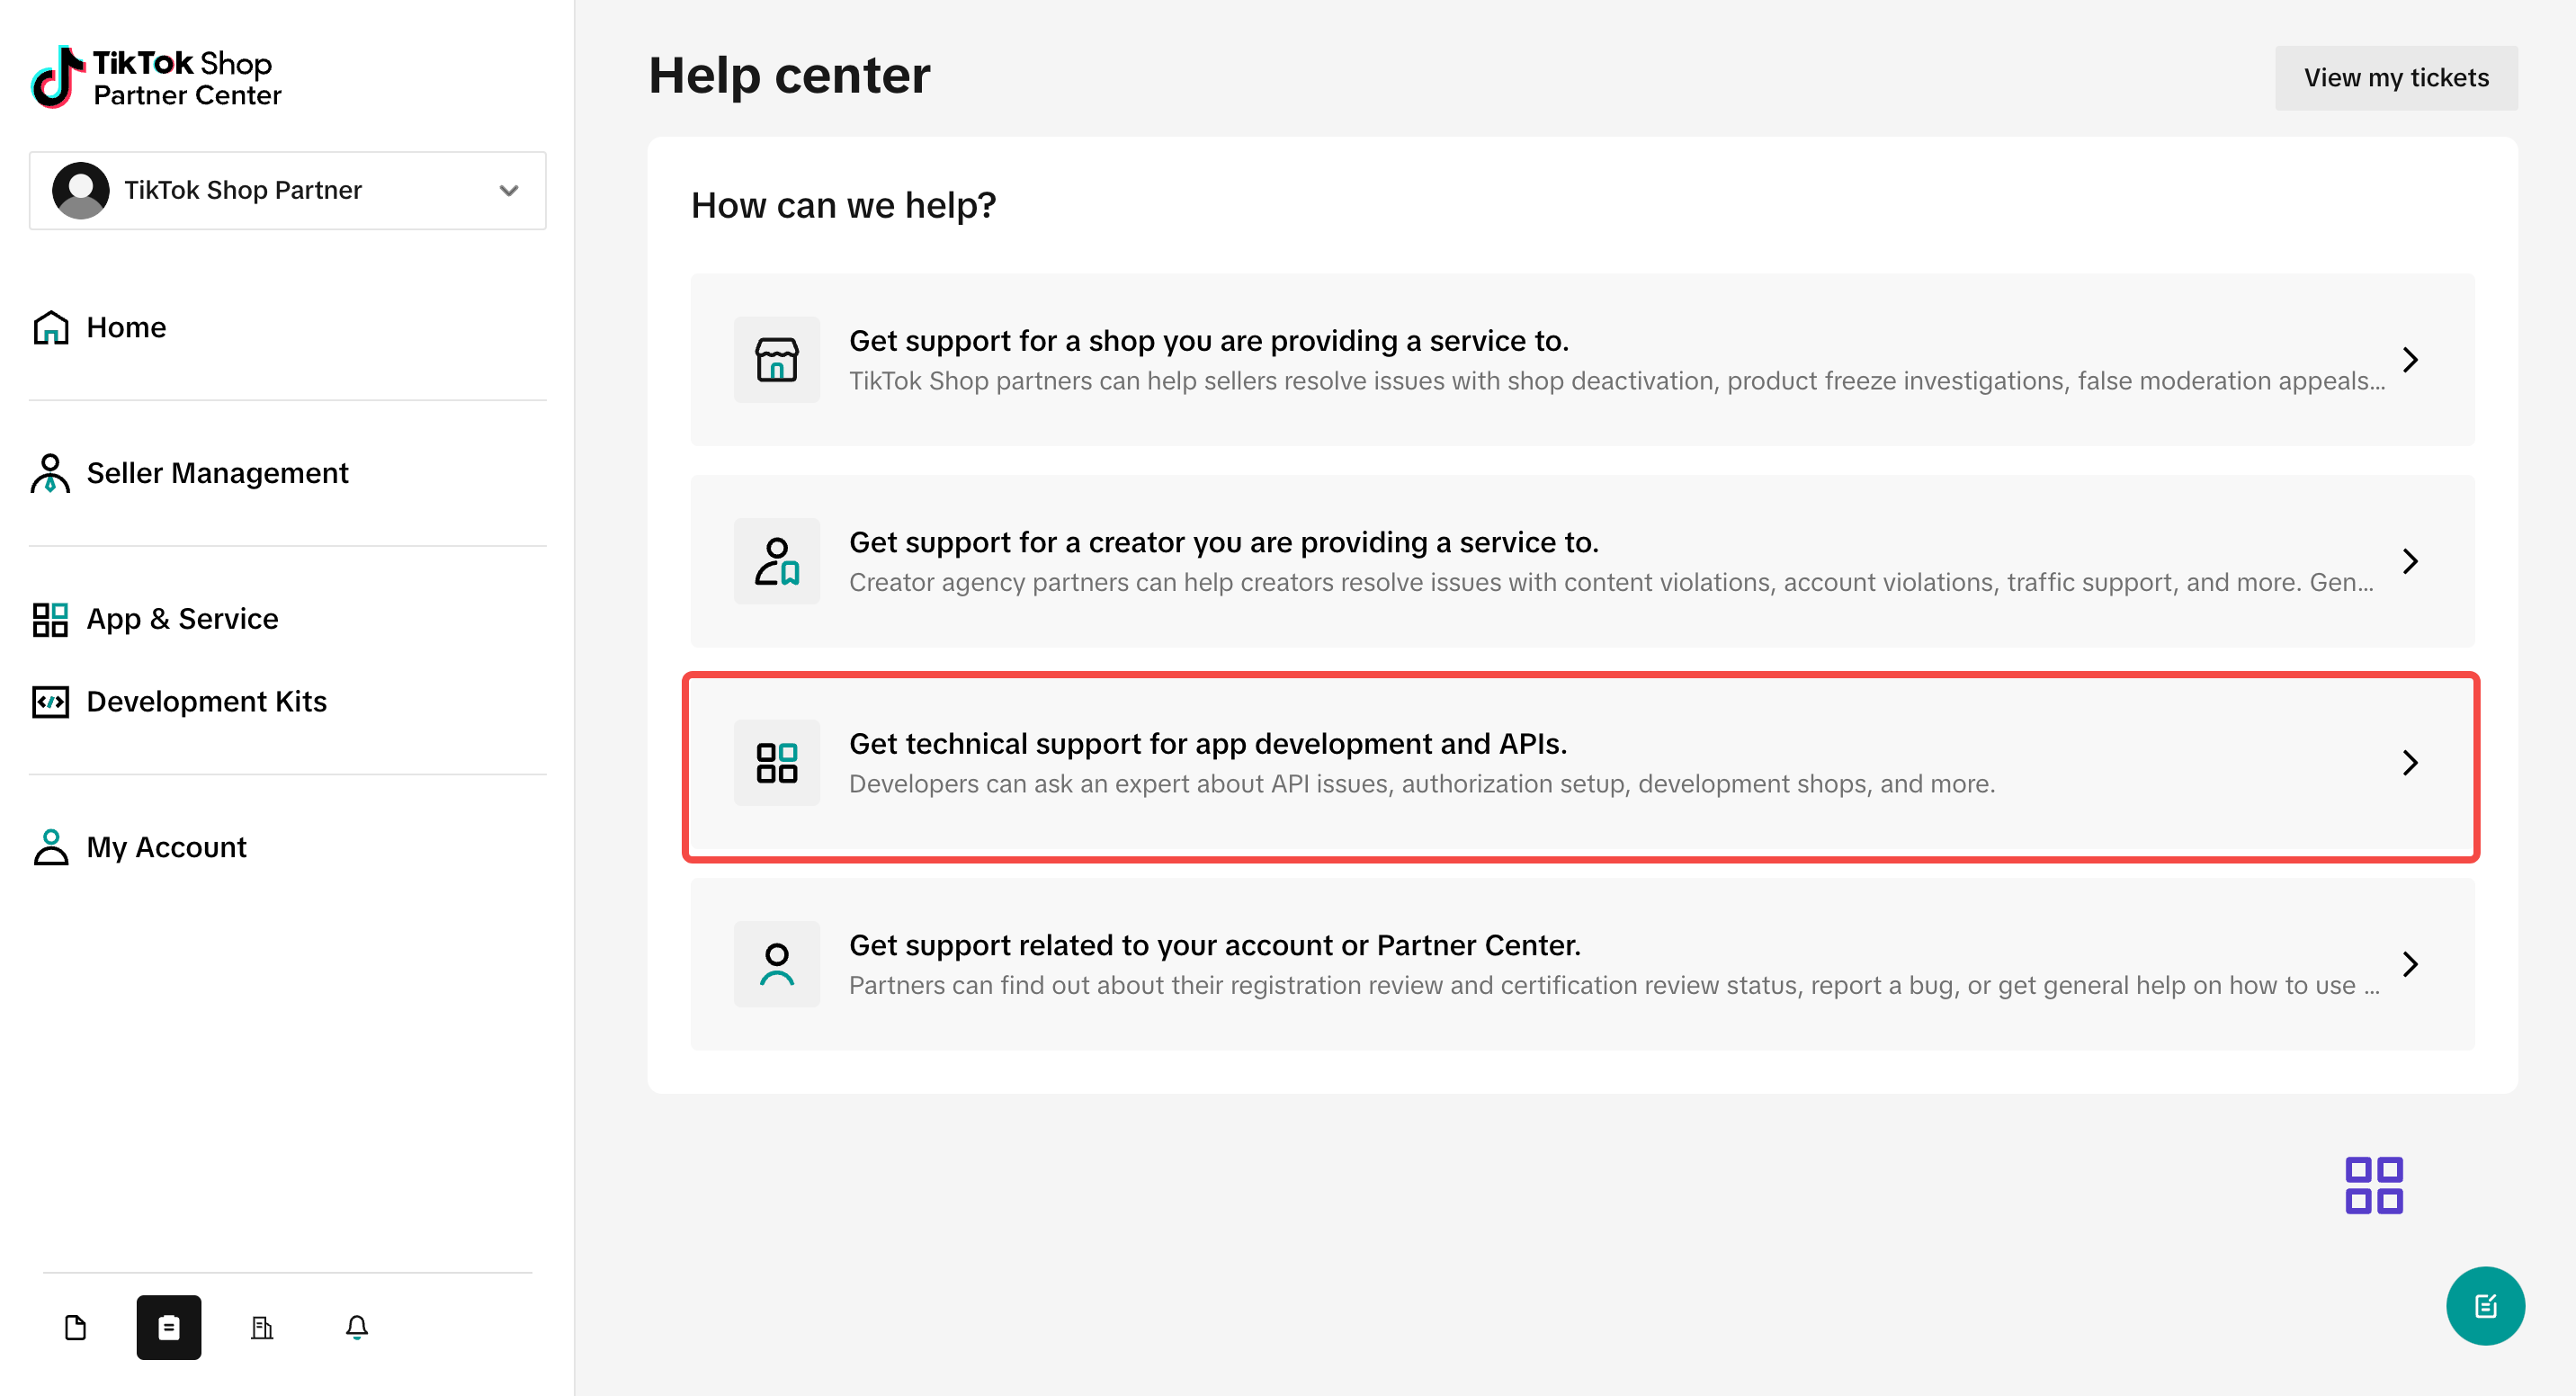
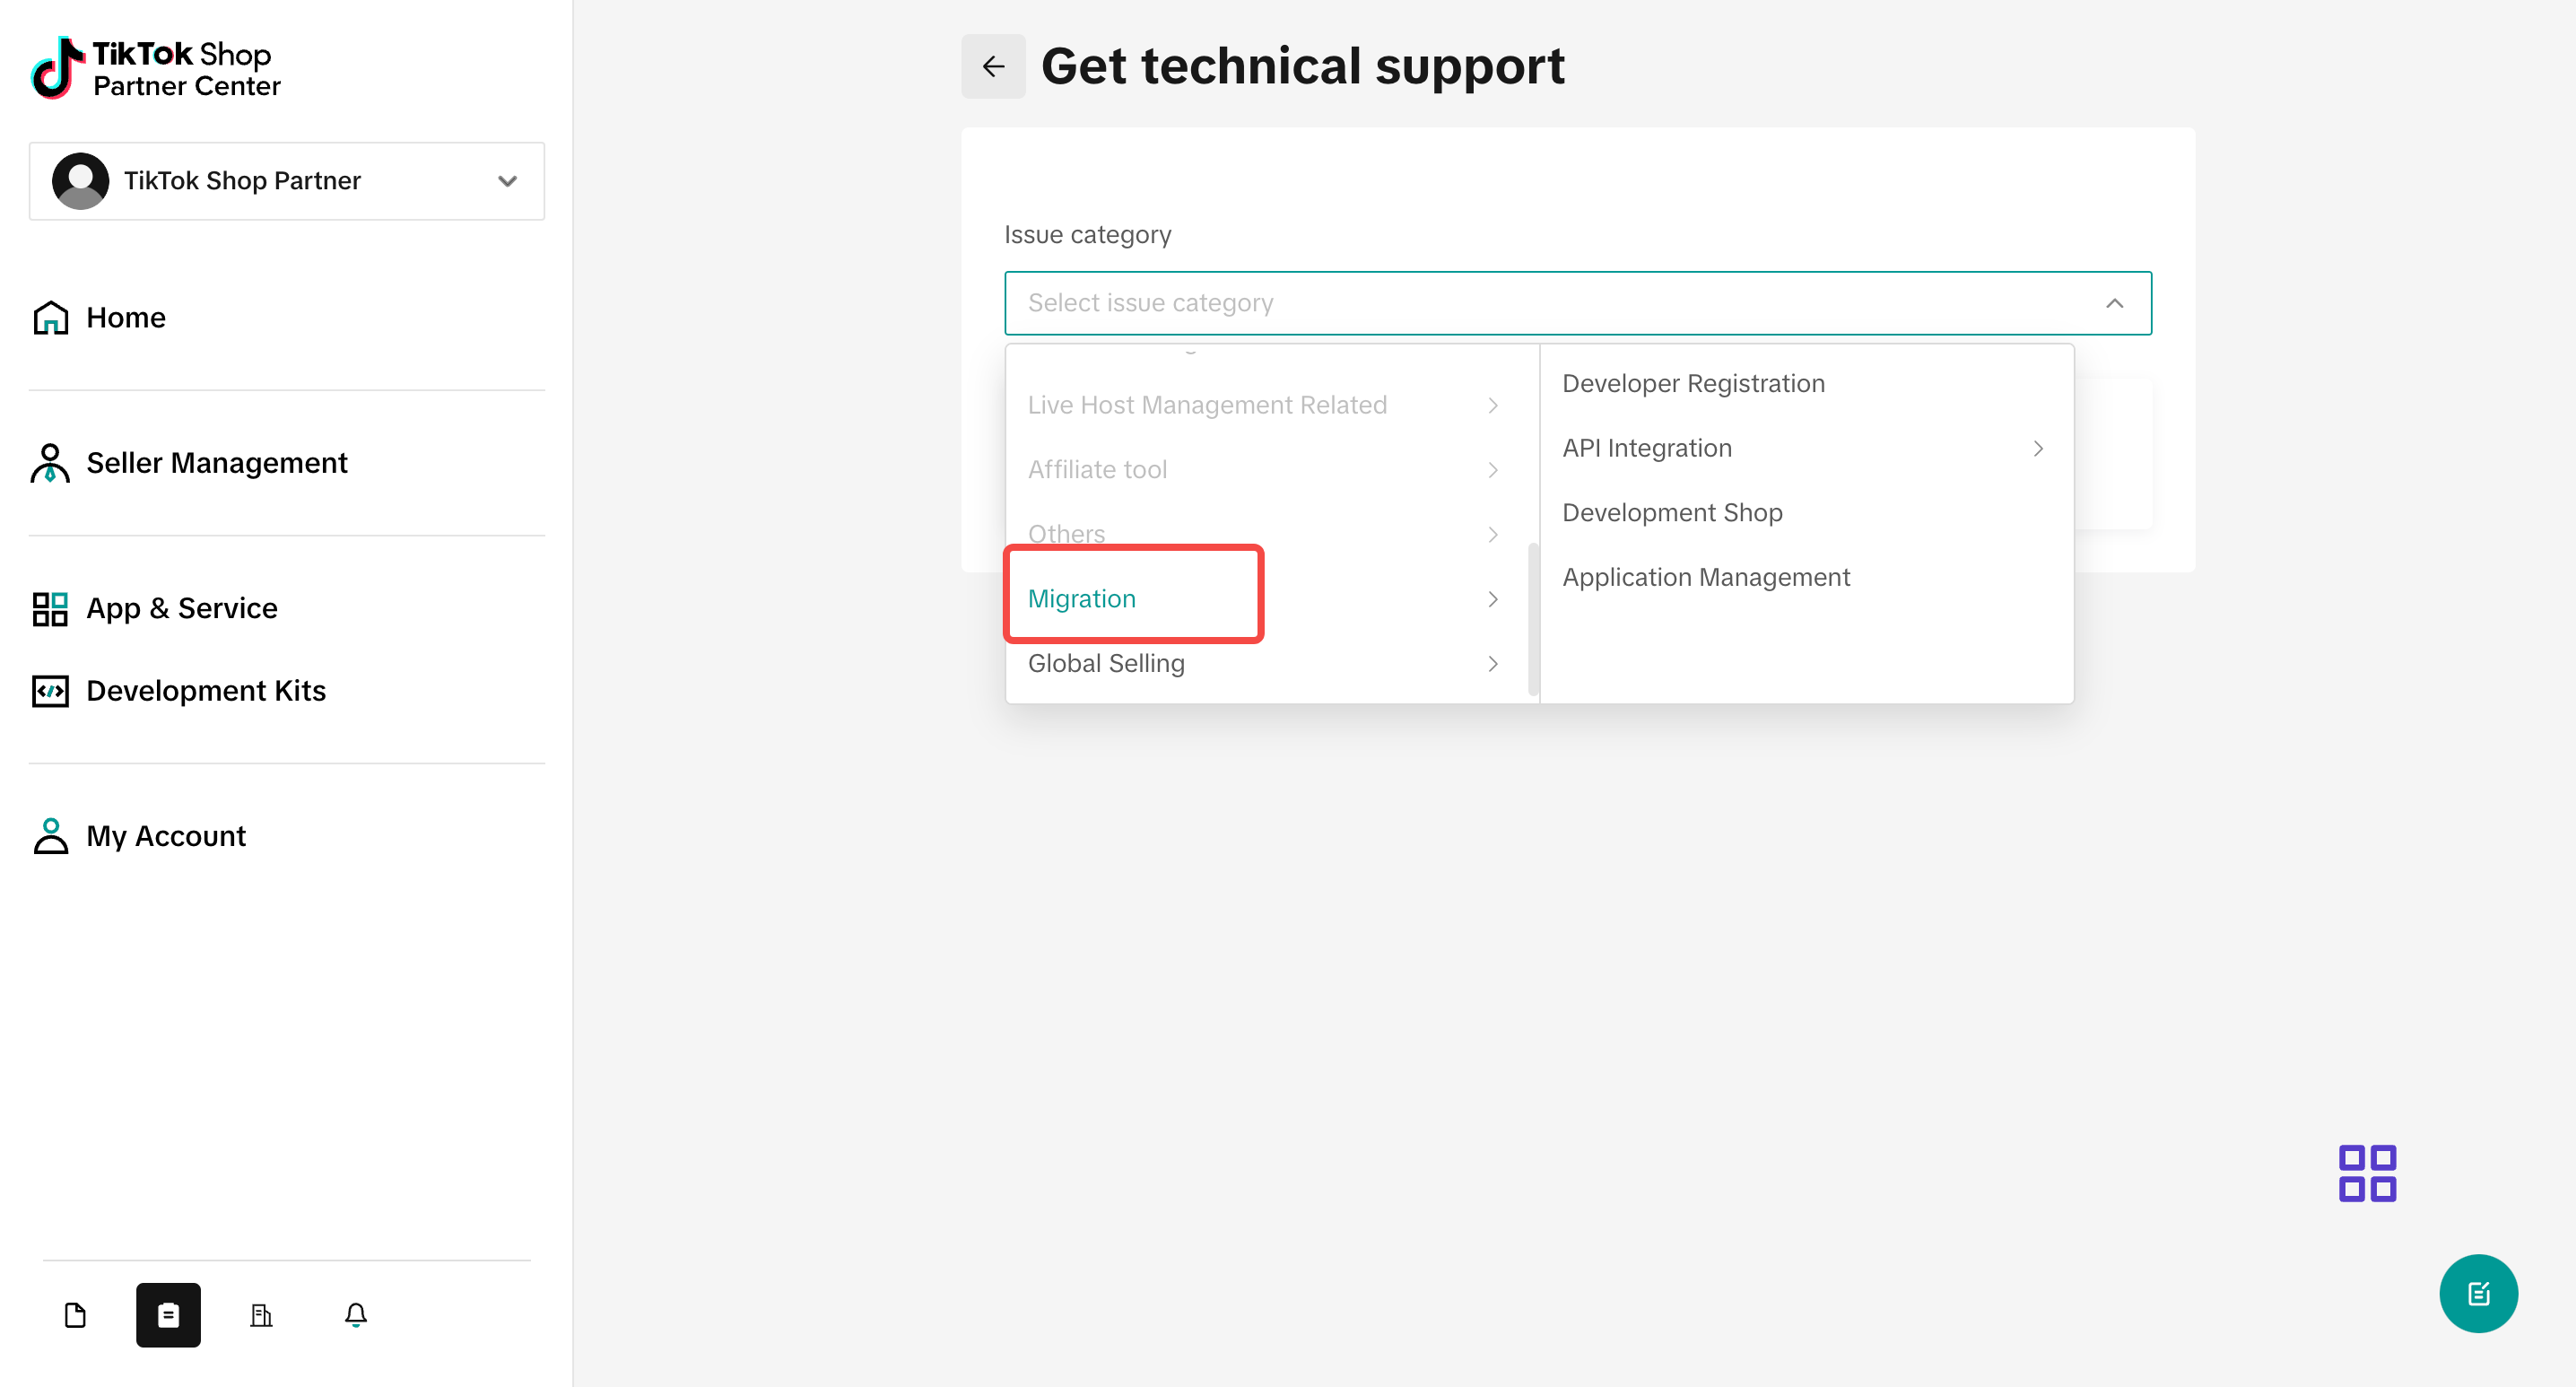
6. How to test API / Can I use the test shop?
There is the Sandbox (test tool) in Tokopedia & Shop Partner Center - Development Kits.
Refer to Step 5: Test your App and Publish for detailed steps.
7. I have API questions, how to solve it?
Please access the Help Center https://partner.tiktokshop.com/ticket/landing